| Author |
Message |
Chris Paterson
Samba Member
Joined: February 21, 2010
Posts: 1068
Location: Newbury Park, CA

|
 Posted: Sun Oct 31, 2010 9:36 am Post subject: DIY Beetle Rotisserie - photos, plans and supply list Posted: Sun Oct 31, 2010 9:36 am Post subject: DIY Beetle Rotisserie - photos, plans and supply list |
 |
|
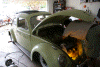
Hey everyone. The last couple of weekends I've been working on building a rotisserie for the copious amounts of body work that I'll be doing on my vert build. One the tasks that I will be tackling is replacing the convertible support rails and feel to do the best job possible, I'm going to need a rotisserie.
So, I started searching around for plans. I found a Kustom Coach Werks thread on how to make a rotisserie. Also on the Samba I found a few threads referencing it and a discussion about how tall it is. They put the rotisserie with a beetle mounted at about 8 feet high. That, I thought, was not a comfortable working height and probably wouldn't fit in my garage, so I modified the plans a bit. The other reason I modified the plans was, they use 1/4" thick rectangular tubing and my little 40amp welder will not weld that thick of metal and get good enough penetration. I didn't want the welds to be weak and have the whole thing come collapsing down on me! The third reason to modify the plans is, I realized that I wanted the thing to be collapsable. It would be ok to have an 8ft by 4ft rotisserie lying around if I had a huge shop, but since I'm a home jobber that means a parking space in the garage!
One of the first things I thought to lose a little bit of height was to flip the legs so that they lay with the long side flat.
Originally I was going to flip the center beam, but once I realized I couldn't weld the 1/4" thick metal I devised a new plan of notching the center beam so that the legs slip in to the end of it. I also fabbed up some brackets that bold both into the upright and to the center beam and legs. Using 16 gauge 2" wide with a 1/8" thick gusset welded into it. At first I tried to bend the 16 gauge steel and realized I was not going to get it perfectly square so I took a 48" piece and cut the whole thing up 3" at a time.
The slip pipe tops with a welded nut so I can lock in the angle.
Then of course the casters. On KCW's video they talk about using big inflatable wheels. Nice, but they're tall and I'm not going to be rolling the body over gravel, so I opted for some simple casters. Also, by flipping the legs so they lay flatter, I was able to bolt the casters right into the legs without needing to weld on a plate for them to bolt to.
Tada!
Parts list:
1- 8 ft. 2"x4"x1/4" Rectangular tubing (center beam)
2- 4 ft. 2"x4"x1/4" Rectangular tubing (legs)
2- 32" 2"x4"x1/4" Rectangular tubing (uprights)
1- 48"x2" 16g plate (brackets)
1- 6"x3" 1/8" plate (bracket gussets)
1- 1 ft. 2" pipe 14g (outer pipe for upright)
1- 1 ft. 1 3/4" pipe 14g (inner pipe for body mount)
1- 5 ft. 2"x2" Square tubing 16g (body mounts)
50- M8 1.25 x 30mm hex bolts
2- M8 1.25 weldable nut
50- M8 Washers
4- casters
Tools
Angle Grinder with cutoff wheel and grinding wheel
Drill
1/4" drill bit (for thread taps)
5/16" drill bit (for brackets and anywhere bolts slip through)
M8 1.25 thread tap
Center punch
Welder
Plans
_________________
- Chris
58' PGSG |
|
| Back to top |
|
 |
Chris Paterson
Samba Member
Joined: February 21, 2010
Posts: 1068
Location: Newbury Park, CA
|
| Posted: Fri Nov 05, 2010 9:52 am Post subject: |
|
|
_________________
- Chris
58' PGSG |
|
| Back to top |
|
|
zeroclearance
Samba Member
Joined: March 23, 2010
Posts: 503
Location: Crandall, TX
|
| Posted: Fri Nov 05, 2010 12:11 pm Post subject: |
|
|
Good idea! but execution lacked a little bro! Remember, time is not an issue when you working on critical parts, especially pieces that hold weight!
_________________
Zero Clearance Auto Werks..
drop it here..drag it home. |
|
| Back to top |
|
|
silvertonguedevil
Samba Member

Joined: September 26, 2010
Posts: 1694
Location: Vale, OR
|
| Posted: Fri Nov 05, 2010 12:38 pm Post subject: |
|
|
What do ya mean??
_________________
-Greg |
|
| Back to top |
|
|
BXRJIM
Samba Member
Joined: July 28, 2009
Posts: 85
Location: Spantuckey WA
|
| Posted: Fri Nov 05, 2010 1:27 pm Post subject: |
|
|
Real Nice! I've thought long and hard about putting my '62 Ragtop body on a rotisserie but I'm afraid of twisting it.
I have my pan on one now getting ready for POR15 and I couldn't imagine flipping that thing as many times as I did to weld in new floor pans without it!!
Again Nice job and thanks for sharing!
Jim
_________________
My new mission- '62 Ragtop |
|
| Back to top |
|
|
Chris Paterson
Samba Member
Joined: February 21, 2010
Posts: 1068
Location: Newbury Park, CA
|
| Posted: Fri Nov 05, 2010 1:46 pm Post subject: |
|
|
| zeroclearance wrote: |
| Good idea! but execution lacked a little bro! Remember, time is not an issue when you working on critical parts, especially pieces that hold weight! |
What's lacking in the execution? Seems to work great and is super sturdy
_________________
- Chris
58' PGSG |
|
| Back to top |
|
|
Chris Paterson
Samba Member
Joined: February 21, 2010
Posts: 1068
Location: Newbury Park, CA
|
| Posted: Fri Nov 05, 2010 1:48 pm Post subject: |
|
|
| BXRJIM wrote: |
Real Nice! I've thought long and hard about putting my '62 Ragtop body on a rotisserie but I'm afraid of twisting it.
I have my pan on one now getting ready for POR15 and I couldn't imagine flipping that thing as many times as I did to weld in new floor pans without it!!
Again Nice job and thanks for sharing!
Jim
|
Thanks Jim! I'll probably build an attachment for the pan too
_________________
- Chris
58' PGSG |
|
| Back to top |
|
|
cru62
Samba Member

Joined: December 31, 2002
Posts: 4119
Location: Margaritaville.....24/7
|
| Posted: Fri Nov 05, 2010 4:18 pm Post subject: |
|
|
| chrispaterson82 wrote: |
| zeroclearance wrote: |
| Good idea! but execution lacked a little bro! Remember, time is not an issue when you working on critical parts, especially pieces that hold weight! |
What's lacking in the execution? Seems to work great and is super sturdy |
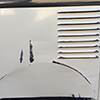
I think what he is talking about is your welding. From the pictures you posted they appear to lack penetration. That welder is more appropriate for use on sheet metal and very thin plate. And some of your finished work(i.e.-
http://chrispaterson.net/vw/rotisserie/IMG_0121.JPG)
is pretty sketchy. This weld should, at the very least, continue on to the saddle. It is possible that you will have no issues and this will last forever. But I would err on the side of caution and use thick wall tubing and a welder that is capable of full penetration welds. Better safe than sorry. Just my $.02.
_________________
"My biggest worry is that when I die, my wife will sell all my parts for what I told her I paid for them"-Jon
Jokes about German sausage are the wurst.
Stop dead photo links! Post your photos to The Samba Gallery! |
|
| Back to top |
|
|
Chris Paterson
Samba Member
Joined: February 21, 2010
Posts: 1068
Location: Newbury Park, CA
|
| Posted: Fri Nov 05, 2010 6:29 pm Post subject: |
|
|
| cru62 wrote: |
| chrispaterson82 wrote: |
| zeroclearance wrote: |
| Good idea! but execution lacked a little bro! Remember, time is not an issue when you working on critical parts, especially pieces that hold weight! |
What's lacking in the execution? Seems to work great and is super sturdy |
I think what he is talking about is your welding. From the pictures you posted they appear to lack penetration. That welder is more appropriate for use on sheet metal and very thin plate. And some of your finished work(i.e.-
http://chrispaterson.net/vw/rotisserie/IMG_0121.JPG)
is pretty sketchy. This weld should, at the very least, continue on to the saddle. It is possible that you will have no issues and this will last forever. But I would err on the side of caution and use thick wall tubing and a welder that is capable of full penetration welds. Better safe than sorry. Just my $.02. |
This is why I hate the internet. So many critics :-/
So I attempted to radius the 1/4" thick pieces of steel but found my tools lacking. Once I placed the pipe on the end I realized that the saddle of the pipe is not where the strength comes from, but rather from the 4" long sides that it sits on. So I welded those with a full bead. The only other things I welded are the brackets, because yes, I didn't have a powerful enough welder to weld with any kind of penetration in 1/4" steel. Trust me, the thing is strong and the end pipes are being pressed down via gravity. The one piece I was worried about was the body mount attachments since the only thing holding that tubing on is the weld, but it seems that I did a good job and it is showing no signs of weakness.
I posted this so that others could benefit from it. Take the plans and modify them as you see fit.
_________________
- Chris
58' PGSG |
|
| Back to top |
|
|
badsix
Samba Member
Joined: November 22, 2007
Posts: 228
Location: coos bay or.
|
| Posted: Fri Nov 05, 2010 6:53 pm Post subject: |
|
|
it will help if you can preheat your weld area with a torch if you have one allso v the weld area and make multiple passes  |
|
| Back to top |
|
|
zeroclearance
Samba Member
Joined: March 23, 2010
Posts: 503
Location: Crandall, TX
|
| Posted: Fri Nov 05, 2010 10:15 pm Post subject: |
|
|
| chrispaterson82 wrote: |
| cru62 wrote: |
| chrispaterson82 wrote: |
| zeroclearance wrote: |
| Good idea! but execution lacked a little bro! Remember, time is not an issue when you working on critical parts, especially pieces that hold weight! |
What's lacking in the execution? Seems to work great and is super sturdy |
I think what he is talking about is your welding. From the pictures you posted they appear to lack penetration. That welder is more appropriate for use on sheet metal and very thin plate. And some of your finished work(i.e.-
http://chrispaterson.net/vw/rotisserie/IMG_0121.JPG)
is pretty sketchy. This weld should, at the very least, continue on to the saddle. It is possible that you will have no issues and this will last forever. But I would err on the side of caution and use thick wall tubing and a welder that is capable of full penetration welds. Better safe than sorry. Just my $.02. |
This is why I hate the internet. So many critics :-/
So I attempted to radius the 1/4" thick pieces of steel but found my tools lacking. Once I placed the pipe on the end I realized that the saddle of the pipe is not where the strength comes from, but rather from the 4" long sides that it sits on. So I welded those with a full bead. The only other things I welded are the brackets, because yes, I didn't have a powerful enough welder to weld with any kind of penetration in 1/4" steel. Trust me, the thing is strong and the end pipes are being pressed down via gravity. The one piece I was worried about was the body mount attachments since the only thing holding that tubing on is the weld, but it seems that I did a good job and it is showing no signs of weakness.
I posted this so that others could benefit from it. Take the plans and modify them as you see fit. |
cru62, thanks on that. It was exactly what I was trying to say!
I can understand not having the right tools, cause I have dealt with that a lot. But really, you use the tools to the BEST of their ability, and if something does not work out right, then your start from scratch again.
I just wanna help, I would hate to see an early drops because of something as simple as even asking a friend for a bigger, better welder.
Again, I was not trying to rag on it, I did say it was a good design and a good idea, but execution lacked a bit. And it was by no means meant to offend you, just to help you...
_________________
Zero Clearance Auto Werks..
drop it here..drag it home. |
|
| Back to top |
|
|
cru62
Samba Member
Joined: December 31, 2002
Posts: 4119
Location: Margaritaville.....24/7
|
| Posted: Sat Nov 06, 2010 7:17 am Post subject: |
|
|
| chrispaterson82 wrote: |
This is why I hate the internet. So many critics :-/
I posted this so that others could benefit from it. Take the plans and modify them as you see fit. |
And this is why I posted my constructive criticism. Your execution has some obvious and potentially disastrous shortcomings. To not point them out would not be in anyone's best interest. Don't get all butthurt. Just accept it in the spirit it was given- one enthusiast to another trying to help  . .
_________________
"My biggest worry is that when I die, my wife will sell all my parts for what I told her I paid for them"-Jon
Jokes about German sausage are the wurst.
Stop dead photo links! Post your photos to The Samba Gallery! |
|
| Back to top |
|
|
johnnypan
Samba Member

Joined: October 24, 2007
Posts: 7431
Location: sackamenna
|
| Posted: Sat Nov 06, 2010 7:44 am Post subject: |
|
|
Poor welding process...failure to properly join welded areas,failure to use an oscillating or weave welding technique,failure to multipass welds in light of a under amperage machine.
lack of basic engineering skills...improper gusseting,inproper joining of tubing for maximum load transfer,extreme weight due to material over spec.,failure to understand loading of device in use,demonstrated inability to perform simple measurements.
Now I bet your butthurt....but get over it,displaying a complex proceedure like the fabrication of body rotator is pretty difficult,and you did a helluva job with layout and readability of the instructions. |
|
| Back to top |
|
|
Chris Paterson
Samba Member
Joined: February 21, 2010
Posts: 1068
Location: Newbury Park, CA
|
| Posted: Sat Nov 06, 2010 10:30 pm Post subject: |
|
|
I'm all for making it better and learning from mistakes. But to leave criticism without explanation is just mean for no reason. That's all I'm trying to say. No one is going to benefit from "Your execution is lacking." People will benefit from, "Next time, you should use a weaving weld technique for better strength." Yeah, I'm butthurt because I freaking spent a good amount of time planning it out, learning and doing the best that I can and prepping the plans, documenting and writing an explanation. So don't be an ass. If you have something to add, great. If you just wanna tell me "that sucks." Then go to the VW Abortions thread.
By the way, how does one perform a weaving technique?
_________________
- Chris
58' PGSG |
|
| Back to top |
|
|
BUGTHUG
Samba's Rented Mule
Joined: April 22, 2007
Posts: 833
Location: KANSAS toto's fire hydrant
|
| Posted: Sat Nov 06, 2010 11:11 pm Post subject: |
|
|
I'm glad to see another bit on the rotisserie, I'm getting ready to build one for a 63 bus I just aquired. I'm thinking about saving a little time and go and buy 2 engine stands from Harbour Freight and modify it to what I need. I think $100.00 on the engine stands is a little cheaper than buying new metal, unless you have some laying around.
I also think it just needs to rotate about90* degrees, or 95* degrees instead of 180*degrees.
But I think what you got will work good for you. you might what to make sure you have some support diangonial, and good cross support so your body don" get jacked out of joint. Its good to brace it up before you start taking to much metal off of it. If you get it tweaked and spend alot of money and time, it could be dangerous to drive and wear your tires out prematurely. OK good luck with your project.
_________________
I know you would understand what I'm saying if you could just see my HANDS
Even the middle of the week says W T F
1963 15 window bus
1966 VW bug
1966 21 window micro bus
1969 Dune Buggy
1965 VW bug
1974 VW bug
1972 Kelmark, VW drive line
1948 Chevrolet Hearse |
|
| Back to top |
|
|
Chris Paterson
Samba Member
Joined: February 21, 2010
Posts: 1068
Location: Newbury Park, CA
|
| Posted: Sat Nov 06, 2010 11:26 pm Post subject: |
|
|
| BUGTHUG wrote: |
I'm glad to see another bit on the rotisserie, I'm getting ready to build one for a 63 bus I just aquired. I'm thinking about saving a little time and go and buy 2 engine stands from Harbour Freight and modify it to what I need. I think $100.00 on the engine stands is a little cheaper than buying new metal, unless you have some laying around.
I also think it just needs to rotate about90* degrees, or 95* degrees instead of 180*degrees.
But I think what you got will work good for you. you might what to make sure you have some support diangonial, and good cross support so your body don" get jacked out of joint. Its good to brace it up before you start taking to much metal off of it. If you get it tweaked and spend alot of money and time, it could be dangerous to drive and wear your tires out prematurely. OK good luck with your project. |
The main reason I wanted to rotate so much was so that I could weld in the convertible support rails. I'm not planning on taking any more metal off of the car so I'm hoping the braces on it will help it not get jacked. The other thing I was extremely happy with is how good the heater channels are on this thing! There is absolutely 0 rust on them! But that's a little off topic. I just wanted to put the rotisserie in it's own thread so that someone surfing and searching for how to build a rotisserie could take what I did and learned and use it or improve it.
_________________
- Chris
58' PGSG |
|
| Back to top |
|
|
johnnypan
Samba Member
Joined: October 24, 2007
Posts: 7431
Location: sackamenna
|
| Posted: Sun Nov 07, 2010 8:07 am Post subject: |
|
|
Weave welding technique:
Pause and deposit weld on one side of the joint,then travel the "puddel" to the other side of the joint and do the same.
Circle technique:
instead of traveling side to side in a weave pattern like above,perform the deposit across the joint in a circle pattern,like a spring is wound.
The key to a good weld is proper penetration,without it the weld has a "stacked" appearance... |
|
| Back to top |
|
|
cru62
Samba Member
Joined: December 31, 2002
Posts: 4119
Location: Margaritaville.....24/7
|
| Posted: Sun Nov 07, 2010 10:20 am Post subject: |
|
|
I looked at your 'vert build thread. That there is some awesome work. I never would have thought to resurrect a vert by using it as the donor car. That is just so backwards to me. But in your case it is clearly the way to go. Why spend so much time fixing rusty, crashed metal when you can swap the good parts onto an even better base, right?
But to continue this thread, what happened to your pics? Aren't they kind of essential to your purpose here? With that in mind, no one on this thread said "that sucks"? All I read was praise for your effort and voicing of some concerns. Often, the only way to learn is to have something you made fail in a catastrophic way. It may have looked perfect and just how you envisioned it. Then when you use it and it fails in a way that breaks something else and/or hurts someone it becomes a harsh lesson. All we are doing is pointing out something(s) that you might have done differently to avoid what I and johnnypan saw as potential weak areas and may lead to an "epic fail". Physics is a bitch and can bite you with no warning. But I'm sure you know that. All I was trying to do was give a buddy a heads-up.
BUGTHUG-Unless HF has changed the tubing size and the casters on their engine stands, you should steer clear. They are barely even adequate for use as an engine stand. The casters are complete crap. I had to replace them just to be able to roll it around. I think I might use wood like BXRJIM before I pay good money for crap that I have to rebuild to use. Again, just my $.02.
_________________
"My biggest worry is that when I die, my wife will sell all my parts for what I told her I paid for them"-Jon
Jokes about German sausage are the wurst.
Stop dead photo links! Post your photos to The Samba Gallery! |
|
| Back to top |
|
|
hitest
Samba Member

Joined: September 30, 2008
Posts: 10321
Location: Prime Meridian, ID
|
| Posted: Sun Nov 07, 2010 10:53 am Post subject: |
|
|
Chris- nice job on this thread. For lack of welding skills myself- I'd say a "fine enough for my car" budget job is just right for me too. When you're all done- I'd let you deliver it to me for it's next 'vert chore...
The comment you made about your heater channels is downright disgusting. Mine are like 'french drains' in the yard- holes every inch for effective ventilation/drainage. I can't believe that car came from Boise with such good channels. You suck! 
_________________
| EverettB wrote: |
I wonder what the nut looks like.
|
'62 L390 151, '62 L469 117, '63 L380 113, '64 L87 311, '65 L512 265, '65 L31 SO-42, '66 L360 251, '68 L30k 141, '71 L12 113, '74 ORG 181
FU#5 |
|
| Back to top |
|
|
bugninva
Samba Member

Joined: December 14, 2004
Posts: 8858
Location: sound it out.
|
| Posted: Sun Nov 07, 2010 11:41 am Post subject: Re: DIY Beetle Rotisserie - photos, plans and supply list |
|
|
| chrispaterson82 wrote: |
| So I attempted to radius the 1/4" thick pieces of steel but found my tools lacking. Once I placed the pipe on the end I realized that the saddle of the pipe is not where the strength comes from, but rather from the 4" long sides that it sits on. So I welded those with a full bead. |
As the others said, as constructive critisism, the fishmouth you attempted really *is* weakening your piece... if you think about the pipe with the car's weight on it, you will see that the sides that you welded solid are to locate the piece, and the "saddle" is what keeps it from drooping(or rising up, depending on which end) and stressing those welds, which could lead to failure of the welds... and the more you rotate the car(repetition) the more you stress those welds... It is *probably* strong enough for a vw body... It's not too late to fix the issue... take apiece of tubing and split it in half length-wise.. then take one half and slide it up to the pipe over the original fishmouth... mark it and grind out, then test fit... do that to both pieces, then you can slide it up tight to the top tube and weld them one at a time.. you will end up with a sleeve around the original piece...
_________________
| [email protected] wrote: |
| With a show of hands, who has built over 1000 engines in the last 25 years? Anyone? |
GEX has. Just sayin |
|
| Back to top |
|
|
|


