| Author |
Message |
vw7266
Samba Member
Joined: April 28, 2004
Posts: 3055
Location: the point, ohio

|
 Posted: Sun Mar 06, 2011 7:49 pm Post subject: Posted: Sun Mar 06, 2011 7:49 pm Post subject: |
 |
|
| Nice work..that cooking unit is awesome! |
|
| Back to top |
|
 |
Smooth60
Samba Member

Joined: February 21, 2007
Posts: 69
Location: PANSCRAPERS Barcelona
|
| Posted: Mon Mar 07, 2011 3:05 am Post subject: |
|
|
Awesome work! 
_________________
'61 Westfalia So23
'54 Oval window |
|
| Back to top |
|
|
DJ Pierre
Samba Member

Joined: November 09, 2008
Posts: 351
Location: Netherlands
|
| Posted: Mon Apr 18, 2011 11:52 pm Post subject: |
|
|
I'm plannning on buying new tyres for our bus. Any suggestions of with tyres i should buy?
I'm thinking of 205-75 r15 or 195-80 r15. I will buy modern tyres since we are planning holidays with the car. The spare type will be an original Firestone 6.40-15 with we allready have. |
|
| Back to top |
|
|
DJ Pierre
Samba Member
Joined: November 09, 2008
Posts: 351
Location: Netherlands
|
| Posted: Sun May 08, 2011 3:43 am Post subject: |
|
|
It has been a while since the last update. But we have been very busy building!
I finished the electics vor 95%. All bus electrics work and i’ve build a second loom for the camper electrics. This loom routes the same way as the standard loom so it’s invisible. Radio, amp, interiorlights, 12v soccets, fridge, espar, all will be powered by the extra battery.
I created a board with all the parts for this system which is mounted under the fridge. It’s invisible once installed but still still user frendly. I will replace the fusebox for an old style type and the main fuse will be located near the battery. I will place a battery guard in it’s place.
The fridge is just a coolbox in an old westy. But we care for a cold beer way too much…So we decided to convert the original fridge into a real working fridge. It’s a system bij Weaco which is popular in the boating scene. It can cool up to 100L wich is more than enough for our fridge. Kind of a scary moment to create holes in a super rare westy fridge…
The bottomsection of the car is nearly finished. Gearbox is in it’s place(shifts perfectly!), steering in place, brakelines are ready to go and all the cables are in place. Just have to order some bolts and such before the wheels can be mounted!
New tyres have been fitted. 4x Vredestein Sprint Classic 185-R15 and a Firestone 6.40-15 for the spare. This looks better when we use the tablestand. Unfortunately the Vredesteins are one inch smaller in size than the 6.40 tyre but it still looks great on the bus.
The ambustep is ready and mounted:
The windowframes are almost done. Hope to finish this nasty job today:
The engine is ready to go to the tuner. The standard manifold would not fit with an alternator and 34pict3. So it had to be modified.
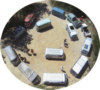
Some random pics:
To be continued! |
|
| Back to top |
|
|
j.pickens
Samba Member
Joined: December 03, 2002
Posts: 9831
Location: Exit 7, New Jersey
|
| Posted: Sun May 08, 2011 8:06 am Post subject: |
|
|
How will you deal with the heat from the eberspacher vent into the cabin with the compressor for the fridge in the same spot?
I can't wait to see this all assembled. A fine bus indeed.
_________________
Founder and Chairman Emeritus, ECMSAS
BBX BBXII and BBXXI Long Distance Award Winner
| BeaterBarndoor wrote: |
i wish more people would actually drive their vws rather than just talking about what they have in the garage. |
| Red Fau Veh wrote: |
If you've seen one sunroof swivel seat kombi, you've seen them all!  |
|
|
| Back to top |
|
|
DJ Pierre
Samba Member
Joined: November 09, 2008
Posts: 351
Location: Netherlands
|
| Posted: Sun May 08, 2011 11:19 am Post subject: |
|
|
| j.pickens wrote: |
How will you deal with the heat from the eberspacher vent into the cabin with the compressor for the fridge in the same spot?
I can't wait to see this all assembled. A fine bus indeed. |
The compressor isn't mounted yet and is not on the exact spot it will be once mounted. I need to create the floor board first. I think it will clear enough to work out. If it turns out te be too hot i will make a heat deflective constuction around the compressor. Either way, it will work out fine. |
|
| Back to top |
|
|
mario_0609
Samba Member

Joined: June 08, 2008
Posts: 156
Location: Vintage VW place of pilgrimage; Germany
|
| Posted: Sun May 08, 2011 4:11 pm Post subject: |
|
|
very cool bus! looking forward to see more pictures!!
_________________
cheers, Mario
* 22 Oct. '58 export bug
* 27 June 72 Westfalia Camper |
|
| Back to top |
|
|
DJ Pierre
Samba Member
Joined: November 09, 2008
Posts: 351
Location: Netherlands
|
| Posted: Tue May 10, 2011 1:06 pm Post subject: |
|
|
We bought a new roofrack today! 134cm Westyrack:
Needs some love and care but it can be fixed! |
|
| Back to top |
|
|
j.pickens
Samba Member
Joined: December 03, 2002
Posts: 9831
Location: Exit 7, New Jersey
|
| Posted: Tue May 10, 2011 5:21 pm Post subject: |
|
|
Yikes! New scratches for the new paint, had to start somewhere...
_________________
Founder and Chairman Emeritus, ECMSAS
BBX BBXII and BBXXI Long Distance Award Winner
| BeaterBarndoor wrote: |
i wish more people would actually drive their vws rather than just talking about what they have in the garage. |
| Red Fau Veh wrote: |
| If you've seen one sunroof swivel seat kombi, you've seen them all! |
|
|
| Back to top |
|
|
Eric&Barb
Samba Member

Joined: September 19, 2004
Posts: 26290
Location: Olympia Wash Rinse & Repeat
|
| Posted: Tue May 10, 2011 7:53 pm Post subject: |
|
|
That is not the correct Eberspacher heater outlet for the 1960 westies!!
From the Gallery:
_________________
In Stereo, Where Available! |
|
| Back to top |
|
|
DJ Pierre
Samba Member
Joined: November 09, 2008
Posts: 351
Location: Netherlands
|
| Posted: Tue May 10, 2011 11:07 pm Post subject: |
|
|
| j.pickens wrote: |
| Yikes! New scratches for the new paint, had to start somewhere... |
I put some rubber molding on the feet of the rack, so no scratches... |
|
| Back to top |
|
|
DJ Pierre
Samba Member
Joined: November 09, 2008
Posts: 351
Location: Netherlands
|
| Posted: Tue May 10, 2011 11:10 pm Post subject: |
|
|
| Eric&Barb wrote: |
That is not the correct Eberspacher heater outlet for the 1960 westies!!
From the Gallery:
|
I know, but this is all i have for now. Seems i have to make ik work until i find the correct parts. Let's make it work first, than make i more correct. It''s not a big deal to replace it in the future. |
|
| Back to top |
|
|
DJ Pierre
Samba Member
Joined: November 09, 2008
Posts: 351
Location: Netherlands
|
| Posted: Sun May 29, 2011 12:25 pm Post subject: |
|
|
This weekend was planned to finish the upholstery. Great to work with my mom again.
All pieces are ready now. The things left to do are the wedge pillows and the little folding chair. I'm pretty happy with the result!
|
|
| Back to top |
|
|
DJ Pierre
Samba Member
Joined: November 09, 2008
Posts: 351
Location: Netherlands
|
| Posted: Sun Jun 05, 2011 1:00 pm Post subject: |
|
|
We took some time to isolate the camper this weekend. I doubted for a long time what product to use for this and eventually chose for the Armaflex 19mm. This is a closed-cell-foam which is used in electrical / technical installations in buildings.
The glueing to the body was something that made me doubt though, but this is the only isolation material which is completely water resistant. Tested it with some water, the next day the same amount was still there! Don't want a "sponge" between my new body and camper interior...
The whole bus is now isolated, except for the doors and subhatch. Will do that as soon as these parts are in place. Actually it was quite some work to get it all in place. The glue was extremely strong, as soon as the isolation hit the body it was already completely stuck.
The results are great though!
Also started to mount the sounddampner to the firewall, should be finished next weekend.
To be continued! |
|
| Back to top |
|
|
Z
Samba Member
Joined: June 15, 2003
Posts: 2517
Location: galveston, tx
|
| Posted: Mon Jun 06, 2011 9:41 am Post subject: |
|
|
| I love this bus...looks great so far. What are you using for the firewall sound dampner? |
|
| Back to top |
|
|
DJ Pierre
Samba Member
Joined: November 09, 2008
Posts: 351
Location: Netherlands
|
| Posted: Mon Jun 06, 2011 11:06 am Post subject: |
|
|
Thanks!
We use plain self adhesive tar mats from a local carparts store, nothing fancy. This will be out of sight in our bus so no high standards here. The Armaflex will make the car a lot more quit by itself and enginenoise is not the biggest concern to us. |
|
| Back to top |
|
|
vw7266
Samba Member
Joined: April 28, 2004
Posts: 3055
Location: the point, ohio
|
| Posted: Mon Jun 06, 2011 7:47 pm Post subject: |
|
|
| those seats look great! |
|
| Back to top |
|
|
DJ Pierre
Samba Member
Joined: November 09, 2008
Posts: 351
Location: Netherlands
|
| Posted: Mon Jun 13, 2011 9:36 am Post subject: |
|
|
And yet another busy week!
Sounddampner is now finished.
We fitted the rear hatch. Window installation was easier than expected. Give or take 20 minutes work, no problems at all.
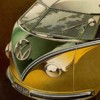
We also fitted the flipseat hardware. The mat is not original to our bus(it's for later busses) but i like the practical use of these. Easy to keep clean and the color looks perfect to the mousegray.
Evelyn coloured the vw logo's on the hubcaps
The big work was in the painting of the interiorpanels. They are ready now. Stay tuned for the next update when we will install the first panels! |
|
| Back to top |
|
|
bagpipe goatee
Samba Member

Joined: February 26, 2008
Posts: 93
Location: Madison
|
| Posted: Mon Jun 13, 2011 10:33 pm Post subject: |
|
|
| Great progress! |
|
| Back to top |
|
|
DJ Pierre
Samba Member
Joined: November 09, 2008
Posts: 351
Location: Netherlands
|
| Posted: Wed Jun 15, 2011 10:19 am Post subject: |
|
|
| DJ Pierre wrote: |
| Eric&Barb wrote: |
That is not the correct Eberspacher heater outlet for the 1960 westies!!
From the Gallery:
|
I know, but this is all i have for now. Seems i have to make ik work until i find the correct parts. Let's make it work first, than make i more correct. It''s not a big deal to replace it in the future. |
Found it!
Got a complete 1961 Ambulance BN4 today.
Too bad the fanguard is useless on later BN4's. I was planning to make the newer 12v heater look like the correct 6v heater as much as possible. The diameter of the heater changed at some point.
|
|
| Back to top |
|
|
|


