| Author |
Message |
SyncroGhia
Samba Member

Joined: August 21, 2009
Posts: 2458
Location: Highnam, UK

|
 Posted: Tue Sep 13, 2011 2:17 pm Post subject: T3 Westfalia Hightop Conversion - Hochdach Posted: Tue Sep 13, 2011 2:17 pm Post subject: T3 Westfalia Hightop Conversion - Hochdach |
 |
|
I'm putting this up as a seperate thread to the Limey thread as it'll take up many pages on its own. As the Limey thread is currently 30 pages long already... it'll be easier for people to read about converting their vans to Westfalia Hightop without sifting through pages of other stuff.
I'm converting my Syncro 16 to Westfalia Hightop. It was originally a 1989 Syncro 16 Caravelle which I then fitted a Westfalia Pop-top to and had intentions of fitting the metal roof frame from the Pop-top to the van so that the top bed would fit properly etc.
After several years of camping and offroading, my wife and I have decided that a hightop (while not looking anywhere near as good) would suit our needs better than a pop-top.
I recently bought a Hightop roof (cut off at the top of the window pillars) from a Westfalia California and have started stripping out all the panels and insulation.
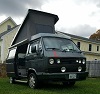
Here are a few photos of the van I removed the roof from.
It was a lot rustier than it looked in the photos and had had a blow over and been bodged.
I cut the roof off so that I would have the complete frame etc to fit everything properly.
More photos to come shortly.
MG
_________________
T3 Syncro 16 S6 Westfalia Limey SOLD
T3 Syncro 6x6 SOLD
T3 RS6 Bluestar
T3 Tristar Syncro 16 SOLD
T3 Tristar Syncro RHD SOLD
Last edited by SyncroGhia on Wed Sep 14, 2011 5:04 am; edited 2 times in total |
|
| Back to top |
|
 |
SyncroGhia
Samba Member
Joined: August 21, 2009
Posts: 2458
Location: Highnam, UK
|
| Posted: Tue Sep 13, 2011 2:40 pm Post subject: |
|
|
In the process of removing all the interior parts, these brackets became obvious.
I've no idea what they're for so if anyone has any ideas... lets hear them.
A quick shot of up one of the pillars...
The front corners of the metal roof have suffered and I'll need to repair these within the process of the conversion.
Inside the roof with all the panelling still in place.
I started by removing the skylight surrounds.
The screws have obviously been a little damp and thankfully all came out although some are very thin. I'll be replacing these with stainless steel I think.
The removal of the insulation is always going to be a horrible job with this stuff. I haven't decided if I'm going to reuse it yet or replace it with something more modern which is easier and less nasty to work with.
Next was the curtain rail.
There is a small piece of foam between the frame and the outer skin. This goes for just about everywhere around the roof.
This was the first time I've seen how the frame works with the roof. A bolt on frame was a welcome suprise.
Then removal of the interior panels.
They're held in by a combination of rivets and other components. You have to remove the child net pole locaters (forgot to take a photo!) and then 2 small rivets per panel.
Then the electrics to the lights.
And the first board will come away revealing more insulation!
The same on the other side etc.
I took the opportunity here to take a couple of photos of the wiring for the lights before I remove it to fit to the van.
Then onto the rest of the panels.
One of the rivets is hidden behind a wooden spacer so some guesswork is needed to drill through to remove the head of the rivet and allow the board to come free.
I almost missed the centre one at the back of the rear panel.
The grey plastic joining sections are very brittle being 20 years old and some have broken away from the rivets entirely. I'll be riveting them back up with spacers around the head of the rivets and placing them away from the damaged areas.
Hey presto... lots of insulation 
I have bagged it all up and marked up where it's from followed by a shower! This stuff gets everywhere.
More to come shortly.
MG
_________________
T3 Syncro 16 S6 Westfalia Limey SOLD
T3 Syncro 6x6 SOLD
T3 RS6 Bluestar
T3 Tristar Syncro 16 SOLD
T3 Tristar Syncro RHD SOLD |
|
| Back to top |
|
|
SyncroGhia
Samba Member
Joined: August 21, 2009
Posts: 2458
Location: Highnam, UK
|
| Posted: Tue Sep 13, 2011 2:50 pm Post subject: |
|
|
The insulation has not been fitted neatly and is folded over at the bottom on several but not all of the pieces.
As I removed all of the insulation, the amount of framework becomes more obvious.
There was a small extra piece of insulation which wasn't obvious at first stuffed down at the back of the roof.
More photos of the bolts which hold the frame on.
The rear corners
A section of the roof lining is stapled in and is tucked underneath the window seal. I'm not sure yet if I have to remove it or not.
It looks like the wooden pieces are fitted to the frame before the cap (fibreglass outer) goes on.
When I first got the roof, I thought that the plastic bolts which are obvious from the outside were to do with holding the cap down. They're not! I'm guessing for attaching roof racks to etc as you can see the reinforcement in the fibreglass.
A shot from the inside of the front corner of the roof which needs work.
The whole roof stripped of interior panels and insulation and ready for me to start removing the sealant holding everything together.
I'm going to try the heat gun on the sealant and see how things go.
Has anyone removed a hightop before and has any words of wisdom?
Thanks
MG
_________________
T3 Syncro 16 S6 Westfalia Limey SOLD
T3 Syncro 6x6 SOLD
T3 RS6 Bluestar
T3 Tristar Syncro 16 SOLD
T3 Tristar Syncro RHD SOLD |
|
| Back to top |
|
|
DAIZEE
Samba Member
Joined: January 26, 2010
Posts: 7552
Location: Greater Toronto Area Ontario West Side
|
| Posted: Tue Sep 13, 2011 3:21 pm Post subject: |
|
|
Very BIG project and I just wanted to let you know, you'll have to attach it better than above if you want to get any speed up!  Just kidding you. Good luck with your project. Just kidding you. Good luck with your project.
_________________
'09 2.5L Jetta 5 cylinder, 5 spd, super turbo, see thread in H2O Cooled Jetta, etc...
83.5 Vanagon L Riviera Model with 98 1.9L TD AAZ 4 speed Daily Driver 3 out of 4 seasons (sold)
84 Vanagon GL Wolfsburg Westy WBX 4 speed (sold) |
|
| Back to top |
|
|
snowsyncro
Samba Member
Joined: January 11, 2009
Posts: 1563
Location: East Preston, Nova Scotia, Canada
|
| Posted: Tue Sep 13, 2011 6:33 pm Post subject: |
|
|
This is going to be very interesting. Thank you for documenting this. Very interesting to see all that metal supporting framework.
Those brackets you are asking about almost look like they are designed to mount the poptop-style luggage rack. Hard to tell, without the benefit of having been there, exactly which way they are oriented. It also looks the paint damage at the bottom of the brackets, that at least some of them have been bent from their original positions.
RonC |
|
| Back to top |
|
|
carterzest
Samba Member

Joined: January 22, 2008
Posts: 3841
Location: Star, ID
|
| Posted: Tue Sep 13, 2011 7:36 pm Post subject: |
|
|
No sir I have never removed a California Hightop, but, thanks so much for documenting this for the masses. I would give a left nu......, er, I would love to have one of these on this side of the pond!
Great writeup. keep it coming! |
|
| Back to top |
|
|
D Clymer
Samba Member
Joined: December 22, 2005
Posts: 2987
Location: Issaquah, WA
|
| Posted: Tue Sep 13, 2011 9:48 pm Post subject: |
|
|
I'm amazed by the amount of sturdy framework that Westfalia incorporated into the high roof. It certainly works in harmony with the basic structure of the van and is in a different league than most of the aftermarket high roofs I've seen that are just fiberglass tubs mounted to the top of a van.
I've actually always liked the look of these. It's going to give Limey a totally new look, but it will be a good one.
David |
|
| Back to top |
|
|
offroad.
Samba Member

Joined: January 01, 2009
Posts: 211
Location: llanelli, s wales
|
| Posted: Tue Sep 13, 2011 11:59 pm Post subject: |
|
|
Ive not removed my roof from the cut but o do know the roof is bonded down and that there is another piece of metal folded over the base of the roof under the sealant. I think you'll need to clear out some of the sealer first, then peal over the extra metal strip and then cut through the rest of the sealer with a wire saw.
It looks like a lot of the factory high tops suffer from condensation rotting out the roof panel.
Lee |
|
| Back to top |
|
|
SyncroGhia
Samba Member
Joined: August 21, 2009
Posts: 2458
Location: Highnam, UK
|
| Posted: Wed Sep 14, 2011 5:03 am Post subject: |
|
|
I've found a website showing photos of an early Westfalia hightop which is removed fairly forcably and there isn't much left of the original roof frame.
Also I don't understand yet why there are lots of holes drilled in the side of the fibreglass when they're removing it.
http://schrauberlaube.de/?page_id=473
Here's hoping mine will come off a little easier so that I can re-use the metal work.
MG
_________________
T3 Syncro 16 S6 Westfalia Limey SOLD
T3 Syncro 6x6 SOLD
T3 RS6 Bluestar
T3 Tristar Syncro 16 SOLD
T3 Tristar Syncro RHD SOLD |
|
| Back to top |
|
|
SyncroGhia
Samba Member
Joined: August 21, 2009
Posts: 2458
Location: Highnam, UK
|
|
| Back to top |
|
|
CdnVWJunkie 
Samba Member
Joined: February 01, 2004
Posts: 1135
Location: Sarnia, Ontario, Canada
|
| Posted: Wed Sep 14, 2011 5:14 am Post subject: |
|
|
I've taken a couple off but not a Westfalia high roof. The last one we took very thin blade and heat and worked at picking sealant out of a more easily accessed portion of the top. After we were through in that one area we forced a piano wire through. Once through we attached handles (recycled cut off broom handles work well) and sawed back and forth. One person inside the van and me on the outside. It's rather slow and at times in tight corners quite difficult but we got the roof off with very minimal damage.
Now, on the other roof because I had better access I chose to use a quality heat gun and flexible putty knives. Also, tedious but I was careful and none of the pieces I touched even required paint touch ups. |
|
| Back to top |
|
|
SyncroGhia
Samba Member
Joined: August 21, 2009
Posts: 2458
Location: Highnam, UK
|
| Posted: Wed Sep 14, 2011 6:59 am Post subject: |
|
|
Interesting photo of someone obviously mis-judged how tall his van was!
You can just see the top of one of the frame bars.
MG
_________________
T3 Syncro 16 S6 Westfalia Limey SOLD
T3 Syncro 6x6 SOLD
T3 RS6 Bluestar
T3 Tristar Syncro 16 SOLD
T3 Tristar Syncro RHD SOLD |
|
| Back to top |
|
|
GBA 88West LA
Samba Member
Joined: September 04, 2008
Posts: 1279
Location: New Hampshire
|
| Posted: Wed Sep 14, 2011 10:18 am Post subject: |
|
|
the Limey Thread and this thread very interesting , you guys have some skills or guts  limey looks great as is ...go limey looks great as is ...go
_________________
88 Westy GL Vanaru 07 2.5 EJ25/AA Trans/oiling plates, 1.14 3rd-.77-4th..solar powered cabin |
|
| Back to top |
|
|
ALIKA T3
Samba Member

Joined: July 30, 2009
Posts: 7300
Location: Honolulu,Hawaii and France
|
|
| Back to top |
|
|
SyncroGhia
Samba Member
Joined: August 21, 2009
Posts: 2458
Location: Highnam, UK
|
| Posted: Wed Sep 14, 2011 1:37 pm Post subject: |
|
|
This sealant is tough stuff!!
This evening I managed to get to the dizzy heights of a whole half length of gutter sealant out... that's it after an hour and a half!
So after having tried many different methods to remove the sealant including a heat gun (getting it hot enough to melt the surface of the sealant), a stanly knife, several screwdrivers, a small pry bar (used as a chisel) with hammer and a tool which is usually used for fitting window seals... I settled on cutting through the seal as close to the fibreglass as possible and as close to the metal gutter as possible so that I only had the bottom section to worry about.
I think it's possible to see the cuts in the sealant in the above photo.
After cutting through, I would work the bottom of the section I was cutting out side by side with a screwdriver while pulling the sealant out of the way (stretching).
You can just about make out that there is a lip which is folded over a fibreglass lip which is at the bottom of the fibreglass top.
There is some rust but not too much. In all honesty, the rust is making removing the sealant easier. When there is no rust, it sticks very well and is very hard work to remove.
I'll be doing this for the next couple of evenings until it's all removed and I can bend the lip up and get to the next lot of sealant. As some of you have mentioned above, I'll be trying to get a blade or cutting wire through to work through the sealant without damaging both the fibreglass roof and metal roof frame.
MG
_________________
T3 Syncro 16 S6 Westfalia Limey SOLD
T3 Syncro 6x6 SOLD
T3 RS6 Bluestar
T3 Tristar Syncro 16 SOLD
T3 Tristar Syncro RHD SOLD |
|
| Back to top |
|
|
BadgerSnakeEyes
Samba Member

Joined: August 15, 2011
Posts: 29
Location: Not-Cal
|
| Posted: Wed Sep 14, 2011 2:13 pm Post subject: |
|
|
| The nuts in those brackets ALMOST look like weld nuts for seat belt provisions, but I don't see how they could be (or why they would be there). They aren't 7/16 x 20 are they? That'd be weird... |
|
| Back to top |
|
|
MarkWard
Samba Member

Joined: February 09, 2005
Posts: 19094
Location: Retired South Florida
|
| Posted: Wed Sep 14, 2011 2:20 pm Post subject: |
|
|
| A little confused. Are you intending to use the fiberglass top and the sheet metal roof from the donor? If so, are you seperating the two just to tackle the rust? From the last pictures it is really sealed on there. Keep the pictures coming. |
|
| Back to top |
|
|
SyncroGhia
Samba Member
Joined: August 21, 2009
Posts: 2458
Location: Highnam, UK
|
| Posted: Wed Sep 14, 2011 2:26 pm Post subject: |
|
|
I'm planning on using both parts but I'm not prepared to but through the roof pillars on Limey to fit it. As the roof panel and parts of the frame are different from a normal tin top van to a Westfalia hightop, the fiberglass top must be removed to get to the welds which hold the metal roof together. Then I can unstitch the metal parts, unstitch Limey's roof, weld it all together and fit the fiberglass top.
MG
_________________
T3 Syncro 16 S6 Westfalia Limey SOLD
T3 Syncro 6x6 SOLD
T3 RS6 Bluestar
T3 Tristar Syncro 16 SOLD
T3 Tristar Syncro RHD SOLD |
|
| Back to top |
|
|
MarkWard
Samba Member
Joined: February 09, 2005
Posts: 19094
Location: Retired South Florida
|
| Posted: Wed Sep 14, 2011 2:30 pm Post subject: |
|
|
| Ok, that makes sense. It is going to be quite a project. It looks like you are working above a van? No space to work on saw horses? I really enjoy these types of threads. I know how much work is involved in these sorts of projects and all of the pitfalls ahead. Have to keep your eye on the target. |
|
| Back to top |
|
|
SyncroGhia
Samba Member
Joined: August 21, 2009
Posts: 2458
Location: Highnam, UK
|
| Posted: Wed Sep 14, 2011 10:58 pm Post subject: |
|
|
The Westfalia hightop roof is sitting on roof bars on top of my Bluestar as I have no where else to put it.
MG
_________________
T3 Syncro 16 S6 Westfalia Limey SOLD
T3 Syncro 6x6 SOLD
T3 RS6 Bluestar
T3 Tristar Syncro 16 SOLD
T3 Tristar Syncro RHD SOLD |
|
| Back to top |
|
|
|


