| Author |
Message |
GypsyDriver
Samba Member
Joined: November 06, 2012
Posts: 190
Location: Columbus, GA

|
 Posted: Wed Dec 12, 2012 10:51 am Post subject: LT Mirror Installation (Photos and Installation Tips) Posted: Wed Dec 12, 2012 10:51 am Post subject: LT Mirror Installation (Photos and Installation Tips) |
 |
|
Hello all, I recently installed a set of LT Mirrors purchased from GoWesty on my 91 Westfalia Camper. Before I did, I searched the forums for help with finding the correct additional required hardware and installation techniques. I did find some helpful information buried in loosely-related threads, but didn't see an install thread, so I thought I'd post my experience here. As a frame of reference, I have basic to slightly above average automotive repair skills. This installation requires only basic hand tools and a variable speed drill. I did this in my carport in about three hours total (only because I went slow trying not to make mistakes.) An experienced installer could probably put these on in an hour.
As mentioned, I purchased the kit from GoWesty. This appears to be the same kit sold worldwide by various vendors. There is a heated version of it available from Germany that I came across once, but I can't find them again.
This is what you get in the kit:
Each side is sold separately. It comes with plastic shims for the top and bottom mounts (like the factory shims, they don't seem to be capable to stopping water from penetrating behind them.) No mounting bolts are included in the kit. You'll reuse the top two bolts from your factory mirror on the bottom mount (note that the LT mirror bottom mount only uses two of the three factory locations that are already in your door. The bottom one will be slightly exposed when you're finished. I'll cover that later.) The mirror mounts to the pre-installed clamp with the included bolt/washer/bolt cap.) The kit appears to be of overall good quality. Its not really 'heavy duty' in my opinion, but its solid, well-constructed and serves its function.
This is the remaining hardware you'll need to purchase:
I know there are various ways to approach this, but after much research this is the way I went. You'll need six 6mm x 25mm tapered bolts/screws (three per side for each top mount). I found these at Home Depot for about $5 or $6. I took the top mount off the mirror and took it into the store to test the fit. The tapered heads seat in the mount very nicely when all is said and done. You'll also need three 6mm rivet nuts per side. At the top of the picture is the rivet nut installation tool and serrated washers you'll need. I purchased both the installation tool and rivet nuts from GoWesty as a kit for about $15. you may be able to find the parts cheaper elsewhere, but I couldn't find them cleanly packaged anywhere else.
You'll need a variable speed drill, a 25/64 drill bit (I bought a new one to ensure I got clean holes - you'll be drilling into your van's sheet metal in tight spots), a large phillips screw driver, a sharpie (to mark holes), blue painter's tape or masking tape, and (optional) automotive primer and paint to paint over the rivet nuts to help fight rust.
EDIT: you'll also need a small round file or a dremel tool with a small round grinding stone on it to debur the 25/64 holes you'll drill for the rivet nuts. The rivet nuts will be a tight fit in the hole and you may need to file around the hole very slightly so they slide in flush with the sheet metal.
Step 1 is to remove your factory mirror and prep the door. Removing the mirror is covered in the Bentley manual, so I won't cover it here. But, a couple of tips ... you don't have to remove the entire door panel. I pulled the forward clips after removing the speaker and was able to access the wiring harness through the speaker hole and the front side. If you just charge into it without reading the Bentley, note that you'll have to pull the wires from the connector or cut them to get the mirror off the door (you'll see what I mean.) Another tip ... you may want to soak your bolts in penetrating oil overnight to help them ease out. A couple of mine were in there really good.
Another tip here ... this is what my door looked like after I got the mirror off (same on both sides):
You'll need to clean this because the new mount is narrower and shorter than the factory mount.
This is what it looked like after thorough scrubbing with soap and water...still not good enough:
I used 0000 steel wool and Myers household cleaner to gently scrub away the remaining ring. If you don't, it will show after you complete the installation as a dirty ring around the sides and bottom of the new mount.
(incidentally, 0000 steel wool and Myers is like a magic eraser for bug stains, rust stains, tar, etc.)
After you get everything clean, prep the area with tape. (Note that I'm showing the driver's side because I learned all my lessons on the passengers side before I started taking pictures.) The tape is there to protect the paint from the inevitable slip of the screw driver or drill bit
Step 2 is to mark and drill the holes for the top mount. I didn't take too many pictures here because I had my hands full, but here was my approach and some tips: Mount the mirror using the top two bolts from the factory mirror. Be sure to use the included plastic shim or the top won't line up properly. Tighten everything down. Now, here's the tricky part ... the top mount is not going to line up perfectly either side to side or front to back on its own. It'll be more than a quarter inch off. The first thing you'll have to do is slide the shim for the top in place. The shim is pretty thick and takes up most of that space. Next, you'll have to coax the top mount into place. This is tricky because you've got to hold the shim in place to ensure the holes are centered, apply force to the top mount and pull out a sharpie to mark the holes. You almost need three hands. A couple of notes . . . don't apply too much force or the mount will slide down the door frame a little and the top bar won't be parallel to the ground when you're finished. Just kinda let it go where it wants to naturally go. I actually did this part three times on each side to ensure everything was lined up before I drilled. (I took the LT mirror off and remounted it, checked the marks, then did it a third time...I'm glad I did.) A final note on this part, I did the two outside holes first, then repeated the process for the inside hole once I'd remounted the mirror with two bolts on the bottom and two on the top. To drill the holes, I drilled a 1/8" pilot hole, then drilled a 25/64th hole for the rivet nut. Not much pressure is required here as the sheet metal is thin. I center-punched the hole on the passenger side, but not on the driver's side. I thought I got a cleaner hole, for some reason, without center punching. This is what the holes look like when you're done (EDIT: this is before deburring...I used a dremel tool with a small round tapered grinding stone on it to debur. You could also use a small round file. Further note, get in and get out quickly with the drill bit when you drill through the sheet metal. There is very little tolerance between the top lip of the rivet nut and the body of the nut. If you let the drill bit wander in the hole unnecessarily, it'll quickly enlarge the hole beyond that tolerance. You can see this starting to happen on the top hole, although, as you can see in the next picture, this one turned out alright.):
Next, drill the inside hole. My pictures jump through the process a little here. But, this is what the rivet nuts look like after installation (instructions are included with the tool.)
This is how I drilled the inside hole
Tips: Tape off the area on the window where the drill will be (its a tight fit.) Tape off the lower window channel to prevent metal shavings from getting inside the channel. Drill the 1/8" pilot hole with the mirror mounted and tightened up. Remove the mirror, drill the 25/64th hole, debur if necessary, and install the third rivet nut.
This is what it looks like when you've got all three rivet nuts in place
Note that the inside rivet nut warped a little. This was the most difficult nut to install on both sides. I think the nut crushes up against the door frame (inside the door) and makes it difficult to turn the wrench. In any event, they're in there rock solid and the shim completely covers the nuts. The serrated edges are from the serrated washer biting into the nut to prevent it from turning while you crush the nut. Now I've got three 6mm mounting points in my door frame.
After I completed the rivet nut installation, I masked off the area immediately surrounding the nuts, then primed and painted (two coats each), hoping this will help prevent rust in this area. The white sticks are Q-tips cut in half to keep paint out of the threads. Once complete, the newly painted area is all hidden beneath the shim. I didn't do this on the bottom.
Installation complete
This is before I blacked out the bolts (all six top and bottom.) I use STA-BLACK (also called M-NU) throughout my van to black out things that are supposed to be black. You apply it with the included tip-applicator. Its durable and dries to a satin finish. Note: you can't really see it here, but the bottom bolt of the factory mount is exposed by 3 or 4 mm below the shim. I put the original factory bolt back in (to fill the hole), then blacked it out. You'd have to know what you were looking at to see it. It looks like its supposed to be that way.
A close up of the top mount (before blacking out the bolt heads). Its a little hard to tell here because of the stark contrast of the stainless bolts with the black mount, but the heads are seated nearly perfectly in the tapered holes in the mount.:
For the mirror, I went with 1/4 in & 3/4 out (1/4 of the mirror is to the inside of the mount and 3/4 is to the outside and the mounting bolt with cap to the inside). The mirror will mount either way. I thought it looked better this way and gave me a little extra viewing angle to the rear.
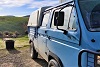
Here's the passenger side in the field (note the blacked out bolts):
Another of the driver's side:
The angles of the van and the background sometimes make the angles of the mirror mount look funny in the pictures, but the top is parallel to the horizontal axis of the van and the ground. The sides should be perpendicular to the ground. The mounts are rock solid and pulling on them rocks the whole van with no movement in the mounts. Its like they're one with the door.
The mirror itself adjusts side to side and up and down and is held there by friction from the one mounting bolt. When I first adjusted them I thought they would surely slip once at highway speeds, but they haven't. The mirrors fold into the van both ways (front and back). The bottom mount is spring loaded and snaps back into the middle position for driving once you fold them back.
Overall, I love them and love the look. I'm headed towards one of those prerunner van setups and this was a nice addition. The visibility is much, much better than the factory power mirrors.
I neglected to take pictures from the front or a closeup of the exposed bottom bolt (I know some on this forum have been concerned about.) When I get back to my van this weekend, I'll update this post with a couple more pictures. I'm installing the SA grill and headlight setup next week and will post a similar install thread that will include pictures from the front of the van.
Cheers!
Last edited by GypsyDriver on Wed Dec 12, 2012 9:48 pm; edited 4 times in total |
|
| Back to top |
|
 |
tarandusVDub
Samba Member
Joined: August 27, 2010
Posts: 1683
Location: Between Here and There
|
| Posted: Wed Dec 12, 2012 11:16 am Post subject: |
|
|
Very nice write-up! I plan on doing this as soon as CIP1 sends me the correct parts. I've been on the fence about the inserts but your approach makes it look pretty doable, with a very clean result. Any thoughts on using thief-proof hardware?
_________________
1990 Syncro 16" DoppleKabine 2.1 DJ 112i
________________________
Sold: 1972 Bay Campmobile; 1984 Westy, base model, 2WD. |
|
| Back to top |
|
|
GypsyDriver
Samba Member
Joined: November 06, 2012
Posts: 190
Location: Columbus, GA
|
| Posted: Wed Dec 12, 2012 11:39 am Post subject: |
|
|
| I looked into hex/star/etc screws so a thief would at least have to have the right tools, but couldn't find any that fit the recessed taper of the top mount. In the end, I just went with phillips head screws (which almost match the factory screws -- the factory ones have slightly rounded heads -- but I like the flat heads for the top better.) |
|
| Back to top |
|
|
Bman
Samba Member

Joined: April 28, 2005
Posts: 895
Location: South Coast, Oregon
|
|
| Back to top |
|
|
uberhare
Samba Member
Joined: July 16, 2008
Posts: 41
Location: Kitchener, Ontario, Canada
|
| Posted: Wed Dec 12, 2012 6:35 pm Post subject: |
|
|
I chickened out and just bought an LT instead!
Looks good.
_________________
Cheap, fast, reliable - Pick your 2! |
|
| Back to top |
|
|
insyncro
Banned

Joined: March 07, 2002
Posts: 15086
Location: New York
|
| Posted: Wed Dec 12, 2012 7:45 pm Post subject: |
|
|
| uberhare wrote: |
I chickened out and just bought an LT instead!
Looks good. |
 |
|
| Back to top |
|
|
Phishman068
Samba Member

Joined: February 19, 2007
Posts: 2013
Location: Pittsburgh PA (ish)
|
|
| Back to top |
|
|
outwesty
Samba Member

Joined: June 06, 2006
Posts: 1078
Location: Northern Sierras
|
| Posted: Wed Dec 12, 2012 9:26 pm Post subject: |
|
|
I agree. They really are a great mirror. I put them on my last syncro and sold it a few months later. I love the heated power mirrors on my westy but they are not as big and don't have the tough look. |
|
| Back to top |
|
|
insyncro
Banned
Joined: March 07, 2002
Posts: 15086
Location: New York
|
| Posted: Wed Dec 12, 2012 9:28 pm Post subject: |
|
|
Threaded insert and threaded stud tool by Wurth
Early Xmas present from my Wurth USA Rep.
Perfect timing as I have a few sets of LT mirrors to mount as well.
Gypsy...nice write up  |
|
| Back to top |
|
|
GypsyDriver
Samba Member
Joined: November 06, 2012
Posts: 190
Location: Columbus, GA
|
| Posted: Wed Dec 12, 2012 9:38 pm Post subject: |
|
|
| Has anyone else seen the link for the heated LTs? I saw them once (and I've also seen various European vendor descriptions of these as 'heatable'), but didn't save the link and can't find it again. |
|
| Back to top |
|
|
GypsyDriver
Samba Member
Joined: November 06, 2012
Posts: 190
Location: Columbus, GA
|
| Posted: Wed Dec 12, 2012 9:39 pm Post subject: |
|
|
| insyncro wrote: |
Threaded insert and threaded stud tool by Wurth
Early Xmas present from my Wurth USA Rep.
Perfect timing as I have a few sets of LT mirrors to mount as well.
Gypsy...nice write up |
Very nice. |
|
| Back to top |
|
|
insyncro
Banned
Joined: March 07, 2002
Posts: 15086
Location: New York
|
| Posted: Wed Dec 12, 2012 9:56 pm Post subject: |
|
|
| GypsyDriver wrote: |
| Has anyone else seen the link for the heated LTs? I saw them once (and I've also seen various European vendor descriptions of these as 'heatable'), but didn't save the link and can't find it again. |
I actually had one pair of the heated LT mirrors a few years ago, but didn't have the right mounting parts to match.
Sold them off not thinking down the road.
Same fella bought my last set of brand new H4s 
IIRC, what you have and what CIP1 sells are different than the heated mirror brackets.
I say this as the mirror didn't fit well on the bracket I had and the wires from the mirror had a small grommet on them that would seal them into the bracket beautifully.
EBay.de is where I find and buy a ton of rare and NLA parts.
It helps to have a Buddy living in Germany who is fluent.
Tristar Connection and Busman would be good places to look for used heated mirrors. |
|
| Back to top |
|
|
GypsyDriver
Samba Member
Joined: November 06, 2012
Posts: 190
Location: Columbus, GA
|
| Posted: Wed Dec 12, 2012 10:12 pm Post subject: |
|
|
| insyncro wrote: |
| GypsyDriver wrote: |
| Has anyone else seen the link for the heated LTs? I saw them once (and I've also seen various European vendor descriptions of these as 'heatable'), but didn't save the link and can't find it again. |
I actually had one pair of the heated LT mirrors a few years ago, but didn't have the right mounting parts to match.
Sold them off not thinking down the road.
Same fella bought my last set of brand new H4s
IIRC, what you have and what CIP1 sells are different than the heated mirror brackets.
I say this as the mirror didn't fit well on the bracket I had and the wires from the mirror had a small grommet on them that would seal them into the bracket beautifully.
EBay.de is where I find and buy a ton of rare and NLA parts.
It helps to have a Buddy living in Germany who is fluent.
Tristar Connection and Busman would be good places to look for used heated mirrors. |
I emailed Busman before I bought my LTs to make sure there weren't real LT and fake/reproduction LT mirrors out there as some of the forum posts allude to and to inquire about the heated versions (I've only seen pictures of them). He didn't have any mirrors, but referred me to Lucas at GoWesty, assuring me Lucas sells the real deal.
I've bought several hard to find parts off eBay UK (I'd like to buy a whole Vanagon off there ... they have some super cool ones over there. I saw an awesome Westfalia HiTop on there tonight.) But, I haven't bought anything off eBay Germany yet. I use Google Translate to help me with the search terms, but still haven't gotten the hang of it yet. |
|
| Back to top |
|
|
GreenMachineVW
Samba Member
Joined: August 08, 2008
Posts: 650
|
| Posted: Wed Dec 12, 2012 10:20 pm Post subject: |
|
|
| GypsyDriver wrote: |
| Has anyone else seen the link for the heated LTs? I saw them once (and I've also seen various European vendor descriptions of these as 'heatable'), but didn't save the link and can't find it again. |
From THIS thread, look HERE. |
|
| Back to top |
|
|
GypsyDriver
Samba Member
Joined: November 06, 2012
Posts: 190
Location: Columbus, GA
|
| Posted: Wed Dec 12, 2012 10:37 pm Post subject: |
|
|
| GreenMachineVW wrote: |
| GypsyDriver wrote: |
| Has anyone else seen the link for the heated LTs? I saw them once (and I've also seen various European vendor descriptions of these as 'heatable'), but didn't save the link and can't find it again. |
From THIS thread, look HERE. |
Hmmm . . . how do the wires thread back through/around the skinny mounting bracket to the wiring harness in the door? The picture seems to indicate there's another half to the connection that would take place 7 or 8 inches outside the mirror housing. I'll have to email them and see if this is a direct-fit replacement or if, indeed, there is a different bracket. Looks a little janky to me ... not beautiful as InSyncro describes it. Maybe there's another version out there? |
|
| Back to top |
|
|
insyncro
Banned
Joined: March 07, 2002
Posts: 15086
Location: New York
|
| Posted: Wed Dec 12, 2012 10:39 pm Post subject: |
|
|
| GypsyDriver wrote: |
| GreenMachineVW wrote: |
| GypsyDriver wrote: |
| Has anyone else seen the link for the heated LTs? I saw them once (and I've also seen various European vendor descriptions of these as 'heatable'), but didn't save the link and can't find it again. |
From THIS thread, look HERE. |
Hmmm . . . how do the wires thread back through/around the skinny mounting bracket to the wiring harness in the door? The picture seems to indicate there's another half to the connection that would take place 7 or 8 inches outside the mirror housing. I'll have to email them and see if this is a direct-fit replacement or if, indeed, there is a different bracket. Looks a little janky to me ... not beautiful as InSyncro describes it. Maybe there's another version out there? |
That isn't what the ones I had looked like.
I will search my GBs of photos and see what I can dig up. |
|
| Back to top |
|
|
GreenMachineVW
Samba Member
Joined: August 08, 2008
Posts: 650
|
| Posted: Wed Dec 12, 2012 10:54 pm Post subject: |
|
|
| GypsyDriver wrote: |
| Hmmm . . . how do the wires thread back through/around the skinny mounting bracket to the wiring harness in the door? The picture seems to indicate there's another half to the connection that would take place 7 or 8 inches outside the mirror housing. I'll have to email them and see if this is a direct-fit replacement or if, indeed, there is a different bracket. Looks a little janky to me ... not beautiful as InSyncro describes it. Maybe there's another version out there? |
I don't have those answers, but I bet if you email them, you will get a reply. As far as the actual mirror goes, from the picture it does look to be an exact match, other than the two wires. Please let us know if you find out anymore information! I vaguely recall that the wires were zip tied to the bar, and not threaded inside it, but I am really not sure. |
|
| Back to top |
|
|
CessnaJon
Samba Member
Joined: August 15, 2008
Posts: 680
Location: Senoia,GA
|
| Posted: Thu Dec 13, 2012 9:31 am Post subject: |
|
|
Looks great! Where were those pics taken? Looks like a nice spot for a Westy GTG around the lake!
_________________
1973 Westy (shared birthday)
1990 Westy Multivan
2015 Passat TDI 6sp
2015 Sportwagon TDI 6sp
LR-JET, Gulfstream 159 |
|
| Back to top |
|
|
GypsyDriver
Samba Member
Joined: November 06, 2012
Posts: 190
Location: Columbus, GA
|
| Posted: Thu Dec 13, 2012 12:45 pm Post subject: |
|
|
| Its Kings Pond way down south on Fort Benning. It's a nice, quiet place, but might be too small and remote for a GTG. Not many recreational opportunities for those with kids, bathrooms, etc.. Roosevelt or Callaway (in the spring/summer) might be better. But, if its just 3 or 4 vans, they could fit in there where I took the pictures. There're a couple of old picnic tables and fire pits down there. |
|
| Back to top |
|
|
CessnaJon
Samba Member
Joined: August 15, 2008
Posts: 680
Location: Senoia,GA
|
| Posted: Thu Dec 13, 2012 2:47 pm Post subject: |
|
|
Sounds good to me- I only know of 3 or 4 Westys in our area anyhow.
_________________
1973 Westy (shared birthday)
1990 Westy Multivan
2015 Passat TDI 6sp
2015 Sportwagon TDI 6sp
LR-JET, Gulfstream 159 |
|
| Back to top |
|
|
|


