| Author |
Message |
DorianL
Samba Member

Joined: June 06, 2013
Posts: 717
Location: Belgium

|
 Posted: Fri Jul 04, 2014 1:30 pm Post subject: Posted: Fri Jul 04, 2014 1:30 pm Post subject: |
 |
|
: - ))))))))))
Yay!!!!!! Good to see it running again. Always brings a smile to my face. : -))))))) |
|
| Back to top |
|
 |
kman
Samba Member

Joined: November 04, 2005
Posts: 739
Location: Michigan
|
| Posted: Mon Jul 07, 2014 1:05 pm Post subject: |
|
|
Now that I have a running engine I can get some things done. Installed main wiring harness and firewall mat. heater channel fiber thingys and insulation muffler stuff.
Put a shift print out and piece of blue glass in my wood shift knob. Original center emblem was missing.
All bolts lined up OK and were tightened. Almost cant believe it myself.
Looks almost inviting in there.
I went with 5 1/2 in wide steel rims, Much better than the narrow rusty ones. I had blasted a couple and it just didn't seem worth the effort.
|
|
| Back to top |
|
|
Basketcase
Samba Member

Joined: August 10, 2011
Posts: 636
Location: Ohio
|
| Posted: Mon Jul 07, 2014 2:19 pm Post subject: |
|
|
lot's of good progress
_________________
'72 Karmann Ghia Coupe (the Boss's) |
|
| Back to top |
|
|
CiderGuy
Samba Member
Joined: December 23, 2013
Posts: 1351
Location: Bucks County, Pa
|
| Posted: Mon Jul 07, 2014 2:38 pm Post subject: |
|
|
| Lots of progress. Looking really good. |
|
| Back to top |
|
|
kman
Samba Member
Joined: November 04, 2005
Posts: 739
Location: Michigan
|
| Posted: Wed Jul 09, 2014 7:33 pm Post subject: |
|
|
Ready to paint it in the morning.
|
|
| Back to top |
|
|
kman
Samba Member
Joined: November 04, 2005
Posts: 739
Location: Michigan
|
| Posted: Thu Jul 10, 2014 7:59 am Post subject: |
|
|
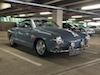
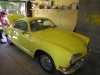
Well I painted it.
It was a decent morning to paint. A good dew to keep the dust down. Little wind. Not too many bugs. But of course a little of all that. Plus there is my tendency to run the clear which I did. but not till the second coat. So, two coats of color and 4 coats of clear which should give me enough to sand my runs and the dirt, bugs and orange peel out. I hope.
Also I painted over a couple of minor dents, so the good news is I don't have to worry about putting the 1st dent in it. 
Rockguard (40% of the roads in my county are dirt roads, and sometimes I get stuck going on one.)
Epoxy sealer
After 1st coat of color (notice I wet the floors a little to keep the dust down)
After 4 coats of clear. and some decent sized runs.
|
|
| Back to top |
|
|
KGCoupe
Samba Member

Joined: July 01, 2005
Posts: 3580
Location: Putting the "ill" and "annoy" in Illinois
|
| Posted: Thu Jul 10, 2014 8:12 am Post subject: |
|
|
The color is almost as beautiful as it is shiny!
Lookin' good. |
|
| Back to top |
|
|
ernstben
Samba Member

Joined: April 30, 2005
Posts: 621
Location: Manchester, Mi
|
|
| Back to top |
|
|
carl4x4
Samba Member
Joined: March 20, 2012
Posts: 679
Location: United Kingdom
|
|
| Back to top |
|
|
kman
Samba Member
Joined: November 04, 2005
Posts: 739
Location: Michigan
|
| Posted: Thu Jul 10, 2014 11:07 am Post subject: |
|
|
Doh! some of the runs really took off, and a couple of sags developed. I guess I'm used to just putting 2 coats of clear on, and I'm a bit rusty, and the lighting conditions suck when I put the tarps up. Excuses. excuses. I'll be a challenge to get these out without having to reclear. We'll see.
I had an emergency afternoon painting session after having to mix all of the color I had left to paint. It was either prep and paint all this extra stuff or buy more paint. Soooooooo.
|
|
| Back to top |
|
|
Basketcase
Samba Member
Joined: August 10, 2011
Posts: 636
Location: Ohio
|
| Posted: Thu Jul 10, 2014 11:33 am Post subject: |
|
|
looks great, waaay better than the "professional" that did our car.
_________________
'72 Karmann Ghia Coupe (the Boss's) |
|
| Back to top |
|
|
CiderGuy
Samba Member
Joined: December 23, 2013
Posts: 1351
Location: Bucks County, Pa
|
| Posted: Fri Jul 11, 2014 3:09 am Post subject: |
|
|
I may have missed it in this thread: How did you come to pick the color for your car?
Looking really good. |
|
| Back to top |
|
|
kman
Samba Member
Joined: November 04, 2005
Posts: 739
Location: Michigan
|
| Posted: Fri Jul 11, 2014 5:27 am Post subject: |
|
|
| CiderGuy wrote: |
I may have missed it in this thread: How did you come to pick the color for your car?
Looking really good. |
I wanted a single stage with clear over it. Non-metallic, solid colors look best to me on classic cars. I pretty much limited my choices to the Kirker line of single stages and picked one. It's basically a color both me and the wife can live with.
The complements are nice. But in reality it's going to take quite a bit of doing to get this paint job looking the way it's supposed to. The dirt nibs will come out easy but the runs, jeeze. I pretty sure the clear picked up some of the color and ran that too. If that is too bad and too visible after taking the runs out then I will have to spot color and reclear.
But I love doing everything twice apparently. |
|
| Back to top |
|
|
KGCoupe
Samba Member
Joined: July 01, 2005
Posts: 3580
Location: Putting the "ill" and "annoy" in Illinois
|
| Posted: Fri Jul 11, 2014 6:03 am Post subject: |
|
|
| kman wrote: |
| CiderGuy wrote: |
I may have missed it in this thread: How did you come to pick the color for your car?
Looking really good. |
I wanted a single stage with clear over it. Non-metallic, solid colors look best to me on classic cars. I pretty much limited my choices to the Kirker line of single stages and picked one. It's basically a color both me and the wife can live with.
The complements are nice. But in reality it's going to take quite a bit of doing to get this paint job looking the way it's supposed to. The dirt nibs will come out easy but the runs, jeeze. I pretty sure the clear picked up some of the color and ran that too. If that is too bad and too visible after taking the runs out then I will have to spot color and reclear.
But I love doing everything twice apparently. |
I wish I could limit myself to only doing things twice! |
|
| Back to top |
|
|
Altema
Samba Member
Joined: June 20, 2010
Posts: 2904
Location: Lower Michigan
|
| Posted: Fri Jul 11, 2014 2:47 pm Post subject: |
|
|
| It's a very interesting color, and I'm anxious to see it driving down the road. Do you have the top for it already? |
|
| Back to top |
|
|
kman
Samba Member
Joined: November 04, 2005
Posts: 739
Location: Michigan
|
| Posted: Fri Jul 11, 2014 3:36 pm Post subject: |
|
|
| Altema wrote: |
| It's a very interesting color, and I'm anxious to see it driving down the road. Do you have the top for it already? |
Just the frame, and a useable front wood bow courtesy of Iowegian. |
|
| Back to top |
|
|
kman
Samba Member
Joined: November 04, 2005
Posts: 739
Location: Michigan
|
| Posted: Sat Jul 19, 2014 12:54 pm Post subject: |
|
|
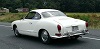
I added an electric antenna. A good idea from another thread.
After much sanding and polishing.
|
|
| Back to top |
|
|
swhitcomb
Samba Member
Joined: November 05, 2003
Posts: 5673
Location: Inwood WV
|
| Posted: Sun Jul 20, 2014 1:14 pm Post subject: |
|
|
Great work! Extremely impressive.
_________________
My 71 Ghia Been in my family since 1980
My Patina 66
My 74 Ghia
07 Boxster |
|
| Back to top |
|
|
kman
Samba Member
Joined: November 04, 2005
Posts: 739
Location: Michigan
|
| Posted: Tue Aug 05, 2014 7:09 pm Post subject: |
|
|
Question: How do you save money?
Answer: Use the crappy bumpers you have.
The middle section of the rear was so pitted that I blasted it and put silver paint on it. Almost every section has problems, so it is what it is. Here are some pics after taking apart, tapping and drilling broken bolts ,blasting and painting the backsides, and reassembling.
I put rockguard on before painting a lot of the inside of the car but it was still a bit tinny so I got som 50 mill GTMAT and corrected the problem. I like that it isn't printed on the outside. I used about 35 square feet. I taped the seams with aluminum duct tape. They have 80 mill and 110 mill too. Diminishing returns and all. This didn't cost too much.
|
|
| Back to top |
|
|
jakehenes
Samba Member

Joined: March 18, 2007
Posts: 96
Location: milwaukee wisconsin
|
| Posted: Wed Aug 06, 2014 5:28 am Post subject: |
|
|
That home paint job looks fantastic! I have done a few and have the opinion that if you put enough clear on you an always sand and buff any runs or bugs. Congrats.
_________________
Owner and mechanic - riverwest auto. |
|
| Back to top |
|
|
|


