| Author |
Message |
2mAn
Samba Member
Joined: October 17, 2005
Posts: 35

|
 Posted: Thu Apr 10, 2014 2:33 pm Post subject: My Gazelle project. Posted: Thu Apr 10, 2014 2:33 pm Post subject: My Gazelle project. |
 |
|
Hello samba! First thread I've ever posted, though I've been a member for a few years, I think. I mostly lurked in the classifieds. I've actually started this build on another forum, but I'm putting it here because I think its the most appropriate here. I'm also going to post it out of order, but eventually it will all make sense to get you caught up.
Years ago, my Dad mentioned that he always liked Gazelles, but once he got married had kids, responsibilities the idea of owning one became a far fetched idea. He isn't a car guy either. A little while ago in my classified lurking I saw a fully assembled Gazelle for sale ( I think it still is) not far away. I don't like the way they look when you build it exactly as you're instructed to. I love to modify stuff and thought that there must be a better way to build one. This brought me to a full Gazelle kit that had never been assembled. Problem is that its in Ohio and I'm in Southern California and the guy wasn't interested in shipping. The idea was still in my head and about a month ago, I found it. A guy with a shop not far from me (~30 miles) had a Gazelle body, flares, the grille and the inner frame for sale. for cheap! I was there within a few hours giving him a deposit and came back 2 weeks later with a truck. The next few posts are simply cut and pasted from the other thread so it might not totally make sense since I started the engine build before I found the Gazelle.
_________________
function follows form
Last edited by 2mAn on Thu Apr 10, 2014 2:46 pm; edited 1 time in total |
|
| Back to top |
|
 |
2mAn
Samba Member
Joined: October 17, 2005
Posts: 35
|
| Posted: Thu Apr 10, 2014 2:34 pm Post subject: |
|
|
Here it was taking up valuable space in a shop in Upland, CA, about 30 miles from my house
I could barely get pics of the damn thing because there was no room to move around...
Regardless, I showed yesterday with my crazy friend and his pickup. The body was a little larger than I thought and the trucks bed was a little smaller than I thought. No big deal...
we drove it home at a safe and steady 58mph with no issues! :screwy:
I actually took the grille and the two smaller fenders when I went and made my deposit. Heres a few pics of the grille, some polishing and the general idea that has been burned in my head.
_________________
function follows form |
|
| Back to top |
|
|
2mAn
Samba Member
Joined: October 17, 2005
Posts: 35
|
| Posted: Thu Apr 10, 2014 2:36 pm Post subject: |
|
|
And now, some details about the engine itself.
-1.6L Block bored to 80.45mm also modified for stroker crank, but still running the stock 80mm crank.
-Carb 1.6 head, ported, polished, and big valves
-Lightened intermediate shaft
-Autotech Lightened Int. Shaft Sprocket
-Lella Crank Pulley, aluminum and underdriven
-274 TT cam with a TT adjustable came gear
-(I thought it was a) Polo G40 valve cover
This was as close as it got in the Shark.
Engine Build
I rebuilt it myself in my garage. The block was cleaned up with a tool to clean up the bores. Not fancy, machine shop stuff but it worked pretty good. I still have a deep rooted fear that it will smoke when its running, but I have some forged 81mm JH pistons that I will throw in there if that happens.
then there is this picture...
It gave me an idea. This motor obviously wasnt very high compression. Stock CR is 8:1, this cant be much higher than that. hmmm......:sly:
_________________
function follows form
Last edited by 2mAn on Thu Apr 10, 2014 2:50 pm; edited 2 times in total |
|
| Back to top |
|
|
2mAn
Samba Member
Joined: October 17, 2005
Posts: 35
|
| Posted: Thu Apr 10, 2014 2:37 pm Post subject: |
|
|
Been slowly plugging away at this when Im free. Having trouble finding a NA diesel intake manifold, but it hasnt stopped me from making progress. My cylinder head is a carb setup and Im running it on megasquirt so I bought some 04 CBR600 F4i throttle bodies. The overall end to end is almost a perfect match for the overall port spacing so the outer intake ports are basically a straight shot
the next hurdle was to find a way to mount the ITBs to the intake manifold that I still dont have. A trip to Home Depot Racing with the intake adapter thing (SOMEONE TELL ME THE CORRECT NAME FOR IT!!! :laugh:) and eventually I found a perfect solution.
Its simply a 1 1/4" threaded galvanized pipe. It threads into the intake adapter thing, and the clamp isnt even needed, but will be installed for extra bite/ insurance.
That made my day. Obviously welding this to a cast aluminum intake manifold will be fun, but I like "fun projects."
So knowing this wont progress much without an intake manifold, I shifted gears to finish up some other loose ends. I needed a pulley for my water pump and knew I needed a recessed one. Unfortunately this is proving to be more of a pain than I expected. Problem is my water pump needs the larger spaced pulley and the only recessed one Ive found was for the small spaced pulley. I'll probably just buy another new water pump to fit the pulley rather than search all over for another pulley. I might also buy an AEB water pump since it has 2 outputs instead of 3. The car this goes into most likely wont have a heater so it simplifies things.
Here are my lightweight goodies!
Heres a crappy cell phone pic of the entire engine. Notice the engine mount, its from a Quantum, I also have the two side motor mounts as well.
_________________
function follows form |
|
| Back to top |
|
|
2mAn
Samba Member
Joined: October 17, 2005
Posts: 35
|
| Posted: Thu Apr 10, 2014 2:43 pm Post subject: |
|
|
Ok, so now that you're caught up you are probably thinking either this  or this or this 
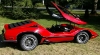
Heres a pic to keep me motivated. I used some zip ties, all my jack stands and some wheels that I'm selling to give me an idea of what it might look like in the future.
So heres the plan:
Gazelle body & flares. Beetle pans. 1.6 motor with Megasquirt and the ITBs hooked up to a 944 transaxle. Front engine, RWD. I'm actually trading the wheels in the pic above for a complete 944 transaxle, rear subframe and probably a few more parts. Guy wants my wheels and has a 944 he is parting out so Im going to try and get the entire drivetrain from the bellhousing back and Im sure I can convince him to let me cut out the tunnel and rear so I can just bolt it all up. Oddly enough, I've found others who had a similar ideas
http://www.944-20v.nl/
http://www.locostusa.com/forums/viewtopic.php?f=35&t=13200&hilit=beetle+motor
From here, it should get interesting to say the least.
_________________
function follows form |
|
| Back to top |
|
|
wythac
Samba Member

Joined: August 02, 2004
Posts: 2791
|
| Posted: Thu Apr 10, 2014 5:45 pm Post subject: |
|
|
| Looks like you are on your way. If it ends up looking like your mockup, it will be a very unique build. Good luck with your next steps, and welcome to the forum, it's nice to see a different kind of kit car builder posting here. |
|
| Back to top |
|
|
Genom
Samba Member

Joined: January 03, 2003
Posts: 660
Location: Palm Springs CA
|
| Posted: Thu Apr 10, 2014 6:27 pm Post subject: |
|
|
| The black rubber "intake adapters" are typically known as Ferncos. |
|
| Back to top |
|
|
pallen
Samba Member

Joined: February 15, 2012
Posts: 589
|
|
| Back to top |
|
|
jspbtown
Samba Member
Joined: January 27, 2004
Posts: 5265
|
| Posted: Fri Apr 11, 2014 8:41 am Post subject: |
|
|
| So a custom tube frame? |
|
| Back to top |
|
|
2mAn
Samba Member
Joined: October 17, 2005
Posts: 35
|
| Posted: Fri Apr 11, 2014 3:27 pm Post subject: |
|
|
| wythac wrote: |
| Looks like you are on your way. If it ends up looking like your mockup, it will be a very unique build. Good luck with your next steps, and welcome to the forum, it's nice to see a different kind of kit car builder posting here. |
Thank you, I have passion for all kinds of cars and doing something like this allows me to draw from the random knowledge of different marques I have. And I always try to learn more.
| Genom wrote: |
| The black rubber "intake adapters" are typically known as Ferncos. |
I would've never known that! Thank you so much!
| pallen wrote: |
| Did you hone those cylinders? It dosent look like they have much of a cross hatch on them. |
They were already bored out to match the larger pistons (80.45mm vs 79.50mm OEM), but there was some surface rust from sitting. I merely cleaned up the bores. The pictures look a lot worse than how they did in person. The tool I used was a three legged thing that attaches to a drill. I still have some fear it will smoke when its running, but if thats the case I have a set of forged JE pistons that will go in.
| jspbtown wrote: |
| So a custom tube frame? |
I know it sounds funny, but Im trying to use as many OEM parts are possible. I think the front suspension (entire front end actually) will be custom because I want a dual wishbone setup, but maybe I can pluck a parts from a Miata or a Honda. The front suspension is going to be one of the last pieces. Ive got a long way to go
_________________
function follows form |
|
| Back to top |
|
|
SBD
Samba Member

Joined: October 24, 2012
Posts: 3298
Location: SOUTH DAKOTA
|
| Posted: Sat Apr 12, 2014 10:08 am Post subject: |
|
|
| Genom wrote: |
| The black rubber "intake adapters" are typically known as Ferncos. |
And the pieces of galvanized pipe you're using are called NIPPLES!  |
|
| Back to top |
|
|
2mAn
Samba Member
Joined: October 17, 2005
Posts: 35
|
| Posted: Mon Apr 14, 2014 11:22 pm Post subject: |
|
|
ok, update time. traded my ATS wheels for 944 parts, and access to a mk1 hoarders stuff.
First thing I did was install the water pump pulley I needed, and slapped the belt on too.
not very exciting, but necessary. still looking for an intake manifold. ideally the one I want is a mk2 NA diesel intake manifold, but I think I will go get a free one from the hoarder.
now, on to the fun stuff. 944 transaxle, rear subframe, torque tube, control arms, axles, rear brakes, etc... basically the rear end is done. not really. nothing is remotely close to being done 
it fits pretty damn well, a credit to using the same family of parts. the torsion tube cutouts are in the right spot. the subframe mount sticks out, but I have a plan for the when it comes time to start building the frame.
with the right offset wheels, they should still fit under the fenders without modifying them
It was finally time to put the engine where I wanted to see it!
and with the torque tube coming up front it actually brought the motor a little further back which is a good thing.
first potential problem. the shifter is a little further forward than I hoped. wont know for sure if this is an issue for a little while though.
and this is how it sits now....
I need to get the Beetle pans soon, megasquirt harness and sensors and a damn intake manifold.

_________________
function follows form |
|
| Back to top |
|
|
Letterman7
Samba Member
Joined: March 14, 2004
Posts: 3232
Location: Downingtown, PA
|
| Posted: Tue Apr 15, 2014 5:25 am Post subject: |
|
|
| That's really thinking outside the (kit) box. I love the idea of the 944 drivetrain and sub frame assembly... give me all kinds of evil ideas. Is the transmission itself slightly offset to the sub frame or is that the angle of the photo? It looks like it's cocked slightly to the right? The shifter looks like it would be easy to cut and shut the shift rod and move the whole thing backwards. |
|
| Back to top |
|
|
2mAn
Samba Member
Joined: October 17, 2005
Posts: 35
|
| Posted: Tue Apr 15, 2014 3:12 pm Post subject: |
|
|
thanks! the transmission is just laying on the ground, so its not sitting right, hence why it looks funny in the pic.
_________________
function follows form |
|
| Back to top |
|
|
2mAn
Samba Member
Joined: October 17, 2005
Posts: 35
|
| Posted: Thu Dec 25, 2014 9:29 pm Post subject: |
|
|
ok! this isnt a dead in the water project, just got derailed with life and having to move into a new garage. This one is dedicated to car stuff so I have my own space and am getting stuff done...
First was working on my gauge set. I had this cluster of Stewart-Warner Classic gauges all wired in a loom from an old 1980 Rabbit CR Racer that never made it to the track. The engine is from the same car. Unfortunately, nothing was labelled so I figured I would get my Dad involved and we went thru and labelled everything. So cool getting to work on this stuff with my Dad. I look forward to taking him for a ride in this when its all done.
Main thing has been getting the frame pieces ready. Im basically making CAD (cardboard aided design ) templates which will be transferred to metal. For the frame rails, there will be two looooonnnnng pieces running the length of the body that will be laser cut x2 per side then using flat sheet (not sure of the gauge yet) they will be boxed to essentially become 3x2 frame rails.
This is me "working"
An idea of what the front section looks like. Basically 1/3 of the way done with these, though the rear 2/3 should be much easier than that front 1/3
The final piece is the spot that the subframe will mount to. This picture was the first version, I made some adjustments on the final version (which I think is the second picture). They are now en route to my buddy Matt Murray @ Eastwood Co. who will help me cutting those out of metal, bending them and welding them together. I cant wait to get them back. Also the frame rails were his idea. Good guy to have in your ear, in my opinion.
and finally, the dumb ideas!... Ive had sort of a turbo kit: 81mm JE Forged Pistons, a 8v Turbo Manifold, but the wrong turbo and a JH crank that I might be able to use. But I was with the crazy friend who helped me deliver the body and I found a perfect turbo, so now instead of a carb setup, its now getting a turbo.
We'll see if I can make it work...
_________________
function follows form |
|
| Back to top |
|
|
2mAn
Samba Member
Joined: October 17, 2005
Posts: 35
|
| Posted: Sat Jan 17, 2015 12:38 pm Post subject: |
|
|
A little more progress!... I finally got my hands on an oil filter flange from a Fox. Due to the longitudinal layout of the engine, the engine mounts and regular Oil filter flange occupy the same space. This was fixed on the Fox/ Quantums but it seemed to be hard to find someone to sell me the piece for a reasonable price. Thanks ebay!
I have a question though, I need to add a spot here for the turbo's oil feed line and was wondering if it matters which one of the available spots I can or should tap? This is a bad pic of the underside that shows the other sensors spot drilled all the way through.
The other question I have is where I can find the exact specs of this turbo. I was told its from a Peugeot Turbo Diesel???
and one last question. I just need a T3 oil feed line, yes?
I also am getting closer to completing my CAD frame rail templates. Once I have triple checked them, I will send them out for a 2 step process where one friend will turn it into a digital image, then another friend will use that digital image to have a big bad expensive machine cut them into metal!
I also found a few more of the stewart warner classic gauges that I needed, because I want them all to match. Little stuff like this excites me! This is a pic of the entire cluster, but this isnt how it will look in the car. No giant shift light, dont worry...
This is one of the gauges from the missing spots on that panel...
I did found a NOS boost gauge, working on an oil temp gauge too. The VDO gauge will probably re used in my E30, pics of that stuff later.
_________________
function follows form |
|
| Back to top |
|
|
2mAn
Samba Member
Joined: October 17, 2005
Posts: 35
|
|
| Back to top |
|
|
2mAn
Samba Member
Joined: October 17, 2005
Posts: 35
|
| Posted: Sun Jan 25, 2015 4:00 pm Post subject: |
|
|
So some more progress on the templates. Im getting close to finishing the "CAD" design portion and soon will be moving it into the .dwg portion soon..
Plan here is to make sure everything lines up perfect because this is basically the exact shape the frame rails will be when they are cut in metal...
I cant wait to get this into metal!!! Im pretty nervous about this phase though honestly
_________________
function follows form |
|
| Back to top |
|
|
2mAn
Samba Member
Joined: October 17, 2005
Posts: 35
|
| Posted: Fri Feb 13, 2015 4:17 pm Post subject: |
|
|
Small update: Figured I might as well install the boost gauge and the oil temp gauge in the panel. Im not going to use this gauge panel, just wanted to see them all togethers.
The other thing I wanted to do was put some legit plugs in the front of the cylinder head. Cant remember what they are exactly for, but only the carb cylinder head had these. Anyways, I had a temporary solution and recently found the perfect solution.
This was the temp solution
and the perfect solution
_________________
function follows form |
|
| Back to top |
|
|
SBD
Samba Member
Joined: October 24, 2012
Posts: 3298
Location: SOUTH DAKOTA
|
| Posted: Sat Feb 14, 2015 8:54 am Post subject: |
|
|
Subscribed! 
_________________
"Just $99 down and $64 a month for 36 months buys you a brand new Volkswagen Beetle!"
| mark tucker wrote: |
| I wouldent waste $ or thyme on building a small motor. build it big so it dosent have to work hard.remember it's only as fast as your foot alows it to be unless you build a small turd then it just stinks as it squishes up through your toes when you step on it. |
|
|
| Back to top |
|
|
|


