| Author |
Message |
Farfrumwork
Samba Member

Joined: October 10, 2008
Posts: 692
Location: Mile High

|
 Posted: Thu Oct 08, 2009 12:01 pm Post subject: My EJ22 swap - Projects appear smaller in mirror Posted: Thu Oct 08, 2009 12:01 pm Post subject: My EJ22 swap - Projects appear smaller in mirror |
 |
|
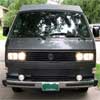
I wrapped up my swap back around mid June. It consisted on rebuilding a '92 Subaru EJ22, and fitting it to my '85 Wolfsburg. I did all the work myself at home, including the wiring harness.
I used a combination of conversion parts, but the bulk of the goods came from SmallCar. I used the now-not-so-new new cast bellhousing, which really is well done and makes the install look almost factory.
I'll make my thanks up front then get to the pictures.
The following people and shops really helped me along through advice and/or prompt service (in no particular order):
*mblotz - my local swap master (and giver of exhaust)
*SC - great service and sweet parts
*Outfront MS - awesome service and an oil pan that withstands LARGE rocks (ask me how I know...  ) )
*EVERYBODY on the subaruvangon group - Sooo much knowledge.
*Superupair in Boulder - thanks for the deals.
*ChesterKV and Ranchero - great threads with lots of pics, which were very helpful.
*The Weide family - You made my harness possible, period.
*My family - thanks to my wife and son for helping me out.
And finally, NO THANKS to burley motorsports  
So anyway, enough gushing. ON WITH THE SWAP!
-Chad
ps- please forgive my spelling/typos. I'm an engineer not a linguist.
Last edited by Farfrumwork on Thu Oct 08, 2009 1:54 pm; edited 1 time in total |
|
| Back to top |
|
 |
Farfrumwork
Samba Member
Joined: October 10, 2008
Posts: 692
Location: Mile High
|
| Posted: Thu Oct 08, 2009 12:01 pm Post subject: |
|
|
So I started with a stripped EJ22 from a '92 Legacy, with a reported 16x,xxx mi. It was completely apart and hot tanked, and I had never heard it run nor did I know the seller at all. It also had a COMPLETE wiring harness (every single thing attached). I paid $275 for it all so I figured it was a deal anyway it turned out.
boxes of a motor
and a harness
I don't know if you can see it, but the bores still had cross-hatching -sweet
Then onto the stand
Looking more like a motor now
I sent the injectors out for cleaning/flow test. They even replace all the o-rings and pintle caps - Whichhunter injector service rocks!!
While everything was apart, and had been pretty well cleaned in the hot tank, I took the time to paint the valve covers and intake spider. Ceramic paint. Me likey
I had replaced every gasket and did the TB/H2O punp/etc... It's normal fare so no pictures, but here's the motor mostly complete. And the painted spider too 
Then on to the harness while I waited for my tax $$ and more components.
Last edited by Farfrumwork on Sun Oct 11, 2009 3:25 pm; edited 3 times in total |
|
| Back to top |
|
|
Farfrumwork
Samba Member
Joined: October 10, 2008
Posts: 692
Location: Mile High
|
| Posted: Thu Oct 08, 2009 12:01 pm Post subject: |
|
|
So, again, I started with this
The started laying it out and getting a feel for what's what. I drive a '93 turbo-Legacy in my daily life so I know the motors pretty well, and had a subject to look at while figuring out various things.
Yes, I overtook my wife's sewing area... 
Copious amounts of painters tape. Label label label!
*note box of refuse harness - it ended up weighing 10lbs.
Finshing up out in the livingroom.
The little piece of paper that was priceless (yet it was FREE!!)
I can't believe I don't have a picture of the fully complete harness by itself (all accordian wrapped and taped). I'll look around some more for that. You'll see parts of it later in the final push section - mounting everthing int the Vanagon.
Then it was time to pull the stock 1.9l. I can't say I was sad to see it go, but man did that little motor give it's all. It would run at 8/10ths all day, and probably still is (I sold it to live on in another '85  ) )
Last edited by Farfrumwork on Sun Oct 11, 2009 3:26 pm; edited 4 times in total |
|
| Back to top |
|
|
Farfrumwork
Samba Member
Joined: October 10, 2008
Posts: 692
Location: Mile High
|
| Posted: Thu Oct 08, 2009 12:24 pm Post subject: |
|
|
In to the garage went the subject. It barely fit.
Last "drive", piloted by my son and co-piloted by the neighbor kid
The workspace
Yea 'ol wasserleaker
Then drain, drain, drain
Look what we have here... typical fine metal particles in the tranny fluid
SHE'S OUT
Then I separated the tranny/ motor and fit the SC bellhousing to the transmission and filled with Redline MT90.
Motor with a moustache and FW/clutch installed.
transit to tranny land (and I'm not talking Trinidad CO)
Coming in
YES
My own private lunar landing "we have touchdown"
Lots of this
Then in went the harness, and the countdown to key-turn is near.
Last edited by Farfrumwork on Thu Oct 08, 2009 9:22 pm; edited 4 times in total |
|
| Back to top |
|
|
Farfrumwork
Samba Member
Joined: October 10, 2008
Posts: 692
Location: Mile High
|
| Posted: Thu Oct 08, 2009 12:38 pm Post subject: |
|
|
Since this is an '85 I don't have the stock ECU location under the rear bench - it was in the engine bay behind the pass tail. I enlarged the AC hole (AC has been gone a long time) and mounted it under the rear cabinent -out of the way yet accessible.
I mounted the Subie ECU on an AL tray I whipped up
And I mounted the tray to an existing bolt under there
I better view of the bulk of the harness exiting the compartment (I later fixed it to the wall more to be secure and out of the way)
My Family inspecting the progress so far. They like it, and they LOVE "Campy" (My son named her when he was ~3)
Thanks Guys!!
SS Smallcar header and my basically free 2.1l exhaust (painted in 2000F ceramic paint too - clean as a jelly bean)
drivers side
pass side
Laying on the concrete - I like that sort of thing
rear view - can you say Clearance?!?!
Ta-Daaaaaa!!!!!!!
And then she was out
Those are new to me stock 14" alloys (which I also painted - Duplicolor wheel paint , silver) wrapped with 27" Grabber AT's. I have more pics of the van and the maiden voyage we took just days after she ran.
More to come - I need to go pick up my son from school 
-Chad
Last edited by Farfrumwork on Thu Oct 08, 2009 1:22 pm; edited 2 times in total |
|
| Back to top |
|
|
syncrosimon
Samba Member

Joined: November 20, 2008
Posts: 257
Location: Devon, England
|
| Posted: Thu Oct 08, 2009 12:49 pm Post subject: |
|
|
That's really nice work. More pictures please.
_________________
1991 16" 2.1 DJ Syncro factory hightop ex Finnish Army Ambulance, now sold.
Thinking about Thing or 181 (182) ownership. |
|
| Back to top |
|
|
markmc90
Samba Member
Joined: June 13, 2007
Posts: 295
Location: Portland, OR
|
| Posted: Thu Oct 08, 2009 12:54 pm Post subject: |
|
|
Yes more pics please. Did you keep track of your costs? I'm curious what your total was by doing all the work yourself.
_________________
87 Syncro |
|
| Back to top |
|
|
wasserbox
Samba Member
Joined: April 08, 2008
Posts: 533
Location: Durango, CO
|
| Posted: Thu Oct 08, 2009 1:23 pm Post subject: |
|
|
| Farfrumwork wrote: |
transit to tranny land (and I'm not talking Trinidad CO) |
Heh. Heh Heh.
Gotta love Co Only jokes...
Looks good. I would have been a little (lot) overwhelmed to get an entire engine in 10 separate boxes. |
|
| Back to top |
|
|
Farfrumwork
Samba Member
Joined: October 10, 2008
Posts: 692
Location: Mile High
|
| Posted: Thu Oct 08, 2009 2:25 pm Post subject: |
|
|
Thanks guys.
Total approximate cost was $2700 or so. That's with selling the 1.9 for $300, but not including the new wheels/tires, but I still have a couple hundred $ worth of spares to sell too.
Around $3000 is where it should be.
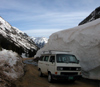
Here's some of the maiden voyage. It had run about 20mi before we took off for southern WY. Nothing like an unproven setup a couple hundred miles from home 
This was on the summer solstice 
which is also my wedding aniversary (good thing all was working well )
"WE MADE IT"
with NO issues I might add.
A few weeks later - outside Nederland
Those tires are killer!
Another trip, this time to the Leadville area
Landed some big fish!
Then over Weston Pass on the way home (12,000). Mostly easy, save one section that was tough -it took 3 tries to get through it and it scarred 2 a-arms and put a nice dent in the seam off my oil pan (just cosmetic)
The new found thrust of the Subaru motor is a great and rewarding feeling. It really makes driving up here at altitude enjoyable (I live at ~5500' ASL, and drive to 10-12,000' on almost every van outing).
There's always more to do, and I have a list of mods to perform, but I'm sure you ALL undestand that. 
Like this - Here's the side shot after I made and installed some rear spacers (saggy butt syndrome)
She rides at just under 18" (center wheel to arch) and I have ~10.5" of clearance under my oil pan/
Later
-Chad |
|
| Back to top |
|
|
markmc90
Samba Member
Joined: June 13, 2007
Posts: 295
Location: Portland, OR
|
| Posted: Thu Oct 08, 2009 3:05 pm Post subject: |
|
|
Thats great to here that your swap went so smoothly. Could you guess at how many hours you spent on it. Mostly the harness is what I'm curious about.
_________________
87 Syncro |
|
| Back to top |
|
|
campism
Samba Member
Joined: September 07, 2007
Posts: 4709
Location: Richmond VA
|
| Posted: Thu Oct 08, 2009 3:26 pm Post subject: |
|
|
| Nice work! An inspiration to those of us itching to tackle a job like that. |
|
| Back to top |
|
|
Franklinstower
Samba Member
Joined: September 21, 2006
Posts: 2010
Location: PNW
|
| Posted: Thu Oct 08, 2009 3:31 pm Post subject: |
|
|
Great Job - looks excellant!
did you put new rings on the pistons? what did you do the heads if anything and do you know what your compression numbers are now? I too did the '92 EJ22 swap all by myself, but the engine had 102k on it so I only did the TB and rollers, cam seals, crank seals, water pump etc.
thanks,
Paul
_________________
'89 Westy - EJ25/22 Frank 4.44 5mt
'75 Miami Blue Sunroof FI Standard Bug
YITB |
|
| Back to top |
|
|
Farfrumwork
Samba Member
Joined: October 10, 2008
Posts: 692
Location: Mile High
|
| Posted: Thu Oct 08, 2009 4:27 pm Post subject: |
|
|
Hours? hmmmm I'd probably rather not think about it HAHA. I did it over the course of many months (working on the donor motor 1st, then into the van).
The harness was probably 15-20hrs I say.
As far as the "rebuild", I guess that's a overused term. I really just "re-sealed" it, new headgasket, all seals and gaskets, TB, tensioners, H2O pump etc... I didn't even go into the oil pump as it was sealed well (no loose screws)
It was kind of a gamble as is, but I rolled the dice and it really does run VERY good. I plan on a frankenstein motor in 3-4yrs (2.5l bottom end/2.2l heads - keeps all the wiring the same) anyhow, but I bet this motor will go quite a while. I want a Syncro transmission first anyhow (or maybe at the same time?) |
|
| Back to top |
|
|
insyncro
Banned

Joined: March 07, 2002
Posts: 15086
Location: New York
|
| Posted: Thu Oct 08, 2009 5:48 pm Post subject: |
|
|
Nice post.
Thanks for documenting with photos.
dylan |
|
| Back to top |
|
|
Rhinoculips
Samba Member
Joined: August 08, 2005
Posts: 918
Location: Keystone, Colorado
|
| Posted: Thu Oct 08, 2009 6:01 pm Post subject: |
|
|
Very nice write up and photos. Thanks for sharing. Especially liked the photos of Weston Pass. I haven't across it in years. Need to get back down there. I have no excuse, its just too close.
I have a grin on my face ever time I drive my '91 EJ22 powered '89 Westy and its been a year since the conversion.
You in Denver?
_________________
“May your trails be crooked, winding, lonesome, dangerous, leading to the most amazing view. May your mountains rise into and above the clouds.” - Edward Abbey
Click to view image |
|
| Back to top |
|
|
Bruce Wayne
Samba Member
Joined: May 15, 2007
Posts: 1210
|
| Posted: Thu Oct 08, 2009 6:13 pm Post subject: |
|
|
| very nice work. wish I had the knowledge to do that. |
|
| Back to top |
|
|
dobryan 
Samba Member

Joined: March 24, 2006
Posts: 17289
Location: Brookeville, MD
|
|
| Back to top |
|
|
VisPacem
Samba Member

Joined: July 15, 2007
Posts: 1143
Location: Las Vegas
|
| Posted: Thu Oct 08, 2009 11:50 pm Post subject: |
|
|
| Farfrumwork wrote: |
Hours? hmmmm I'd probably rather not think about it HAHA. I did it over the course of many months (working on the donor motor 1st, then into the van).
The harness was probably 15-20hrs I say.
As far as the "rebuild", I guess that's a overused term. I really just "re-sealed" it, new headgasket, all seals and gaskets, TB, tensioners, H2O pump etc... I didn't even go into the oil pump as it was sealed well (no loose screws)
It was kind of a gamble as is, but I rolled the dice and it really does run VERY good. I plan on a frankenstein motor in 3-4yrs (2.5l bottom end/2.2l heads - keeps all the wiring the same) anyhow, but I bet this motor will go quite a while. I want a Syncro transmission first anyhow (or maybe at the same time?) |
Man ... you are THE Hombre as my gringo friends would say. I am very impressed. Beautiful van and if I may say beautiful family. Great pictures. My top off to you.....
As you mentioned it I guess it will not be considered off topic, but I am most interested in any info you may have on that 2.5 with 2.2 heads. The 2.2 in mine performs just fine but with mileage unknown and a rabelaisian appetite for motor oil I guess I will have to confront his problem sooner or later and ****to me*** the 2.5 with 2.2 head will be the way to go.
Thanks for the post
_________________
LG aka VisPacemPB, *The* party Pooper
No Regrets (Nothing to do with Vanagons) |
|
| Back to top |
|
|
ftp2leta
Samba Member

Joined: October 11, 2004
Posts: 3271
Location: Montreal
|
| Posted: Fri Oct 09, 2009 5:21 am Post subject: |
|
|
Harnesses... wires wires wires...
I'm impress, bravo! On top, your harness is one of the hardest to do, i real spider web compare to, let see, an 2003-04. I admire you, very nice job, and it look like it was fun also. Beautiful family you have there.
Don't worry about the bottom end of that 2.2L, it may last longer then the van itself.
Using a 2.5L short block with stock intake/FI will only give you a bit more torque.
A nice but rare 2.2L conversion is the very late (third phase) 2.2L, it as 2.5L heads. About 145hp. But no one is using that engine because it's somewhat unique.
I just finished my 35th conversion yesterday, an 09 engine with 07 electronic.
http://www.benplace.com/bertrand_subi1.htm
Cheers, Ben
_________________
Working with rust, grease, dirt and dust is a sad truth.
------------------------------------------------------
FI part for sale: http://www.benplace.com/parts_sale1.htm
My site: http://www.benplace.com/vw2.htm
Subi conversion: http://www.benplace.com/vanaru_eng.htm
Youtube http://www.youtube.com/user/ftp2leta |
|
| Back to top |
|
|
mblotz
Samba Member

Joined: February 25, 2004
Posts: 296
Location: D-town, at base of the rocky's
|
| Posted: Fri Oct 09, 2009 6:08 am Post subject: |
|
|
| greetings from medellin, but--when we racin up the pass? ill even tow dirt bikes to keep it fair |
|
| Back to top |
|
|
|


