| Author |
Message |
ajdenette
Samba Member
Joined: February 15, 2009
Posts: 768
Location: Hope Valley RI

|
 Posted: Wed Jan 20, 2010 2:00 pm Post subject: Sliding door hinge repair rebuild Posted: Wed Jan 20, 2010 2:00 pm Post subject: Sliding door hinge repair rebuild |
 |
|
So I had 2 Sliding door hinges in pretty poor shape one had one top bearing left in tact the other only had the inner races left. I started by removing the remainders of the bearings. I used 1/4” snap rings and PBB77R-4 at the hard ware store they were listed as being for power tools Makita and the like.
For those who don’t have lots of random parts lying around and a worn out hinge on there slider first remove the inside panel of the slider. Next with the door pretty much closed remove the bolt on the inside of the door. The bolts are 13mm and easy to get at with a ratchet and an extension.
Next open the door and support it working in my carport I used some tires when I work on the sliding door I use my floor jack under the sill this also allows for adjustment of the door for final assembly.
Next remove the last 2 screws holding the hinge to the door.
Finally slide the hinge back out of the door then rotate down to get the two bearings out and lift up to get the roller off the track.
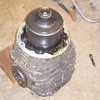
Here is a comparison of a rebuilt hinge to the hinge I removed from the van
Here is a picture showing the parts I used, the disassembled hinge and roller, and the completely assembled hinge. The newer hinge had a removable bearing where the older hinge uses the roller where the outer race is the roller making it un re build able I could not find a replacement bearing for the roller so I reused the one I had as it looked like it was brand new. I also go new snap rings to retain the bearings.
The snap rings holding the bearings on must be removed first when I removed them the deformed so I decided to replace them instead of trying to reuse them
This bearing race or in the second hinge my one good bearing came off easily with a chisel on the bottom hammering it off.
The second bearing was a lot harder both were just the inner race and the lower bearing race was the same diameter so I used a cold chisel to create a gap to get a good seat for the chisel to drive the race off
After the races were removed I cleaned up the pieces and removed the roller.
First you remove the 10mm nut holding the bearing on.
Next a drift pin was used to remove the roller with the bearing attached.
At this point I found the difference on the second roller.
An 8mm socket fits over the shafts and applies the force nicely against the inner races I pried the bearing out of the roller the first time and mused up the seal a little but would use a socket if I were to do it again. It gets assembled so the snap ring is on the inside making it hard to tell which is which without removing them.
To get the bearing started into the roller after I had it out I used 2 blocks of wood. (You want them to be parallel to drive the bearing in straight)
Next I used a 13mm socket to seat the bearing so the snap ring could be installed.
Next I put the bearings back on using the 8mm socket.
This is done to both top bearings.
Make sure to seat both bearings so that the snap ring grove is visible so the snap rings can be installed.
My snap ring pliers didn’t fit in the holes for the small snap rings so I ended up using my fingers went well for all but 1 of them.
After this the 8mm socket was used to press the bearing back onto the hinge.
After the bearing is seated the 10mm nut and the lock washer are replaced and the assembly is finished.
I plan on greasing it with wheel bearing grease for reinstall as that’s what seemed to be on them from the factory that kept the roller working so well and in such good condition all these years later.
Finally it is time to reinstall the hinge. I got some grease and couldn’t find any latex gloves so I used some sandwich bags.
Gave the bearings a liberal covering with grease
And put the hinge back in getting the first bolt going is tricky especially as the tire I was using to support the door flexed this is where the jack would have been nice at not moving through the process doing the outer 2 bolts then the inner on finishing up with some adjusting to make sure the door closes smoothly.
http://s544.photobucket.com/albums/hh331/adenette/hinge%20repair/ the album with some more shots of the process.[/url]
_________________
1985 2wd Westy with 2000 Subaru 2.2 current driver
https://www.thesamba.com/vw/forum/viewtopic.php?t=685635
1986 Syncro Doka Project next in line
https://www.thesamba.com/vw/forum/viewtopic.php?t=732777
1990 Vanagon Syncro Base awaiting body work |
|
| Back to top |
|
 |
Saguache
Samba Member

Joined: December 28, 2009
Posts: 360
Location: Gunnison, CO
|
| Posted: Wed Jan 20, 2010 2:05 pm Post subject: |
|
|
Beauty job, any idea what size the barrings are? Rebuilding may be harder than replacement in my case.
Thanks for the great photos!
_________________
Matt Thyer
http://zenoswagen.wordpress.com/ |
|
| Back to top |
|
|
Captain Pike
Samba Member

Joined: December 30, 2003
Posts: 3439
Location: Talos IV, Piedmont Arizona
|
| Posted: Wed Jan 20, 2010 2:09 pm Post subject: |
|
|
That is why I have 4 spares.
_________________
LEARN TO SELF RESCUE
59 Panel bus, 1966 Single cab. 73' 181. 73 Westy. 91' H6 Vanagon 3.3L.
....Bad Sneakers.... |
|
| Back to top |
|
|
ajdenette
Samba Member
Joined: February 15, 2009
Posts: 768
Location: Hope Valley RI
|
| Posted: Wed Jan 20, 2010 3:13 pm Post subject: |
|
|
circlip inner dimension 0.29 in. but started as 0.25 in.
New Bearing inner dimension 0.314 in and outer dimension 0.865 in.
Old Bearing inner dimension 0.312 in and outer dimension 0.848 in.
so it looks like the inner race is about 3/16 in. and the outer race is probably 7/8 i forget what the box of parts say at the hard ware store
_________________
1985 2wd Westy with 2000 Subaru 2.2 current driver
https://www.thesamba.com/vw/forum/viewtopic.php?t=685635
1986 Syncro Doka Project next in line
https://www.thesamba.com/vw/forum/viewtopic.php?t=732777
1990 Vanagon Syncro Base awaiting body work |
|
| Back to top |
|
|
stevey88
Samba Member
Joined: January 16, 2008
Posts: 1317
Location: Fremont, SF Bay Area
|
| Posted: Wed Jan 20, 2010 3:51 pm Post subject: |
|
|
Thank you very much for the step by step. I am about to remove my slider for a repaint.
_________________
Steve |
|
| Back to top |
|
|
davideric9
Samba Member
Joined: January 21, 2009
Posts: 1014
Location: Oakland CA
|
| Posted: Wed Jan 20, 2010 5:28 pm Post subject: |
|
|
Nice Job. Seems like it may be easier and quicker to remove the slider and then remove/reinstall the hinge. As you may know it only takes removing two screws on the body roller track cover and then the door comes off without any other fasteners or tools. All told it takes less than a minute or two to either remove or install the slider door.
_________________
1987 Syncro Westfalia, stock (bought 1994)
1986 Syncro Westfalia SVX, 3 knob (bought 2008)
1987 Westfalia (bought 2010)
1988 Wolfsburg GL (bought 2012) |
|
| Back to top |
|
|
bgwoods
Samba Member
Joined: February 05, 2011
Posts: 48
Location: Mason City, Iowa
|
| Posted: Mon Aug 19, 2013 12:32 pm Post subject: |
|
|
Any idea on where to get a replacement for a '69 bay window bus?
I shut the door pretty hard a couple of days ago, and I ended up with a hanging door in my right hand and a pile of parts in my left hand.
It all kind of went back together in a Jerry-rigged manner, but some parts are hashed and it does NOT like to open easily.
_________________
"nothing like a nice piece of hickory"
'69 Bay Window |
|
| Back to top |
|
|
BillM
Samba Member
Joined: June 18, 2004
Posts: 1381
Location: Stonington,CT
|
| Posted: Tue Aug 20, 2013 8:32 am Post subject: |
|
|
You are missing the plastic cap that goes on the top of the assembly.
I have a couple new spares if you want one for the cost of postage just
message me.
The cap
The hinge with cap
_________________
Bill M
87 Westy |
|
| Back to top |
|
|
bgwoods
Samba Member
Joined: February 05, 2011
Posts: 48
Location: Mason City, Iowa
|
| Posted: Wed Aug 21, 2013 8:30 pm Post subject: |
|
|
Many thanks!
Just saw your reply.
Will address when at work in a.m.
_________________
"nothing like a nice piece of hickory"
'69 Bay Window |
|
| Back to top |
|
|
GoWestyYoungMan
Samba Member
Joined: January 01, 2011
Posts: 150
Location: SoCal
|
| Posted: Fri Sep 27, 2013 5:20 pm Post subject: |
|
|
| Thanks for the excellent write-up...what timing!! |
|
| Back to top |
|
|
GoWestyYoungMan
Samba Member
Joined: January 01, 2011
Posts: 150
Location: SoCal
|
| Posted: Fri Sep 27, 2013 5:27 pm Post subject: |
|
|
| Thanks for the excellent write-up...what timing!! |
|
| Back to top |
|
|
Vanagator
Samba Member

Joined: January 14, 2009
Posts: 230
Location: Cool lush mountains in Mexico
|
| Posted: Fri Aug 15, 2014 11:26 am Post subject: |
|
|
On my van (1986 camper) there's a curved bumper/stop in the track where that double roller hinge slides. It softens the blow when the hinge turns the corner inward. Its shown here but out of stock...
http://www.van-cafe.com/home/van/page_1950_615/sliding-door-bumperstop.html
Mine is shot and crumbled off, so now it just smashes into the curved metal frame with a nasty sound. Anyone know a fix for this or where to find/how to replace another? |
|
| Back to top |
|
|
MarkWard
Samba Member

Joined: February 09, 2005
Posts: 18972
Location: Retired South Florida
|
| Posted: Thu Oct 15, 2015 2:36 pm Post subject: |
|
|
Hello, I needed the two bearings for the middle support mentioned above. I came across this thread in hopes of finding a local replacement bearing. No problem with the Vanagon vendors, but I had the door off and could have it fixed same day with the bearing. Using the above dimensions, I called our local bearing house.
They came up with SKF 608 2RSJEM Made in Italy. The fit was fine. The local bearing house was a little proud of them at $13.00 each, but the door is back on same day. Time is money. Hope this helps someone in a similar spot. The ABEC 5 mentioned above refers to the grade, not the actual part number needed to order them. mark |
|
| Back to top |
|
|
Jilly Bean
Samba Member
Joined: May 11, 2018
Posts: 12
Location: HI
|
| Posted: Fri Jan 17, 2020 6:34 pm Post subject: Re: Sliding door hinge repair rebuild |
|
|
| I have an 81 vanagon. The placement in the door and the hinge is differnet than the one in the pictures. Would love to have some advice repair for my 81 as the hinge wont move at all. Thanks! |
|
| Back to top |
|
|
jungle dog
Samba Member
Joined: January 11, 2006
Posts: 7
Location: kingston, ri
|
| Posted: Wed Oct 18, 2023 8:21 am Post subject: Re: Sliding door hinge repair rebuild |
|
|
| Jilly Bean wrote: |
| I have an 81 vanagon. The placement in the door and the hinge is differnet than the one in the pictures. Would love to have some advice repair for my 81 as the hinge wont move at all. Thanks! |
My newly acquired '81 also has a hinge that won't move. Not having any luck finding info online for this short time frame.
Any help is appreciated.
Cheers. |
|
| Back to top |
|
|
shagginwagon83
Samba Member

Joined: February 07, 2016
Posts: 4378
Location: SWVA

|
|
| Back to top |
|
|
snuf
Samba Member
Joined: April 15, 2008
Posts: 261
Location: TN
|
|
| Back to top |
|
|
jungle dog
Samba Member
Joined: January 11, 2006
Posts: 7
Location: kingston, ri
|
|
| Back to top |
|
|
|


