| Author |
Message |
Howesight
Samba Member

Joined: July 02, 2008
Posts: 3418
Location: Vancouver, B.C.

|
 Posted: Fri Mar 25, 2011 1:37 pm Post subject: Pop-top Extension: Evolution of the Pop-Top Posted: Fri Mar 25, 2011 1:37 pm Post subject: Pop-top Extension: Evolution of the Pop-Top |
 |
|
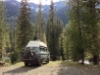
My Westy is adapting to the changes in its envronment by growing an extension!
UNDER THE BIG TOP
In my ‘86 Syncro Westy, I always found when camping that there was no decent place to put all the things that you bring along in the area behind the back seat when it’s time to use the lower bunk. Sure, you could put it all in, on, around and under the front seats, but then you can’t use the front seats, and you have to pull all that stuff out in the morning anyway. Or, you could put some of your stuff outside, under the van. But we have lots of rain, bears, raccoons and other critters here in BC. Oh, just use the luggage bin at the front of the roof you say? Still gets rained on, gets sap on it, and gets dew. The small critters can also get up there. Maybe even more importantly, anytime I wanted to fetch something off the luggage rack at night, I’d let cold air in and warm air out.
So I decided to add the luggage rack to the main part of the pop-top and gain the storage space inside the Westy. I’ll show how I did it in a few posts to come.
Last edited by Howesight on Fri Mar 25, 2011 5:10 pm; edited 1 time in total |
|
| Back to top |
|
 |
DAIZEE
Samba Member
Joined: January 26, 2010
Posts: 7552
Location: Greater Toronto Area Ontario West Side
|
| Posted: Fri Mar 25, 2011 1:42 pm Post subject: |
|
|
there's more coming, right?
_________________
'09 2.5L Jetta 5 cylinder, 5 spd, super turbo, see thread in H2O Cooled Jetta, etc...
83.5 Vanagon L Riviera Model with 98 1.9L TD AAZ 4 speed Daily Driver 3 out of 4 seasons (sold)
84 Vanagon GL Wolfsburg Westy WBX 4 speed (sold) |
|
| Back to top |
|
|
Mofus
Samba Member

Joined: February 21, 2008
Posts: 369
Location: San Diego
|
| Posted: Fri Mar 25, 2011 2:06 pm Post subject: Re: Pop-top Evolution |
|
|
| Howesight wrote: |
| I’ll show how I did it in a few posts to come. |
He said there's more to come...probably needs more than 5-minutes.
Howesight, are you going to custom make a giant tent that extends all the way to the front?
_________________
'87 Syncro passenger w/ 2.2L Subaru
'10 Passat Wagon (keeps Mrs. Mofus away from my van) |
|
| Back to top |
|
|
Howesight
Samba Member
Joined: July 02, 2008
Posts: 3418
Location: Vancouver, B.C.
|
| Posted: Fri Mar 25, 2011 2:20 pm Post subject: |
|
|
| Yes, I am making (or having made) a large tent using Sunbrella fabric. I am also making a large fly out of ripstop waterporoof nylon which I plan to on calling my (fingers making quotation marks here) "Grosserwasserstopper". |
|
| Back to top |
|
|
Spinal Tap
Samba Member
Joined: August 01, 2008
Posts: 413
Location: Chicago IL
|
| Posted: Fri Mar 25, 2011 2:37 pm Post subject: |
|
|
Are you going to "remove" the luggage rack? By that, I mean, are you going to make the top of the pop-top more-or-less smooth from front to back?
Thanks!
_________________
'85 Westy
'74 MG-B
| RCB wrote: |
| Its called tact...and tact is the ability to tell someone to go to hell in such a manner that they anticipate the trip. |
|
|
| Back to top |
|
|
Howesight
Samba Member
Joined: July 02, 2008
Posts: 3418
Location: Vancouver, B.C.
|
| Posted: Fri Mar 25, 2011 2:47 pm Post subject: |
|
|
I am leaving the "luggage rack" as it is formed from the factory. This allows me to put odds and ends and camp chairs up there.
BUT, I am also making a "lid" for this area to cover it for aerodynamics improvement and hopefully a little less wind noise. This is why I have to attach drain plumbing to the drain holes on the "luggage" area.
As it turns out, there will still be a space of about 1.5" to 2" between the bottom of the luggage rack and the steel roof which will accomodate the front portion of the tent when the poptop is down plus, if I am lucky, my "pillow board" from my upper berth. |
|
| Back to top |
|
|
Howesight
Samba Member
Joined: July 02, 2008
Posts: 3418
Location: Vancouver, B.C.
|
| Posted: Fri Mar 25, 2011 3:07 pm Post subject: |
|
|
The Big Top How-To:
https://www.thesamba.com/vw/gallery/pix/788747.jpg[/img]
1. Measure and Mark:
a. I wanted to ensure perfect alignment, since the front of the finished roof will have to seal properly. So, with the pop-top and luggage rack still on the Westy with the seals properly installed, I used a long straight edge to draw lines on the side of the Westy pop-top portion and onto the luggage rack. I used pencil which is good because none of the solvents I used for other work on the roof would erase the pencil, but one of those white rubber pencil erasers worked when the job was done.
b. I also made a space measurement to establish the proper space between the front luggage rack and the Westy pop-top.
2. Temporary bracing:
a. I got four 1/8" by 1" by 6 ft. mild steel strips from Home Depot. I drilled four 5/32" holes in each strip to correspond with some existing holes in the pop-top from the rack attachment drip rails and elsewhere to rigidly support the luggage rack.
b. I then used an M6 tap to tap these holes to receive M6 bolts. This was key to getting accurate alignment.
c. I placed the strips in alignment and marked my locations with a sharpie for the holes to be drilled in the fibreglass.
d. Then I threaded the bolts through the strips and into the fibreglass.
e. I had already cut off the old ripped tent. If you are saving your tent, you should remove it at the start.
f. Now I removed the roof. It turns out to be far easier to leave the rear pop-top hinges on the steel Westy roof and instead remove the bolts holding the fibreglass roof to the hinges. I removed the roof myself without a helper, standing up inside the Westy, lifting up the roof, turning it 90 degrees, and “walking” it to the sliding door side of the vehicle. I don’t recommend this, but if no helper is available and you are 6"1", go for it!
g. Now I placed the roof on my work table and removed each of the bolts, one at a time, threading them in from the inside of the roof to the metal strap on the outside, before moving on to the next bolt. This enabled me to tighten the straps quite tightly to eliminate any movement.
h. In order to have the two portions of the roof align at the point where they will be joined with fibreglass, I had to cut off a portion of the front part.
The entire bulkhead you see in the above photo gets cut out together with a band, from the driver's side of the pop-top to the passenger side, about 1.5" wide.
In the photo above, you can see the 1.5" strip and the bulkhead cut out and the gap fibreglassed together.
In the photo above, you can see the stubs for the drain pipes that have to be installed to drain the luggage rack. These are PVC plastic from Home Depot used for in-ground lawn watering systems. I roughed up the ends of the PVC and the luggage rack mating surface and used white gel-coat to "glue" them in place, then did two layers of fibreglass over top to hold them in placed.
In the photo above, you can see where I built the channel that the tent will attach to. It is installed so that it lines up precisely in height to match the 1/2" channel in the regular Westy pop-top both as to width and as to height. Belowq are a couple more views.
Since the "luggage rack" will no longer be held in place by 8 bolts, it was necessary to stiffen the front lip of the luggage rack to prevent the wind from making it vibrate or lift. I added a stiffening rib by attaching a 1" by 1" piece of pine cove trim, face down. I used very tiny screws installed from the top of the pop-top to hold it in place to 'glass over it and then removed the screws once the fibreglass hardened. This can be seen in the pics below:
I have now gel-coated over all the work shown above, but no pics yet. I am prepping to paint the roof body-colour ("color" for the Americans on the forum).
This project was quite dirty, but quite fun too. |
|
| Back to top |
|
|
Ahwahnee
Samba Member

Joined: June 05, 2010
Posts: 10288
Location: Mt Lemmon, AZ
|
| Posted: Fri Mar 25, 2011 3:08 pm Post subject: |
|
|
Just when you think you've seen everything...
Interesting mod, look forward to the finished product. |
|
| Back to top |
|
|
vanagonjr
Samba Member

Joined: October 07, 2010
Posts: 3667
Location: Dartmouth, Mass.
|
| Posted: Fri Mar 25, 2011 4:01 pm Post subject: |
|
|
I've always liked this idea since seeing the below van on vanagon.com
Glad to see someone doing this.
John
|
|
| Back to top |
|
|
IrideWheelies
Samba Member
Joined: July 09, 2009
Posts: 386
Location: Olympia, WA
|
| Posted: Fri Mar 25, 2011 5:40 pm Post subject: |
|
|
I'm really interested in seeing how the water is going to drain from the luggage rack. It looks like drain hoses will take the water outside of the canvas and onto, or past, the rain gutter on the roof.
Great idea! Thank you for posting!
_________________
89' Dove Blue Syncro Hightop |
|
| Back to top |
|
|
DAIZEE
Samba Member
Joined: January 26, 2010
Posts: 7552
Location: Greater Toronto Area Ontario West Side
|
| Posted: Sat Mar 26, 2011 7:49 am Post subject: |
|
|
I'm getting the concept now, looking forward to future pics. 
_________________
'09 2.5L Jetta 5 cylinder, 5 spd, super turbo, see thread in H2O Cooled Jetta, etc...
83.5 Vanagon L Riviera Model with 98 1.9L TD AAZ 4 speed Daily Driver 3 out of 4 seasons (sold)
84 Vanagon GL Wolfsburg Westy WBX 4 speed (sold) |
|
| Back to top |
|
|
wbx
Samba Member

Joined: April 11, 2005
Posts: 1254
Location: Monterey, CA
|
| Posted: Sat Mar 26, 2011 8:39 am Post subject: |
|
|
I think this is pretty damn cool, and makes a lot of sense (I know I never use the luggage rack and would rather not fill up the front seats, either...)
My only concern is the front lip catching air and trying to pry the top up. Have you considered adding a little air deflector lip to the front of the van's roof, kind of like a roof rack would have, but way smaller? Something just an inch tall would do - securely fastened to the body, would seem to eliminate any chance of that.
I'm curious to see the results!
_________________
'84 Westy (first owner).......but my daily driver has pedals
My "perspective" mantra:
A Volkswagen Vanagon is just a material thing,
As such, it is of the earth,
And if i need to, I can let my Van go. |
|
| Back to top |
|
|
MarkWard
Samba Member

Joined: February 09, 2005
Posts: 19017
Location: Retired South Florida
|
| Posted: Sat Mar 26, 2011 10:07 am Post subject: |
|
|
| Brilliant! |
|
| Back to top |
|
|
Howesight
Samba Member
Joined: July 02, 2008
Posts: 3418
Location: Vancouver, B.C.
|
| Posted: Sat Mar 26, 2011 2:59 pm Post subject: |
|
|
WBX said:
"My only concern is the front lip catching air and trying to pry the top up. Have you considered adding a little air deflector lip to the front of the van's roof, kind of like a roof rack would have, but way smaller? Something just an inch tall would do - securely fastened to the body, would seem to eliminate any chance of that. "
I have a plan for that. I am going to use the bolts at the very front of the "luggage rack" but turn them into "wing bolts" by adding a round knob that allows the bolts to be screwed in by hand. I'll leave the two front attachment brackets in place, but I will likely have to pad them a bit so that they do not damage the pop-top fabric.
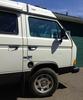
Here are some more pics illustrating this:
The photo above shows a mock-up of where the pop-top rail will be installed. The rail will be notched where it overlaps the attachment bracket.
The photo above shows the passenger side area mocked up. The aluminum rail will need to be straightened where the orginal is kinked for the roof profile.
The three photos below show the underside of the pop-top very close to closed as I wanted to see how much space there would be remaining and where my drains would have to go.
_________________
'86 Syncro Westy SVX |
|
| Back to top |
|
|
1621
Samba Member
Joined: May 15, 2006
Posts: 2174
|
| Posted: Sat Mar 26, 2011 3:07 pm Post subject: |
|
|
I'm really enjoying this thread. Great work and innovation!
_________________
'85 Westy |
|
| Back to top |
|
|
dobryan
Samba Member

Joined: March 24, 2006
Posts: 17267
Location: Brookeville, MD
|
|
| Back to top |
|
|
noganav
Samba Member
Joined: January 06, 2006
Posts: 1236
Location: San Diego CA
|
| Posted: Sat Mar 26, 2011 4:55 pm Post subject: |
|
|
| Awesome. Super inventive. |
|
| Back to top |
|
|
akyrie
Samba Member
Joined: March 24, 2010
Posts: 519
Location: Driftless, Wisco
|
| Posted: Sat Mar 26, 2011 5:04 pm Post subject: |
|
|
I was feeling spiffy with my recent tin-top to pop-top conversion. This is something else though.
A. |
|
| Back to top |
|
|
fastwagens
Samba Member

Joined: March 01, 2004
Posts: 1028
Location: Michigan (The other west coast)
|
| Posted: Sat Mar 26, 2011 5:44 pm Post subject: |
|
|
| Very cool. That will add so much more space. |
|
| Back to top |
|
|
Sodo
Samba Member

Joined: July 06, 2007
Posts: 10763
Location: Western WA
|
| Posted: Sun Mar 27, 2011 3:48 pm Post subject: |
|
|
Very nice. Nothing like being wide open as soon as the top goes up. Every westy-camper knows how it goes, a big messy pile of 'stuff' on the front seats. Especially with a small family!
For those who want more space but can't undertake such a big modification, GoWesty has a rain fly kit that provides some storage space there, accessible thru the tent front window.
(GoWesty photo from http://www.gowesty.com/ec_view_details.php?id=4046
Edit: One problem with this kit ( as a storage extension ). It covers the side windows on a newer "3-window" tent.
_________________
'90 Westy EJ25, NEW oil rings (!) 2Peloquins, 3knobs, SyncroShop pressure-oiled pinion-bearing & GT mainshaft, filtered, cooled gearbox.
'87 Tintop w 47k 53k, '12 SmallCar EJ25, cooled filtered original gearbox
....KTMs, GasGas, SPOT mtb
Last edited by Sodo on Sun Mar 27, 2011 6:15 pm; edited 1 time in total |
|
| Back to top |
|
|
|


