| Author |
Message |
wcfvw69
Samba Purist

Joined: June 10, 2004
Posts: 13685
Location: Arizona

|
 Posted: Thu Sep 04, 2014 11:06 am Post subject: Distributor 113905205T rebuild *PIC Heavy* Posted: Thu Sep 04, 2014 11:06 am Post subject: Distributor 113905205T rebuild *PIC Heavy* |
 |
|
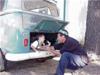
This vacuum advance only distributor was installed in both bugs and bus's in 1969 and 1970. My 69 bug has it and my 1970 bus has a German 009. I bought this used 205T off The Samba a few months ago to replace the 009 in my bus. I discovered quickly this distributor wasn't as advertised and it had some issues to say the least. The biggest is the up and down play on the shaft. The 2nd issue was the breaker plate was semi frozen and didn't rotate very well. The shaft also was very sticky and didn't spin w/out a fair amount of effort. The shaft probably moved 1/4" up and down. I figured the two fiber washers were broken and missing and that was indeed the case.
Here's the distributor as I got it.
To disassemble these distributors, you remove the two screws that hold the vacuum can on. One screw also holds the condenser as well. Lift off the return spring with a pick and remove the vacuum can arm off the breaker plate. Then remove the vacuum can from the distributor. Then unscrew the points and remove them. You can then use a pick to remove the spring that covers the pin on the bottom of the shaft that holds the drive dog to the shaft. Use a chisel to make a mark across both the shaft and drive dog (on one side only) on the bottom of them so you know how to orientate it during reassembly. If you install the drive dog backwards, the rotor will point 180* the opposite way. It won't point at the notch on the distributor rim but 180* from it.
I put the distributor on a vise and used a drill bit to knock the pin out. They don't usually take too much pressure to remove. Just make sure you don't knock it out quickly or the pin can fly across the garage or fall to the floor, never to be seen again.
Then remove the shaft from the distributor housing. Mine was so gummed up that it wouldn't easily come out. I had to gently knock it out with a punch. Once the shaft was removed, I saw why it was stuck in there. Lots of dirt, old dry grease, rust and corrosion.
Slide up the breaker plate next. It might be a bit stuck on there like mine was from the old grease, corrosion and dirt. I used a pair of needle nose pliers to wiggle mine up and out.
Be aware that there is a steel shim under the breaker plate. This shim keeps the steel breaker plate from rubbing into the aluminum body when it pivots.
As you can see, once this distributor was disassembled, it was pretty nasty inside it.
The first thing I did was clean and degrease the shaft. It was rough in some spots. I cleaned the shaft then polished the shaft where it spins in the bushing at the bottom of the distributor with 2000 grit sand paper and oil. It came out very smooth. I then did the same where the points rubbing block runs. I then cleaned out the distributor body, lubed up the shaft with engine oil and checked for side to side play. Luckily, this one was tight.
I took the body over to my blast cabinet and then blasted it with a fine glass media. It removed all the oxidation, dirt, crud and oil from the body. I was careful to NOT blast the bottom bushing or the spot where the breaker plates rotates inside the housing.
The breaker plate didn't pivot very easily on the inside of the distributor housing so I polished it up inside w/2000 grit paper and oil. I did the same to the inside of the distributor housing where it rides. After this, it rotated VERY easily with no resistance.
Here I'm smoothing out the housing where the breaker plate pivots. I then thoroughly cleaned all the parts with break cleaner to insure I removed all the media from them.
One of the most common things I see when I've taken apart these old, aluminum distributors are the ground wires being broken, frayed and in some cases, they are wrapped around the spring. This one was about to let go as well.
I fired up my little butane solder gun and waited quite a while for it to heat up the breaker plate so the solder would stick to it. I got the ground re-secured to the underside of the breaker plate well.
This picture shows how the steel shims and the fiber washers go when reinstalling the shaft. I read all the previous threads on distributor rebuilds and came away a bit confused until I found comments from both Glenn and Tasb (Tim).
When you go to reassemble the distributor, you first put the steel shim back into the body of the distributor. Then you insert the breaker plate. I greased the breaker plate hole that I polished with Bosch distributor grease. Then grab the shaft. A steel shim goes on first on the shaft up against the top of the shaft where the points block runs against. Then a fiber shim. I used engine oil to lube the bottom of the shaft and slid the shaft in. I then inserted the 2nd fiber shim up against the distributor body followed by two thin, steel shims, then the drive dog. I had pre-assembled the shaft into the distributor once to check the up and down movement. It took two thin, steel shims on the bottom against the drive dog to remove all the perceivable up/down movement.
The rest of the assembly is a reverse of taking it apart. I drove the drive dog pin back through (after insuring I hade it orientated back on the shaft correctly). Then I installed the spring over the pin. I then installed a NOS vacuum can and a new condenser. Once the I put the vacuum can arm on the pin on the breaker plate, I slipped the return spring over it on the pin. I then installed the points. I lubed the shaft where the points rubbing block rides with Bosch distributor grease
**Note, this 205T distributor points have a pin on one end that goes into the open hole on the breaker plate and then it's held down in place with the adjusting screw once you set the gap. I grabbed the wrong new points and thought I was missing a pin on the breaker plate! DUH. Tim or TASB on here straightened me out.
I then removed my 205T distributor out of my 69 bug and installed this one. I need to go thru the one I removed. This timing is set to 0* on this distributor with the original NOS vacuum can I installed. I checked my dwell and timing with a light and it advanced up to around 29*.
I want to thank Tim (Tasb) and Glenn for answering my question and for helping me with a couple of parts.
_________________
Contact me at [email protected]
Follow me on instagram @sparxwerksllc
40+ years of VW repair, and VW parts and vehicle restoration experience.
The Samba member since 2004.
**Now rebuilding throttle bodies for VW's and Porsche's**
**Restored German Bosch distributors for sale or I can restore yours**
**Restored German Pierburg fuel pumps for sale or I can restore yours**
**Restored Porsche fuel pumps or I can restore yours**
**Restored Porsche distributors or I can restore yours**
Last edited by wcfvw69 on Fri Sep 05, 2014 9:12 am; edited 5 times in total |
|
| Back to top |
|
 |
Glenn 
Mr. 010

Joined: December 25, 2001
Posts: 79784
Location: Sneaking up behind you
|
| Posted: Thu Sep 04, 2014 11:17 am Post subject: |
|
|
Looks good.
_________________
Glenn
74 Beetle Specs | 74 Beetle Restoration | 2180cc Engine
"You may not get what you pay for, but you always pay for what you get"
Member #1009
#BlueSquare
עַם יִשְׂרָאֵל חַי |
|
| Back to top |
|
|
jlex
Samba Member

Joined: January 23, 2009
Posts: 2902
Location: NW Pennsylvania
|
| Posted: Thu Sep 04, 2014 12:41 pm Post subject: |
|
|
Nice post. Should have made it about 3 years earlier when I refurbished my 205T. The severe cold of a PA winter gummed up the grease on the advance plate even worse & it couldn't move. Luckily, I was able to spot the problem and temporarily cured it with carb & choke cleaner spray. Took it apart a couple weeks later to give it a thorough overhaul.
You're lucky the vacuum can still works. I had to hunt down a new one and that took quite a while. Now have a fully functional spare... just in case.
_________________
jlex.
'70 std. "Elsie"
'88 Carrera |
|
| Back to top |
|
|
OzzyTR
Samba Member
Joined: August 04, 2014
Posts: 9
Location: TURKEY
|
| Posted: Thu Sep 04, 2014 12:55 pm Post subject: |
|
|
What's the grey thing I circled in yellow?
And what's the cable extending from it? (I tried to mark it with red) |
|
| Back to top |
|
|
Glenn
Mr. 010
Joined: December 25, 2001
Posts: 79784
Location: Sneaking up behind you
|
| Posted: Thu Sep 04, 2014 1:13 pm Post subject: |
|
|
Its a vacuum advance canister and the red is the vacuum hose.
_________________
Glenn
74 Beetle Specs | 74 Beetle Restoration | 2180cc Engine
"You may not get what you pay for, but you always pay for what you get"
Member #1009
#BlueSquare
עַם יִשְׂרָאֵל חַי |
|
| Back to top |
|
|
gt1953
Samba Member
Joined: May 08, 2002
Posts: 13948
Location: White Mountains Arizona
|
| Posted: Thu Sep 04, 2014 5:29 pm Post subject: |
|
|
Nice rebuild. The 205T is a great distributor.
_________________
Volkswagen: We tune what we drive.
Numbers Matching VW's are getting harder to find. Source out the most Stock vehicle and keep that way. You will be glad you did.
72 type 1
72 Squareback
({59 Euro bug, 62, 63, 67, 68, 69, 73 type ones 68 & 69 type two, 68 Ghia all sold}) |
|
| Back to top |
|
|
tasb
The Distributor Distributor
Joined: April 27, 2002
Posts: 6814
Location: Pentwater, Michigan
|
| Posted: Thu Sep 04, 2014 6:21 pm Post subject: |
|
|
Agreed, usually you don't need quite so much flexible vacuum line
_________________
Roads Scholar
1957 Kombi low mileage 36 hp governor equipped M 178 Slow Drag Winner 2014, 2015, 2018
1965 hardtop Deluxe Microbus owned since 1990 M 620 factory 12 v 1500cc
1961 (October)Single Cab- Road Trip Workhorse
Member# 2059 |
|
| Back to top |
|
|
wcfvw69
Samba Purist
Joined: June 10, 2004
Posts: 13685
Location: Arizona
|
| Posted: Thu Sep 04, 2014 8:22 pm Post subject: |
|
|
Thanks for the nice feedback. Glenn and Tim (TASB) are the distributor guru's with these VW distributors. If you don't want to mess with these distributors, Tim's the guy to send your aluminum distributor to for rebuild and Glenn is the one for the cast distributors to rebuild. They also have the machines to test them after overall.
I agree that the 205T is a GREAT distributor. I also like the 205K that's in my 67 bug too. I prefer these vacuum distributors over the 009s.
I hope this post answers questions for people who want to disassemble, inspect and clean their old distributors themselves. If your original distributor has never been taken apart, I can assure you that it needs it. Just cleaning out the 40+ years of dirt and crud along with cleaning the parts and re-lubing them will make them work as new again. Just be aware that in most cases, you'll find the original fiber washers missing, broken or about to fall apart. Have a couple of new fiber washers handy if you decide to take yours apart.
In most cases, the vacuum cans on these distributors are pretty tough and typically still work. I've read that what kills the vacuum cans are not using the steel/copper vacuum lines with the loop in them at the top to keep any fuel vapors from running thru the vacuum line, down into the vacuum can and then ruining the rubber diaphragm. The old, beat up vacuum can on these used distributor I bought still worked fine. I used a rubber vacuum hose and pulled vacuum on it w/my mouth and it held fine. I just found that NOS can that looked pretty to install on my restored 69 bug engine.
_________________
Contact me at [email protected]
Follow me on instagram @sparxwerksllc
40+ years of VW repair, and VW parts and vehicle restoration experience.
The Samba member since 2004.
**Now rebuilding throttle bodies for VW's and Porsche's**
**Restored German Bosch distributors for sale or I can restore yours**
**Restored German Pierburg fuel pumps for sale or I can restore yours**
**Restored Porsche fuel pumps or I can restore yours**
**Restored Porsche distributors or I can restore yours**
Last edited by wcfvw69 on Fri Sep 05, 2014 9:27 am; edited 2 times in total |
|
| Back to top |
|
|
vamram
Samba Member

Joined: March 08, 2012
Posts: 8066
Location: NOVA
|
| Posted: Fri Sep 05, 2014 4:15 am Post subject: |
|
|
Bill - great post, add my thanks to your list for the great details.
One question for you- where can I get fiber washers for these? At a local FLAPS? I'd like to take a 2nd shot at rebuilding one of my spare DVDAs and odds are i'll need those.
_________________
"Men are qualified for civil liberty in exact proportion to their disposition
to put moral chains upon their own appetites. -Edmund Burke
“If something cannot go on forever, it will stop.”
Stop Russian-Soviet Aggression!!
'74 Super 9/16 - present, in refurb process.
'73 Super - 6/18 - Present - Daily Driver!
'75 Super Le Grande...languishing since 2022.
Click to view image
Save the Supers!! |
|
| Back to top |
|
|
wcfvw69
Samba Purist
Joined: June 10, 2004
Posts: 13685
Location: Arizona
|
| Posted: Fri Sep 05, 2014 5:54 am Post subject: |
|
|
| vamram wrote: |
Bill - great post, add my thanks to your list for the great details.
One question for you- where can I get fiber washers for these? At a local FLAPS? I'd like to take a 2nd shot at rebuilding one of my spare DVDAs and odds are i'll need those. |
Thanks- I bought the fiber washers from Glenn Ring.
_________________
Contact me at [email protected]
Follow me on instagram @sparxwerksllc
40+ years of VW repair, and VW parts and vehicle restoration experience.
The Samba member since 2004.
**Now rebuilding throttle bodies for VW's and Porsche's**
**Restored German Bosch distributors for sale or I can restore yours**
**Restored German Pierburg fuel pumps for sale or I can restore yours**
**Restored Porsche fuel pumps or I can restore yours**
**Restored Porsche distributors or I can restore yours** |
|
| Back to top |
|
|
jlex
Samba Member
Joined: January 23, 2009
Posts: 2902
Location: NW Pennsylvania
|
| Posted: Fri Sep 05, 2014 6:05 am Post subject: |
|
|
Oddly enough, I saw a box of assorted fiber washers at Harbor Freight tools last weekend. Don't know if anything there would be the right size, but I was thinking I wish I had known about their washers when I redid my 205T. Only time I saw them available over the counter. May want to check it out if there's one in the neighborhood.
_________________
jlex.
'70 std. "Elsie"
'88 Carrera |
|
| Back to top |
|
|
flyboy161
Samba Member

Joined: December 26, 2009
Posts: 2135
Location: Perry, GA
|
|
| Back to top |
|
|
sb001
Samba Member

Joined: May 19, 2011
Posts: 10473
Location: NW Arkansas
|
| Posted: Fri Sep 05, 2014 7:26 am Post subject: |
|
|
Sticky this thread! 
I desperately need to get into my AE distributor and check it- it already gave me fits once last year when it apparently stuck from all the grime piled up inside it.
_________________
I'm the humblest guy on this board.
1969 autostick sedan, family owned since new
1600 SP engine
Solex 30 PICT 3 carburetor
Bosch 113905205AE autostick distributor |
|
| Back to top |
|
|
wcfvw69
Samba Purist
Joined: June 10, 2004
Posts: 13685
Location: Arizona
|
| Posted: Fri Sep 05, 2014 8:51 am Post subject: |
|
|
Here's a picture of the shim that Glenn posted in another thread a while back. I saw some fiber shims for sale at Ace Hardware but they were the wrong size and too thick as well.
_________________
Contact me at [email protected]
Follow me on instagram @sparxwerksllc
40+ years of VW repair, and VW parts and vehicle restoration experience.
The Samba member since 2004.
**Now rebuilding throttle bodies for VW's and Porsche's**
**Restored German Bosch distributors for sale or I can restore yours**
**Restored German Pierburg fuel pumps for sale or I can restore yours**
**Restored Porsche fuel pumps or I can restore yours**
**Restored Porsche distributors or I can restore yours** |
|
| Back to top |
|
|
tasb
The Distributor Distributor
Joined: April 27, 2002
Posts: 6814
Location: Pentwater, Michigan
|
| Posted: Fri Sep 05, 2014 7:04 pm Post subject: |
|
|
Rebuilding a 113 905 205 T and then rebuilding a 113 905 205 AE are very different procedures. this thread would be useful for the following distributors:
113 905 205 K
113 905 205 M
113 905 205 T
131 905 205
Also will guide you through rebuilding the similar :
ZV/JUR 4 R 3
111 905 205 M
111 905 205 N
and perhaps a few others I have left out. If you have something else the tips offered will be helpful but yours will not look or function the same as the 113 905 205 T featured in this post.
How's that for a disclaimer?
_________________
Roads Scholar
1957 Kombi low mileage 36 hp governor equipped M 178 Slow Drag Winner 2014, 2015, 2018
1965 hardtop Deluxe Microbus owned since 1990 M 620 factory 12 v 1500cc
1961 (October)Single Cab- Road Trip Workhorse
Member# 2059 |
|
| Back to top |
|
|
volkswagen_bug
Samba Member

Joined: November 04, 2008
Posts: 759
Location: Sumter, SC
|
| Posted: Sat Feb 28, 2015 11:23 am Post subject: |
|
|
Any tips to getting the pin out? I've tried hammering it out, but it only budges a little bit and then gets stuck.
_________________
1968 Volkswagen Bug w/ 1600 Dual Port
"It’s better to give than to receive. Especially advice." -Mark Twain |
|
| Back to top |
|
|
Glenn
Mr. 010
Joined: December 25, 2001
Posts: 79784
Location: Sneaking up behind you
|
| Posted: Sat Feb 28, 2015 11:43 am Post subject: |
|
|
Use a bigger hammer
_________________
Glenn
74 Beetle Specs | 74 Beetle Restoration | 2180cc Engine
"You may not get what you pay for, but you always pay for what you get"
Member #1009
#BlueSquare
עַם יִשְׂרָאֵל חַי |
|
| Back to top |
|
|
wcfvw69
Samba Purist
Joined: June 10, 2004
Posts: 13685
Location: Arizona
|
| Posted: Sat Feb 28, 2015 2:47 pm Post subject: |
|
|
| volkswagen_bug wrote: |
| Any tips to getting the pin out? I've tried hammering it out, but it only budges a little bit and then gets stuck. |
Ideally, get a steel punch that fits in the hole. The drill bit I used worked but I then bought a set of steel punches and they work much better. As Glenn mentioned, sometimes they need a big whack to get them out.
_________________
Contact me at [email protected]
Follow me on instagram @sparxwerksllc
40+ years of VW repair, and VW parts and vehicle restoration experience.
The Samba member since 2004.
**Now rebuilding throttle bodies for VW's and Porsche's**
**Restored German Bosch distributors for sale or I can restore yours**
**Restored German Pierburg fuel pumps for sale or I can restore yours**
**Restored Porsche fuel pumps or I can restore yours**
**Restored Porsche distributors or I can restore yours** |
|
| Back to top |
|
|
Zylinderkopf
Samba Member

Joined: September 09, 2012
Posts: 687
Location: SE Oklahoma
|
| Posted: Sat Feb 28, 2015 3:58 pm Post subject: |
|
|
wcfvw69: thanks for putting in the time and effort for this thread. I just went through this myself a couple of weeks ago and it would have been so much easier if I had had your detailed description back then. It will certainly help others from now on.
_________________
1963 Beetle
1966 Beetle 1300
1970 Karmann Ghia Coupe
1971 Super Beetle
1974 Thing
"A lot of people never use their initiative because no one told them to." |
|
| Back to top |
|
|
jlex
Samba Member
Joined: January 23, 2009
Posts: 2902
Location: NW Pennsylvania
|
| Posted: Sat Feb 28, 2015 4:40 pm Post subject: |
|
|
| volkswagen_bug wrote: |
| Any tips to getting the pin out? I've tried hammering it out, but it only budges a little bit and then gets stuck. |
I feel your pain.... on the first one I cleaned, I had a hell of a time getting the pin out, no matter how big a hammer I used. Finally gave up and took it up the street to a local indy shop where the guy pressed it out with his hydraulic press. The second one I did wasn't so bad. By that time I had a good vise that may have helped a lot.
I've been thinking about that first pin and am wondering if maybe the pin was tapered and I should have been hammering on it from the other direction. Have you tried both ways? Yeah, getting the pin out of that first one was murder... Good luck on that 
It could also have something to do with the drift you're using to hammer it out with too.... if the drift is too small, could be that the pin is being mushroomed out the harder you hit it. Ideally, you want to use a flat faced drift that is nearly the diameter of the hole you're trying to drive the pin out of. I think I tried using a nail on the first one which would expand the edges of the pin thereby wedging it in even more. Live and learn...
_________________
jlex.
'70 std. "Elsie"
'88 Carrera |
|
| Back to top |
|
|
|


