| Author |
Message |
esde
Samba Member

Joined: October 20, 2007
Posts: 5969
Location: central rust belt

|
 Posted: Wed Sep 17, 2014 9:41 pm Post subject: 64 11 window frame and floor replacement Posted: Wed Sep 17, 2014 9:41 pm Post subject: 64 11 window frame and floor replacement |
 |
|
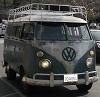
Always wanted a split bus, but I haven't been able to find one close till now. Why take a chance buying something and shipping it across country when I can get my own rusted hulk right here in Philly at the south philly van club?
Thanks to Matt for dragging this to Philly from New York. Here it is as found
on my trailer back at my place
nestled into the corner to get started
the cargo floor is a total loss
I scrounged some parts from friends, bus depot, and made a bunch. The main frame rails are supposedly 12 gauge but these were rusted through all over and thin. Replacing the frame from the torsion housing to where it turns up to the front beam seems like a good start for a solid bus, so I had these made from 1/8" steel.
The bottom leg is 3/16" longer than needed, as any shorter and the die on the press brake won't grab it. I'll trim it after the repair is done, maybe.
I decided to not mess with the shift rod tube, and repaired the I beam pieces by keeping the center 4" and welding new sides on. Those parts are Shoenfeld I think
braced the torsion housing across all of the new I beams, posted the frame to the floor in a few spots, put some diagonal braces in the cargo area and cut out the first chunk of frame. New piece fitted up, had to be careful to not pinch the wiring harness
Here's the front section getting fitted
and another angle
I made my own top hat sections, they're 14 gauge 1.5" square tube, with a flat plate welded to the bottom, and the hole for the shift rod tube bored in. It's the right size and shape, and much stronger than the 2 top hat pieces I had here.
On to the front drivers side. It's a bit more of a mess than any of the rest has been, and will involve repair up close to the beam mounts, if not farther. Here's as far as I'm cutting for now
Here's the part before fitting. The angled tab on top bends under the remaining frame and gets welded
Before welding
After welding a 14g plate over the seam, on the inside of the channel. I had to cut the bottom off of the remaining frame, it was so rusty the plasma cutter couldn't maintain an arc. Did manage to set a pile of acorns in the frame on fire and smoke up the shop though. It's maddening when you know somethings on fire but can't find it..
Here's the beginning of the repair
Next I'll weld on the bottom leg of the frame channel, and then I'll finish the repair with a new inside plate. I'm not sure If I'll use 1/8" or 14 gauge, thoughts?
The floor frame is starting to look like something! And the bus is no longer on stands or in danger of collapse.
I picked up these cargo doors from a local, they have been stored for 40 or more years and are just about rust free
And these matching front doors, which are exceptionally nice
The next stage will be after a giant pile arrives from Gerson, which is all of the tall rockers, lower dog legs, a, b, and c pillars, cargo floor, and front floor.
I'm pretty happy with the progress so far, as it just came into the shop on August 31st, so this is 18 days of evenings and weekends. Going to take a break now and get ready for the show in Flanders!
SD |
|
| Back to top |
|
 |
south_island_surf
Samba Member

Joined: September 23, 2004
Posts: 149
Location: Victoria, BC, Canada
|
|
| Back to top |
|
|
RPGreg2600
Samba Member
Joined: November 07, 2010
Posts: 1657
Location: Vallejo, CA
|
| Posted: Wed Sep 17, 2014 10:02 pm Post subject: |
|
|
| Wow!!! |
|
| Back to top |
|
|
BarryL 
Samba Member

Joined: November 01, 2004
Posts: 14272
Location: Casa de Oro, California
|
| Posted: Thu Sep 18, 2014 1:17 pm Post subject: |
|
|
| That is some serious ambition and now I know where the beef is. |
|
| Back to top |
|
|
esde
Samba Member
Joined: October 20, 2007
Posts: 5969
Location: central rust belt
|
| Posted: Fri Sep 19, 2014 8:37 pm Post subject: |
|
|
a few hours today
someone had hacked this cavern for god knows what reason. This will do till I find a chunk with the correct bead
here's the forward top hat piece fitted. The copper is a weld through primer I'm trying for blind panels that need to get welded
Waiting on the classic fab stuff, so I might get started on the front floor, which I bought from Wolfsburg West. Probably pull the beam too, so I can get it cleaned, and finish the frame repair. |
|
| Back to top |
|
|
esde
Samba Member
Joined: October 20, 2007
Posts: 5969
Location: central rust belt
|
| Posted: Fri Sep 26, 2014 6:03 pm Post subject: |
|
|
progress.
Drivers side frame rail got the bottom section welded in
I made a template and plasma cut some 11 gauge inner panels for each side. These reach halfway up to where the beam mounts, and will allow me to weld in the front crossmember under the bulkhead. Once that's in place, I'll trust that the frame will be strong enough to not move when I remove the beam. The next repair will continue to the front crossmember and include the beam mounts. Here are the plates prior to trimming
clamped in place for a test fit
Drilled several 5/16 holes for welds and installed
And the other side
The frame on this side is tweaked, it is bent outwards at the bottom. Once I get the crossmember in I am going to put some large pipe clamps to work and try drawing it back into position.
Got sick of wrapping my hair around the creeper wheel and getting rust in my eyes, so on to the front floor
Here's what I'm working with, note the absence of the shifter mount and crossmember. Yay
Here's after removing the "floor"
A donor shifter section is fitted, side to side. Front to rear it's to short so I'll have to make up some of it
Here's how much is missing between the shifter mount and what's left of the brake mount
I took the best measurement I could from under another bus, and off of what remained of my old floor to start dabbing up the new mount
Here it is in and fully welded
heated and un seized the brake and clutch pedal pivots. It looks like there might be a bushing on the brake pedal, wondering if anyone has attempted that replacement? Next up is the crossmember, remove the (very) stuck steering wheel, and fit the floor. I'll probably blast the front frame and shoot it with some epoxy while the access is good too. SD |
|
| Back to top |
|
|
earlywesty
Samba Member

Joined: May 03, 2004
Posts: 2358
Location: In the woods, Ontario
|
| Posted: Fri Sep 26, 2014 6:16 pm Post subject: |
|
|
| cool thread, thanks for sharing. |
|
| Back to top |
|
|
esde
Samba Member
Joined: October 20, 2007
Posts: 5969
Location: central rust belt
|
| Posted: Fri Oct 03, 2014 7:55 pm Post subject: |
|
|
someday I'll be done vacuuming acorns and nests out of this, but it's named the bus: Maushaus. Today I cleaned a full 5 gallon bucket worth out of the front heat pipe and lower valence areas. The steering wheel refused to budge even after soaking, broke a 3 jaw puller, and I ended up making this from some 1/2" plate
It came off with a bang, after bending the puller, and fully mushrooming the first thread. I had started banging on it with a brass hammer, but thought better of it, but too late. Solution: an M16-1.5 thread die
Had to grind the first thread down with a dremel to help get the die started straight
and in the end it is fixed.
QUickly dropped the floor in to see how good the fit is
It's a wolfsburg panel, and looks like it will fit the bill. Pulled it back out and removed the pedals. Rebushed the brake pedal, and welded up the egged out holes for the clutch pin and brake pin. On to sandblasting:
Got the frame pretty clean, and inside of the front where I could. It's pretty miserable work, but I got carried away and did the dash, windshield frame, door hinge pillars, and inside the upper air box.
After blowing and vacuuming the sand out of the channels, I went in with this
http://www.eastwood.com/internal-frame-coating-w-spray-nozzle-qt.html
specifically between the inner and outer valence, and between the headlight panel and nose skin. There's some more rust hiding, but it's not so bad that it warrants pulling it apart now. This stuff has decent feedback, so I'm hoping it slows or stops rust in those seams. I have some repair on the drivers side front frame, specifically the lower leg is bad from the beam almost to the steering box. After that i'll coat it with this
http://www.custom-aerosol.com/pdf/ppg-dplf-epoxy-primer-product-sheet.pdf
and weld the floor in. Maybe by next weekend  |
|
| Back to top |
|
|
esde
Samba Member
Joined: October 20, 2007
Posts: 5969
Location: central rust belt
|
| Posted: Tue Oct 07, 2014 9:26 pm Post subject: |
|
|
getting closer to fitting the front floor. Welded up the holes where the leading edge of the floor fastens.
You can see how pitted the top piece of the driver side frame is. I cut it out from the front to good steel where it curves up to the beam.
cut a new piece from 12 gauge sheet
stitched in
I use the pulse mode on the welder as it lets me get a really hot weld on the relatively thin metal with less risk of melting it out
Just a few small pinholes to chase down and I can fit the floor.
I'll tack it in place, but have the feeling that I should wait for the lower doglegs and a pillars to get here before any real permanent welding.
SD |
|
| Back to top |
|
|
1967250s
Samba Member
Joined: May 02, 2007
Posts: 2137
|
| Posted: Wed Oct 08, 2014 10:41 am Post subject: |
|
|
| Amazing repairs, great tutorial. Thanks, from a Bay owner! |
|
| Back to top |
|
|
brettsvw
Samba Member
Joined: November 22, 2007
Posts: 2145
Location: Florida
|
|
| Back to top |
|
|
esde
Samba Member
Joined: October 20, 2007
Posts: 5969
Location: central rust belt
|
| Posted: Fri Oct 10, 2014 7:59 pm Post subject: |
|
|
received a nice shipment from Bogota, Columbia this week. Right in time, as I've just got the front floor fitted, and need the doglegs to get the door opening right.
the floor, came oiled, all the ones I had seen were completely green. Gave myself a wicked cut straight away on the slippery edge
the tall panel for the drivers side
So, set to working on the drivers side lower dogleg. It starts at the A-pillar, but unfortunately, after chopping out the rust
there is no a pillar
fuzzy
front corner for the outer valence, flanged on two sides
punched and ready to go
Bent up the inner and outer A pillar pieces
inner piece is a good enough match
somewhere while welding the phone rang a zillion times, and the steel below the lower hinge was a bitch to weld. I got wrapped up in it, and forgot to take more pics.
Chased the hinge plate threads with an M8 tap, and bolted up the door. This let me mark where the dogleg should mount on the front pillar
Nice to see it come together finally. I can't wait to be able to close a door! |
|
| Back to top |
|
|
esde
Samba Member
Joined: October 20, 2007
Posts: 5969
Location: central rust belt
|
| Posted: Wed Oct 22, 2014 10:23 pm Post subject: |
|
|
Had to take a few days off to tend to some tasks around the house, and get started on some halloween costumes. Having all of the new panels there and no time was killing me so I cleared this evening and got to work. I've learned the hard way about checking door fit and gaps while welding new panels in, and am determined to learn from those mistakes..
Thankfully this PDF is here on Samba for me to use as a baseline
http://www.thesamba.com/vw/archives/info/split_bus_dimensions.php
After chasing the hinge plate holes with the correct tap, I hung the cargo doors. No good, tight at the bottom, but they look ok at the top. The B pillar is what it is, as that dimension is set by the bulkhead and dogleg. I doubt anything I've replaced has changed it, but the frame length would affect the position of the C pillar so I started taking measurements. Turns out the passenger side was short by a heavy 1/16th. The solution ended up being simple, with the exception of cutting a few poorly placed (hard to get to with a grinder) tack welds. Support the frame and cut it at the miter
I turned the ends of a bar clamp around to use as a spreader, and pushed everything to the factory measurement. The doors are tight at the center, but have room around the edge, and don't hit each other
I'm not using this outer rocker, I've got one on the way from WW.
Cut out the old C pillar and welded the new one in
I'm going to hold off welding it to the inner rocker till the outer gets here, to fine tune the placement.
I welded the passenger side outriggers in, and test fit the jack mounts, and am getting started on the front and rear cross members. Here's one punched for welds, epoxy coated on the inside, weld through primer on the mounting face. This has been my treatment for all blind areas so far.
As soon as these are in, I'll pull out the front beam and trans. I've got a pair of flipped spindles on the way from Campingbox, and type 3 axles and custom axle tubes for the rear. The front is loose, and one reduction box is munched, so the decision to drop it some was not hard to make
|
|
| Back to top |
|
|
esde
Samba Member
Joined: October 20, 2007
Posts: 5969
Location: central rust belt
|
| Posted: Thu Oct 23, 2014 9:45 pm Post subject: |
|
|
And a few pics of the dogleg fit. Man, the front doors are a real bear to align. It seems like I'm going to have to tweak the opening with a port power to get the door to sit nicely in the opening.
In the end I figured that a slightly too large gap was preferable, as I can build an edge up if it really bugs me. The doglegs fit everywhere nicely, but the lowest horizontal gap is 1/4" larger than I like. When I tried to tweak it upwards, it opened up a dozen other issues, so it stays as is.
I've been doing the thin panel welding with my spool gun and .023 wire, as it lets me keep .035 on the main gun for big stuff. The spool is also on a 30' lead, so I'm not dragging my machine all over trying to get the torch close enough. Tonight I fried the last contact tip, hope someone n town has a few so I can keep welding through the weekend.. |
|
| Back to top |
|
|
esde
Samba Member
Joined: October 20, 2007
Posts: 5969
Location: central rust belt
|
| Posted: Tue Oct 28, 2014 8:45 pm Post subject: |
|
|
Trying to button up everything that's easiest with the floor still out: clutch, accelerator, heater, and brake cable guide tubes, brake lines, and the heater air tube connections. I also have the last 10" of the shift rod tube to be replaced, but have yet to pull the transmission to get at it
Here's the tube maze partway through.
Finally got my hands on the wolfsburg cargo rocker. Very, very high quality. Sharp bends, perfect fit. It was a drag that I had to drill out the spot welds to separate the inner stiffener from the outer rocker, but that was the only way I could see to get it fitted around the B and C pillars.
For the record, the I beam supports are Shofield, Klokkerholm inner rockers, home made frame rails, Wolfsburg West cargo rocker, and Klassic Fab pillars and outriggers. A real mutt of an assembly and I'm happy with it
You can see how the contour matches the Klassic Fab pillar perfectly
In hindsight, I would fit the floor, rocker, and both B the and C pillar together. I got lucky and the gap under the cargo doors is perfect, but it is a small miracle.
Here's what's left of the rear heater log
so I am replacing it with this
and will weld up these holes to salvage it's supply pipe
Finally got around to pulling the front beam out and apart. This shoe is not ready to budge
Picked up these from Campingbox, they are really nice. Too nice to put under this thing just yet
and will clean/ sandblast/ paint/ replace everything as the front goes back together.. |
|
| Back to top |
|
|
esde
Samba Member
Joined: October 20, 2007
Posts: 5969
Location: central rust belt
|
| Posted: Tue Nov 04, 2014 7:49 pm Post subject: |
|
|
Progress has seems to have slowed, but it's more that the fitting of these panels is slow if you want everything to line up correctly when you're finished. As it is, there are a few things that are a little off, and I can't trace why exactly. Chalk it up to a 50 year old bus that rotted the lower 12" off..
Took the beam out and power washed it. The center pin is pretty good, gave the whole thing a coat of satin black epoxy, and it will get the new flipped spindles.
I knew there was rust waiting
started cutting it out
and patching
The inside
Patch panels getting fitted and welded, I used some 12 gauge steel
The inside
I lapped the repair piece, and will weld the top seam to finish the repair.
Not too bad, just filthy work. All in all it took about 4 hours. Now I understand the appeal of a rotisserie
On to the driver side next.. |
|
| Back to top |
|
|
south_island_surf
Samba Member
Joined: September 23, 2004
Posts: 149
Location: Victoria, BC, Canada
|
|
| Back to top |
|
|
esde
Samba Member
Joined: October 20, 2007
Posts: 5969
Location: central rust belt
|
| Posted: Sun Nov 16, 2014 11:25 pm Post subject: |
|
|
spent a few afternoons and this long night finishing up the frame rails, and several other loose ends. The inner panels of the frame rails, forward of the beam mount were rusted thin at the bottom two inches. I cut out the rust, and plasma cut some repair plates
Driver side, front crossmember bent back so I could get it in
Passenger side
Then to finish the inner panel, up to the front beam mount. I had stopped 12" shy with the repair before, as I was sure that the beam was helping to hold things straight and square. Now I get to finish it. Several times in and out, trimming with the plasma cutter, and it's ready to get welded in
You can see my heater cable tube replacements. It's stainless, I had to drill out the original tube a bit, and it slipped in tightly.
Finished the welding, and ground it down some
The outside of thje driver side rail. Look at all of that new steel..
Still have some details to do here, clutch tube bracket, Heater pipe connection, driver parking brake cable..
Passenger side. I tried to wrap some heat sleeve around the wire harness, and I pray it didn't get melted during all of this work. The poor 34 is jealous, it needs some love too
Patched in some spots where the front floor meets the wheel well, and on the inner dogleg. The inner dogleg is one place where I found the gerson panel to not fit well. If I pushed it to meet all of the other panels, it pulled the alignment off
Gonna try to knock out the little stuff, so I can get grey epoxy under the front before mounting the beam. Then I can spin it around to do the driver side, and pull the trans. Right now its up tight to the wall, pain it the ass.. |
|
| Back to top |
|
|
Daniel G
Crazy Amish Guy

Joined: April 23, 2004
Posts: 828
Location: Central Alabama Amish Country
|
| Posted: Mon Nov 17, 2014 1:51 am Post subject: |
|
|
I have to say, I am quite impressed with the amount of progress you have made so far! Especially given that you are doing this without a rotisserie. Keep up the good work!
_________________
1967 13 Window Deluxe
1966 Beetle
1971 Panel
1978 Westfalia Camper
Transmissions For Dummies |
|
| Back to top |
|
|
esde
Samba Member
Joined: October 20, 2007
Posts: 5969
Location: central rust belt
|
| Posted: Wed Nov 19, 2014 6:36 pm Post subject: |
|
|
| Daniel G wrote: |
| Especially given that you are doing this without a rotisserie. Keep up the good work! |
How ironic will it be when I sell the bus to fund my knee replacement? Crawling around this thing is getting old, but there's good progress that shows some light at the end of the tunnel.
Grey epoxy under the front floor. I got pretty much everything except the drivers dogleg, which will be done soon.
Now to get the beam back into it, bolt up the wheels and turn it around to get the other side |
|
| Back to top |
|
|
|


