| Author |
Message |
south_island_surf
Samba Member

Joined: September 23, 2004
Posts: 149
Location: Victoria, BC, Canada

|
 Posted: Sat Dec 10, 2011 8:59 pm Post subject: '65 Single Cab (and rotisserie) build Posted: Sat Dec 10, 2011 8:59 pm Post subject: '65 Single Cab (and rotisserie) build |
 |
|
Hey Samba,
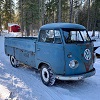
My name's Art, I've been a member since '04. Since then I've been looking off and on for a project, and finally got one in March of this year. Bought the truck in Vancouver (from Alp, a member here), and I live in Victoria, BC.
The truck had been sandblasted and bodywork started probably over ten years ago. The project began in North Carolina, then moved to Washington, where Alp picked it up. He ended up with too many projects, so I took it off his hands...
At the ferries on the way home:
Home:
As it sat for several months while I finished some projects around the house:
New parts that came with it:
-Klassic Fab bed.
-Cheap rocker (orange), battery tray, decent used floor for patches.
-Nice re-done seats.
-New Interior panels and under-seat mats.
-Repro bumpers.
-Wiring harness.
-New shoes, wheel cyls, flex hoses, bearings, tie rods.
-Looks like a full set of seals.
-Boxes of used bits and pieces
Missing engine, gas tank, rear apron. Side gates are probably savable; rear gate beyond help. |
|
| Back to top |
|
 |
south_island_surf
Samba Member
Joined: September 23, 2004
Posts: 149
Location: Victoria, BC, Canada
|
| Posted: Sat Dec 10, 2011 9:05 pm Post subject: |
|
|
Finally got started a few weeks ago. Bought my compressor, had it wired up, got some tools... Man, having air in the shop is very nice! Couldn't break a couple lug studs free... wrenching with a breaker bar made the tire spin on the polished concrete floor. Picked up a decent IR impact wrench and it spun them no problem, then made short work of the front end dissassembly.
Picked up all the steel for my dolly/half-rotisserie, I'll weld it up when I get the trans and front end out:
Got the front end out tonight; dinged up the front shift rod a little trying to separate it from the rear, but it should be fine.
Front end done. I picked up a cheapy air hammer and pickle fork set from the new Princess Auto (closest we get to Harbor Freight in canada), which made separating all the tie rod ends super quick:
|
|
| Back to top |
|
|
south_island_surf
Samba Member
Joined: September 23, 2004
Posts: 149
Location: Victoria, BC, Canada
|
| Posted: Sat Dec 10, 2011 9:10 pm Post subject: |
|
|
Trans/axles/rgb's out:
Ended up selling the trans, drum to drum (minus nosecone) back to Alp for use in one of his projects. |
|
| Back to top |
|
|
south_island_surf
Samba Member
Joined: September 23, 2004
Posts: 149
Location: Victoria, BC, Canada
|
| Posted: Sat Dec 10, 2011 9:21 pm Post subject: |
|
|
Using a chain (extra one from the kids' playground) and jack to get the spring plates off the stopper:
Dolly frame welded (copied a design from the second page of the biggest rotisserie thread on here):
Dolly brackets bolted to the frame:
Lowered onto the dolly frame, where I tacked it. Actually, I was worried about things moving when I welded it up, so I tried to lay as many beads as I could before pulling it out. Things still moved a bit, and I had to ream some holes in the angle iron brackets. I'd use a bigger drill bit if I did it again, more wiggle room.
Pulled it out and started welding:
Drilling plates for the casters:
Welding them on:
Done:
Test drive across the garage!
I'd love to start some sheet metal work, but the used welder I bought didn't come with shielding gas, so before I get a bottle I'll weld up the half-rotisserie with the flux-core wire I've got going.
I'll take some shots of the problem areas and post those next... |
|
| Back to top |
|
|
unclespanky
Samba Member
Joined: December 14, 2007
Posts: 1081
Location: Insanity Cruz
|
| Posted: Sat Dec 10, 2011 9:23 pm Post subject: |
|
|
Nice progress!!! keep the pics coming please!  |
|
| Back to top |
|
|
south_island_surf
Samba Member
Joined: September 23, 2004
Posts: 149
Location: Victoria, BC, Canada
|
| Posted: Sat Dec 10, 2011 9:24 pm Post subject: |
|
|
Bulkhead behind the cab:
Mild radio hack:
Passenger front wheel well:
Passenger floor and dogleg:
Driver's floor and dogleg:
Roof creased (from a rotisserie?) over passenger rain gutter:
Driver's side rocker:
Battery tray (came with a repair piece):
Lower nose:
All in all, pretty minor stuff for a split. I'm debating whether to blast it again and re-do all the bodywork, or just grind all the patches where rust has started again. The whole underside is surface-rusted, and the treasure chest area is spotty.
Side gates are probably savable, rear gate is toast. Doors haven't been touched; they'll need some work. Treasure chest doors are bare metal with pinhole rust, decklid is primered.
Hoping to have it ready for paint when the weather warms up... April? We'll see... |
|
| Back to top |
|
|
Saul Koll
Samba Member

Joined: September 28, 2008
Posts: 196
Location: Portland
|
| Posted: Sat Dec 10, 2011 10:03 pm Post subject: |
|
|
| Looking good, I'll be watching! |
|
| Back to top |
|
|
Fuzz VW
Samba Member

Joined: September 19, 2005
Posts: 233
Location: Upstate NY/VT
|
| Posted: Sun Dec 11, 2011 12:03 am Post subject: |
|
|
Nice project! Looks to be a really solid bus. Nice job on the cart too. Clean and simple.
_________________
The Older the Better!
www.wolfsgart.com
www.wagenfest.com (Vintage VW & Porsche Festival) |
|
| Back to top |
|
|
Campy
Samba Member
Joined: January 10, 2005
Posts: 4933
Location: Chico, CA
|
| Posted: Sun Dec 11, 2011 1:02 am Post subject: |
|
|
I would recommend using a tie rod end separating tool to remove the drag link and tie rod ends (no damage).
Since the body was taken down to bare metal, take it back down to bare metal, including removing any filler, especially if two coats of epoxy primer were not shot over the body. You don't want your new paint to start getting bubble spots.
I like the photographs: they make me feel like I am there.
_________________
Don't worry; be happy. (Baba) |
|
| Back to top |
|
|
crukab
Samba Chef

Joined: December 13, 2002
Posts: 6131
Location: Vermont
|
| Posted: Sun Dec 11, 2011 6:44 am Post subject: |
|
|
Nice looking project Truck !
I like the no center posts in your garage, wish I had that option when mine was built.
You will love the second treasure chest door when working inside the beast, keep the great picks coming.
_________________
Tom
My Pops:
http://www.thesamba.com/vw/forum/viewtopic.php?t=604100&highlight=
I know you will always be with me, rest in peace with no more pain. 8/13/14.....
In the yard right now:
'51 Dodge 5 window truck
'65 Bug
'66 Singlecab
'82 Rabbit Truck Diesel from CALI 
'86 Doublecab W/T
'91 Vanagon carat/wolfsbrg.Tiico
'88 Dodge Ram pickup
'11 Jetta Wagon |
|
| Back to top |
|
|
BenTen
Samba Member
Joined: May 27, 2011
Posts: 134
Location: Anderson, SC
|
| Posted: Sun Dec 11, 2011 7:01 am Post subject: |
|
|
That SC is in great shape compared to any I've seen especially from the NC/SC area. Will be watching your progress!
Ben |
|
| Back to top |
|
|
south_island_surf
Samba Member
Joined: September 23, 2004
Posts: 149
Location: Victoria, BC, Canada
|
| Posted: Sun Dec 11, 2011 9:28 am Post subject: |
|
|
Thanks for the kind words, everyone!
| Campy wrote: |
I would recommend using a tie rod end separating tool to remove the drag link and tie rod ends (no damage).
Since the body was taken down to bare metal, take it back down to bare metal, including removing any filler, especially if two coats of epoxy primer were not shot over the body. You don't want your new paint to start getting bubble spots.
I like the photographs: they make me feel like I am there. |
New tie rods were among the many parts that came with the project, and the old ones were worn... Whatever primer was used was sprayed over ten years ago with no sign of lifting, but I still think I'd like to start from scratch.
| crukab wrote: |
Nice looking project Truck !
I like the no center posts in your garage, wish I had that option when mine was built.
You will love the second treasure chest door when working inside the beast, keep the great picks coming. |
I have a huge microlam beam that didn't need the post... I have a rental suite up above, occupied by a nurse. I'm going to ask her when her night shifts are, so I can have some late-night sessions banging away in the garage! |
|
| Back to top |
|
|
P.Rocket
Samba Member

Joined: September 19, 2007
Posts: 3
|
| Posted: Sun Dec 11, 2011 2:19 pm Post subject: |
|
|
Good looking project Art. Looking forward to keeping an eye on your progress.
I'm Andrew from Abbotsford, the guy with the fuel tank.
Does the bus tank fit in that location on a single cab?
You've got my number, chat ya later. |
|
| Back to top |
|
|
south_island_surf
Samba Member
Joined: September 23, 2004
Posts: 149
Location: Victoria, BC, Canada
|
| Posted: Sun Dec 11, 2011 2:23 pm Post subject: |
|
|
Hey Andrew, yeah the tank is the same.
I am missing the sheet metal that hides the tank in the treasure chest... anybody have that? |
|
| Back to top |
|
|
crukab
Samba Chef
Joined: December 13, 2002
Posts: 6131
Location: Vermont
|
| Posted: Sun Dec 11, 2011 2:53 pm Post subject: |
|
|
| south_island_surf wrote: |
I am missing the sheet metal that hides the tank in the treasure chest... anybody have that? |
yep-
You can have the one in the pic for the cost to ship. Do you have a friend in WA. ?? It would make the shipping cheaper.
_________________
Tom
My Pops:
http://www.thesamba.com/vw/forum/viewtopic.php?t=604100&highlight=
I know you will always be with me, rest in peace with no more pain. 8/13/14.....
In the yard right now:
'51 Dodge 5 window truck
'65 Bug
'66 Singlecab
'82 Rabbit Truck Diesel from CALI
'86 Doublecab W/T
'91 Vanagon carat/wolfsbrg.Tiico
'88 Dodge Ram pickup
'11 Jetta Wagon |
|
| Back to top |
|
|
south_island_surf
Samba Member
Joined: September 23, 2004
Posts: 149
Location: Victoria, BC, Canada
|
| Posted: Sun Dec 11, 2011 6:11 pm Post subject: |
|
|
| crukab wrote: |
| Do you have a friend in WA. ?? It would make the shipping cheaper. |
I wish! I've been hammered on brokerage fees getting stuff across the border... That's a generous offer, thanks! I'll look for awhile in Canada, then maybe hit you up closer to paint time if I haven't found one.
Got started on the rotisserie part of the dolly today:
Good penetration:
Here's all that's left of the original colour, I'm guessing it's Ivory, seems closer than Pearl White:
Paint choices are down to Pearl White, Anthracite, or of course good ol' Dove Blue. BRM's for sure. |
|
| Back to top |
|
|
south_island_surf
Samba Member
Joined: September 23, 2004
Posts: 149
Location: Victoria, BC, Canada
|
| Posted: Mon Dec 12, 2011 8:48 pm Post subject: |
|
|
Got more done on the rotisserie.
Second upright and crossbrace:
Adjustable piece to brace the cab:
Placed this tube against the cab, tucked up under the rain gutter, then traced how it sat against the brace so I can cut it and weld them at that angle:
Only had a couple hours in the garage today, hopefully I can finish it off tomorrow and flip this sucker on its side!
_________________
Art
My '65 single cab project:
http://www.thesamba.com/vw/forum/viewtopic.php?t=491474 |
|
| Back to top |
|
|
HotStreetVw
Samba Member
Joined: October 03, 2004
Posts: 871
Location: Wild West
|
| Posted: Mon Dec 12, 2011 8:54 pm Post subject: |
|
|
You don't NEED the additional support at the cab. The frame is plenty strong to support the weight of the shell.
_________________
4inBhore
50 Split - 2724cc NA. Haltech injected
62 Notchback - 2542cc Turbo WIP |
|
| Back to top |
|
|
south_island_surf
Samba Member
Joined: September 23, 2004
Posts: 149
Location: Victoria, BC, Canada
|
| Posted: Mon Dec 12, 2011 9:07 pm Post subject: |
|
|
I'm sure you're right, and I've read the debate on the rotisserie threads...
Just peace of mind, especially since this is my first fabricating project beyond skateboard grind rails! I'm pretty sure all the welds are good, but a little insurance never hurt.
_________________
Art
My '65 single cab project:
http://www.thesamba.com/vw/forum/viewtopic.php?t=491474 |
|
| Back to top |
|
|
dmuis
Samba Member
Joined: September 01, 2004
Posts: 381
Location: Sunny Alberta, Wild Rose Country.
|
| Posted: Mon Dec 12, 2011 10:19 pm Post subject: |
|
|
I was looking at that singlecab back in 2009 already, but when I sold my other bus in 2010, I needed a driver, the withdrawal was so bad. Bought a 65 singlecab, but always wondered about the colour of yours. It does really look closer to ivory. Have you got an Mcode plate with it? That should tell all. It's behind the passenger seat, down low.
Closely watching the thread,
Darren |
|
| Back to top |
|
|
|


