| Author |
Message |
Muggee007
Samba Member
Joined: December 16, 2011
Posts: 44
Location: Alabama

|
 Posted: Thu Dec 29, 2011 9:25 am Post subject: What was I thinking? / Restoration 64 Kombi Posted: Thu Dec 29, 2011 9:25 am Post subject: What was I thinking? / Restoration 64 Kombi |
 |
|
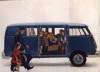
[img]http://www.flickr.com/photos/73084465@N07/6594647921/[/img]
I hope that image shows up.....
Hello Everyone!
This is my first post and hopefully the start of a long restoration process for my 64 Kombi. I have worked on other cars over the years (mostly old BMWs and Mercedes) but this is my first VW and it is in pretty bad shape. Rust removal and heavy body work are not my thing so if you see something Im not doing correctly please let me know.
Everyone here has been an inspiration to me and I hope that the progress of my project will inspire others.
Klassib fab and other panels were delivered yesterday and everything is looking great. Time to really get to work. Thanks already to MonkeyNut in NC and Gerson you guys have been great to work with. |
|
| Back to top |
|
 |
OTO X58
Samba Member

Joined: March 27, 2004
Posts: 3159
Location: Santa Cruz, CA
|
| Posted: Thu Dec 29, 2011 9:28 am Post subject: |
|
|
here you go:
Good luck with your project! |
|
| Back to top |
|
|
Muggee007
Samba Member
Joined: December 16, 2011
Posts: 44
Location: Alabama
|
| Posted: Thu Dec 29, 2011 10:07 am Post subject: Some Progress pics if anyone is interested |
|
|
The inside was really too far gone. All the wood was rotten from the backside.
sorry about the angle, Ill have to work on figuring that out for the next posts
First delivery of metal!!! Its like Christmas!
Minimum tool requirement for removing the floor.....
Spot weld cutter from NAPA that was recommended here. The hole is a little big, but this thing is AWESOME. I bought extra blades but after the entire floor it is still sharp. One thing is that you do need to drill a pilot for the pin otherwise it wanders. Oh and thanks to the forum for the tip of using a wire wheel to find out where the spot welds were it really did help.
This is where Im at now, Im probably going to pull the beams to do the top hats instead of splitting them, Im a little worried about the shifter alignment later though. |
|
| Back to top |
|
|
bill may
Samba Member

Joined: August 27, 2003
Posts: 14160
Location: san diego,ca
|
| Posted: Thu Dec 29, 2011 11:07 am Post subject: Re: Some Progress pics if anyone is interested |
|
|
| Muggee007 wrote: |
First delivery of metal!!! Its like Christmas!
|
the 4 pieces of square tubing are for a vw beetle. they go inside bumper blades to reinforce the blade. the were sold by EMPI back in 70's and before.
_________________
Admin note: Bill Passed away - July, 2017
1965 panel bus-Kermit
"Camping is cheaper than therapy"
www.sv2s.com
www.steeringboxscrapers.net
SBS #100
http://www.thesamba.com/vw/forum/viewtopic.php?t=453617 |
|
| Back to top |
|
|
Eric&Barb
Samba Member

Joined: September 19, 2004
Posts: 25895
Location: Olympia Wash Rinse & Repeat
|
| Posted: Thu Dec 29, 2011 11:30 am Post subject: |
|
|
Do please consider posting your images on thesamba. Too often old interesting post have no images because other websites have removed them due to how long they were there.
Hammer and center punch would be better and faster to get the spot weld remover tool a starting dimple instead of drilling.
Do not give up on the interior cabinets. Can be used for templates to make new ones. Your bus very likely was camper modified by some company or off plans followed by an individual. If the former it could be one of the last examples of that companies work, and either way a nice piece of history of the bus.
_________________
In Stereo, Where Available! |
|
| Back to top |
|
|
Muggee007
Samba Member
Joined: December 16, 2011
Posts: 44
Location: Alabama
|
| Posted: Thu Dec 29, 2011 6:42 pm Post subject: Square Tubes |
|
|
Actually the square tubes are from a sun roof section I purchased. Its hard to see in the pictures but the roof is badly damaged on the kombi. I know it wont be original but I thought that if Im saving this thing from the scrap yard and I need to put a roof in anyway.... sunroof sounded good.
I am now using the samba gallery so I hope that is whats proper.
I didnt get much done today, finally got my house roof inspected from the tornado / storm damage done this year. More pics tomorrow. I pulled the speaker from the dash today and Im wondering if the bracket is original... pics in the morning. |
|
| Back to top |
|
|
Muggee007
Samba Member
Joined: December 16, 2011
Posts: 44
Location: Alabama
|
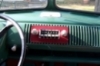
| Posted: Fri Dec 30, 2011 9:23 pm Post subject: Slow Day / Speaker in the Kombi |
|
|
I beams are fighting back and had some stuff get in the way of the bus today. I was wondering if this is really a stock speaker mount and speaker? Ill look through the rest of the forum for some answers as well, just thought it was kind of cool. Im pretty sure it wont sound really good in its current state 
|
|
| Back to top |
|
|
sventinker
Samba Member
Joined: June 10, 2009
Posts: 1481
Location: the sandbox
|
| Posted: Fri Dec 30, 2011 9:49 pm Post subject: |
|
|
Yes that is a correct speaker mount and don't toss that speaker because you can get it re-coned.
_________________
April 3rd 62 standard mgr/pw
374 North American equipment
Includes 6 popouts
025 Safety belts
195 Adjustable bench seat/backrest (until 1963)
| dawerks wrote: |
| Perfection only comes with delusion. |
http://www.oacdp.org/ |
|
| Back to top |
|
|
rebapuck
Samba Member
Joined: May 17, 2007
Posts: 1023
Location: Chapel Hill NC
|
| Posted: Sat Dec 31, 2011 10:38 am Post subject: |
|
|
I have just redone the first three of my awning windows and they no longer leak!! Ask me how when you get to that step.
_________________
Judy
1966 Camper "Hannah"
1967 SingleCab "Khady" |
|
| Back to top |
|
|
cru62
Samba Member

Joined: December 31, 2002
Posts: 4121
Location: Margaritaville.....24/7
|
| Posted: Sat Dec 31, 2011 11:02 am Post subject: |
|
|
You don't need to drill a hole for that spot weld cutter. If it wanders you can just use a center punch in the middle of the spot weld.
_________________
"My biggest worry is that when I die, my wife will sell all my parts for what I told her I paid for them"-Jon
Jokes about German sausage are the wurst.
Stop dead photo links! Post your photos to The Samba Gallery! |
|
| Back to top |
|
|
Muggee007
Samba Member
Joined: December 16, 2011
Posts: 44
Location: Alabama
|
| Posted: Tue Jan 03, 2012 10:36 pm Post subject: Update on the bus... floors / beams come to a halt |
|
|
Well it turns out you get what you pay for  . I started to measure up the tophats I bought from the bus depot and well they are junk. First clue should have been that the bends were no where near 90 degrees, the problems is when I make them 90 degrees the tophat is much to tall to be used. They are much too long and there are no holes cut either. So being that I am happy with the rear top hat from Wolfsburg West and I needed some little things from them anyway, an order was placed. Pictures will be posted of the difference when the new parts arrive. . I started to measure up the tophats I bought from the bus depot and well they are junk. First clue should have been that the bends were no where near 90 degrees, the problems is when I make them 90 degrees the tophat is much to tall to be used. They are much too long and there are no holes cut either. So being that I am happy with the rear top hat from Wolfsburg West and I needed some little things from them anyway, an order was placed. Pictures will be posted of the difference when the new parts arrive.
Thanks for the suggestion on the center punch instead of using a drill, Ill give it a shot.
I was not going to toss the speaker, but I hadnt considered putting a new cone on it. I have done this for subs (no the bus is not getting a subwoofer) but did not know there were generic cones for smaller speakers out there.
Im torn on the camper windows, I like the pop outs better and according to M codes thats what came with the bus originally in the first place. If I decide to keep the camper windows Ill ask for help down the road.
Speaking of M codes, according to what I read I should have windshield washers? There is a hackjob of a setup on the bus now, but the holes do not look like they are in the proper place.
My code plate has a 13 5 in the upper left corner and in the middle has the following numbers 425 015 025 114. Does this mean that I should have washer fluid in the bus?
Thank you for the comments so far. |
|
| Back to top |
|
|
bill may
Samba Member
Joined: August 27, 2003
Posts: 14160
Location: san diego,ca
|
| Posted: Wed Jan 04, 2012 5:34 am Post subject: |
|
|
you can use TEK screws (#10 or #12)about 1 1/2" long to drill out spotwelds. they have a hex head that i cut off to chuck in drill. they look like a hex headed sheetmetal screw with a short drill bit on end. you can drill about 30-50 spotwelds,throw dull one away and use another one. i think they come a box of 100 real cheap at home depot
_________________
Admin note: Bill Passed away - July, 2017
1965 panel bus-Kermit
"Camping is cheaper than therapy"
www.sv2s.com
www.steeringboxscrapers.net
SBS #100
http://www.thesamba.com/vw/forum/viewtopic.php?t=453617 |
|
| Back to top |
|
|
SkooobaSteve
Samba Member
Joined: March 23, 2005
Posts: 3152
Location: Dothan Alabama
|
|
| Back to top |
|
|
Muggee007
Samba Member
Joined: December 16, 2011
Posts: 44
Location: Alabama
|
| Posted: Fri Mar 23, 2012 6:58 pm Post subject: Progress |
|
|
Here are some updates... My real job has been getting in the way of the bus ha ha.
Cutting access to the retaining nuts... they were broken off an rusted solid, PB blaser EZ out you name it didnt work.
Dont worry I cleaned it all up and coated it with rust sealant and primer before sealing it back up.
First time with a lid since 78!
If anyone can help me on a minor thing, the two rods that prop the lid are missing some sort of connector at the end... IE it seems that something needs to attach the two together so it will actually prop up the lid. Does anyone have pics of this piece?
All this fun stuff has been reinstalled (with trans to check for alignment) and it all looks good. C Pillar and B Pillar are patched and cargo rocker is in place. Pics will be posted soon. |
|
| Back to top |
|
|
Muggee007
Samba Member
Joined: December 16, 2011
Posts: 44
Location: Alabama
|
| Posted: Fri Mar 23, 2012 7:05 pm Post subject: Inner Nose Support issues... Please help! |
|
|
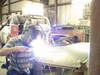
I need to post some more pics of the progress on the rust bucket but after I get this nose piece in I think I have officially crossed the threshold of going from my rust having a bus problem to my bus having a rust problem
OK here is the problem.... I have the piece dry fitted to the frame rails. The support is pushed flush to the frame rails and it is still sticks 3/4" too far out on the drivers side and 1/2" on the passenger side. Can I "bend" this to fit the shape of the bus???? Is this normal??? I have everything braced and the door gaps looked good when I started so whats up?
Please let me know so I can get this part done. |
|
| Back to top |
|
|
quartermilecamel
Samba Member

Joined: April 16, 2008
Posts: 3929
Location: ohio
|
| Posted: Fri Mar 23, 2012 9:45 pm Post subject: |
|
|
Is the nose sheetmetal itself just too far in maybe?
_________________
Waiting for santa to drop off funky green. I can wish can't I???? |
|
| Back to top |
|
|
olliehank47
Samba Member
Joined: May 04, 2011
Posts: 1198
|
| Posted: Sat Mar 24, 2012 8:01 am Post subject: |
|
|
For the engine lid.
64 had two different engine lid props--early were single, flat metal folding metal arms, and later (through 67) were two-armed, round rod-like arms that loop around two rollers near the bottom of the engine compartment frame and attach to the engine lid with a single bolt. From your photo, I can see the rollers attached to the engine compartment frame so you will need the rod type prop. Here's a link: http://www.thesamba.com/vw/classifieds/detail.php?id=950714 |
|
| Back to top |
|
|
Muggee007
Samba Member
Joined: December 16, 2011
Posts: 44
Location: Alabama
|
| Posted: Sat Mar 24, 2012 5:58 pm Post subject: Nose update |
|
|
@quartermilecamel, Thanks for the suggestion but it turns out that the dimension from the frame bracket to the front edge was too long, combine that with the wrong radius in the part and that explains the problem. I had one of my friends come over and help me tweak the shape back and I folded over the tabs a little further on the frame rails allowing the support to sit further back. All in all it fits really freakin sweet now! This is my 1st VW so I am still trying to figure out how this puzzle goes together. I have A pillars now!
@olliehank47 Thank you so much for the link. I have the rod but not the paperclip looking retainer. A coat hanger loop welded together works great! I thought the piece would look a little more complicated.
Thanks everyone again, the samba rules! |
|
| Back to top |
|
|
Muggee007
Samba Member
Joined: December 16, 2011
Posts: 44
Location: Alabama
|
| Posted: Mon Dec 03, 2012 8:48 am Post subject: Build Update Pics |
|
|
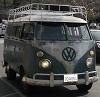
Its been a while since I have posted an update. Traveling for work has thrown any schedule out the window. Maybe THIS May I will be riding in my Bus.
Ebrake pin from a friend
It doesnt look that bad from this side, but someone used foam for insulation and combined with the camper windows destroyed the metal inside
Rims Blasted and painted. Mental note: Next time buy better rims instead of spending two weeks getting these looking good.
And Finally!!! She rolls.....
Cant wait to finish the metal work and throw those spindles and plates from WideFive on there! |
|
| Back to top |
|
|
RPGreg2600
Samba Member
Joined: November 07, 2010
Posts: 1657
Location: Vallejo, CA
|
| Posted: Mon Dec 03, 2012 11:36 am Post subject: |
|
|
| Nice! |
|
| Back to top |
|
|
|


