| Author |
Message |
NUG637
Samba Member
Joined: March 27, 2012
Posts: 144
Location: Australia

|
 Posted: Fri May 02, 2025 5:41 pm Post subject: The Dirty Double Cab - Built to Take a Load Posted: Fri May 02, 2025 5:41 pm Post subject: The Dirty Double Cab - Built to Take a Load |
 |
|
How good is ChatGPT i asked for a witty crude topic name for a dual cab and it came up with this
Anyway back in late July 2024 my good friend Rhett found a dual cab that was rough and within my price range so you know what that means… rusty!
Just how i like em.
It sat nosed into a bush with no front windscreen….
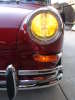
Numbers suggest a Jan 68, speedo says December 67. With all the early quirky bits |
|
| Back to top |
|
 |
NUG637
Samba Member
Joined: March 27, 2012
Posts: 144
Location: Australia
|
| Posted: Fri May 02, 2025 6:00 pm Post subject: Re: The Dirty Double Cab - Built to Take a Load |
|
|
It’s been sat at the folks acreage ever since getting it transported up to Brisbane waiting for me to finish St. Christopher before making its way home into my shed. Where it looks right at home
While scratching my head at where to start i thought i would see how much life is left in the honey brown spray job its had in it hay day…
Gets a fair shine to it but is very thin, it was originally Lotus white i think as the inside and underside have not been resprayed.
With the front being the worste i thought i would start pulling it all apart to get an idea on what’s required for repairs….
I tried removing the handbrake lever but it was so rusty In place i had to cut the entire bracket off the car before i could beat the shit out of the handbrake leaver pin to try and get them apart… i slowly won but not without fighting it for a very long time
Im gonna strip the front and start saving for the front valance inner and outer, bottoms of a pillars, windscreen frame repair, and the entire front floor…
Bus shit is so expensive compared to type 1, which is why this is gonna be a SLOW build…. And being that this bus needs nearly every horizontal panel replaced its gonna take me some time to come up with the money. That is why saint christopher will hit the market at some point this year once im happy that its all dialled in.
This bus also stank of stale fuel so pulled the tank out to find it peppered with pin holes stinking up the rear floor….
|
|
| Back to top |
|
|
ALLWAGONS
Samba Member
Joined: June 03, 2000
Posts: 4731
Location: Pasadena CA/DTLA soon China
|
| Posted: Fri May 02, 2025 8:29 pm Post subject: Re: The Dirty Double Cab - Built to Take a Load |
|
|
Nice to see another double cab getting revived. I love mine, it fits everyone and so much you can do with it. Can’t wait on the progress.
Martin
Allwagons
‘71 Euro spec double cab
_________________
I'd be UNSTOPPABLE if not for Law Enforcement and PHYSICS.
I recycle old cars and parts, other than when I rot, that's as Green as I am going to get.
Thanks to my Tesla driving neighbors, I feel more relaxed driving my SUBURBAN and old VW's.
Everything sounds good on paper! |
|
| Back to top |
|
|
NASkeet
Samba Member
Joined: April 29, 2006
Posts: 3238
Location: South Benfleet, Essex, UK
|
| Posted: Sat May 03, 2025 12:38 pm Post subject: Re: The Dirty Double Cab - Built to Take a Load |
|
|
What is even better, is that it's in a country where they drive on the correct side of the road; namely the left-hand side, so the steering column and pedals are conveniently placed on the right-hand side.
It does look a bit rough though, even for Australia! 
Note the long-stemmed interior rear-view mirror & non-cut-out type sun-visors, which are preferable for a Westfalia motor-caravan with rear ceiling-mounted cupboard.
My 1973 VW "1600" Type 2 Westfalia Continental required a late-1969 model-year VW Type 2 long-stemmed interior rear-view mirror, which has the compatible spring-loaded ceiling mounting.
_________________
Regards.
Nigel A. Skeet
Independent tutor (semi-retired) of mathematics, physics, technology & engineering for secondary, tertiary, further & higher education.
Much modified, RHD 1973 VW "1600" Type 2 Westfalia Continental campervan, with the World's only decent, cross-over-arm, SWF pantograph rear-window wiper
Onetime member, plus former Technical Editor & Editor of Transporter Talk magazine
Volkswagen Type 2 Owners' Club (Great Britain)
https://vwt2oc.co.uk |
|
| Back to top |
|
|
NUG637
Samba Member
Joined: March 27, 2012
Posts: 144
Location: Australia
|
| Posted: Mon Jun 16, 2025 4:54 am Post subject: Re: The Dirty Double Cab - Built to Take a Load |
|
|
Yeah this thing is rough, which is why the price was right and I’m not shy of a big project. If anything I enjoy the build just as much if not more then driving the finished product. 
Due to sitting under a bush with no windscreen the front is pretty cooked….
Facebook provided some cheaper front end panels a few weeks back.
This gave me a template of how high I could cut off the front nose to start inspecting
Kinda looks like it’s going back together but it’s not just yet…. Just trial fitting this jigsaw puzzle as I don’t have much experience with buses
|
|
| Back to top |
|
|
NUG637
Samba Member
Joined: March 27, 2012
Posts: 144
Location: Australia
|
| Posted: Mon Jun 16, 2025 4:59 am Post subject: Re: The Dirty Double Cab - Built to Take a Load |
|
|
Within 12 hours of the beetle selling an order was placed through justkampers for a rather large order of replacement panels
So to do the inner lower Front nose I need to weld to the “A” pillars…. But my lower “A” pillars are cooked so they are my first panel to tackle….
First was to add some bracing so the doglegs could be removed to get access to both sides of the lower “A” pillar
These BBT panels fit very good with very minor tweaks
With the passenger “a” pillar done I thought I would see what the fitment was like on these cheaper black panels which thankfully were only supplied for these lower dogleg sections as the fitment and pressings are dogshit…. But are thin and easy enough to beat into a rough enough shape to get to work.
This outer dogleg took a few hours work to get close enough that I’m happy to manipulate a little as I weld it in. I’ve test fitted the door for gaps etc and it’s close enough for now but before I burn it in I will need to do the same with the inner dogleg section and make sure the 2 work with each other…. |
|
| Back to top |
|
|
NUG637
Samba Member
Joined: March 27, 2012
Posts: 144
Location: Australia
|
| Posted: Tue Jun 24, 2025 10:12 pm Post subject: Re: The Dirty Double Cab - Built to Take a Load |
|
|
After many hours manipulating this outer dogleg repair section i ended up separating the top and the side piece as i couldn't quite get it where i wanted it...
Once i got it siting in a position that lined up with the door, the a pillar and the inner dogleg section then I stitched it back together in a more OEM form
then it came to the inner dogleg/step section which ended up being a little short once i finished hacking stuff out of my way.... this required me to bend up a little splice piece to bridge the old to the new...
Also had to remove the inner bumper mount from the rotten dogleg and fit it to the new piece which of course was nowhere near the holes they had made in the repro panel.
after a good coat of paint to the inside of both panels it was time to close it all up
Passenger dogleg done! Abit of grinding to go and onto to doing it all again on the drivers side...
also had a small win off Facebook last week getting a lightly patina'd front badge and the VW script for the rear that it never came with
|
|
| Back to top |
|
|
jtauxe 
Samba Member

Joined: September 30, 2004
Posts: 5980
Location: Los Alamos, New Mexico, USA
|
| Posted: Wed Jun 25, 2025 8:59 am Post subject: Re: The Dirty Double Cab - Built to Take a Load |
|
|
Oh, my! Good on you for saving it! 
I also have RHD, but here in the US we drive on the wrong side of the road for it. It's actually nice for parking. The only real drawback is that it is hard to see around vehicles in front of me on 2-lane roads (aka dual carriageway roads).
_________________
John
"Travelling in a fried-out Kombi, on a hippie trail, head full of zombie..." - Colin Hay and Ron Strykert
http://vw.tauxe.net
1969 Transporter, 1971 Westfalia, 1976, 1977, 1976, 1977, 1971, 1973, 1977 Westfalias,
1979 Champagne Sunroof, 1974 Westfalia Automatic, 1979 Transporter, 1972 Sportsmobile, 1973 Transporter Wild Westerner, 1974 Westfalia parts bus, 1975 Mexican single cab *FOR SALE*, 1978 Irish 4-door double cab RHD
|
|
| Back to top |
|
|
NUG637
Samba Member
Joined: March 27, 2012
Posts: 144
Location: Australia
|
| Posted: Tue Jul 15, 2025 8:52 pm Post subject: Re: The Dirty Double Cab - Built to Take a Load |
|
|
Onto the drivers side now...
After learning my lesson on the passenger side, i didn't even bother trying to fit the panel spot welder together like they send it... split it all apart, sandblasted it, primed it inside and out and started beating it into shape and fitting it up how it should.... my measurements were the same side to side but the inner step/dogleg section was about 20mm short at the A-pillar end this time so had to weld abit on to make it work...
this needed triming off
then welded it together once things were in the right spots
|
|
| Back to top |
|
|
NUG637
Samba Member
Joined: March 27, 2012
Posts: 144
Location: Australia
|
| Posted: Mon Jul 28, 2025 3:45 am Post subject: Re: The Dirty Double Cab - Built to Take a Load |
|
|
Welded the handbrake mount back on after having to cut it off just to remove the handbrake pin….
Also welded a bumper mount nut back on that broke loose during tear down
Fixed a small patch of rust that had formed between the floor and the top of the chassis rail,
Then went about welding the inner front valance on
Test fitted the “A” pillar to front inner valance bracing panels before burning them in
Been testing a weld through primer which seems to be doing pretty well. It definitely splasters a bit more before burning in but has a far greater heat resistance to the coating that’s close to the weld which should really help in any lapped panel situation I would think.
A big props to Steve at das resto parts, I called him a while back saying I would be chasing a load bed floor for a d/c in the near future and to let me know when he would get one in next. He messaged me last week telling me his shipment landed and he had put one aside for me before doing his stocklist update on the website. He is also very knowledgeable on reproduction panels having dealt with them when they ran the resto shop.
So another piece of the puzzle ready to go when I get to it.
Next up was the inner kick panel that mounts on top of the inner brace that the cab floor butts up against, I kept what was left of the original one for a reference after reading about the differences of 68 model buses and also the difference with rhd to lhd panels. As you can see there were a few differences, mainly the heater control hole locations and the 68 only hard brake fluid line hole. This was a near exact reproduction panel otherwise and was a perfect fit, very impressive. Had to weld on the washer bottle mount also
With the entire front end being put together with repo panels I test fit everything before welding stuff home. With the kick panel sitting in place i thought I would test fit the new cab floor…. Once again a killer fit with some minor tweaks required.
Clutch pedal hole was a little off which I will just oversize a little to gain clearance.
But the brake pedal was spot on
Gear shifter holes will need a little oversizing as well, handbrake was spot on. And the panel was a perfect tight fit on all 4 sides so it was decided to leave the panel and just ream the holes that were a bit off
These replacement panels have been great quality and a pleasure to work with unlike the dogleg “kolkkerholm” stuff. Like night and dad |
|
| Back to top |
|
|
brookmp
Samba Member

Joined: February 05, 2010
Posts: 352
Location: San Diego, CA
|
| Posted: Mon Jul 28, 2025 11:13 pm Post subject: Re: The Dirty Double Cab - Built to Take a Load |
|
|
Your work is both fascinating and totally inspiring. Looking forward to seeing this double cab restored. Incredible. Thanks for sharing.
_________________
1968 Westfalia Campmobile
1971 Double Cab Pick-up
1974 Standard Beetle |
|
| Back to top |
|
|
NUG637
Samba Member
Joined: March 27, 2012
Posts: 144
Location: Australia
|
| Posted: Tue Aug 05, 2025 4:10 am Post subject: Re: The Dirty Double Cab - Built to Take a Load |
|
|
Thanks for the kind words, it’s been very enjoyable doing something different so far
Once I was content with how things were sitting I welded in the kick panel and painted the lower nose inner support in readiness to be closed up
Then welded home the lower nose middle support brace
Then prepped the floor for its future fitment
|
|
| Back to top |
|
|
NUG637
Samba Member
Joined: March 27, 2012
Posts: 144
Location: Australia
|
| Posted: Sat Aug 09, 2025 3:41 am Post subject: Re: The Dirty Double Cab - Built to Take a Load |
|
|
This weeks project was to continue the prep for the cab floor figment…. The very bottom of the front wheel arches were rusted out where they meet the floor. The donor bus was rusted in the same spot but i got cuts a few inches up and only had to manipulate them slightly and fold up the bottom lip to get them to work
Also had to form up the vinyl floor retaining strip
Have been toying with the idea of how i was going to repair the drivers wheel arch, initially i thought i would just tub the bus and that would fix the rusty wheel arches but after a bit of research on stance, and me being 6’4” i thought i would keep it stock and add tubs down the line if i had to…. Then i thought i might just be able to weld up the pin holes but after a wire wheel it was obvious that wasn’t gonna work either…So again donor bus to the rescue! Hope i dont regret just pulling the trigger and tubbing it from the get go
|
|
| Back to top |
|
|
ALLWAGONS
Samba Member
Joined: June 03, 2000
Posts: 4731
Location: Pasadena CA/DTLA soon China
|
| Posted: Sat Aug 09, 2025 8:32 am Post subject: Re: The Dirty Double Cab - Built to Take a Load |
|
|
Great work! I admire your skills. I personally have walked away from double cabs in better condition as I do not have the skill set to do that type of work. I am glad this one found you! Had I bought a bud like this, in USA standards I would be up to $30 grand in bodywork. Keep up the good work! If you never had a double cab, you’ll find it as the most comfortable utilitarian air cooled VW you will ever own, the many thumbs up on the road will be a plus!
Martin
Allwagons
‘71 Euro spec double cab
_________________
I'd be UNSTOPPABLE if not for Law Enforcement and PHYSICS.
I recycle old cars and parts, other than when I rot, that's as Green as I am going to get.
Thanks to my Tesla driving neighbors, I feel more relaxed driving my SUBURBAN and old VW's.
Everything sounds good on paper! |
|
| Back to top |
|
|
NUG637
Samba Member
Joined: March 27, 2012
Posts: 144
Location: Australia
|
| Posted: Mon Aug 11, 2025 5:08 am Post subject: Re: The Dirty Double Cab - Built to Take a Load |
|
|
Thanks ALLWAGONS, i can only afford rusty tin and then spend all my time and little money putting them back together…. I usually enjoy them for quite a while before i have to sell them to fund something else… but this d/c i think will be one I hold on to…. Time will tell. My point is i dont like to drop big coin on a car but can justify small amounts each week to make it “mine” and its kinda like a mental health plan… i really enjoy them build
Anyway I found a little bit of time on Sunday afternoon to burn in the cab floor, feels like abit of a milestone but a drop in the ocean of what’s still left to do
Painted the underside before i fitted it to help with less work over head…
Then spent an hour on the grinder this afternoon tidying everything up… im sure my neighbours loved it!
|
|
| Back to top |
|
|
pondoras box
Samba Member
Joined: March 22, 2004
Posts: 1923
Location: Warren, PA
|
| Posted: Mon Aug 11, 2025 6:07 am Post subject: Re: The Dirty Double Cab - Built to Take a Load |
|
|
I don’t know about bays but I know this whole area is extremely difficult to get lined up correctly on splits and fitting the welding gun / trigger in some of these areas can be tricky.
Awesome work here! Loving all the pics. I have recently located a bay double and might try to get it, not sure yet as I have way to many cars now, but definitely going to watch your thread.
_________________
Looking for anything from Hal Casey Motors out of Hamburg New York, from license plate surrounds to matchbooks.
1961 23 Window (Bobo)
1965 11 Window (Zelda). https://www.thesamba.com/vw/forum/viewtopic.php?t=563183
1965 13 Window (Lucas)
1957 Oval ragtop
1960 hardtop
1964 hardtop
1965 hardtop (Arschloch)
1973 standard bug (Dirty Gertie)
https://www.thesamba.com/vw/forum/viewtopic.php?t=804912
1988 Cabriolet VR6 conversion |
|
| Back to top |
|
|
NUG637
Samba Member
Joined: March 27, 2012
Posts: 144
Location: Australia
|
| Posted: Sat Aug 16, 2025 3:10 am Post subject: Re: The Dirty Double Cab - Built to Take a Load |
|
|
Thanks pondoras box, I was pleasantly surprised with how it all came together. Lots of checking nd measuring but that’s all part of the fun!
My time had been limited this week. So only managed a small achievement. The passenger fresh air vent on the d/c is non existent…. Completely rusted. The donor buses was surprisingly good considering the state of the rest of the bus though the passenger side air vent section still suffered a small amount of rust…. So I thought I would try my luck at hand forming a piece to weld in as I had no other option….
Not the prettiest repair but beggars can’t be choosers and it’s all to be hidden anyway
Next week, im hoping to get it welded in the dash |
|
| Back to top |
|
|
NUG637
Samba Member
Joined: March 27, 2012
Posts: 144
Location: Australia
|
| Posted: Thu Aug 21, 2025 10:39 pm Post subject: Re: The Dirty Double Cab - Built to Take a Load |
|
|
Got the fresh air ducts knocked in this week thanks again to the parts bus
|
|
| Back to top |
|
|
NUG637
Samba Member
Joined: March 27, 2012
Posts: 144
Location: Australia
|
| Posted: Thu Aug 28, 2025 9:42 pm Post subject: Re: The Dirty Double Cab - Built to Take a Load |
|
|
Slowly working my way through the never-ending list of rust repairs
Next cab off the rank was the inner windshield support structure
Cut the old one out, wire brushed, treated and coated the surface rust that was lurking behind
Note the difference in the dash top mounting pieces that are spot welded to this inner windscreen support panel? this is where the dash top has the Phillip head screws near the bottom rubber of the front window.... Im guessing the captive nut style is more of this 68 only quirky stuff? the one with the spire clip is what i cut off the 70 parts bus as they were in far better condition to what was on the D/C. i had to separate them then sandblast them before fitting them to the new repair panel
this piece is usually fitted in from the front before the front nose skin is attached but due to me keeping most the nose attached i have had to cut this repair in half to get it to fit into place without bending it in half.
Coated the backside before fitting it
And Done!
Got a little distracted while grinding up the spot welds and wanted to investigate how thin the surface rust was at the top of the A pillar.... too thin to try fill with weld so got to making a repair patch... just haven't had time to fit it yet after i cut out the rust and coated the inner A pillar which was still intact
|
|
| Back to top |
|
|
NUG637
Samba Member
Joined: March 27, 2012
Posts: 144
Location: Australia
|
| Posted: Thu Sep 04, 2025 3:39 am Post subject: Re: The Dirty Double Cab - Built to Take a Load |
|
|
Top Apillar in
Stopped into a local metal fab shop and ordered a few different size right angle folds to help with a few repair panels. For $85 and enough metal to fix the lower outer windshield section and the entire bottom of the rear seat pedestal I thought that was good value.
Borrowed my brothers new shrinker/stretcher that he hasn’t used yet and started to have a play as I had never used one before either
And massaged it to a point where I was extremely happy to weld that sucker in
|
|
| Back to top |
|
|
|


