| Author |
Message |
Sunroof53
Samba Member
Joined: October 22, 2007
Posts: 301
Location: UK

|
 Posted: Thu Mar 27, 2008 4:04 pm Post subject: Photos of fuel pipe replacement. Posted: Thu Mar 27, 2008 4:04 pm Post subject: Photos of fuel pipe replacement. |
 |
|
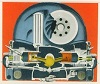
Had to replace the fuel pipe on my 53 and despite my sane rational side saying run the tube along side the tunnel ,i decided to run it inside .
I found a few previous access holes which had been badly covered up so this was an opertunaty to tidy it all up.
Looking towards the front .Note clutch cable to the top right.
Here shows plastic pipe used to pull copper alloy pipe (doesnt go brittle like pure copper)through the frame head as i didnt want to cut a hole there.
New pipe was tie wrapped to the existing stuff to make it rigid . |
|
| Back to top |
|
 |
Splitdog
Samba Split Personality

Joined: February 16, 2004
Posts: 4125
Location: Planet VW
|
| Posted: Thu Mar 27, 2008 7:55 pm Post subject: |
|
|
Nice tunnel pics! 
_________________
CH³NO²
Z = z² + C
Der Blitzkrieg Kafers
#notacallooker |
|
| Back to top |
|
|
billmetric
Samba Member

Joined: March 16, 2006
Posts: 1061
Location: Columbus City USA
|
| Posted: Thu Mar 27, 2008 11:06 pm Post subject: |
|
|
is that copper alloy brake pipe too  ( link to recent info on british copper line technology ) : ( link to recent info on british copper line technology ) :
http://www.dimebank.com/BrakePlumbing.html
I saw some pics of some Germans redoing split frame tubes somewhere on here and they cut the whole bottom of the frame tunnel off, replaced ALL pipes at once, spot welded everything back up like factory, I was impressed, no extra holes, that would be some serious work
_________________
There is an idea of a Billmetric; some kind of abstraction. But there is no real me: only an entity, something illusory. And though I can hide my cold gaze, and you can shake my hand and feel flesh gripping yours and maybe you can even sense our lifestyles are probably comparable... I simply am not there... |
|
| Back to top |
|
|
Sunroof53
Samba Member
Joined: October 22, 2007
Posts: 301
Location: UK
|
| Posted: Fri Mar 28, 2008 2:38 am Post subject: |
|
|
| billmetric wrote: |
is that copper alloy brake pipe too ( link to recent info on british copper line technology ) :
http://www.dimebank.com/BrakePlumbing.html
I saw some pics of some Germans redoing split frame tubes somewhere on here and they cut the whole bottom of the frame tunnel off, replaced ALL pipes at once, spot welded everything back up like factory, I was impressed, no extra holes, that would be some serious work |
i have seen that report before but copper nickel brake lines have been used since the seventies in the UK .i think if it was a real problem it would have been taken off the market by now. |
|
| Back to top |
|
|
virtanen
Samba Member
Joined: January 08, 2006
Posts: 1463
Location: Finland
|
|
| Back to top |
|
|
Sunroof53
Samba Member
Joined: October 22, 2007
Posts: 301
Location: UK
|
| Posted: Fri Mar 28, 2008 4:34 pm Post subject: |
|
|
thats a great link.Unfortunatly the hole in the end of the framehead is small and has the handbrake rod in the way .it will be useful if i ever have to do it again though.thanks . |
|
| Back to top |
|
|
splitjunkie
Samba Member
Joined: April 04, 2006
Posts: 4095
|
| Posted: Fri Mar 28, 2008 4:56 pm Post subject: Re: Photos of fuel pipe replacement. |
|
|
Man, That is like a colonoscopy of a VW. Cool picture
_________________
Chris
You know, a lot of these scratches will buff right out... Jerry Seinfeld |
|
| Back to top |
|
|
srj1200
Samba Member
Joined: September 13, 2007
Posts: 74
|
| Posted: Sat Mar 29, 2008 12:11 pm Post subject: |
|
|
that's funny, i was thinking the same thing. sweet pics!
j |
|
| Back to top |
|
|
c.davis419
Samba Member

Joined: May 18, 2003
Posts: 506
Location: Vista,CA
|
| Posted: Thu Sep 04, 2008 9:01 pm Post subject: |
|
|
That is seriously the only part of a ACVW I've never seen before. Now I've seen everything... 
_________________
1967 beetle
1974 Thing |
|
| Back to top |
|
|
BlastMasterMannyFresh
Samba Member

Joined: November 21, 2001
Posts: 6102
Location: #31peach
|
| Posted: Thu Sep 11, 2008 8:54 am Post subject: |
|
|
| c.davis419 wrote: |
| That is seriously the only part of a ACVW I've never seen before. Now I've seen everything... |
LOL. I felt the same exact way when I saw that picture. |
|
| Back to top |
|
|
COD
Samba Member
Joined: July 23, 2018
Posts: 5
Location: Costa Mesa
|
| Posted: Sat Feb 02, 2019 5:44 pm Post subject: Re: Photos of fuel pipe replacement. |
|
|
Access holes ?
Are you kidding ?
Those you shown in your photos are obviously fresh.
I'm facing this same problem and looking for ways to push new stainless tube through the tunnel of my 56: of course I don't want to cut a holes if I don't have to...
_________________
OldKid |
|
| Back to top |
|
|
Bruce
Samba Member
Joined: May 16, 2003
Posts: 17296
Location: Left coast, Canada
|
| Posted: Sun Feb 03, 2019 11:07 pm Post subject: Re: Photos of fuel pipe replacement. |
|
|
There's no need to hack up your tunnel like that.
When I did it, I fed the line in from the hole between the front axle beam tubes. I had a bare light bulb in the tunnel at the trans end to completely illuminate the inside of the tunnel. I fed it in, following the path of the original line. The original line was cut off at the shift rod coupler, and inside the frame head. I inserted a piece of welding rod into the hole in the left frame horn, all the way to the shift rod. Then when the new tube got to this point, I put the tube around the welding rod and continued pushing it. The welding rod will guide the tube out the hole in the frame horn. Easy.
I was also able to bend the tube 90º at the front to go out the top of the frame head.
Once it is in place, you can go through all the factory holes using long hemostats and secure it to the original fuel line with zip straps. Or you can use baling wire.
_________________
| overheard at the portland Swap Meet... wrote: |
| ..... a steering wheel made from a mastadon tusk..... |
|
|
| Back to top |
|
|
COD
Samba Member
Joined: July 23, 2018
Posts: 5
Location: Costa Mesa
|
| Posted: Sun Feb 10, 2019 10:40 pm Post subject: Re: Photos of fuel pipe replacement. |
|
|
Thanks a lot Bruce ! I will try your recommended instructions before I start cutting holes. Without trying, my biggest concern so far is pushing the line through the original hole up front...but i'll give it a go. Thanks again !
_________________
OldKid |
|
| Back to top |
|
|
Bub
Samba Member

Joined: June 10, 2004
Posts: 1155
Location: Central Washington
|
| Posted: Tue Feb 18, 2020 7:50 pm Post subject: Re: Photos of fuel pipe replacement. |
|
|
I just did this on my 54' .
I went the other way around. I got 20' of stainless line to use. Started at the rear where the original line was/is. Used a dremel to make some extra room in the same 'outlet' that the old line protrudes from then unfolded a coat hanger and ran it up through the frame from the rear until I could grab it at the shift coupler. Advance the hanger (guidewire in surgery) as far as you can.
Then run the new fuel line over the hanger and maneuver it through the tunnel forward.
I used a 1" hole saw to make a hole- it sort of has to be a size where you can shine a light into the tunnel AND use a tool/hook to grab the new fuel line- and fed the new line forward until I could see it in my 1" hole.
Then used a short section of hanger to 'hook' the fuel line and pull it up through my access hole. rust proof the hole, use a grommet for the new line and plug the original fuel line hole up...
No way to weld inside the tunnel, so it's just trial and error and patience to make sure the new line doesn't sit against anything that moves ; like the clutch cable near the front..etc..
Overall a good outcome I think,
_________________
| hitest wrote: |
| Had a girlfriend once who shall we say, nearly arrived at the mere sight of a semaphore in action- easy to please she was... |
|
|
| Back to top |
|
|
VW_Jimbo 
Samba Member

Joined: May 22, 2016
Posts: 9978
Location: Huntington Beach, CA
|
| Posted: Thu Nov 30, 2023 4:16 pm Post subject: Re: Photos of fuel pipe replacement. |
|
|
I finished up this repair a few years ago, but just ran across this thread. So, I thought that I would post up another method. Always more than one way to skin a cat!
The fuel line is held in place. It is not welded at the retainers. No where along the run is this conduit welded. Funny stuff I never knew!
So, to get the old fuel tubing out, I had to get creative, as the retainers were super tight. The tubing will push through the retainer, but not the rust. So, I cut the tubing as close to the retainer as I could and hammered out the remnant piece.
Like this! The retainer has an unwelded seam!
Pulled out the roll of tubing and cut a segment off.
I then threaded it into the retainer. Perfect fit!
Had to cut a small triangular piece out of the tunnel bottom to access this retainer.
See the tubing going through.
Then the retainer in the middle.
Then, utilizing the previously cut fork, I push, bent, pulled and pried the new fuel tubing through the fork.
And then I pulled it out of the opening on the top of the fork.
With the tubing sticking out the back, I turned my attention to where it needs to exit the tunnel at the front.
Utilizing that front access hole, directly in back of the Nap Hat, gives me access to the area by the pedals and the area in back of the frame horn. And there it is, the fuel line!
I then pushed the line all the way forwards, till it came out the inspection cover hole. Cut off this piece from the roll I had and returned to the rear of the car To pull out the line, back to the Access hole I made, so I can bend the tubing, to help get it through the exit hole.
I then returned to the front, bent the end of the conduit at a 45 angle and weaseled it past the e-brake conduits. It has to curve under these and then stick out the tunnel. Spent a lot of time, pulling a small amount, bending it, pulling, bending, on and on. Until finally, the tubing cleared the adjacent conduits, cleared the tunnel and exited the front hole!
I then worked my way back to the rear, tightening up the clamps and bending the conduit to enter the fork nicely, without rubbing on anything!
Excess at the rear. Better too long than too short!
Cut, recent and pushed back into the tunnel!
Looking down into the fork.
With the new line installed, I wanted to add a rear tubing support, within the fork, to keep the tubing from bouncing around inside there loose. So, I added a support in each fork and secured the tubing within each one.
I then checked the fit of the previously removed pan and made some cuts to ease in alignment. There, perfect!
Tacked that side in and went to the other side.
Then welded the two of them up.
Also, welded up a rust hole in the fork.
With all of that installed, I moved onto buttoning it back up. First, prepared the front access hole. Ground it down to clean steel and shot some weldable primer onto the surfaces.
Same with the cover. Also, had to hammer this one flat again.
Laid into place and welded! Keep catching the seam sealer from the pan install on fire.
Then over to the triangular piece.
It was then time to stop, clean up and return to the family! Until next weekend![/quote]
_________________
Jimbo
There is never enough time to do it right the first time, but all the time necessary the second time!
| TDCTDI wrote: |
| Basically, a whole bunch of fuckery to achieve a look. |
| 67rustavenger wrote: |
GFY's Xevin and VW_Jimbo!  |
|
|
| Back to top |
|
|
|


