| Author |
Message |
Last Triumph
Samba Member

Joined: October 10, 2006
Posts: 915
Location: Wirral, United Kingdom

|
 Posted: Sat Nov 27, 2010 10:13 am Post subject: Posted: Sat Nov 27, 2010 10:13 am Post subject: |
 |
|
Trying the remove the oil seal from the Oval gearbox and am failing miserably.
Bentley manual says to leaver it out being careful not to scratch the sealing surfaces, which is fair enough....
Lever it out with what, exactly?
And where?
Not a chance.
Frozen solid.
Is there a special technique I need to be shown?
When I did the front crank seal on my old Passat, I ended up having to drill two opposing holes in the flat front face of the metal part of the seal and screwing in a couple of PK screws, then using a puller to pull it out - however, I can't do this on this occasion as the length of the first motion shaft stops you getting a puller any where near it.
Getting a bit frustrated to be honest...
Come on guys, how's it done? |
|
| Back to top |
|
 |
Humanure
Samba Member
Joined: May 31, 2002
Posts: 376
Location: Pangea
|
| Posted: Sat Nov 27, 2010 10:36 am Post subject: |
|
|
_________________
It is difficult to free fools from the chains they revere. |
|
| Back to top |
|
|
Last Triumph
Samba Member
Joined: October 10, 2006
Posts: 915
Location: Wirral, United Kingdom
|
| Posted: Sat Nov 27, 2010 10:37 am Post subject: |
|
|
That looks like a handy tool.
Which regrettably, I don't have.
Any other ideas, or techniques with more traditional tools?
Thanks |
|
| Back to top |
|
|
jvulich
Samba Member
Joined: May 06, 2010
Posts: 215
Location: Clovis
|
| Posted: Sat Nov 27, 2010 10:51 am Post subject: |
|
|
| I used a slide hammer with a screw on the end of it. |
|
| Back to top |
|
|
Last Triumph
Samba Member
Joined: October 10, 2006
Posts: 915
Location: Wirral, United Kingdom
|
| Posted: Sat Nov 27, 2010 11:00 am Post subject: |
|
|
| jvulich wrote: |
| I used a slide hammer with a screw on the end of it. |
Grrrr - another tool I don't have.
Ok, I've got a plastic fork - will that do?  |
|
| Back to top |
|
|
Jeckler
Samba Member
Joined: September 27, 2005
Posts: 2718
Location: Mesa, AZ
|
| Posted: Sat Nov 27, 2010 11:01 am Post subject: |
|
|
I used a drift and hammer and hammered one side until it was cocked in the hole. This means there's less surface area keeping it in the hole and allowed me to get a hook behind it to pull it out.
It looks like yours might have a flange though.
_________________
Andy
'63 Bug rebuild here.
Did you know that sellers can't charge a fee to accept PayPal?
| bill may wrote: |
| I am the crabby old guy. |
Knowledge is knowing that a tomato is a fruit.
Wisdom is knowing not to put it in fruit salad. |
|
| Back to top |
|
|
slow36hp
scott wimberley

Joined: August 09, 2004
Posts: 3113
Location: mukilteo washington
|
|
| Back to top |
|
|
Last Triumph
Samba Member
Joined: October 10, 2006
Posts: 915
Location: Wirral, United Kingdom
|
| Posted: Sat Nov 27, 2010 11:28 am Post subject: |
|
|
Whilst I figure out a way to remove the rear oil seal from the gearbox, the rest of the day was more successful.
At very long last, my cover plate gaskets arrived!
This allowed me to finally install and set up the end play in the axle tubes.
I spent a very long time assembling, checking and disassembling everything over and over again experimenting with various gasket combinations to get the end play just about perfect.
The factory specification is a clearance of 0.4mm - 0.6mm with a wear limit of 0.7mm so I was determined to get it as close to 0.5mm as possible. Sad, I know, but just the way I roll.
Once I'd established that I'd got the cover plates back in the correct orientation that they were originally by matching up the wear and witness marks, I checked for free movement all the way through the axle movement then secured everything tight.
The method I used to measure the end play was to mount the box on it's side, and use a magnetic base and clock gauge mounted to the end of the axle nut against the end of the bearing carrier. A bit fiddly to set up, but once I'd got everything square and central, I got very repeatable results.
With everything seated and ready, I zero'd the clock....
Then pulled up the axle tube away from the box until it 'topped out' on the cover plate.....
I won't pretend that I wasn't just a little bit delighted to get it perfectly on the 0.5mm middle point. Despite much effort, I couldn't get the other side any close than 0.48mm, but I'm still very pleased indeed to get them this central and equal.
This left me with it looking much more complete.
Next up was the new starter motor bush, which following advice, I left to soak in oil for 24 hours before installation to allow the bronze to soak up a little lubrication without having it dripping everywhere.
Which was then duly installed...
I then turned my attention to the starter motor which received it;s final clean. It was officially minus 2 degrees at this point and the reason the picture is slightly blurred is due to Mrs LT shivering in the cold!
It came out nice and clean with the usual aged and patina look.
I then installed it back on to the gearbox where it belongs, covered in a nice layer of sealing wax.
From the bell housing side, it's all snug and cosy once more.
I then moved onto the rear oil seal, where I'm currently stuck trying to remove it.... |
|
| Back to top |
|
|
PatterBon
Samba Engine Connoisseur

Joined: September 27, 2008
Posts: 3461
Location: Poulsbo, WA
|
| Posted: Sat Nov 27, 2010 11:45 am Post subject: |
|
|
LT, is there any way you could perhaps cut it into sections? Pardon my ignorance because I've never worked on a tansaxel but maybe that'd help?
_________________
PNW Dub Folk & Kitsap dub Folk (KdF)
Austin Aircoolers VW Gang
2020 Ford F-150
1973 Standard Beetle
1969 Cessna 172K Airplane
US Army CH-47 Chinook Helicopter Repairer November 2013 - July 2024 |
|
| Back to top |
|
|
Last Triumph
Samba Member
Joined: October 10, 2006
Posts: 915
Location: Wirral, United Kingdom
|
| Posted: Sat Nov 27, 2010 11:59 am Post subject: |
|
|
| PatterBon wrote: |
| LT, is there any way you could perhaps cut it into sections? Pardon my ignorance because I've never worked on a tansaxel but maybe that'd help? |
There's a U section shaped metal reinforcement ring built into the seal, so sadly no...
I'll figure something out - not to worry. The difficult part is trying to to make the surrounding area look like a battle zone from all the poking, prodding and levering.... |
|
| Back to top |
|
|
sunroof
Samba Member

Joined: October 06, 2006
Posts: 2071
Location: Winnipeg
|
| Posted: Sat Nov 27, 2010 12:40 pm Post subject: |
|
|
My2 pence worth. Buy a putty knife and cut the blade into the shape required to pull the seal out.
Don
BTW now that you have metric money, do you still call them pence? |
|
| Back to top |
|
|
Last Triumph
Samba Member
Joined: October 10, 2006
Posts: 915
Location: Wirral, United Kingdom
|
| Posted: Sat Nov 27, 2010 2:33 pm Post subject: |
|
|
Drilled holes in the metal cage and using a PK screw, attached a bracket and length of rope....
And using a screwdriver and hammer as opposing levers, pulled it out. It really was stuck fast, as initially I pulled two smaller screws out of the hole without moving the seal, hence the other holes!
Then installed the new seal....
Another box ticked. |
|
| Back to top |
|
|
Duder
Samba Member

Joined: July 14, 2009
Posts: 39
Location: Torrance, CA
|
|
| Back to top |
|
|
Lobotomy
Samba Member

Joined: May 30, 2010
Posts: 517
Location: Traverse City, MI
|
| Posted: Sat Nov 27, 2010 7:15 pm Post subject: |
|
|
Wow, this was one of the best build threads I've seen in a long time. Keep it up!
_________________
Vehicles I have:
1974 Super Beetle "Reginald"
1983 AM General DJ-5
1958 Honda c-100 |
|
| Back to top |
|
|
jvulich
Samba Member
Joined: May 06, 2010
Posts: 215
Location: Clovis
|
| Posted: Sat Nov 27, 2010 8:13 pm Post subject: |
|
|
| Last Triumph wrote: |
| jvulich wrote: |
| I used a slide hammer with a screw on the end of it. |
Grrrr - another tool I don't have.
Ok, I've got a plastic fork - will that do? |
If anybody could make it work you could. You've already got it out but, here's a suggestion for future reference that Mrs. LT and Mrs. Vulich wouldn't like. If I were in a pinch I'd take a cheap butter knife to the grinder and use it for a seal puller. |
|
| Back to top |
|
|
BugMan114
Samba Member

Joined: March 22, 2007
Posts: 3744
Location: Ellenwood, GA
|
| Posted: Sun Nov 28, 2010 11:13 am Post subject: |
|
|
quick question. If you used jet fuel to clean the inside of the gearbox, that would mean, there is no oil between all the bushings and moving parts. Are you going to swish some oil around in there, just like you did the jet fuel, to lube the parts prior to running? I would think not doing so would be like building a motor with no assembly lube. I've never used jet fuel either, but is there a chance there is still some inside, or does it evaporate over time? if not, i'd think a good swish with oil, and drain is in order.
_________________
1974 Super Beetle: Custom resto in progress
1972 Super Beetle: Daily Driver
1971 Std. Beetle w/ 1929 Mercedes Benz Gazelle kit
1960 Baja Bug
1969 Baja Bug
Sand Rail- Homemade
Sand Rail- FUBAR
Aircooled Airheads
Why the hell do they call it a gland nut. its obviously a big fat bolt!!! |
|
| Back to top |
|
|
Last Triumph
Samba Member
Joined: October 10, 2006
Posts: 915
Location: Wirral, United Kingdom
|
| Posted: Sun Nov 28, 2010 11:41 am Post subject: |
|
|
| BugMan114 wrote: |
| quick question. If you used jet fuel to clean the inside of the gearbox, that would mean, there is no oil between all the bushings and moving parts. Are you going to swish some oil around in there, just like you did the jet fuel, to lube the parts prior to running? I would think not doing so would be like building a motor with no assembly lube. I've never used jet fuel either, but is there a chance there is still some inside, or does it evaporate over time? if not, i'd think a good swish with oil, and drain is in order. |
Jet fuel is a refined form of kerosene which is effectively a very fine oil anyway.
Yes it evaporates.
I only swilled the bottom of the box case, not a thorough bath of all the upper internals.
Yes, either way, it'll get an oil swill before the final fill.
Stay tuned for today's update following shortly.... |
|
| Back to top |
|
|
Last Triumph
Samba Member
Joined: October 10, 2006
Posts: 915
Location: Wirral, United Kingdom
|
| Posted: Sun Nov 28, 2010 12:25 pm Post subject: |
|
|
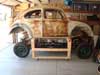
Now that the transmission is now ready for installation, it was time to clean up and protect the rear bodywork, suspension and engine bay whilst access is good - replacing missing or perished rubbers along the way.
As per usual, everything always takes longer than usual, so I only got as far as the initial clean, but the findings and results are well worth the hours of effort.
At least the messiest part of the job is now over.
This included the rear inner wings and underside of the wings which whilst had been wiped over previously, hadn't had a thorough scrub with jet fuel.
I was delighted with what I found - it's just absolutely rock solid - everywhere! The original wings are perfect too, and check out the bumper mounts!
The areas of surface patina are only a dark colour due to the temporary wetting effect of the jet fuel.
Those that know me well, will know that this is just utter pornography for me, and the stuff my dreams were made of!
The other side is just as nice too!
If you think that's nice - wait until you see underneath!
I started at the top and cleaned the inside of the W-lid - don't come much cleaner than this....
The engine bay metal work is in the same condition as everything else.
Now for the really messy part.... The next 3 hours were spent sitting cross legged in the engine bay armed with a variety of brushes, scrapers and squirty bottles of cleaners.
The frame horns were totally cacked!
This what was underneath...
There's a fair bit more to go, but once I'd got the heavy stuff off, I wanted to get the body work cleaned so it only leaves the final detailing of the horns and suspension next time out.
Note the pools of jet fuel all over the floor that I sat in for an uncomfortably long time, considering it was below freezing.
Cleaning the rear underside as anyone who has done this before will know is a challenge, especially at 6' 4" and 200 lbs.... but I got there in the end and boy was I pleased with what I found. Couple of small areas will get the benefit of a fine wire brushing to remove a few heavier deposits, but other than that, it just needs protecting - over the moon.
And this is how things look at LT Towers this evening....
A tough, but satisfying day.... |
|
| Back to top |
|
|
PatterBon
Samba Engine Connoisseur
Joined: September 27, 2008
Posts: 3461
Location: Poulsbo, WA
|
| Posted: Sun Nov 28, 2010 1:07 pm Post subject: |
|
|
That, my good sir, is a work of art. You are one lucky man.
_________________
PNW Dub Folk & Kitsap dub Folk (KdF)
Austin Aircoolers VW Gang
2020 Ford F-150
1973 Standard Beetle
1969 Cessna 172K Airplane
US Army CH-47 Chinook Helicopter Repairer November 2013 - July 2024 |
|
| Back to top |
|
|
maboyce
Samba Member

Joined: December 21, 2009
Posts: 182
Location: Olympia, WA
|
| Posted: Sun Nov 28, 2010 1:36 pm Post subject: |
|
|
Are you planning to kill that rust with acid, or just seal over it with the wax spray?
Great thread, by the way. I had to do this kind of cleaning to my engine and transmission too - it's such a terrible job, but brings such satisfaction... |
|
| Back to top |
|
|
|


