| Author |
Message |
webwalker
Samba Member

Joined: January 26, 2006
Posts: 2803
Location: Mount Laurel, NJ

|
 Posted: Tue Dec 24, 2013 4:38 pm Post subject: Posted: Tue Dec 24, 2013 4:38 pm Post subject: |
 |
|
| SGKent wrote: |
| webwalker wrote: |
Some of these are just bloody brilliant.
Here's one to solve: How about a clutch disk centering tool?
... when you've got to get things put together TONIGHT and you can't find yours!
M |
use a socket, extension bar and a roll of masking tape. Choose a socket slightly smaller than the pilot bearing and wrap it with masking tape until it just fits. wrap the shaft of the extension with masking tape until it just fits the clutch. Works well in a pinch. As for the real tools - I had several VW ones, the kind made of plastic and offered them for free a few years back. No one wanted them cause everyone has one that came with the clutch set they bought. So they went to the plastic recycler. I have a wooden one someone turned on a lathe that I've used since about 1975 or so and it is still going. |
Thanks Steve, that's a good one. I remember seeing wooden pilot tools for sale circa 1989, but they were made from soft pine or bass wood and polished with (believe it) shoe polish. I passed. But I did use the shoe polish trick 10 years later in a theatrical production I was art director for when we really needed the woodgrain to 'pop' visually. Good for that. Naught else.
Happy Christmas.
M
_________________
"Consistent maintenance with quality products is the cheapest warranty you'll ever need."
1977 CE1 Transporter Deluxe, Subaru EJ22, Skills Cooling, Steedle HD 091 w/ GuardT .82 4th
Click to view image |
|
| Back to top |
|
 |
Rag00oll
Samba Member
Joined: June 07, 2012
Posts: 220
Location: Pittsburgh, PA
|
| Posted: Tue Dec 24, 2013 10:08 pm Post subject: |
|
|
Clutch centering tool...
my finger just so happens to be the correct size and i've never had a problem. Just lucky i guess 
I don't have a picture but I have an aluminum plate that bolts to the flywheel and the case with a big hole in the center that i use to remove the flywheel gland nut. |
|
| Back to top |
|
|
babysnakes
Samba Member
Joined: August 19, 2008
Posts: 7177
|
| Posted: Wed Dec 25, 2013 6:16 am Post subject: |
|
|
| I've got a spare input shaft in the tool box that I use. |
|
| Back to top |
|
|
Tri-Bus
Samba Member

Joined: November 29, 2005
Posts: 732
Location: Butler PA
|
| Posted: Wed Dec 25, 2013 6:55 am Post subject: |
|
|
| babysnakes wrote: |
| I've got a spare input shaft in the tool box that I use. |
same here some times junk parts make the best tools
_________________
73 Westy
A VW team with a triathlon problem, or something like that.... |
|
| Back to top |
|
|
germansupplyscott
Samba Member

Joined: May 22, 2004
Posts: 7286
Location: toronto
|
| Posted: Sat Jan 04, 2014 2:48 pm Post subject: pressure relief screw, Fuel sender, |
|
|
i think most folks who do a lot of working on vehicles probably have a drawer full of home-made tools for odd jobs when a standard tools won't get it done. i have a pile in my tool box and since i work on bay buses a lot most the home-made tools in my kit are bay specific.
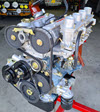
this is a tool for the big oil pressure relief screw on the type 4 engine, it's made from an old 14mm socket that was cracked and part of a large washer:
below is a wrench for the late style of fuel tank sender, made from an oil filter wrench and some small pieces of square stock. with this wrench it's relatively easy to re/re the tank sender without removing the tank from the bus. you're working blind to do this but it's not too difficult. i can't imagine being able to remove and replace the sender with the tank in place unless you had a tool like this.
_________________
SL |
|
| Back to top |
|
|
SGKent 
Samba Member
Joined: October 30, 2007
Posts: 42957
Location: at the beach in Northern Wokistan
|
| Posted: Sat Jan 04, 2014 5:58 pm Post subject: Ignition lock cylinder, Center pin, Pre lube, Steering box |
|
|
Scott I like your creativeness - especially on the relief tool. My fanciest self tools are probably cut off wrenches and ground thin wrenches to get into places as shortcuts rather than remove something else to get to a bolt or nut. That and a few bent with heat things sort of like the old carb wrenches made to get to carb nuts. My favorite home brew is this for pulling a lock cylinder on a bay.
center pin tools
pre-lube tool
Tool to adjust steering torque when rebuilding steering boxes
|
|
| Back to top |
|
|
airschooled
Air-Schooled

Joined: April 04, 2012
Posts: 13628
Location: West Coast, USA
|
| Posted: Sat Jan 04, 2014 7:02 pm Post subject: |
|
|
Nice ones Scott and Steve!
I can figure out how awesome most of those are by looking, but what is the "pre-lube tool?"
_________________
One-on-one tech help for your vintage Volkswagen:
www.airschooled.com
Road trip reports and tech blog:
https://www.patreon.com/airschooled |
|
| Back to top |
|
|
Tcash
Samba Member

Joined: July 20, 2011
Posts: 12843
Location: San Jose, California, USA
|
| Posted: Tue Jun 03, 2014 8:20 am Post subject: Smoke Tester |
|
|
To link to this post
| Code: |
[url=https://www.thesamba.com/vw/forum/viewtopic.php?p=7227303#7227303]Smoke Tester[/url]
|
| sixer wrote: |
Hi all,
A quick write up for this forum, since I couldn't find it when I was searching earlier. I recently had some vacuum leak woes. I built a smoker to make it easier to find them. Based on this design over in the Vanagon forum: http://www.thesamba.com/vw/forum/viewtopic.php?p=5282178
Parts required:
- Quart paint can
- 1/8" barbed to NPT fitting
- Valve stem
- JB weld, epoxy, something gluey.
Instructions:
1) Drill two holes in the lid, one for the barbed fitting, one for the valve stem.
2) Insert barbed fitting, pot with epoxy or JB weld.
3) Install Valve stem
To use:
1) Hook up a pump to the valve stem (I used a manual bike pump).
2) Hook up a vacuum line from the barbed fitting to a place in the vacuum system.
3) Block S-boot with a beer bottle.
4) Light something on fire in the can. I used a scrap of t-shirt soaked in gas and oil, along with some cardboard.
5) Put the fire out, pop the lid on, start pumping the air pump and look for smoke.
Relevant pictures below:
| GoBigEmma wrote: |
That's a cool setup! We copied it to check for vacuum leaks, but we used smoke bombs that I used to make as a kid instead of cigarettes: Wrap a ping pong ball in aluminum foil (make sure to wrap it tight or it will burn, but not smoke) and hold a flame under one spot of it until it starts smoking. Produces a whole lot of smoke (like, A LOT), but breathing that stuff in definitely shortens your life by the smell of it, so be careful.  |
|
Last edited by Tcash on Mon Sep 25, 2017 8:40 am; edited 3 times in total |
|
| Back to top |
|
|
Tcash
Samba Member
Joined: July 20, 2011
Posts: 12843
Location: San Jose, California, USA
|
| Posted: Sun Jun 15, 2014 8:54 am Post subject: Swing lever bushing tool |
|
|
| whip618 wrote: |
Here is a bushing puller set that I made years ago, it is designed to pull the bushings out from the bottom and the threaded rod is 1/2-13 in 304 stainless. Works well
Phil |
http://www.thesamba.com/vw/forum/viewtopic.php?p=4942679#4942679 |
|
| Back to top |
|
|
dugfresh
Samba Member

Joined: November 04, 2012
Posts: 651
Location: Seattle
|
| Posted: Sun Jun 15, 2014 9:00 am Post subject: Re: Swing lever bushing tool |
|
|
I made something similar to pull the wrist pins from cylinders.. im sure lots of others have done the same.
_________________
78 Riviera
http://flic.kr/s/aHsjDRJPa1 |
|
| Back to top |
|
|
Tcash
Samba Member
Joined: July 20, 2011
Posts: 12843
Location: San Jose, California, USA
|
| Posted: Sun Jul 20, 2014 5:10 pm Post subject: Ball Joint Tool, Brake caliper piston |
|
|
WendyArmbuster
This is a homemade ball joint tool I made for pressing out my ball joints on my '78 bus. It's a Ford wheel bearing lock nut tool with a 2.5" inner diameter. I drilled 2 holes for 5/16" square head nuts, which I filed on two sides to make them the same dimension as the notches in the ball joint flange. I inserted the filed square headed bolts in the holes from the inside and welded them into place. It worked really well.
I replaced my ball joints without a press!
Thanks to ChipWrecked
I made some 40 stainless retaining plate shims. Have a look.
Open and resize to scale 1/2"x 6" to match picture. Transfer to the material of your choice and cut out.
Last edited by Tcash on Sun Apr 24, 2016 11:48 am; edited 2 times in total |
|
| Back to top |
|
|
Brian
Samba Moderator

Joined: May 28, 2012
Posts: 8339
Location: Oceanside
|
| Posted: Wed Jul 23, 2014 5:45 pm Post subject: Rear wheel bearing |
|
|
Installed my bearings with this:
Took the old bearings, welded the outer races and the inner bearing together. Used the stub axle as a hammer and smacked them in place.
If anyone needs to use it let me know.
_________________
Wash your hands
'69 Bug
'68 Baja Truck
'71 Bug
'68 Camper
Only losers litter |
|
| Back to top |
|
|
Tcash
Samba Member
Joined: July 20, 2011
Posts: 12843
Location: San Jose, California, USA
|
| Posted: Sun Dec 14, 2014 1:42 pm Post subject: Dent puller, Hub puller |
|
|
Last edited by Tcash on Thu Oct 05, 2017 8:46 am; edited 2 times in total |
|
| Back to top |
|
|
oscarsnapkin
Samba Member

Joined: October 22, 2013
Posts: 570
Location: Bucks County, PA
|
| Posted: Sat Apr 25, 2015 2:56 am Post subject: exhaust leak |
|
|
Made this for finding exhaust leaks. Cost me about $5.00 and works great. Drilled a 5/16 hole into a rubber stopper, and pressed in a 3/8 barbed fitting so it's nice and tight. Just have to make sure the air pressure is low, otherwise the stopper will pop out of the tailpipe.
_________________
- 1977 CEI Sunroof Bus 2.0L F.I. Hydraulic Lifters
- 1973 Thing
"It’s so easy to laugh, it’s so easy to hate, it takes strength to be gentle and kind." |
|
| Back to top |
|
|
Tcash
Samba Member
Joined: July 20, 2011
Posts: 12843
Location: San Jose, California, USA
|
|
| Back to top |
|
|
Tcash
Samba Member
Joined: July 20, 2011
Posts: 12843
Location: San Jose, California, USA
|
| Posted: Tue May 19, 2015 5:23 pm Post subject: Spring tension |
|
|
| mondshine wrote: |
The way I've always checked the relief springs is to find a piece of steel tube which fits inside the spring. I set the tube in a vice with one end protruding the specified loaded length. Then use a hook made from shirt hanger wire to pull the spring flush to the pipe with a handheld scale (like fishermen use).
Like this:
It's a little primitive, but better than nothing.
Good luck, Mondshine |
Last edited by Tcash on Sun Apr 24, 2016 11:51 am; edited 1 time in total |
|
| Back to top |
|
|
busdaddy
Samba Member

Joined: February 12, 2004
Posts: 53212
Location: Surrey B.C. Canada, but thinking of Ukraine
|
| Posted: Tue May 19, 2015 6:20 pm Post subject: |
|
|
| Tcash wrote: |
| mondshine wrote: |
The way I've always checked the relief springs is to find a piece of steel tube which fits inside the spring. I set the tube in a vice with one end protruding the specified loaded length. Then use a hook made from shirt hanger wire to pull the spring flush to the pipe with a handheld scale (like fishermen use).
Like this:
It's a little primitive, but better than nothing.
Good luck, Mondshine |
|
Inventive, I use a big C clamp and a small modern electronic (load cell) kitchen scale, clamp the spring onto the scale (scale on it's side, one end of the clamp under the scale, other on end of spring) and compress to desired length, then read scale.
Potatoes/potatos 
_________________
Rust NEVER sleeps and stock never goes out of style.
Please don't PM technical questions, ask your problem in public so everyone can play along. If you think it's too stupid post it here
Stop dead photo links! Post your photos to The Samba Gallery!
Слава Україні! |
|
| Back to top |
|
|
Tcash
Samba Member
Joined: July 20, 2011
Posts: 12843
Location: San Jose, California, USA
|
| Posted: Sat Jun 06, 2015 9:08 am Post subject: case splitter |
|
|
| Dr OnHolliday wrote: |
Tool made from old oil pump body, to safely jack case halves apart.
|
Last edited by Tcash on Sun Apr 24, 2016 11:52 am; edited 1 time in total |
|
| Back to top |
|
|
Tcash
Samba Member
Joined: July 20, 2011
Posts: 12843
Location: San Jose, California, USA
|
| Posted: Fri Jul 24, 2015 12:19 pm Post subject: Bushing puller |
|
|
| gears wrote: |
A puller arrangement can be easily fabricated to pull a blind bushing out. I use an old generator screw coupled to a second screw. In this photo, my tool is set up as a mini-slide hammer, but it can also be used as a straight puller, using just the shorter screw and a smaller diameter socket.
Here's a close up detail of the modified washer that slips through the bushing. Note the internal angle that allows the washer to adequately tilt on the screw shaft as it's fed through:
|
Thanks to gears |
|
| Back to top |
|
|
Tcash
Samba Member
Joined: July 20, 2011
Posts: 12843
Location: San Jose, California, USA
|
| Posted: Sun Aug 09, 2015 5:43 pm Post subject: Type IV (4) Degree Wheel |
|
|
| Rob R wrote: |
Here are a few more pictures
|
|
|
| Back to top |
|
|
|


