| Author |
Message |
Joostt
Samba Member

Joined: June 04, 2016
Posts: 76
Location: Noordwijk, Netherlands

|
 Posted: Mon Jun 06, 2016 2:49 pm Post subject: YAKGRP: late '69 coupe Posted: Mon Jun 06, 2016 2:49 pm Post subject: YAKGRP: late '69 coupe |
 |
|
Yet Another Karmann Ghia Restoration Project
So here's my story.
For the past couple of months (or years) I was looking for a karmann ghia that would suit my plan. This plan is restoring a ghia to use it as a daily driver. I've never restored a car and my experience with working on a car is limited to the smaller jobs I did on a Volvo Amazon from 1965 that I owned and drove for 2 years. So for this project I have to have a little confidence in me being the handy guy around the house and my ability to acquire the skills needed along the project. The restoration projects on the samba have really helped me, and while reading them I also noticed the helpful input from other samba members. So I figured it would be both fun and helpful to start my own thread.
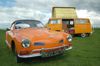
I found a car on ebay in the VW's country of origin: Germany. A 7 hour drive from where I live, in the Netherlands. After some exciting bidding I bought this car and picked it up in november 2015. Is it a coupe from september 1969 and it has been sitting in the last owners garage for the last 25 years. The car had a little check-up before I bought it and started when I picked it up. The original 'Kraftfahrzeugbrief' is with the car and states all 6 previous owners. The first owner was a 'Sekretärin' (German for secretary) and the guy I bought the car from told me that her boss from a big chemical company bought it for her back in '69.
From the outside the car looks pretty good. It does need a lot of work however, after sitting in a garage for a quarter of a century. My plan is to do a 'body on' restoration. As much as possible I will keep this car original. I already started with removing the engine and transaxle and some welding on the car. I will post pics of this first work in the next days. Here are the pics from ebay, car on the trailer and a photo from the 'Kraftfahrzeugbrief'.
|
|
| Back to top |
|
 |
c21darrel
Samba Member
Joined: January 22, 2009
Posts: 8241
Location: San Dimas
|
|
| Back to top |
|
|
mcdonaldneal
Samba Member
Joined: June 13, 2013
Posts: 2734
Location: Gullane, Scotland
|
|
| Back to top |
|
|
Joostt
Samba Member
Joined: June 04, 2016
Posts: 76
Location: Noordwijk, Netherlands
|
| Posted: Wed Jun 08, 2016 2:05 pm Post subject: Re: YAKGRP: late '69 coupe |
|
|
| Quote: |
The boss bought it for her huh?? interesting.  |
Must have been a very good secretary 
I was sure there was rust when I bought the car. It was on the road for 20 years in european climate, so no doubt it had rust. But it turned out to be a bit more then expected (as always  ). I'll post pics of rust found and removed so far. First some pics of the disassembly of the rear of the car. ). I'll post pics of rust found and removed so far. First some pics of the disassembly of the rear of the car.
I decided to start this project at the rear of the car. It is a 1970 model year, it also has a swingaxle, IRS was introduced later on ghia's for the european market. The engine is the original one, the number matches the number that's in the 'Kraftfahrzeugbrief'.
After 25 years doing nothing everything was stuck and penetrating oil was my best friend.
| Quote: |
| The coolest thing to me is that you seem to have the thermostat cable |
Thanks for pointing this out. Wasn't aware of that  . .
Engine bay before and after removing the engine (and transaxle)
Right brake drum
Left brake drum
The left side wouldn't come off despite al the leverage, penetrating oil and heat I used. I ended up ordering a torque master tool from cip1.com which did the trick.
And here some pics from the right side with the first extensive rust that I found. Turned out that the guy who has been welding on this car in the past just loved patching. A metal patch on every rust hole...
I decided to start with fixing the right chassis support and the surrounding panel by replacing it with a repair panel. More to come.. |
|
| Back to top |
|
|
c21darrel
Samba Member
Joined: January 22, 2009
Posts: 8241
Location: San Dimas
|
|
| Back to top |
|
|
Joostt
Samba Member
Joined: June 04, 2016
Posts: 76
Location: Noordwijk, Netherlands
|
| Posted: Thu Jun 09, 2016 1:37 pm Post subject: Re: YAKGRP: late '69 coupe |
|
|
Plan for this restoration is a body on resto. I would like to do a body off resto, but I do not have the place in my garage. Besides that, with a body on resto I can cut the resto in smaller jobs. It's my first restoration of a car and I would hate to see it end like one of those ad's with a seperated body en chassis together with a lot of boxes with parts  . .
Regarding the level of restoration; my aim is a fun ghia to drive for daily use, left stock whenever possible but do the upgrades when needed for daily use (reliability, safety and handling).
What I will have to do on the car to bring it to this state:
-Overhaul the brakes, replace brake lines, overhaul or replace brake cylinder
-Rebuild the engine
-Do something with the transaxle (I still have to figure this one out..  ) )
-Remove all rust, and protect it from further rusting:
-- replace right rear chassis support panel
-- probably the rockers on both sides (I have seen a very usefull thread about body on rocker replacement). Maybe just replace the outer rocker panels. Will see this when i come to this job.
-- repair the rear bumper support panels
-- Some rust on the lower part of both doors
-- Probably a lot more...
-repair the door hinges (sagging)
-the floor pans look good, just a little spot to repair
-Check all electrics
-And everything that I find along the way.. |
|
| Back to top |
|
|
Joostt
Samba Member
Joined: June 04, 2016
Posts: 76
Location: Noordwijk, Netherlands
|
| Posted: Sat Jun 11, 2016 2:43 pm Post subject: Re: YAKGRP: late '69 coupe |
|
|
So I started at the right rear chassis support. First thing I did was remove some of those patches. Behind every patch was a rusty hole. Who ever installed those patches never thought it was useful to remove the rust at that same place.
Cut out the panel with my angle grinder
I noticed that the corner on the front end where the repair panel would be attached was rusty as well. I had to repair this part before I could install the repair panel. To be able to inspect this corner I had to remove the arm support. I drilled out the spot weld and took it aside.
I have to warn you, the following pictures can be shocking...
I first cut out and repaired the place where the chassis support repair panel would attach. And installed the repair panel.
After that some more cutting and welding to repair the other rust holes.
And repair the small hole at the rear where it meets the engine bay. The opening in the engine bay to the front that was in this place was not used in my car. So I decided to not recreate it. Does anyone know what it's used for?
|
|
| Back to top |
|
|
Joostt
Samba Member
Joined: June 04, 2016
Posts: 76
Location: Noordwijk, Netherlands
|
| Posted: Thu Jun 16, 2016 2:18 pm Post subject: Re: YAKGRP: late '69 coupe |
|
|
I've been busy with electrolytic derusting. After trying a couple of other methods like different derusting fluids, electrolytic derusting felt like some sort of miracle. There is a lot to find about this method on the web. It works great, is cheap and scalable.
Here is what I did.
My set up. I used an old 12volt trafo that I had lying around. To measure the amperes I hooked up my multimeter.
The rusted gearbox support:
When it comes out after a day you can see the chips of rust came loose.
Under running tap water the rust is easily scrubbed of the gearbox support and already lookes a lot better.
I'm using caprotech rx5 and rx10 to protect the metal. It's a dutch product and works great on these derusted parts. After 3 layers of this paint:
Did the Same with a brake backing plate:
Last edited by Joostt on Thu Jun 16, 2016 2:48 pm; edited 1 time in total |
|
| Back to top |
|
|
c21darrel
Samba Member
Joined: January 22, 2009
Posts: 8241
Location: San Dimas
|
|
| Back to top |
|
|
Joostt
Samba Member
Joined: June 04, 2016
Posts: 76
Location: Noordwijk, Netherlands
|
| Posted: Thu Jun 16, 2016 3:02 pm Post subject: Re: YAKGRP: late '69 coupe |
|
|
| I do have sandblasters in my area and I could do the sandblasting in a garage nearby. I did this once but prefer the electrolytic derusting. It doesn't make a mess other than some rust chips in my sink. And the time to get the rust of isn't a whole lot more. These parts took me about 15 minutes each (not including the 24 hour waiting ) |
|
| Back to top |
|
|
Joostt
Samba Member
Joined: June 04, 2016
Posts: 76
Location: Noordwijk, Netherlands
|
| Posted: Sat Jul 02, 2016 2:35 pm Post subject: Re: YAKGRP: late '69 coupe |
|
|
Next project was the outer edge of the inner wheel housing. There were some rust holes. This inner wheel housing ends on the rear side of the rear fender. I noticed before that there were done some repairs on the rear fender. However, I chose to ignore this for a while untill this point where I had to know where to joint the repair panel of the inner wheel housing with the rear fender. I wasn't to happy with what I came across. A large part of the rear fender was repaired in the same fashion as elsewhere. Instead of a repair panel, flat sheet metal was used and more or less shaped as needed. Again the rusted metal wasn't removed, but the sheet metal was welded on top of it. And afterwards loads of bondo were used to recreate the shape of the rear fender. There was another patch on the outer wheel arch, repaired in the same manner.
I removed the rusted part of the inner wheel housing. Removed the part of the lower rear fender were the repair panel of the inner wheel housing would normally be joined. So that later on I can use a repair panel for the lower rear fender to join this part again.
So this is where I am at this point in time. The previous posts were from work i've done in the past months. This is what i've done last week.
In the next week I want to replace the lower rear fender with a repair panel. Once this is in place I need to decide to either repair or replace the rear bumper support. So far my experience is that getting the repair panels in the exact right place takes a lot of time, and repairing the existing metal whenever possible seems the way to go.
|
|
| Back to top |
|
|
Joostt
Samba Member
Joined: June 04, 2016
Posts: 76
Location: Noordwijk, Netherlands
|
| Posted: Sun Jul 03, 2016 12:46 pm Post subject: Re: YAKGRP: late '69 coupe |
|
|
With an hour to spare I started on replacing the rear part of the fender today. After carefully drawing the lines around the repair panel I cut away the metal that was actually a interesting mix of rust and bondo . With this section cutted out there was room for closer inspection of the rear bumper support. I'm convinced now that it is beyond repairable and will order a new panel for it.
|
|
| Back to top |
|
|
Rome
Samba Member
Joined: June 02, 2004
Posts: 10754
Location: Pearl River, NY
|
| Posted: Mon Jul 04, 2016 2:38 pm Post subject: Re: YAKGRP: late '69 coupe |
|
|
You're doing excellent work! For us in the USA we've been fortunate that all Ghias since the 1969 model year (as of 8/1968) received the independant rear suspension regardless if a manual or the optional automatic transmission was installed. So to see a '70 like yours still with swingaxle is unusual, though normal for your market.
As to your engine tarboards- the advice already given is vital- save the originals! You can clean the surface off with a mild degreaser. If there are any tears in the surface you can use heavy roofing paper (common here in the USA) to glue over the entire surface, though this is not easy on the curved side panels.
Are you using a weld-through primer to protect your patch panels from future rust?
What kind of welder are you using?
On your rear brake backing plates, were you able to free up and remove the two adjusting wheels for the rear shoes before you painted them? They must rotate freely to move the shoes outward occasionally. These often seize after longer periods of non-use. Now is the time to check before assembly.
|
|
| Back to top |
|
|
Joostt
Samba Member
Joined: June 04, 2016
Posts: 76
Location: Noordwijk, Netherlands
|
| Posted: Sat Jul 09, 2016 2:20 pm Post subject: Re: YAKGRP: late '69 coupe |
|
|
Yes, I do use weld through primer on al parts that can not be painted anymore once welded. And I'm using a mig welder from Telmig.
The rear brake adjusting wheels where indeed seized and it took quite some time to get them out. I cleaned them, put some copper grease on and put them back in before painting so that no paint would come in those holes.
I have a question regarding the tarboards. I keep everything that comes off the car. The tarboard side panels seem to have two layers. The tarboard behind the engine has only one later. Anyone who knows why?
The right one on the picture is the outer layer
|
|
| Back to top |
|
|
Rome
Samba Member
Joined: June 02, 2004
Posts: 10754
Location: Pearl River, NY
|
| Posted: Sun Jul 10, 2016 6:25 am Post subject: Re: YAKGRP: late '69 coupe |
|
|
| Quote: |
| The tarboard side panels seem to have two layers. |
Yes. The reason for a two-part side panel is that the layer to the outside of the car is a stiff cardboard which serves as a "form holder" for the actual tarboard panel. There is no support in the body for the side panels, just empty space. If you did not have the cardboard layer, the tarboard would slowly collapse on itself due to the heat of the engine compartment.
The large tarboard against the firewall is fastened to the firewall with numerous metal spikes so that it cannot easily fold down during the car's life. |
|
| Back to top |
|
|
Joostt
Samba Member
Joined: June 04, 2016
Posts: 76
Location: Noordwijk, Netherlands
|
| Posted: Mon Jul 11, 2016 2:04 pm Post subject: Re: YAKGRP: late '69 coupe |
|
|
Thanks! That's a logical explanation. I didn't realise the tarboard will be more flexible when heated.
Yesterday I welded the repair panel of the lower rear fender in place. I will have to grind it flat. But first I will start on the bumper mount. Once this is in place I can weld it all around, grind it down and put on some primer to prevent surface rust.
|
|
| Back to top |
|
|
Joostt
Samba Member
Joined: June 04, 2016
Posts: 76
Location: Noordwijk, Netherlands
|
| Posted: Fri Oct 14, 2016 1:56 pm Post subject: Re: YAKGRP: late '69 coupe |
|
|
It's been a while, but I found the time to work on my ghia again.
I removed the rusty rear bumper support and welded in a new one. And closed the front side of this bumper support with some new metal.
|
|
| Back to top |
|
|
63 vwnotch
Samba Member
Joined: December 31, 2002
Posts: 764
Location: Riverside,CA Econo Motors
|
| Posted: Fri Oct 14, 2016 2:40 pm Post subject: Re: YAKGRP: late '69 coupe |
|
|
wow the Ghia looked great until you started digging around...being a new ghia owner but a long time vw owner I've come to believe ghias rust more than any other VW's, and in the most awkward areas...
I'm worried now what I will find when I start digging around on my car, I intend to go about it the same way, this way I can still drive it...
Keep up the good work and look forward to further posts.. |
|
| Back to top |
|
|
J1
Samba Member
Joined: February 10, 2014
Posts: 707
Location: Bottom left
|
| Posted: Fri Oct 14, 2016 11:41 pm Post subject: Re: YAKGRP: late '69 coupe |
|
|
Just want to say it's inspiring to see people tackle these challenges head on. You post these before and after photos that make it seem like you completed them during a commercial break, but I know there was a lot of thinking, time and sweat put into each part. Thanks for sharing.
_________________
1971 Ghia coupe. Assume I know nothing and you'll be pretty darn close to the truth. |
|
| Back to top |
|
|
Joostt
Samba Member
Joined: June 04, 2016
Posts: 76
Location: Noordwijk, Netherlands
|
| Posted: Sat Oct 15, 2016 4:45 am Post subject: Re: YAKGRP: late '69 coupe |
|
|
| Quote: |
| wow the Ghia looked great until you started digging around... |
It did.. And I'm afraid it's going to look a lot worse before getting better. But that's part of the deal with this car. Good thing I have those photo's to look at once in a while to help me remember what the car looked like/is going to look like
| Quote: |
| You post these before and after photos that make it seem like you completed them during a commercial break, but I know there was a lot of thinking, time and sweat put into each part. |
Indeed. For anyone who's is going to restore a ghia, expect to put a lot of time in thinking, reading, doing, redoing different steps in the process. And maybe shed a little tear once in a while .
And thank you J1 for already making me worry a lot less about the rocker panels with your thread (http://www.thesamba.com/vw/forum/viewtopic.php?t=598829&highlight=). |
|
| Back to top |
|
|
|


