| Author |
Message |
nathansnathan
Samba Member

Joined: April 14, 2008
Posts: 1671

|
 Posted: Sun May 09, 2010 11:35 am Post subject: Sparkplug diagnostic wire Posted: Sun May 09, 2010 11:35 am Post subject: Sparkplug diagnostic wire |
 |
|
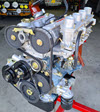
I should have got the 2 thin green wires that come out the grey sleeve.
This is the sparkplug diagnostic wire that was wrapped around the hard line to the charcoal canister when I got my bus. There is a acvw garage by where I used to live. I've seen them there a few times on busses they'd have on their lifts.
I've always been reluctant to pull my sparkplug wire ends off to put it on. Once I did this by accident and just stuck the wire back in. -drove it for like a week that way, but thought I should get new wires then. -this seems like the only way to get the piece on. The end 'loop' unplugs from the socket at the end; there are 2 pointy spades that go in.
|
|
| Back to top |
|
 |
mandodave
Samba Member

Joined: July 29, 2008
Posts: 110
Location: St. Paul MN
|
| Posted: Mon Apr 26, 2010 8:15 pm Post subject: |
|
|
I am jumping the top 2 middle connectors.
There are 2 big red wires (one with a red stripe)- they go into the wire loom so I am not sure which is which. But one pretty quickly makes it to the battery and the other to the starter.
I did not add any wires except the 2 coming from the switch. |
|
| Back to top |
|
|
rustbus
Samba Member

Joined: June 18, 2009
Posts: 2079
Location: alberta
|
| Posted: Mon Apr 26, 2010 7:57 pm Post subject: |
|
|
| mandodave wrote: |
One thing I did do in my '72 was to put remote starting button back there
|
awsome, me wanna do this too, where do the big red wires go? one to your starter and the other to battery (+)? (one of mine is cut, I'm suspicious it might be the one to the battery.....?
_________________
May of '72 Deluxe.  2.0L L-Jet CS & 091 trans conversion 2.0L L-Jet CS & 091 trans conversion
my Bus thread |
|
| Back to top |
|
|
mandodave
Samba Member
Joined: July 29, 2008
Posts: 110
Location: St. Paul MN
|
| Posted: Mon Apr 26, 2010 6:44 pm Post subject: Central test socket remote starter |
|
|
One thing I did do in my '72 was to put remote starting button back there
|
|
| Back to top |
|
|
raygreenwood
Samba Member
Joined: November 24, 2008
Posts: 23508
Location: Oklahoma City
|
| Posted: Mon Apr 26, 2010 4:12 am Post subject: |
|
|
The pickup used at 19 and 20 IIRC...is a timing pickup. It is an inductive ring with a two prong plug about 17mm in diamter. It slips around the #1 plug wire and is used for checking timing with the diagnostic system without hooking up a timing light.
A good source for "American " wire is Del City wire http://www.delcity.net/ Made in Del City Oklahoma, outside Oklahoma city. Good products.
Also...you can buy excellent quality wire at McMaster Carr http://www.mcmaster.com/#
Ray |
|
| Back to top |
|
|
Desertbusman
Samba Member

Joined: June 03, 2005
Posts: 14654
Location: Arizona
|
| Posted: Mon Apr 26, 2010 1:08 am Post subject: |
|
|
Not sure about a '72. A '71 has the 1 steel tube running up the right side. All the harness runs inside a plastic loom and that then is inside the steel tube. It pretty much fills up the tube with very little extra room. I've never heard of the mickey mouse split loom comming from the factory. I had a bunch of new wires to run and put them in a split loom, taped together every few inches. It was too mickey mouse so I tore it out right away. There were a set of round holes going thru all the crossmembers right near the stock steel tube. So i used a black vinyl tube from Lowes. Seems like it was 1/2" ID. And pulled a bundle of wires thru it using a long piece of rigid wire. Then ran it thru the frame holes. Ace Hardware had auto wire but maybe not now. With all my connectors, including the original ones, I crimp, solder, and cover with shrink tubing. It needed a new hole up front to get up to the cowl under the kick panels.
_________________
71 Superbug
71 Westy |
|
| Back to top |
|
|
SGKent 
Samba Member
Joined: October 30, 2007
Posts: 42952
Location: at the beach in Northern Wokistan
|
| Posted: Sun Apr 25, 2010 11:04 pm Post subject: |
|
|
the stuff we see in the all the flaps now is chinese. Even the connectors. It is like a huge vacuum picked up all the American wire and sank it to the bottom of the sea. You might be able to find some good quality belden wire from old automotive shops who have a rack that is 10 years old. Or find something online if you are lucky. We went 1 size up on wire because it was chinese - and I try to route things so they can't rub. Pieces of rubber fuel line sliced make great insulators around bends where wire can rub. If it can it will.
_________________
 Canned Water - the new California approved parts cleaner (except in a drought in which case rub it with sand). Canned Water - the new California approved parts cleaner (except in a drought in which case rub it with sand).
George Carlin:
"Most people don't know what they're doing, and a lot of them are really good at it."
Skills@EuroCarsPlus:
"never time to do it right but always time to do it twice" |
|
| Back to top |
|
|
nathansnathan
Samba Member
Joined: April 14, 2008
Posts: 1671
|
| Posted: Sun Apr 25, 2010 10:49 pm Post subject: |
|
|
"Split loom" as it's called and what is pictured, is supposed to be like that. It goes around. It's about the only thing at an electronics store that seems remotely appropriate. I used it to run my gauge wires a few years ago. At places in combination with electrical tape. it's alright but I'd like it to be better, especially since after that I had to run like 2 more that are just exposed.
My plan was to get a lot of heat shrink. Still though, probably not as good as a full on auto grade solution. Also, hardware store wire gets pretty crappy with heat and exposure, not to mention oil.
I'd thought of getting wire from a bus, though that is 30 years old, and you'd think I could find better wire?
I have a 72, so no loom is available. I'd be a bit suspect of it if there was even. Maybe I will look for aviation spec wire. If it's worth doing... |
|
| Back to top |
|
|
SGKent
Samba Member
Joined: October 30, 2007
Posts: 42952
Location: at the beach in Northern Wokistan
|
| Posted: Sun Apr 25, 2010 10:40 pm Post subject: |
|
|
what I do when that happens is buy several different sizes of quality heat shrink tubing and use the soldering iron to make good solid patches. I put two heat shrinl pieces on each one - two different sizes so it is well insulated. If you have a 1971 then I think new looms are available for it. If it is later you have to find a donor and cut out the section that you need and splice.
_________________
Canned Water - the new California approved parts cleaner (except in a drought in which case rub it with sand).
George Carlin:
"Most people don't know what they're doing, and a lot of them are really good at it."
Skills@EuroCarsPlus:
"never time to do it right but always time to do it twice" |
|
| Back to top |
|
|
nathansnathan
Samba Member
Joined: April 14, 2008
Posts: 1671
|
| Posted: Sun Apr 25, 2010 10:34 pm Post subject: |
|
|
|
|
| Back to top |
|
|
SGKent
Samba Member
Joined: October 30, 2007
Posts: 42952
Location: at the beach in Northern Wokistan
|
| Posted: Sun Apr 25, 2010 10:28 pm Post subject: |
|
|
| Quote: |
| I have been thinking of the next step to the front to back wiring. Good call on actually using the factory tube. The split loom that I have is in need of an upgrade. I know some of mine is now all stiff and brittle. Where would you reccomend getting 'good' wire from? |
split as in broken open or split as in pre-bay bus?
_________________
Canned Water - the new California approved parts cleaner (except in a drought in which case rub it with sand).
George Carlin:
"Most people don't know what they're doing, and a lot of them are really good at it."
Skills@EuroCarsPlus:
"never time to do it right but always time to do it twice" |
|
| Back to top |
|
|
nathansnathan
Samba Member
Joined: April 14, 2008
Posts: 1671
|
| Posted: Sun Apr 25, 2010 10:26 pm Post subject: |
|
|
I have been thinking of the next step to the front to back wiring. Good call on actually using the factory tube. The split loom that I have is in need of an upgrade. I know some of mine is now all stiff and brittle. Where would you reccomend getting 'good' wire from?
| Quote: |
| you are talking about the CYL TEMP gauge? |
No, the wire I'm talking about is 19 and 20 in orange, part of the diagnostic system. mine had it dangling, but I think it's supposed to go around your spark plug wire. I imagine some oldskool set of sparkplug wires that maybe you can pop the ends off. I wish I had a pic of the connector
Last edited by nathansnathan on Sun Apr 25, 2010 10:36 pm; edited 2 times in total |
|
| Back to top |
|
|
SGKent
Samba Member
Joined: October 30, 2007
Posts: 42952
Location: at the beach in Northern Wokistan
|
| Posted: Sat Apr 24, 2010 10:49 pm Post subject: |
|
|
you are talking about the CYL TEMP gauge? You can splice into it as long as you stay away from the cold junction.
I have a wire fish, the type electricians use. I slide it through the tube where the harness is on the passenger side. The harness takes up maybe 40% of the space. The rest is empty and unused. Then I pull a piece of twine, tape it to the end of my new wires which I have already bundled maybe every foot with electricans tape. Then I pull it through. Wire tie it to the exisiting harness and up through the floor. Recaulk everything. I get good grade wires, fresh wires with no cracking, and I don't drive myself nuts spending hours trying to locate a harness wire somewhere in the middle of a wire loom. I cam leave three or four feet extra on the end and cut to length.
_________________
Canned Water - the new California approved parts cleaner (except in a drought in which case rub it with sand).
George Carlin:
"Most people don't know what they're doing, and a lot of them are really good at it."
Skills@EuroCarsPlus:
"never time to do it right but always time to do it twice" |
|
| Back to top |
|
|
nathansnathan
Samba Member
Joined: April 14, 2008
Posts: 1671
|
| Posted: Sat Apr 24, 2010 9:45 pm Post subject: |
|
|
| Seems like kind of the place to ask this, but the diagnostic wire that goes to the sparkplug wire, it is a closed circle, so how was it that you would get the wire through? |
|
| Back to top |
|
|
busdaddy
Samba Member

Joined: February 12, 2004
Posts: 53210
Location: Surrey B.C. Canada, but thinking of Ukraine
|
| Posted: Sat Apr 24, 2010 9:27 pm Post subject: |
|
|
| SGKent wrote: |
| look on the passenger side at the back. The tube is there in case it becomes a RHD model. |
That may be a late sunroof only thing, all the busses I've seen have 1 tube only on the right.
_________________
Rust NEVER sleeps and stock never goes out of style.
Please don't PM technical questions, ask your problem in public so everyone can play along. If you think it's too stupid post it here
Stop dead photo links! Post your photos to The Samba Gallery!
Слава Україні! |
|
| Back to top |
|
|
rcrjacob
Samba Member

Joined: June 23, 2008
Posts: 174
Location: Vacaville, CA
|
| Posted: Sat Apr 24, 2010 5:31 pm Post subject: |
|
|
| Not on mine. My harness is in the tube on the passenger side. |
|
| Back to top |
|
|
SGKent
Samba Member
Joined: October 30, 2007
Posts: 42952
Location: at the beach in Northern Wokistan
|
| Posted: Sat Apr 24, 2010 5:15 pm Post subject: |
|
|
look on the passenger side at the back. The tube is there in case it becomes a RHD model.
_________________
Canned Water - the new California approved parts cleaner (except in a drought in which case rub it with sand).
George Carlin:
"Most people don't know what they're doing, and a lot of them are really good at it."
Skills@EuroCarsPlus:
"never time to do it right but always time to do it twice" |
|
| Back to top |
|
|
rcrjacob
Samba Member
Joined: June 23, 2008
Posts: 174
Location: Vacaville, CA
|
| Posted: Sat Apr 24, 2010 4:33 pm Post subject: |
|
|
| SGKent wrote: |
| not meaning disrespect but in the time it has taken to look this up I could have pulled wires on 10 buses from the back to front. 10 minutes tops if you already have different colors. We bought 3 colors and with the help of model paint and a small brush made different colors. They are in a bundle that took literally 5 minutes to pull from back to front. Our bus has a spare tube and so did my 1971. Use a stiff wire or electrical fish to pull a piece of twine through, hook it to the wires and pull them through the tube. Push them through the grommet where the other cables go. While you are there recaulk anything that needs it. At the back you follow the frame and push through where all the battery cables go through. |
Wish mine had an extra tube, I have a TON of extra wires to run. |
|
| Back to top |
|
|
busdaddy
Samba Member
Joined: February 12, 2004
Posts: 53210
Location: Surrey B.C. Canada, but thinking of Ukraine
|
| Posted: Sat Apr 24, 2010 4:29 pm Post subject: |
|
|
| rcrjacob wrote: |
| Isn't that a 73 model? |
You mean 6/72?, nope, that's as 72 as it gets, 73 didn't begin until August.
_________________
Rust NEVER sleeps and stock never goes out of style.
Please don't PM technical questions, ask your problem in public so everyone can play along. If you think it's too stupid post it here
Stop dead photo links! Post your photos to The Samba Gallery!
Слава Україні! |
|
| Back to top |
|
|
rcrjacob
Samba Member
Joined: June 23, 2008
Posts: 174
Location: Vacaville, CA
|
| Posted: Sat Apr 24, 2010 3:02 pm Post subject: |
|
|
| Isn't that a 73 model? |
|
| Back to top |
|
|
|


