| Author |
Message |
floundermay
Samba Member
Joined: April 28, 2009
Posts: 45
Location: Detroit

|
 Posted: Sat Apr 20, 2019 6:30 pm Post subject: Re: Flounder's 71 super vert nightmare restoration Posted: Sat Apr 20, 2019 6:30 pm Post subject: Re: Flounder's 71 super vert nightmare restoration |
 |
|
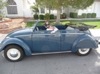
Been a long time but I am still slowly moving forward bug. I actually have insurance and a license plate and took her for a drive to the corner today. Still lots to do but it is looking like a car!
|
|
| Back to top |
|
 |
lovethatconvertible
Samba Member
Joined: August 22, 2008
Posts: 1434
Location: Las Vegas N. V.
|
| Posted: Thu Apr 20, 2017 4:49 pm Post subject: Re: Flounder's 71 super vert nightmare restoration |
|
|
Excellent, Another one almost back from the dead. Nice work
_________________
1960 Convertible |
|
| Back to top |
|
|
floundermay
Samba Member
Joined: April 28, 2009
Posts: 45
Location: Detroit
|
| Posted: Thu Apr 20, 2017 12:02 pm Post subject: A Few More Pics |
|
|
|
|
| Back to top |
|
|
floundermay
Samba Member
Joined: April 28, 2009
Posts: 45
Location: Detroit
|
| Posted: Thu Apr 20, 2017 11:54 am Post subject: Re: Flounder's 71 super vert nightmare restoration |
|
|
Well finally back from getting painted. Actually I found a place that let me rent their spray booth for the day. I started at 8 in the morning and did not finish till almost 10 at night. No breaks, no food. I was exhausted and very sore. The worst part is I had to drive back out(about an hour)the next morning to pick the car up before 8. It is nowhere near perfect, but it looks good from a distance!
|
|
| Back to top |
|
|
floundermay
Samba Member
Joined: April 28, 2009
Posts: 45
Location: Detroit
|
| Posted: Thu Apr 20, 2017 10:53 am Post subject: Re: Flounder's 71 super vert nightmare restoration |
|
|
| 260KMN wrote: |
Some nice work there, if its any consolation, i did almost all the same repairs on my cabrio, it seems like an endless weldathon but its worth it in the end.
Looking forward to seeing this done. |
Looks all too familiar, I have become a much better welder then when I started! |
|
| Back to top |
|
|
260KMN
Samba Member
Joined: January 17, 2014
Posts: 241
Location: Devon UK
|
| Posted: Wed Dec 14, 2016 3:59 pm Post subject: Re: Flounder's 71 super vert nightmare restoration |
|
|
Some nice work there, if its any consolation, i did almost all the same repairs on my cabrio, it seems like an endless weldathon but its worth it in the end.
Looking forward to seeing this done. |
|
| Back to top |
|
|
jerrybromley
Samba Member
Joined: August 06, 2016
Posts: 124
Location: Michigan
|
| Posted: Thu Dec 01, 2016 2:45 pm Post subject: Re: Flounder's 71 super vert nightmare restoration |
|
|
WOW I love this thread ! I am doing almost exactly the same thing on my 73 convert .
This is what I brought home
these are some of the problems
This is my solution
|
|
| Back to top |
|
|
floundermay
Samba Member
Joined: April 28, 2009
Posts: 45
Location: Detroit
|
| Posted: Thu Dec 01, 2016 1:02 pm Post subject: Re: Flounder's 71 super vert nightmare restoration |
|
|
I am leaning towards a blue and white two tone paint mix. Originally the wife wanted tourquoise and white, but I think a bright metallic royal blue and white is where it will be.
I looked through your build thread, great work, gives me motivation to complete mine! |
|
| Back to top |
|
|
beetlenut
Samba Member

Joined: May 27, 2009
Posts: 3012
Location: RI
|
| Posted: Thu Dec 01, 2016 11:54 am Post subject: Re: Flounder's 71 super vert nightmare restoration |
|
|
Great job and Great perseverance! I had a similar project that just might make it back on the road by Spring. The VW specific knowledge you've gained along the way will serve you well for the rest of the car's life. There's something about knowing every nut and bolt of your car that makes driving it that much more pleasing! What color are you going to paint it?
_________________
scrapyards are for quitters
---------------------------------------
| Wetstuff wrote: |
| ... I spend more time shaking it than directing it?! I get a pretty decent blast for 8sec. then have to shake it again. |
- Words to live by right there!
My 74 Super rebuild thread: http://www.thesamba.com/vw/forum/viewtopic.php?p=6507104#6507104 |
|
| Back to top |
|
|
floundermay
Samba Member
Joined: April 28, 2009
Posts: 45
Location: Detroit
|
| Posted: Thu Dec 01, 2016 10:10 am Post subject: Re: Flounder's 71 super vert nightmare restoration |
|
|
So it has been two and a half years since I posted, Many people would have quit or given up, I'm still working and making progress. I Have completed te engine, and it runs on a the stand. And I am almost ready to send the girl off to paint. I decided to have someone else paint is as I did not want to do that much painting in an attached garage. Here are a few pictures of how it looks today, a huge difference the some of my earlier posts!
|
|
| Back to top |
|
|
floundermay
Samba Member
Joined: April 28, 2009
Posts: 45
Location: Detroit
|
| Posted: Sun Mar 30, 2014 11:53 am Post subject: Driver side rear quarter done! |
|
|
Driver side done, not going to weld the bottom down until all four corners are done in case i need to make any final tweeks. Currently the door gaps are good and they shut very nicely!
Little man out to help, Safety First!
inside repair
Almost ready for the patch
Patch Cut
Tacked in
Welding done
Coat of Masterseries primer (will remove and use epoxy primer when i do final body work)
Needs a little hammer work at the weld seam, but that can wait. (Look at the nice door gap!)
|
|
| Back to top |
|
|
floundermay
Samba Member
Joined: April 28, 2009
Posts: 45
Location: Detroit
|
| Posted: Sun Mar 30, 2014 11:42 am Post subject: Engine Compartment |
|
|
Engine back in car to help fit panels
Rear apron on and welded
Somewhat complete looking rear end!
|
|
| Back to top |
|
|
floundermay
Samba Member
Joined: April 28, 2009
Posts: 45
Location: Detroit
|
| Posted: Sun Mar 30, 2014 11:37 am Post subject: Package tray going in |
|
|
Starting to look like a car!
|
|
| Back to top |
|
|
floundermay
Samba Member
Joined: April 28, 2009
Posts: 45
Location: Detroit
|
| Posted: Sun Mar 30, 2014 11:34 am Post subject: Convertible top mount point replacement |
|
|
What a nightmare! Again thank god for donor metal!
TOP ON FITS NICE!
|
|
| Back to top |
|
|
floundermay
Samba Member
Joined: April 28, 2009
Posts: 45
Location: Detroit
|
| Posted: Sun Mar 30, 2014 11:22 am Post subject: Rear wheel well repair |
|
|
Basically the same for both sides |
|
| Back to top |
|
|
floundermay
Samba Member
Joined: April 28, 2009
Posts: 45
Location: Detroit
|
| Posted: Sun Mar 30, 2014 11:11 am Post subject: A Pillar Replacement |
|
|
Replacing the a Pillars thanks to the donor car
|
|
| Back to top |
|
|
floundermay
Samba Member
Joined: April 28, 2009
Posts: 45
Location: Detroit
|
| Posted: Sun Mar 30, 2014 11:07 am Post subject: Body Going back On |
|
|
After cutting out the rusted bottom of the vert I am ready to transplant it onto the sedan bottom. Unfortunately my bracing did not help much so I ended separating the car into pieces to get things to line up (sorta) |
|
| Back to top |
|
|
floundermay
Samba Member
Joined: April 28, 2009
Posts: 45
Location: Detroit
|
| Posted: Sun Mar 30, 2014 11:00 am Post subject: Four years later still working Thread update |
|
|
I has been a long 4 years, moved, changed jobs so I have not made much progress till lately. so I will update over the next few posts. Here is the fat chick in her new home
|
|
| Back to top |
|
|
zozo
Samba Member

Joined: October 15, 2005
Posts: 5217
Location: South of Ol' San Antonio
|
| Posted: Sun Jul 18, 2010 5:37 pm Post subject: |
|
|
| It looks like you're determined to drag that beast back from the edge of the grave. GREAT JOB. Keep up the good work, and keep posting pics of the progress. |
|
| Back to top |
|
|
floundermay
Samba Member
Joined: April 28, 2009
Posts: 45
Location: Detroit
|
| Posted: Sun Jul 18, 2010 5:24 pm Post subject: starting to wrk on the donor car channels |
|
|
The heater channels from the donor were in fairly good shape. There was only 3 places that needed to be addressed. both sides of the front crossmember and on little area on the channel. so I cut out the area welded in donor metal. Then I had the entire thing blasted, two coats of Masterseries, then 2 coats of epoxy primer so that it will match my plans for the body. Any comments on the welding would be helpful, I am getting better, but I still do not think I am doing things just right.......
Bad metal cut out
Welding in new metal
Lots of Grinding, how does it look?
Blasted
Finally painted and on the Chassis
Well that is all for now, a year worth of work in 4 posts. I will post more as I make progress. Thanks for the comments so far. I have a ton more pictures posted on photobucket, just search for "floundermay" |
|
| Back to top |
|
|
|


