| Author |
Message |
Vangabonders
Samba Member

Joined: January 15, 2013
Posts: 174
Location: Chattanooga TN

|
 Posted: Wed Jun 28, 2023 6:14 pm Post subject: Posted: Wed Jun 28, 2023 6:14 pm Post subject: |
 |
|
| Spike0180 wrote: |
| 77Campmobile wrote: |
| Thrasher22 wrote: |
Sadly barely any progress this summer, I've ran into a (LOT) of problems trying to fit the rear fender. It had so much oil-canning that I had to cut out sections and weld in patches. FFS...
Almost done rebuilding the inside of the wheel well from scratch though, and will start rust proofing everything today to start trying to get the outer panel on! Big step I've been working towards for a while.
Two questions hopefully people can help with:
1. Does anyone know where to buy plugs to fill these holes inside the wheel well? (the blue arrows) I'd rather not weld them shut, but want a solution that's better than the poor quality plastic that VW originally used which leaked...
2. What should I seal along the red lines with? I bought some closed cell window sealing foam, would that work? |
What did you end up using for adhesive along the redlines in your pictures? I am doing this area on my bus next and have been searching for what to use here.
Thanks |
If you're looking for adherence: 3m Panel Bond 08116 |
I don't think panel bond would work here as its really runny and the gap between the inner wheel well and outer skin is large. Any other ideas or ways people have filled this gap? I am working on this part of my bus currently.
_________________
73 tintop to poptop westfalia (Frankenbus) |
|
| Back to top |
|
 |
tristanblue
Samba Member
Joined: May 30, 2019
Posts: 343
|
| Posted: Tue Jan 07, 2020 9:25 pm Post subject: Re: 1975 "Rustmobile" Restoration |
|
|
I am looking for supplier of C pillar. You mentioned Averies, is this a panel the make or is it from one of the big suppliers. I can not seem to find any.
|
|
| Back to top |
|
|
Spike0180
Samba Member

Joined: June 06, 2015
Posts: 2269
Location: Detroit, Michigan
|
| Posted: Fri Jan 04, 2019 6:44 am Post subject: |
|
|
| 77Campmobile wrote: |
| Thrasher22 wrote: |
Sadly barely any progress this summer, I've ran into a (LOT) of problems trying to fit the rear fender. It had so much oil-canning that I had to cut out sections and weld in patches. FFS...
Almost done rebuilding the inside of the wheel well from scratch though, and will start rust proofing everything today to start trying to get the outer panel on! Big step I've been working towards for a while.
Two questions hopefully people can help with:
1. Does anyone know where to buy plugs to fill these holes inside the wheel well? (the blue arrows) I'd rather not weld them shut, but want a solution that's better than the poor quality plastic that VW originally used which leaked...
2. What should I seal along the red lines with? I bought some closed cell window sealing foam, would that work? |
What did you end up using for adhesive along the redlines in your pictures? I am doing this area on my bus next and have been searching for what to use here.
Thanks |
If you're looking for adherence: 3m Panel Bond 08116
_________________
Brutis Patches Izabich: 1970 VW Transporter - 1776cc DP
Current State: Projects never truly end...
Location: Grosse Pointe, Michigan
Other cars: 2003 F150, 2003 Jetta GLI vr6-6sp
Sambastic: adj; the quality of being nit picky, elitist, expecting everyone to do things the way they believe is best with no regard to situation, "sambastic" |
|
| Back to top |
|
|
alman72
Samba Member
Joined: October 09, 2014
Posts: 2575
Location: MICHIGAN
|
| Posted: Thu Jan 03, 2019 11:10 am Post subject: Re: 1975 "Rustmobile" Restoration |
|
|
| he has not been on here in a year or two...feb of 2017 |
|
| Back to top |
|
|
77Campmobile
Samba Member
Joined: June 18, 2006
Posts: 102
Location: New Hampshire
|
| Posted: Thu Jan 03, 2019 10:34 am Post subject: |
|
|
| Thrasher22 wrote: |
Sadly barely any progress this summer, I've ran into a (LOT) of problems trying to fit the rear fender. It had so much oil-canning that I had to cut out sections and weld in patches. FFS...
Almost done rebuilding the inside of the wheel well from scratch though, and will start rust proofing everything today to start trying to get the outer panel on! Big step I've been working towards for a while.
Two questions hopefully people can help with:
1. Does anyone know where to buy plugs to fill these holes inside the wheel well? (the blue arrows) I'd rather not weld them shut, but want a solution that's better than the poor quality plastic that VW originally used which leaked...
2. What should I seal along the red lines with? I bought some closed cell window sealing foam, would that work? |
What did you end up using for adhesive along the redlines in your pictures? I am doing this area on my bus next and have been searching for what to use here.
Thanks |
|
| Back to top |
|
|
Pinetops
Samba Member

Joined: March 24, 2007
Posts: 2987
|
| Posted: Sat Sep 20, 2014 8:11 pm Post subject: |
|
|
I just wanted to check in and say bravo! You have done an absolutely incredible job with your bus, the level of quality you achieved is truly impressive. I wish you much enjoyment with your bus, you've earned it!
_________________
"A rolling bus gathers no rust." |
|
| Back to top |
|
|
secretsubmariner
Champagne Wrangler

Joined: January 08, 2011
Posts: 3109
Location: Tulsa, OK
|
|
| Back to top |
|
|
eche_bus
Samba Member
Joined: October 07, 2007
Posts: 1318
|
| Posted: Fri Aug 15, 2014 8:27 pm Post subject: |
|
|
What an excellent job you've done on the bodywork and paint - and under less-than-ideal workspace conditions! Grrrreat looking bus, and very happy to learn you had no mech. problems during the maiden voyage! Congratulations!!  |
|
| Back to top |
|
|
whatdoesthisbuttondo?
Samba Member

Joined: April 05, 2012
Posts: 259
Location: Victoria
|
| Posted: Fri Aug 15, 2014 11:21 am Post subject: |
|
|
Man, Frank looks awesome, great job!
_________________
Orange 1973 Campervan. Rebuilt 1700cc with dual Solex carbs. Pertronix electronic points on stock distributor. Engine rebuild in progress (fall 2023). |
|
| Back to top |
|
|
Thrasher22
Samba Member

Joined: October 05, 2010
Posts: 858
Location: Calgary, Canada
|
| Posted: Thu Aug 14, 2014 12:29 pm Post subject: |
|
|
| wcfvw69 wrote: |
That really turned out fantastic! For someone who hadn't tackled welding nor bodywork before, you should be VERY proud of yourself for what you accomplished. That really turned out great.
Nice job! |
Thanks! I'm pretty pleased with the final result. Next project I tackle it should just move a little faster 
_________________
1975 Westfalia - http://www.thesamba.com/vw/forum/viewtopic.php?t=516701 |
|
| Back to top |
|
|
Thrasher22
Samba Member
Joined: October 05, 2010
Posts: 858
Location: Calgary, Canada
|
| Posted: Thu Aug 14, 2014 12:27 pm Post subject: |
|
|
Final catch-up post. If you're a stock nazi, or refruse to cut corners, do not read any further. But if you want to fix your turn signal for free, read on 
Last night I set my mind to getting my turn signals to auto cancel, as I NEVER remember to turn them off. I'll take a couple more pics tonight and do a full "how to" to fill in the missing steps for those who haven't taken their steering wheel off before.
Step 1: Remove horn cover with your fingernail/razor/whatever.
Step 2: Unplug the horn grounding wire, and unbolt the steering wheel (I believe it is a 24mm bolt). Set steering wheel aside.
You can now see the assembly for the turn signal, wiper blade control, and high beams.
I chose to remove it by removing the 4 flat head machine screws and unplugging the two harnesses from the bottom to clean 40 years of junk out. Old grease and dirt was removed with a can of carb cleaner, and I re-greased thoroughly with Jigalou, a grease-less spray lubricant.
If you know how these work, skip to step 3.
Normally there is a spring-like piece of metal (middle arrow), which attached two sliding pieces of plastic (side arrows) together. When you "activate" the turn signal, there is a piece of plastic which pops out of the middle. When you turn the steering wheel, there is a "nub" on the wheel that catches this plastic pieces and pushes it to one side or the other, popping the signal back into position. I apologize if this part is hard to follow, but pop off your steering wheel and it will be obvious.
I was missing the plastic bit indicated by the left arrow and the metal spring, so when the steering wheel pushed the plastic part that pops out, there was nothing for it to push against on one side, and no spring to hold the other side in place. Given how I would have probably needed to buy a whole new assembly to get these two tiny parts, I decided to improvise.
Step 3: Fix it!
All that is really missing is something for the steering wheel to push against to pop things into place. So I took some #4 3/8" screws and screwed them into the slots indicated by the two side arrows. You could use a smaller screw, but any bigger you risk cracking the plastic, or being too tall and interfering with the steering wheel.
Step 4: Reassemble!
So long story short... if your turn signal does't work, throw some screws in it
I took it for a test drive, and it works beautifully.
_________________
1975 Westfalia - http://www.thesamba.com/vw/forum/viewtopic.php?t=516701 |
|
| Back to top |
|
|
wcfvw69
Samba Purist

Joined: June 10, 2004
Posts: 13680
Location: Arizona
|
| Posted: Thu Aug 14, 2014 12:23 pm Post subject: |
|
|
That really turned out fantastic! For someone who hadn't tackled welding nor bodywork before, you should be VERY proud of yourself for what you accomplished. That really turned out great.
Nice job!
_________________
Contact me at [email protected]
Follow me on instagram @sparxwerksllc
40+ years of VW repair, and VW parts and vehicle restoration experience.
The Samba member since 2004.
**Now rebuilding throttle bodies for VW's and Porsche's**
**Restored German Bosch distributors for sale or I can restore yours**
**Restored German Pierburg fuel pumps for sale or I can restore yours**
**Restored Porsche fuel pumps or I can restore yours**
**Restored Porsche distributors or I can restore yours** |
|
| Back to top |
|
|
Thrasher22
Samba Member
Joined: October 05, 2010
Posts: 858
Location: Calgary, Canada
|
| Posted: Thu Aug 14, 2014 12:01 pm Post subject: |
|
|
I spent a month or two doing short city drives and tuning up the engine, then painted the bumpers, front logo, and sandblasted/painted the bumper mounts.
By this point my turbine HVLP system was starting to struggle and I'd gotten tired of all the prep and cleaning, so I bought one of the "bring your own paint" style spray cans from napa and was fairly impressed. I'll look up the brand name if anyone is interested, but it comes with a small glass jar which you mix your paint into, which screws into an can or propellant (I believe propane/butane mix), and you use it like a regular spray can.
The downside is the butane makes the paint quiet cold, so you need to spray fairly heavy to get it to flow nicely.
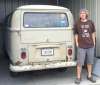
I'd been rushing all summer so that I could have the bus ready for my wedding early Aug, and the photographer took a bunch of pics of us with it
Just one so far, waiting for more:
The weekend after the wedding, I was finally able to get the bus on the highway for its maiden camping trip!
Just drove an hour from town, but it required a fair bit of 65mph driving, gravel roads, and mountain driving. I packed every spare I had and half the tools in the garage, preparing for the worst... which never came. I'm pretty pleased to say not a single thing went wrong! The bus, which is now known as Frank (as in stein, both for the color and the many pieces needed to bring him back to life) drove beautifully! Even managed 23mpg.
And just for fun, our cat came/was dragged out for a visit
_________________
1975 Westfalia - http://www.thesamba.com/vw/forum/viewtopic.php?t=516701 |
|
| Back to top |
|
|
Thrasher22
Samba Member
Joined: October 05, 2010
Posts: 858
Location: Calgary, Canada
|
| Posted: Thu Aug 14, 2014 11:54 am Post subject: |
|
|
Thanks wcfvw69, I really appreciate it!
I've given up on trying to get the photos on my old phone, so to jump ahead several months...
I don't have a ton of photos from the last few months as I've been recovering from a pretty serious concussion mid-april and wasn't allowed to use electronic devices for more than short periods.
On the plus side, all I was able to do when I was on medical leave from work was slowly keep working on the bus! Because of this, I was able to finish painting the doors and start assembling everything!
On of the first shots back on the road, I drove to my parents house to store him for a few days while I restored the pop-top.
The roof was in decent shape aside from some scratches which needed some light filler and a bunch of mold on the underside from "someone" storing it in his back yard for a few years
Sanded down for paint:
I painted with Interlux Brightside. Really impressed with the paint, it is fantastic at leveling out, and dries very glossy and hard! I also sandblasted the tie downs, and spray bombed them black. They're just attached with some machine screws with nuts on the inside.
Next up: Flooring!
Before:
I almost hate covering up the new paint...
During:
I just used regular cheap plywood with plastic flooring underlay.
After:
Snap-together laminate flooring from Home Depot, exact same color as the cabinates and was cheap!
I put regular old fiberglass insulation behind all the panels. I'll do a more serious job of sound deadening and insulating this winter.
And started doing trips around town!
_________________
1975 Westfalia - http://www.thesamba.com/vw/forum/viewtopic.php?t=516701 |
|
| Back to top |
|
|
wcfvw69
Samba Purist
Joined: June 10, 2004
Posts: 13680
Location: Arizona
|
| Posted: Thu Jul 03, 2014 5:57 pm Post subject: |
|
|
I just ran across this thread and had to tell you great job. It takes a lot of tenacity to see a restoration thru. Especially when you discovered the amount of rust and previous crappy repairs. Doing that type of work in those cold working conditions is fantastic.
Looking forward to your future updates on how it looks now.
_________________
Contact me at [email protected]
Follow me on instagram @sparxwerksllc
40+ years of VW repair, and VW parts and vehicle restoration experience.
The Samba member since 2004.
**Now rebuilding throttle bodies for VW's and Porsche's**
**Restored German Bosch distributors for sale or I can restore yours**
**Restored German Pierburg fuel pumps for sale or I can restore yours**
**Restored Porsche fuel pumps or I can restore yours**
**Restored Porsche distributors or I can restore yours** |
|
| Back to top |
|
|
Thrasher22
Samba Member
Joined: October 05, 2010
Posts: 858
Location: Calgary, Canada
|
| Posted: Thu Jul 03, 2014 8:42 am Post subject: |
|
|
Thanks! Its all back together now and been doing small trips around town, but my phone died with all the progress photos. I'll do a big retroactive update when I figure out how to download them 
_________________
1975 Westfalia - http://www.thesamba.com/vw/forum/viewtopic.php?t=516701 |
|
| Back to top |
|
|
DONGKG
The Araneta Boys
Joined: August 28, 2006
Posts: 5476
Location: Cainta, Rizal, Philippines, "A Certified Type 3 and Karmann Ghia Maniac"
|
|
| Back to top |
|
|
Thrasher22
Samba Member
Joined: October 05, 2010
Posts: 858
Location: Calgary, Canada
|
| Posted: Mon Apr 07, 2014 2:45 pm Post subject: |
|
|
Because my garage is pretty small I figured it would be easier to paint a couple parts at a time. So this round it got to be engine door + hatch, rear and sliding door!
Primered one side, waited 24 hours, then turned them around and flipped upside down to make sure every side had appropriate coverage.
If you're temporarily heating a garage in a cold climate like me, make sure to keep parts off the floor. The heating and cooling will cause a lot of moisture to build up on the floor, which could give you some rust/adhesion problems. I propped them up on wood scraps.
To paint both sides I made some half-hearted wooden stands for the bottom and something heavy to lean them on.
Then paint!
After the garage has aired out for a couple days I'll get started on the front doors, and finish up the bumpers.
_________________
1975 Westfalia - http://www.thesamba.com/vw/forum/viewtopic.php?t=516701 |
|
| Back to top |
|
|
Thrasher22
Samba Member
Joined: October 05, 2010
Posts: 858
Location: Calgary, Canada
|
| Posted: Mon Apr 07, 2014 1:38 pm Post subject: |
|
|
Thanks guys!
Spent the last 3 months working on the doors and bumpers...
First I took everything to a big DIY sandblasting yard and got them cleaned up.
Sliding door was pretty crusty and had some old hidden damage, so it needed the inside and outside replaced. This piece was a little trickier as I really wanted to keep the curve of the door matching the body as exactly as possible, and really couldn't have it accidentally be any shorter/longer than factory
First I carefully cut off the outer skin.
Then tacked on the new skin, flipped it over and cut out the inner rot:
The outer skin was from Schofield and was great quality. Unfortunately I was stuck with klokkerholm for the inner, so it needed some work:
The most obvious was that the bottom lip was thin many places, and completely disappeared for stretches, which would prevent moisture from draining out the bottom. Since I didn't have specific crimping tools, I cut a large right-angle ruler in half, clamped one side underneath, and hammered the other side down beside it to create the lip.
Another important issue that needed to be dealt with, was the drains had large ripples in them which would have pooled water and lead back to... more rust!
To correct the shape I found a chisel which was the same width, clamped the metal down really tightly around it with the thick rulers to make a mold, and hammered it into shape.
Then with the outer skin still clamped firmly in the old/correct position I tacked the inner support back on. Once I was 100% with the shape and position, I cut the outer skin off and finished butt welding the inside.
All patched up and with a couple coats of weld-through primer:
Once all that was done, welding the skin on was relatively straight forward. Before I folded the edges of the skin over, I put some seam sealer between the two parts to keep moisture out of there forever.
Next up was doing some dent repair on the engine door and decided to improve on the license plate mounting system by welding nuts onto the back of the holes. The bottom two were just welded shut since they're not "really" needed.
More to follow...
_________________
1975 Westfalia - http://www.thesamba.com/vw/forum/viewtopic.php?t=516701 |
|
| Back to top |
|
|
eche_bus
Samba Member
Joined: October 07, 2007
Posts: 1318
|
| Posted: Thu Feb 20, 2014 10:04 am Post subject: |
|
|
| Such a clean look. It's come one heck of a long way! Great looking bus! |
|
| Back to top |
|
|
|


