| Author |
Message |
Wildthings
Samba Member

Joined: March 13, 2005
Posts: 52720

|
 Posted: Thu Sep 30, 2021 12:47 am Post subject: Re: 003 Automatic transmission refresh/rebuild Part 1 - Final Drive Posted: Thu Sep 30, 2021 12:47 am Post subject: Re: 003 Automatic transmission refresh/rebuild Part 1 - Final Drive |
 |
|
Look for a letter stamped on one of the three mounting bosses. That is the code to tell you which torque converter you have. Otherwise they all look and fit the same. If you get the wrong code TC, say the one for a 412 it will give poor performance in a bus and likely burn up the transmission quickly.
At a minimum you want a "D" torque converter, but preferably a "Z" or and "H". IIRC the "Z" was used in the last year of the aircooled Vanagon and VW recommend that it be used as a replacement for the earlier aircools, while the "H" was for the later 2.1L watercooled Vanagons and had the same high stall speed as the "Z". |
|
| Back to top |
|
 |
Wasted youth
Samba Member

Joined: July 06, 2012
Posts: 5175
Location: California's Hot and Smoggy Central Valley
|
| Posted: Wed Sep 29, 2021 5:46 pm Post subject: Re: 003 Automatic transmission refresh/rebuild Part 1 - Final Drive |
|
|
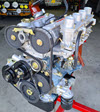
I had a chance to look today, unfortunately I was not able to determine a part number. But it was sourced from Axiom Technologies through an online vendor.
Here are some probably useless pictures of two Type 3 / 003 VW torque converters. The one in the cardboard box is the original out of my 73 bus. The other with the flex plate is a core from the junkyard.
|
|
| Back to top |
|
|
SGKent 
Samba Member
Joined: October 30, 2007
Posts: 42950
Location: at the beach in Northern Wokistan
|
|
| Back to top |
|
|
Wasted youth
Samba Member
Joined: July 06, 2012
Posts: 5175
Location: California's Hot and Smoggy Central Valley
|
| Posted: Tue Sep 28, 2021 2:46 pm Post subject: Re: 003 Automatic transmission refresh/rebuild Part 1 - Final Drive |
|
|
I still have the old torque converter from when I rebuilt this unit. At the time, I decided I would buy a rebuilt TC for my project and hold onto the old one. That one was married up to the 1700 with the correct camshaft.
I will see if there is a part number on it, and there is likely paperwork available with sourcing information. |
|
| Back to top |
|
|
skills@eurocarsplus
Samba Peckerhead

Joined: January 01, 2007
Posts: 17966
Location: sticksville, ct.
|
| Posted: Mon Sep 27, 2021 9:22 pm Post subject: Re: 003 Automatic transmission refresh/rebuild Part 1 - Final Drive |
|
|
pretty sure they are different
stall speed would almost certainly be different.
talk to wildthings. he claims these parts are plentiful and are easily found...
seriously if you find one, they are going to want a core back
a friend who owns a shop in CA just went thru this and there was a 700.00 core
anyway, post a WTB ad and pray. and if you find one, just pay the price and have it rebuilt. they don't grow on trees
i paid almost 200 bux for a fucking transmission pan.
yea, the joy of automatics....
_________________
| gprudenciop wrote: |
my reason for switching to subaru is my german car was turning chinese so i said fuck it and went japanese....... |
| Jake Raby wrote: |
| Thanks for the correction. I used to be a nice guy, then I ruined it by exposing myself to the public. |
| Brian wrote: |
| Also the fact that people are agreeing with Skills, it's a turn of events for samba history |
|
|
| Back to top |
|
|
ksternquist
Samba Member
Joined: August 07, 2018
Posts: 1
Location: Corning, NY
|
| Posted: Mon Sep 27, 2021 8:20 pm Post subject: Re: 003 Automatic transmission refresh/rebuild Part 1 - Final Drive |
|
|
| I've looked around on various forums and found this the best place to try to ask my question. I've got a 75 automatic baywindow with an 003 transmission with a type 4 2.0L engine. I am missing the torque converter and trying to source one has been a nightmare. Am I correct in thinking I can use a torque converter sourced from a type 3 with an 003 transmission? |
|
| Back to top |
|
|
Wasted youth
Samba Member
Joined: July 06, 2012
Posts: 5175
Location: California's Hot and Smoggy Central Valley
|
| Posted: Wed Aug 19, 2015 4:21 pm Post subject: |
|
|
| raygreenwood wrote: |
....I am actually more worried about bearings. Its just a habit I got into.
Even though I am of the mind that if you are refurbishing or rebuioding you should replave as many of the bearings as you can....if not all of them......there are some needle bearings and one diff bearing on my some of my trans that are unobtanium. ....so I just get in the habit of taking a whole day from start to finish so no risk to bearings.
Ray |
I like this.
And the differential portion can be rebuilt within a few hours actual time, if you have all the parts ready. So, yeah that could be done within a day. |
|
| Back to top |
|
|
raygreenwood
Samba Member
Joined: November 24, 2008
Posts: 23507
Location: Oklahoma City
|
| Posted: Wed Aug 19, 2015 1:37 pm Post subject: |
|
|
| Wasted youth wrote: |
For what it's worth, I was pleasantly surprised about the effectiveness of the Harbor Freight parts tank. Key thing here, though is to not dilute their solvent as directed. I think it was like 1:12 solvent/water. I did about a 50% ratio. It stings the skin after about a minute, so wear dip gloves (Home Depot).
As Ray says, begin with a pressure washing first. I have a nice one, and it makes a huge mess, but totally worth it.
The only thing I part ways with Ray on is that I feel it is unnecessary to plan on cleaning the case on the same day you will be rebuilding it. YES... you will be exposing bare cast iron to water and solvents... so YES you must plan on ridding ALL of that before you 'bag and tag' it in a dust free, dry storage. I simply don't have the luxury to do all that in one day.
Thanks for the comments. There are a few parts identification/labeling errors in the Part 2 - Transmission Half of this thread. Be wary of this, and carefully follow your service manual. I have simply not gone back in here to fix the errors. My responsibility, I know!!  |
 I have a harbor freight parts washer as well. I have had it going on 2.5 years....and I use a solvent from O'Reillys that is pretty damn good....not water based. ....but high flash point.....and the parts washer has had 0 problems with pump or hose. In fact...outside of strengthening the legs......its been a great parts washer. I have a harbor freight parts washer as well. I have had it going on 2.5 years....and I use a solvent from O'Reillys that is pretty damn good....not water based. ....but high flash point.....and the parts washer has had 0 problems with pump or hose. In fact...outside of strengthening the legs......its been a great parts washer.
Yep.....I hear ya on the time issue.....but my point about rust worries is not about, the gears or the trans parts.....even a little water for a couple of days wont hurt those. ....I am actually more worried about bearings. Its just a habit I got into.
Even though I am of the mind that if you are refurbishing or rebuioding you should replave as many of the bearings as you can....if not all of them......there are some needle bearings and one diff bearing on my some of my trans that are unobtanium. ....so I just get in the habit of taking a whole day from start to finish so no risk to bearings.
Ray |
|
| Back to top |
|
|
Tcash
Samba Member

Joined: July 20, 2011
Posts: 12843
Location: San Jose, California, USA
|
|
| Back to top |
|
|
SGKent
Samba Member
Joined: October 30, 2007
Posts: 42950
Location: at the beach in Northern Wokistan
|
| Posted: Wed Aug 19, 2015 7:25 am Post subject: |
|
|
We always found it easiest to just spray down a trans with a spray bottle filled with Stoddard solvent, sit 5 - 10 minutes then pressure wash it. You can also use store bought engine cleaner or simple green too. Try to do it away from where it will wash into streams etc. Then proceed with the rest of the job including cleaning. The solvent will dissolve the oil and grease based grime, and the soapy mixture will dissolve the dirt based grime.
If one watches CL they can find inexpensive used solvent tanks designed for Stoddard solvent. This is the same parts cleaner Safety Clean uses. One can buy Stoddard solvent from any oil dealership by the gallon. Most parts washers like this will do a better job than the soap based units. Unfortunately the cheap ones HF sells etc are not fire safe and Stoddard solvent safe. Many shops when they upgrade or close have parts washers they sell cheaply. I paid about $75 for mine. If one lacks that a big plastic tube will work but sometimes they crack from the weight of the parts and look out. Stoddard solvent is flammable.
_________________
 Canned Water - the new California approved parts cleaner (except in a drought in which case rub it with sand). Canned Water - the new California approved parts cleaner (except in a drought in which case rub it with sand).
George Carlin:
"Most people don't know what they're doing, and a lot of them are really good at it."
Skills@EuroCarsPlus:
"never time to do it right but always time to do it twice" |
|
| Back to top |
|
|
Wasted youth
Samba Member
Joined: July 06, 2012
Posts: 5175
Location: California's Hot and Smoggy Central Valley
|
| Posted: Wed Aug 19, 2015 6:30 am Post subject: |
|
|
| VWStepper... not sure which parts you are troubled by... Can you PM some pics to me? |
|
| Back to top |
|
|
Wasted youth
Samba Member
Joined: July 06, 2012
Posts: 5175
Location: California's Hot and Smoggy Central Valley
|
| Posted: Wed Aug 19, 2015 6:29 am Post subject: |
|
|
For what it's worth, I was pleasantly surprised about the effectiveness of the Harbor Freight parts tank. Key thing here, though is to not dilute their solvent as directed. I think it was like 1:12 solvent/water. I did about a 50% ratio. It stings the skin after about a minute, so wear dip gloves (Home Depot).
As Ray says, begin with a pressure washing first. I have a nice one, and it makes a huge mess, but totally worth it.
The only thing I part ways with Ray on is that I feel it is unnecessary to plan on cleaning the case on the same day you will be rebuilding it. YES... you will be exposing bare cast iron to water and solvents... so YES you must plan on ridding ALL of that before you 'bag and tag' it in a dust free, dry storage. I simply don't have the luxury to do all that in one day.
Thanks for the comments. There are a few parts identification/labeling errors in the Part 2 - Transmission Half of this thread. Be wary of this, and carefully follow your service manual. I have simply not gone back in here to fix the errors. My responsibility, I know!!
Last edited by Wasted youth on Wed Aug 19, 2015 6:32 am; edited 1 time in total |
|
| Back to top |
|
|
raygreenwood
Samba Member
Joined: November 24, 2008
Posts: 23507
Location: Oklahoma City
|
| Posted: Tue Aug 18, 2015 9:31 pm Post subject: |
|
|
To answer an, earlier question.....how, best to clean the case.
I am no trans expert...but have been through several 003....most especially the diff section from 411 and 412 cars.....and completely through numerous 004 manual trans and early rabbit 4 and 5 speeds. I learned about cleaning the hard way.
And about refurbishing trans with parts that are NLA.....some rules of thumb I now use:
1. Do not begin cleaning the trans until the day you plan to begin work...and start early so that it gets cleaned spotless AND disassembled, degreased, sorted/laid out, prtectibely oiled....all in one day.
2. Pressure washing will not....by itself....remove caked on layers of water borne dirst and oil. Its just too tough. Spend elbow grease and some strong slow evaporating solvent with wire brushes...powered and unpowered to fully scour yh3 outside in every nook and cranny. Drain the oil now.
3. Then rinse with solvent...self emulsifying solvent similar to brake cleaner.
4. Pressure wash hard....not with a p*ssy unit from Sears.....a real pressure washer with 1200 to 1500 psi at 2.0 gpm average....preferably with hot water and an industrial degreasing soap. Dont worry about getting water in it... because you are going to dry it well and immediately disassemble it.
If you dont have access to a real pressure washer...bag it, still wet with, solvent and take it, down and pay to have it, steam cleaned.
5. Disassemble and give everything at least a cursory dip in the parts washer to remove water....then use WD40...then dip it in oil and lay it out on a squeeky clean bench and cover it up.
Now you can go back to the case and clean anything you missed.
Really nice write up and pictures. I will be starting one similar on the 004 trans in a couple of months.
The last rule I now have.....because most of these trans are getting hard to get parts for...get them and use them while you can. If you have to open the case and you have the $ and time...do it all. In lieu of that....even if working on say....just the diff section....its worthwhile to at least strip and meticulously clean.....all of it. Ray |
|
| Back to top |
|
|
VeeDubb steppin
Samba Member
Joined: August 16, 2015
Posts: 80
Location: weast of eden
|
| Posted: Tue Aug 18, 2015 8:48 pm Post subject: |
|
|
| Great work,awesome and thoughtful documentation for others to refer to .I have been hunting for 003 information and there was a wealth of it in your post .I am re assembling a semi-basket case. 75 automatic Bus, At the moment I am working without the so called Bible .I have gathered up the made of Unobtanium linkage and have it installed ,and lo and behold it appears a 2.99 $ bushing has me stymied .At the transmission lever arm where the selector lever cable hooks to , there appears to be a missing plastic bushing that has me held up ! Would you know where I can find one , and where might I find a diagram or picture of the lever arm and the 003 in general . one more question , I have two complete drivetrains 1 1975 fuel injected w/ 003 " trans original bus engine combo , and one 1977 bus engine and trans 010 Im going to go completely rebuild one or the other ...any suggestions to which would be the better setup ...anybody ? Again thnks for the info Ben |
|
| Back to top |
|
|
HapyBus
Samba Member

Joined: May 03, 2004
Posts: 235
|
| Posted: Thu Mar 06, 2014 4:05 pm Post subject: |
|
|
Hello Skills.. I hope this is not hijacking the thread. I just today called a transmission shop to determine how to clean the exterior.
Reading your advice, I am asking you.. best way to clean the entire tranny while out of vehicle?
The local advice was a wire gringing wheel, or polish it as he said, and plenty of brake clean.
Thank you for reading
_________________
Beep Beep
HapyBus |
|
| Back to top |
|
|
skills@eurocarsplus
Samba Peckerhead
Joined: January 01, 2007
Posts: 17966
Location: sticksville, ct.
|
| Posted: Sun Sep 15, 2013 5:02 am Post subject: |
|
|
just be careful...i would hade to see you smoke a NLA bearing because of a hunk of crud. it's nice to see people dive in!
_________________
| gprudenciop wrote: |
my reason for switching to subaru is my german car was turning chinese so i said fuck it and went japanese....... |
| Jake Raby wrote: |
| Thanks for the correction. I used to be a nice guy, then I ruined it by exposing myself to the public. |
| Brian wrote: |
| Also the fact that people are agreeing with Skills, it's a turn of events for samba history |
|
|
| Back to top |
|
|
Wasted youth
Samba Member
Joined: July 06, 2012
Posts: 5175
Location: California's Hot and Smoggy Central Valley
|
| Posted: Sat Sep 14, 2013 8:40 pm Post subject: |
|
|
I agree to a very large extent. I had two options to clean this, given that I am not set up as a shop: Use my Honda pressure washer  , or dip it in the parts tank whole , or dip it in the parts tank whole 
I didn't want to use the Honda for risking getting water blasted into the case and start rust on the parts, and I didn't want to dip the whole thing in the parts washer either. There's no way I would trust those O-rings and pan gasket at their advanced age. What I did was scrape and wire brush away the caked grime and carefully opened it up. It's a given that particles of shit got in there, but my plan was to disassemble it, place all the machined parts in lidded tubs, then dip the case. That is what I ultimately did, and I hope to add more pictures and details this week.
It's true that I probably could have put a lot more effort by hand, though. If you think that's bad, wait 'til you see how unsanitary the Transmission side was when it got rebuilt!
So far, I have only uploaded some of the pictures and just a little bit of reference. I finished this up a few months ago, and so far the bus is a good driver, except for a valve seat that's about to drop on No. 2 I 
Many more pictures to come, I'm just getting started on this thread. Stay tuned!  |
|
| Back to top |
|
|
skills@eurocarsplus
Samba Peckerhead
Joined: January 01, 2007
Posts: 17966
Location: sticksville, ct.
|
| Posted: Sat Sep 14, 2013 8:01 pm Post subject: |
|
|
i applaud you for taking this on, but as a professional volvo tech, i have to say, you would be fired on the spot for not cleaning the outside before exposing it's insides.
not trying to be a dick, but one little crumb in the wrong place will ruin your day.
just sayin'
carry on. looks like a fun project
_________________
| gprudenciop wrote: |
my reason for switching to subaru is my german car was turning chinese so i said fuck it and went japanese....... |
| Jake Raby wrote: |
| Thanks for the correction. I used to be a nice guy, then I ruined it by exposing myself to the public. |
| Brian wrote: |
| Also the fact that people are agreeing with Skills, it's a turn of events for samba history |
|
|
| Back to top |
|
|
Red Fau Veh
Samba Member

Joined: September 07, 2012
Posts: 3037
Location: Prescott Az.
|
| Posted: Sat Sep 14, 2013 7:11 pm Post subject: |
|
|
Really good and timely post, well done. I'm going to attempt to refurbish mine. Have you come across a flex plate and torque converter for a 010 trans? I need them for mine if anyone knows where to find them.
_________________
1971 Deluxe Sunroof Bay 1905 stroker, dual idf40's, 74mm Scat forged crank, engle 110 cam. CB 044 heads, AutoCraft rockers, chromoly push rods
1973 Orange transporter stock type 4 with dual 40 Dellortos and Empi single quiet pack
1969 Adventurewagen blue whale Gene Berg 1776 built by Dave Kawell dual 36 DRLA's, Vintage Speed exhaust, Bosch 019 screamer
1961 Swivel Seat camper, L345 grey
| Touch Nicks Thing wrote: |
| Swivel Seat panels are for people with no friends |
|
|
| Back to top |
|
|
Gatorbus
Samba Member
Joined: June 25, 2012
Posts: 82
Location: South Texas
|
| Posted: Sat Sep 14, 2013 12:52 pm Post subject: |
|
|
Excellent write-up, thanks for taking the time to document. I got my spare 003 out back and this post will come in handy.
_________________
1973 Automatic Transporter
2.0 Single Weber |
|
| Back to top |
|
|
|


