| Author |
Message |
dubshack1
Samba Member

Joined: September 14, 2006
Posts: 233

|
 Posted: Thu Oct 28, 2010 5:48 pm Post subject: 60 Single Cab slamma-jamma! Posted: Thu Oct 28, 2010 5:48 pm Post subject: 60 Single Cab slamma-jamma! |
 |
|
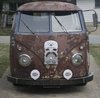
Hello everyone, I just wanted to start a thread on my current build. I sold "The Stabbin Cabbin" shortly after WinterJam last year to a friend and then aquired this 1960 SC. It was built buy Oldspeed and has a 2180 stroker and a Rancho freeway flyer. The cooling system is a fullflow with remote cooler and fan and a deep sump oil pan. It is really quick and a blast to drive but nowhere near as cool as the panel was. So I decided to make some changes. Follow along and I will post pics of the mods along with explinations. Feel free to tell me what you think.Thanks
|
|
| Back to top |
|
 |
IN2RUST
Samba Member

Joined: October 30, 2005
Posts: 1942
Location: West Coast
|
| Posted: Thu Oct 28, 2010 5:52 pm Post subject: |
|
|
Very nice ride height... 
_________________
RUSTFARMER....I like anything old and rusty! |
|
| Back to top |
|
|
dubshack1
Samba Member
Joined: September 14, 2006
Posts: 233
|
| Posted: Thu Oct 28, 2010 5:55 pm Post subject: |
|
|
So I miss the panel and wanted to do the SC like the panel but this time with full air ride and 944 disk conversion. I found a 944 in a localyard and purchased the complete brake system including master cylinder. I was going to build my own air beam and bought a set of 2" raised side plates from DetroitJonny and all the tubing. I then saw the beam that Punchdrunk offers and figured that it would save me time so I ordered his also in the 2" configuration but with independant front meaning I can do "side to side " with the bags if I want.It is a really nice beam and Matt was great to deal with and couldnt have made abetter choice. Here is a pic of the beam befor it was installed.
|
|
| Back to top |
|
|
dubshack1
Samba Member
Joined: September 14, 2006
Posts: 233
|
| Posted: Thu Oct 28, 2010 6:02 pm Post subject: |
|
|
To istall the beam you need to notch the front frame where the beam goes and basicly move it up 2 1/4 in so there is clearance around the beam.
here are a few with the beam installed.
|
|
| Back to top |
|
|
dubshack1
Samba Member
Joined: September 14, 2006
Posts: 233
|
| Posted: Thu Oct 28, 2010 6:08 pm Post subject: |
|
|
After installing the beam I decided to start on the rear. I started by cutting some 5" c notches for the frame and cutting the frame o match. here are some pics of the frame cut and ofthe torsion housing mods too.
|
|
| Back to top |
|
|
dubshack1
Samba Member
Joined: September 14, 2006
Posts: 233
|
| Posted: Thu Oct 28, 2010 6:21 pm Post subject: |
|
|
I wanted to see how lo t would go so I installed the driverside rear tailing arm and bolted my mock up wheel on,looks pretty low.
here are a few after this evening. Notice the c notches in the cradel and the clearencing for the trailing arms and cv axles.
You can also see the bag mounts and the dradel sectioning as well. I will take more pics tomorrow after I install the trailing arms and bag and possibly the trans. Thanks |
|
| Back to top |
|
|
volksaddict
Samba Member
Joined: August 19, 2003
Posts: 1757
|
| Posted: Thu Oct 28, 2010 7:07 pm Post subject: |
|
|
| Quote: |
| Very nice ride height... |
Yes, that first pic looked sweet.
looks like solid work though. |
|
| Back to top |
|
|
dubshack1
Samba Member
Joined: September 14, 2006
Posts: 233
|
| Posted: Thu Oct 28, 2010 7:11 pm Post subject: |
|
|
| Also notice that this bus was originaly a SWR and some idiot decided that it had to be Dove Blue, its like they dipped it,blue paint everywhere |
|
| Back to top |
|
|
clnvwe2
Samba Member

Joined: April 15, 2006
Posts: 881
Location: BBQ grill
|
| Posted: Thu Oct 28, 2010 7:47 pm Post subject: |
|
|
Looking good Silly Slobby!!!!!!!!!
_________________
"Keep your horn on"
Instagram : Flatkool
WTB- The Brundage Motors Plate frame that Merrpie Pribanic's looking for. |
|
| Back to top |
|
|
i_am_cool_fred
Samba Member
Joined: June 26, 2004
Posts: 1743
Location: Benton, AR
|
| Posted: Fri Oct 29, 2010 6:00 am Post subject: |
|
|
excuse my ignorance on irs, but why did you have to C-notch the craddle??? is it because the trailing arms are going above instead of below said craddle??
_________________
proud owner of a defunct 1979 sunroof kombi
Brian Denning, as seen on Gearz TV |
|
| Back to top |
|
|
GLHTurbo
Samba Member
Joined: March 30, 2009
Posts: 1376
Location: New Jersey
|
| Posted: Fri Oct 29, 2010 6:49 am Post subject: |
|
|
nice work, what bags/valve/hose size are you going to run?
_________________
1957 Beetle
1966 Bus |
|
| Back to top |
|
|
dubshack1
Samba Member
Joined: September 14, 2006
Posts: 233
|
| Posted: Fri Oct 29, 2010 4:12 pm Post subject: |
|
|
| I had to notch the cradle to have enough clearance for the lower bag mount and to let the trailing arm articulate down far enough to get the tires on and off. I am going with all 1/2 " and smc valves with the new viar 444 2 pack,5 gallon tank,slambags and ect ect.Thanks for all the comments. |
|
| Back to top |
|
|
my65vert
Samba Member

Joined: November 09, 2003
Posts: 6187
Location: Middleburg, Florida
|
| Posted: Fri Oct 29, 2010 5:07 pm Post subject: |
|
|
when I did the PaddyWagen I removed the cradle completly and fabbed support bars from the trans forks right up to the upper bag mount support bar.
That gives you way more room in there.
_________________
OGJHC
Kombisutra;
I'm starting to get little wafts of bus stink coming from the north. Something about the unique scent of drivers seat padding when it's glued together with mouse piss and shit that really gets me going... and I'm smelling it! Oh yeah! Time to start loading up the equipment. |
|
| Back to top |
|
|
dubshack1
Samba Member
Joined: September 14, 2006
Posts: 233
|
| Posted: Fri Oct 29, 2010 6:46 pm Post subject: |
|
|
the plans are in the works for a complete remod of the rear after turkey rod run, the bus will be super slammed at winterjam.
Last edited by dubshack1 on Fri Oct 29, 2010 7:20 pm; edited 1 time in total |
|
| Back to top |
|
|
my65vert
Samba Member
Joined: November 09, 2003
Posts: 6187
Location: Middleburg, Florida
|
| Posted: Fri Oct 29, 2010 7:15 pm Post subject: |
|
|
| dubshack1 wrote: |
| the plans are in the works for a complete remod of the rear after turkey rod run, the bus will be supper slammed at winterjam. |
supper slammed? we going to dinner?
_________________
OGJHC
Kombisutra;
I'm starting to get little wafts of bus stink coming from the north. Something about the unique scent of drivers seat padding when it's glued together with mouse piss and shit that really gets me going... and I'm smelling it! Oh yeah! Time to start loading up the equipment. |
|
| Back to top |
|
|
dubshack1
Samba Member
Joined: September 14, 2006
Posts: 233
|
| Posted: Fri Oct 29, 2010 7:19 pm Post subject: |
|
|
| lol,didnt catch that either. we can go to dinner though. |
|
| Back to top |
|
|
63CabDriver
Samba Member

Joined: November 10, 2006
Posts: 512
|
| Posted: Sat Oct 30, 2010 7:45 am Post subject: |
|
|
| This thing is going to look bad ass! |
|
| Back to top |
|
|
vw6366
Samba Member

Joined: October 24, 2003
Posts: 178
Location: Stockton "209"
|
| Posted: Sat Oct 30, 2010 9:28 am Post subject: |
|
|
| dang It looks good. cant wait to see how low it will go and it should ride like a caddy..... |
|
| Back to top |
|
|
dubshack1
Samba Member
Joined: September 14, 2006
Posts: 233
|
| Posted: Sun Oct 31, 2010 7:22 pm Post subject: |
|
|
| got all the suspension in and working minus the air compressors and valves, supposedly in the mail. I also got the steering box raise mocked up,3", had to cut the floor and will be straightening the draglink. I will take pics tomorrow and post them. Thanks |
|
| Back to top |
|
|
clnvwe2
Samba Member
Joined: April 15, 2006
Posts: 881
Location: BBQ grill
|
| Posted: Mon Nov 01, 2010 2:31 pm Post subject: |
|
|
Lets see the pics.....
_________________
"Keep your horn on"
Instagram : Flatkool
WTB- The Brundage Motors Plate frame that Merrpie Pribanic's looking for. |
|
| Back to top |
|
|
|


