| Author |
Message |
ivwshane
Samba Member
Joined: May 19, 2011
Posts: 1921
Location: Sacramento ca

|
 Posted: Sun Feb 10, 2019 6:31 pm Post subject: Fan housing to engine tin seal? Posted: Sun Feb 10, 2019 6:31 pm Post subject: Fan housing to engine tin seal? |
 |
|
I remember reading one of our resident experts posts about how he was going to put foam or something on the front lip of the fan housing where the rear tin rest on. He had a picture and I thought I read that it was actually done at the factory to keep exhaust gases out of the engine bay.
Does anyone have any info or a link to that post?
_________________
77 westy 2.0 FI
69 ghia coup 1600dp
70 single cab |
|
| Back to top |
|
 |
Hoody
Samba Member
Joined: November 28, 2007
Posts: 1948
|
| Posted: Sun Feb 10, 2019 7:27 pm Post subject: Re: Fan housing to engine tin seal? |
|
|
| It’s in Eche Bus’s build thread. |
|
| Back to top |
|
|
busdaddy
Samba Member

Joined: February 12, 2004
Posts: 53015
Location: Surrey B.C. Canada, but thinking of Ukraine
|
| Posted: Sun Feb 10, 2019 7:29 pm Post subject: Re: Fan housing to engine tin seal? |
|
|
Can't help with a link, but I've never seen factory seals between the shroud and cylinder tins, since it's under pressure I doubt exhaust will get in, but some thin weatherstripping will make sure all the cooling air goes where it's needed and prevent wear from rubbing.
I have seen thin foam weatherstrip from the factory on the tin surrounding the engine, particularly on the rear parts where they meet each other and touch the shroud, that might help with exhaust stink (but a good bus driver fixes any leaks before they happen, right?).
Household weatherstrip from your local home improvement store works great, get the black closed cell stuff. But the adhesive on it dies after a few months of engine heat, gluing the non adhesive side down with 3M weatherstrip adhesive or contact cement lasts for many years, peel out the paper strip after it's installed.
_________________
Rust NEVER sleeps and stock never goes out of style.
Please don't PM technical questions, ask your problem in public so everyone can play along. If you think it's too stupid post it here
Stop dead photo links! Post your photos to The Samba Gallery!
Слава Україні! |
|
| Back to top |
|
|
ivwshane
Samba Member
Joined: May 19, 2011
Posts: 1921
Location: Sacramento ca
|
| Posted: Sun Feb 10, 2019 7:38 pm Post subject: Re: Fan housing to engine tin seal? |
|
|
| Hoody wrote: |
| It’s in Eche Bus’s build thread. |
Lol, of course it is!
Thanks!
| eche_bus wrote: |
Exhaust / Heating / Cooling Overhaul Part XII - bringing on the rear tin and a few more details
The goal continues to be on getting the exhaust installed. Having completed the underside preparation, it was time to go back up top and get the rest of those ducks in a row. One big duck was the rear tin.
The microfiche drawing showed some sort of sealer (#19) was used between the fan shroud and some of the tin. But where and why and whatfor???  There were only small fragments remaining when I pulled everything apart. There were only small fragments remaining when I pulled everything apart.
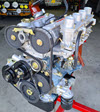
I didn't get any specific answers from posing the shroud sealer question on this forum, so with my wife's help holding and balancing everything, pushed and pulled and bent all the tins back in place. After studying where the gaps were along the shroud, I applied a closed-cell sponge-rubber weatherstripping tape along most of the ledge where the shroud met the center tin, and a small part of where it met the left tin.
The red arrow and lines point to the weatherstrip along this ledge:
I find the right tin and how it overlaps the lower flange of the alternator tin to be a little odd. The alternator flange begins to flare down and away from the right tin right where there is a rectangular cutout in the right tin and continues well up the right side. It might be a coincidence, but I have two alternator tins that fit the right tin like that, to suggest it was designed that way. So I applied the weatherstripping along the right tin where it overlapped the bottom ledge of the alternator tin, leaving a gap where there was a cutout in the right tin seemingly provided to drain water from the area.
I used black RTV to seal any gaps between one tin and the next.
Here's everything completed in the latest go-around:
- Rear tin back in place and (hopefully) sealed.
- New ceramic-coated muffler heat shield installed.
- Original Bosch coil refinished and bracket installed.
- Timing scale detailed.
- Original fan screen back in place.
- Brand-new timing and valve adjustment spec decal.
- Original oil filler neck cleaned up and installed with new tin seal and re-plated clamp
- New aux. blower tube rubber seals in upper middle tins
Next: either work on making a piece to replace the metal removed when the A/C compressor was installed, or install exhaust. Some small work left if I don't feel like doing either.  |
_________________
77 westy 2.0 FI
69 ghia coup 1600dp
70 single cab |
|
| Back to top |
|
|
tommu 
Samba Member

Joined: November 15, 2011
Posts: 664
Location: L.A.
|
| Posted: Sun Feb 10, 2019 8:08 pm Post subject: Re: Fan housing to engine tin seal? |
|
|
It’s still there after the I rebuilt the engine. I will say that it seems most important to make sure your tin fits well. I had another set of tin powder coated and it ended up so distorted that there were gaps around the shroud. I went back to the original Eche tin in the end.
_________________
  |
|
| Back to top |
|
|
SGKent
Samba Member
Joined: October 30, 2007
Posts: 42808
Location: at the beach
|
| Posted: Sun Feb 10, 2019 10:18 pm Post subject: Re: Fan housing to engine tin seal? |
|
|
| tommu wrote: |
| It’s still there after the I rebuilt the engine. I will say that it seems most important to make sure your tin fits well. I had another set of tin powder coated and it ended up so distorted that there were gaps around the shroud. I went back to the original Eche tin in the end. |
didi you paint or powder coat the tin?
_________________
George Carlin:
"Most people don't know what they're doing, and a lot of them are really good at it."
Skills@EuroCarsPlus:
"never time to do it right but always time to do it twice"  |
|
| Back to top |
|
|
tommu
Samba Member
Joined: November 15, 2011
Posts: 664
Location: L.A.
|
| Posted: Sun Feb 10, 2019 10:56 pm Post subject: Re: Fan housing to engine tin seal? |
|
|
I had a spare set of tin powder coated which looked great. But either the blasting or baking distorted it. I ended up using a combination of both. All the rear tin was painted by Jon and fitted perfectly.
_________________
|
|
| Back to top |
|
|
Wildthings
Samba Member

Joined: March 13, 2005
Posts: 52550
|
| Posted: Sun Feb 10, 2019 11:37 pm Post subject: Re: Fan housing to engine tin seal? |
|
|
| I apply silicone on several places where my tins contact the engine or each other. I smooth the silicone and then let is skim fairly well and then assemble the parts. If done right the silicone will fill any void and lock to pieces to each other, but will not give to much problem when the parts are disassembled. |
|
| Back to top |
|
|
|


