| Author |
Message |
Matt_H
Samba Member

Joined: August 09, 2022
Posts: 25
Location: Cornwall, UK

|
 Posted: Mon Mar 20, 2023 7:36 am Post subject: Re: The 1959 Franken Project Posted: Mon Mar 20, 2023 7:36 am Post subject: Re: The 1959 Franken Project |
 |
|
Looking great ! 
What made you choose that bumper style - it's a 58 or earlier one I reckon.. |
|
| Back to top |
|
 |
Shoyrtt
Samba Member
Joined: August 21, 2010
Posts: 1109
Location: Redlands, CA
|
| Posted: Mon Mar 20, 2023 2:11 pm Post subject: Re: The 1959 Franken Project |
|
|
| Matt_H wrote: |
Looking great !
What made you choose that bumper style - it's a 58 or earlier one I reckon.. |
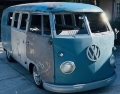
I really like the look of a pressed bumper (up to 1958) on a dove blue bus with the bullet turn signals. I know they are not correct for a 59, but aesthetically they just complete the look to me. This 1960 was recently freshened up with a set of pressed bumpers and one of my favorite buses is this dove blue Kombi that is here in SoCal for inspiration.
http://www.cookersvdubs.com/tims-og-paint-60-kombi.html
|
|
| Back to top |
|
|
Shoyrtt
Samba Member
Joined: August 21, 2010
Posts: 1109
Location: Redlands, CA
|
| Posted: Wed Apr 05, 2023 1:35 pm Post subject: Re: The 1959 Franken Project |
|
|
Running both hard and soft radiator lines and brake lines on the bus. We tried to use an off the shelf air tank for the bags but they were all too big. Fabbed up an old piece of tubing to serve as the tank that sits outboard of the frame rail and is tucked up and out of the way. 
|
|
| Back to top |
|
|
Shoyrtt
Samba Member
Joined: August 21, 2010
Posts: 1109
Location: Redlands, CA
|
| Posted: Sat Apr 08, 2023 2:28 pm Post subject: Re: The 1959 Franken Project |
|
|
Cut the steering shaft down for the wheel placement. Also a picture of Jim’s brake booster with some plumbing.
|
|
| Back to top |
|
|
Shoyrtt
Samba Member
Joined: August 21, 2010
Posts: 1109
Location: Redlands, CA
|
| Posted: Sat Jul 15, 2023 6:41 am Post subject: Re: The 1959 Franken Project |
|
|
Again something different on the Frankenbus. Here is the clutch cable made by Control Cables. No bowden tube and it avoids any interference with the air bags.
|
|
| Back to top |
|
|
ddutch
Samba Member
Joined: June 17, 2020
Posts: 219
Location: Nederland
|
| Posted: Sun Jul 16, 2023 4:20 pm Post subject: Re: The 1959 Franken Project |
|
|
Being an engineer, I want to mention that the holes you've cut out of the frame for the cooling tubes, have severly weaken this part of the chassis. It now has probably not even 50% of its original strength. The original heatertube was positioned in the middle of the height of the frame beam and left the upper and lower part of this rectangular beam intact, and has very little effect on it's strenght. Structurally it's comparable with a so called ''Castellated steel beam''. https://cmqconsulting.com/construct_material/castellated-beams/
If you close the holes in the beam under the pipes by welding in some metal plates of sufficient thickness, you'll probably be fine. The underside of the beam needs to be in one piece to be able to function as a beam.  |
|
| Back to top |
|
|
Shoyrtt
Samba Member
Joined: August 21, 2010
Posts: 1109
Location: Redlands, CA
|
| Posted: Mon Jul 17, 2023 12:43 pm Post subject: Re: The 1959 Franken Project |
|
|
| ddutch wrote: |
Being an engineer, I want to mention that the holes you've cut out of the frame for the cooling tubes, have severly weaken this part of the chassis. It now has probably not even 50% of its original strength. The original heatertube was positioned in the middle of the height of the frame beam and left the upper and lower part of this rectangular beam intact, and has very little effect on its strenght. Structurally it's comparable with a so called ''Castellated steel beam''. https://cmqconsulting.com/construct_material/castellated-beams/
If you close the holes in the beam under the pipes by welding in some metal plates of sufficient thickness, you'll probably be fine. The underside of the beam needs to be in one piece to be able to function as a beam. |
Thanks for that input. Yes we capped that lower beam, I just don’t have a picture of the final product. Here is a picture from the front looking rearward with the heater plumbing.
|
|
| Back to top |
|
|
ddutch
Samba Member
Joined: June 17, 2020
Posts: 219
Location: Nederland
|
| Posted: Mon Jul 17, 2023 6:00 pm Post subject: Re: The 1959 Franken Project |
|
|
| Shoyrtt wrote: |
Thanks for that input. Yes we capped that lower beam, I just don’t have a picture of the final product. Here is a picture from the front looking rearward with the heater plumbing.
|
Good to hear that you've fixed it. Keep on going with the work on this nice project. |
|
| Back to top |
|
|
Shoyrtt
Samba Member
Joined: August 21, 2010
Posts: 1109
Location: Redlands, CA
|
| Posted: Tue Jul 18, 2023 5:14 pm Post subject: Re: The 1959 Franken Project |
|
|
| ddutch wrote: |
| Good to hear that you've fixed it. Keep on going with the work on this nice project. |
Thank you again for the advise! My youngest daughter just graduated with her masters degree last month and sent me this picture from her phone. She wanted to remind me that the bus was supposed to be driving by the time she finished school (apparently I said that at some point). I'm making a trip to Idaho to work on it in 10 days, so hopefully it is on the road soon. 
Her picture from 2019:
|
|
| Back to top |
|
|
Shoyrtt
Samba Member
Joined: August 21, 2010
Posts: 1109
Location: Redlands, CA
|
| Posted: Wed Jul 19, 2023 11:25 am Post subject: Re: The 1959 Franken Project |
|
|
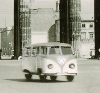
I found these old pictures from when I picked up the nose. Hopefully there is a date on the back of the OG speedometer that will tell me what year it was built. My guess was 62-63 and that it was once converted into a "snail" camper with the bracing around the base of the B pillars.
|
|
| Back to top |
|
|
EverettB 
Administrator

Joined: April 11, 2000
Posts: 71609
Location: Phoenix 602
|
|
| Back to top |
|
|
Culito
11010101

Joined: December 07, 2006
Posts: 5880
Location: Columbia Missourah
|
| Posted: Sat Jul 22, 2023 10:01 pm Post subject: Re: The 1959 Franken Project |
|
|
| Shoyrtt wrote: |
The stainless exhaust is finished. Lots of cutting and tig welds to get it nice and tucked in.
|
Nice, I need to figure out something like this for my type 4.
_________________
© CJ Industries, Inc.
'64 standard w/2.0L type 4
'62 bug
| johnnypan wrote: |
| ...dont pay no attention to Culito,he's a cornhole.. |
|
|
| Back to top |
|
|
Shoyrtt
Samba Member
Joined: August 21, 2010
Posts: 1109
Location: Redlands, CA
|
| Posted: Sat Jul 29, 2023 11:17 pm Post subject: Re: The 1959 Franken Project |
|
|
I took a non-stop flight from John Wayne to Idaho Falls on Friday and worked on the bus today. Pulled the engine and trans and all of the accessories on the underside and then pressure washed and cleaned everything.
Beautiful part of the country.
|
|
| Back to top |
|
|
brettsvw
Samba Member
Joined: November 22, 2007
Posts: 2158
Location: Florida
|
|
| Back to top |
|
|
Shoyrtt
Samba Member
Joined: August 21, 2010
Posts: 1109
Location: Redlands, CA
|
| Posted: Wed Aug 02, 2023 6:39 pm Post subject: Re: The 1959 Franken Project |
|
|
| brettsvw wrote: |
I think pressed bumpers compliment my early 59 kombi. |
That is a great looking bus Brett! |
|
| Back to top |
|
|
Shoyrtt
Samba Member
Joined: August 21, 2010
Posts: 1109
Location: Redlands, CA
|
| Posted: Wed Aug 02, 2023 6:53 pm Post subject: Re: The 1959 Franken Project |
|
|
Lots of work completed on the bus this past weekend, but not a lot of pictures.  After pulling the engine and trans and spending a few hours cleaning, I painted and did some work to tidy up the frankenbus. We were then able to reinstall everything and did a little dimple die work in the engine bay, installed the wiring harness from AV Subaru Conversions and did the final routing of all of the plumbing, air lines, heater lines and brake lines. New shocks all around and I had some fun putting on the bullets and a set of headlights. We also installed the new bench seat and brackets. As you can see, we still need to work on adjusting the cargo doors, but it was a great time in Idaho. I need to do a big window purchase soon and plan another trip maybe in the fall. After pulling the engine and trans and spending a few hours cleaning, I painted and did some work to tidy up the frankenbus. We were then able to reinstall everything and did a little dimple die work in the engine bay, installed the wiring harness from AV Subaru Conversions and did the final routing of all of the plumbing, air lines, heater lines and brake lines. New shocks all around and I had some fun putting on the bullets and a set of headlights. We also installed the new bench seat and brackets. As you can see, we still need to work on adjusting the cargo doors, but it was a great time in Idaho. I need to do a big window purchase soon and plan another trip maybe in the fall.
https://avsubaruconversions.com/
|
|
| Back to top |
|
|
Shoyrtt
Samba Member
Joined: August 21, 2010
Posts: 1109
Location: Redlands, CA
|
|
| Back to top |
|
|
Shoyrtt
Samba Member
Joined: August 21, 2010
Posts: 1109
Location: Redlands, CA
|
|
| Back to top |
|
|
Shoyrtt
Samba Member
Joined: August 21, 2010
Posts: 1109
Location: Redlands, CA
|
| Posted: Sun Sep 24, 2023 9:24 pm Post subject: Re: The 1959 Franken Project |
|
|
I made the drive this weekend to help with the wiring on the Frankenbus. The goal was to get it running. I sent Jeff at AV Subaru Conversions/AutoVentures the stock Subaru harness and the computer. In the ordering process I had to specify the make and model of VW it was going into along with the transmission. He returned it with everything tagged and labeled to help with the install. On the few items where we had questions, he was available by text message to send pictures etc. I can’t say enough on how easy he made the process. Nice to hear it rumble!
Link
Here are the gauges in test mode:
And I finally pulled the speedometer only to find it was not original to the nose:
Last edited by Shoyrtt on Thu Sep 28, 2023 2:48 pm; edited 1 time in total |
|
| Back to top |
|
|
Shoyrtt
Samba Member
Joined: August 21, 2010
Posts: 1109
Location: Redlands, CA
|
|
| Back to top |
|
|
|


