| Author |
Message |
poundman
Samba Member

Joined: April 05, 2024
Posts: 434
Location: Sugar Land, Texas

|
 Posted: Thu May 29, 2025 10:28 am Post subject: Re: Engine/Transmission removed where and how would you start? Posted: Thu May 29, 2025 10:28 am Post subject: Re: Engine/Transmission removed where and how would you start? |
 |
|
| SGKent wrote: |
in answer to the nosecone question. As the main bearing moves it slowly eats into the softer aluminum, which the arrow clearly shows. This allows the shaft and associated gears to move forward and change the mesh. As those gears wear, a slope on the teeth is created and eventually they, especially 4th, will start having issues that could include popping out of gear under certain loads. The fix is to mill the nose cone flat again and install the metal plate. The bolts are too short for a paper gasket on each side. Some people use RTV on both sides, some use one paper gasket and RTV. The 002 models were worse doing it than the 091 because the 002 main bearing does not have the half moon key in it to keep the bearing from spinning in the case, although that does not even stop it from happening. That big circle holds the main bearing, shaft and gear cluster in position.
|
I see this clearly now on my nose cone. The wear is very bad. If Odometer is accurate, this bus has 89K miles.
_________________
-----------------------------------------
Restoring a 1972 Bay Window Bus that has not be registered for the road since 1981.
Sugar Land, Texas |
|
| Back to top |
|
 |
SGKent 
Samba Member
Joined: October 30, 2007
Posts: 42788
Location: at the beach
|
| Posted: Thu May 29, 2025 11:04 am Post subject: Re: Engine/Transmission removed where and how would you start? |
|
|
prob 189K or 289K or maybe even 389K. 12,000 - 15,000 miles a year for the first 10 years is 120K - 150K, then say five - eight years of nothing then 1500 a year for 20 years or another 45K to 50K. That puts it about 189K. Speedo rolls back to zero at 99,999.9
_________________
George Carlin:
"Most people don't know what they're doing, and a lot of them are really good at it."
Skills@EuroCarsPlus:
"never time to do it right but always time to do it twice"  |
|
| Back to top |
|
|
poundman
Samba Member
Joined: April 05, 2024
Posts: 434
Location: Sugar Land, Texas
|
| Posted: Thu May 29, 2025 11:55 am Post subject: Re: Engine/Transmission removed where and how would you start? |
|
|
| SGKent wrote: |
| prob 189K or 289K or maybe even 389K. 12,000 - 15,000 miles a year for the first 10 years is 120K - 150K, then say five - eight years of nothing then 1500 a year for 20 years or another 45K to 50K. That puts it about 189K. Speedo rolls back to zero at 99,999.9 |
I think you are correct at 189K. It is hard to say how many years it was used. The DMV says it was last registered in 1981 but that doesn't mean it was not used. Even 9 years at 15K per year is 135K plus I think it was used beyond that without registration. I do know there was newspaper stuffed in the air vents for heater boxes and the date on the newspaper was 2004. I think that is when it was put into storage, maybe even a bit earlier. Think PO was trying to restore it, he had some parts removed but then got sick and passed away. I was told this was the second engine, maybe a rebuilt. All those things kind of line up we you look at the wear on that nose cone.
_________________
-----------------------------------------
Restoring a 1972 Bay Window Bus that has not be registered for the road since 1981.
Sugar Land, Texas |
|
| Back to top |
|
|
poundman
Samba Member
Joined: April 05, 2024
Posts: 434
Location: Sugar Land, Texas
|
| Posted: Sat May 31, 2025 3:36 pm Post subject: Re: Engine/Transmission removed where and how would you start? |
|
|
Continuing on my engine/transmission clean up and refresh. I started on the nose cone today. I got the seal and bushing on the outside but the side bushing would not come out. I trusted my gut on this one thinking that I might be better off just leaving the old bushing. I was going to do more harm then good removing it, and god only knows if the new bushing would fit ok.
I ordered the steel thrust plate from weddle and will get the nose cone milled down 1mm per the instructions. I guess I could go 1mm plus thickness of another gasket if I put a gasket on each side. Thoughts?
Next I started to tackle the push rods, tubes and heads on cylinder 3/4. I chose this side because when I removed exhaust it took 2 of the studs out that I need to fix, plus the spark plug thread on #4 is bad at the top and needs to be refreshed. I got a big nervous when trying to remove the head bolts. I saw at least 1 stud move so I stopped to regroup and ask for help here. The outside head nuts and studs are rusty. I soaked with penetrating oil last night and used some wire brush to try to clean up the outside thread. Any other suggestions to get these nuts removed without breaking or removing the studs?
I am curious about this head number ? Looks like 021.101.371Q. What does it tell me?
Good news that the push rods and tubes look ok. Only 1 ding on 1 tube but I don't think that will impact much, it is not enough to interfere with the push rod. Should I clean these tubes up and paint them?
_________________
-----------------------------------------
Restoring a 1972 Bay Window Bus that has not be registered for the road since 1981.
Sugar Land, Texas |
|
| Back to top |
|
|
Wildthings
Samba Member

Joined: March 13, 2005
Posts: 52484
|
| Posted: Sat May 31, 2025 4:43 pm Post subject: Re: Engine/Transmission removed where and how would you start? |
|
|
Find a socket whose OD is is about the size of the ID of the tubes and drive it into the damaged tube far enough to knock the dent mostly out. Using teflon pipe dope on the o-rings will make pushing the tube back into place easier. Rotating the tubes as you push them in can make them go in easier and reduce the risk they get cut.
https://www.thesamba.com/vw/forum/viewtopic.php?p=4681873 |
|
| Back to top |
|
|
poundman
Samba Member
Joined: April 05, 2024
Posts: 434
Location: Sugar Land, Texas
|
| Posted: Sat May 31, 2025 8:10 pm Post subject: Re: Engine/Transmission removed where and how would you start? |
|
|
| Wildthings wrote: |
Find a socket whose OD is is about the size of the ID of the tubes and drive it into the damaged tube far enough to knock the dent mostly out. Using teflon pipe dope on the o-rings will make pushing the tube back into place easier. Rotating the tubes as you push them in can make them go in easier and reduce the risk they get cut.
https://www.thesamba.com/vw/forum/viewtopic.php?p=4681873 |
Great thread and advice. When you say teflon pipe dope, is that the stuff used on pluming, like a grease?
I would love some advice at getting those head nuts off without breaking or pulling out the entire stud. Can I used a bit of heat or is that a bad idea on the head?
_________________
-----------------------------------------
Restoring a 1972 Bay Window Bus that has not be registered for the road since 1981.
Sugar Land, Texas |
|
| Back to top |
|
|
SGKent
Samba Member
Joined: October 30, 2007
Posts: 42788
Location: at the beach
|
| Posted: Sat May 31, 2025 9:20 pm Post subject: Re: Engine/Transmission removed where and how would you start? |
|
|
| poundman wrote: |
Continuing on my engine/transmission clean up and refresh. I started on the nose cone today. I got the seal and bushing on the outside but the side bushing would not come out. I trusted my gut on this one thinking that I might be better off just leaving the old bushing. I was going to do more harm then good removing it, and god only knows if the new bushing would fit ok.
I ordered the steel thrust plate from weddle and will get the nose cone milled down 1mm per the instructions. I guess I could go 1mm plus thickness of another gasket if I put a gasket on each side. Thoughts?
Next I started to tackle the push rods, tubes and heads on cylinder 3/4. I chose this side because when I removed exhaust it took 2 of the studs out that I need to fix, plus the spark plug thread on #4 is bad at the top and needs to be refreshed. I got a big nervous when trying to remove the head bolts. I saw at least 1 stud move so I stopped to regroup and ask for help here. The outside head nuts and studs are rusty. I soaked with penetrating oil last night and used some wire brush to try to clean up the outside thread. Any other suggestions to get these nuts removed without breaking or removing the studs?
I am curious about this head number ? Looks like 021.101.371Q. What does it tell me?
Good news that the push rods and tubes look ok. Only 1 ding on 1 tube but I don't think that will impact much, it is not enough to interfere with the push rod. Should I clean these tubes up and paint them?
|
Black RTV, or Treebond 1184 will do fine on one side.
_________________
George Carlin:
"Most people don't know what they're doing, and a lot of them are really good at it."
Skills@EuroCarsPlus:
"never time to do it right but always time to do it twice" |
|
| Back to top |
|
|
Wildthings
Samba Member
Joined: March 13, 2005
Posts: 52484
|
| Posted: Sat May 31, 2025 11:18 pm Post subject: Re: Engine/Transmission removed where and how would you start? |
|
|
| poundman wrote: |
stuff used on pluming, like a grease?
I would love some advice at getting those head nuts off without breaking or pulling out the entire stud. Can I used a bit of heat or is that a bad idea on the head? |
It's designed to lubricate and seal pipe threads, but also works to ease the installation of the pushrod tubes. You can get it in fairly small tubes which is plenty for this particular job. Make sure it says teflon on the tube.
You want intense heat like an Oxy-Act torch that will get one side of the nut red hot quickly and then remove the nut immediately. |
|
| Back to top |
|
|
poundman
Samba Member
Joined: April 05, 2024
Posts: 434
Location: Sugar Land, Texas
|
| Posted: Sun Jun 01, 2025 6:32 am Post subject: Re: Engine/Transmission removed where and how would you start? |
|
|
| Wildthings wrote: |
| poundman wrote: |
stuff used on pluming, like a grease?
I would love some advice at getting those head nuts off without breaking or pulling out the entire stud. Can I used a bit of heat or is that a bad idea on the head? |
It's designed to lubricate and seal pipe threads, but also works to ease the installation of the pushrod tubes. You can get it in fairly small tubes which is plenty for this particular job. Make sure it says teflon on the tube.
You want intense heat like an Oxy-Act torch that will get one side of the nut red hot quickly and then remove the nut immediately. |
I don't have access to oxy-act torch or a induction coil. Would standard propane torch work? I might be able to make a shield with some spare aluminum to keep as much heat off the heads. I guess the risk is warping the heads with too much heat. Might ask in the neighborhood would might have induction coil to borrow.
_________________
-----------------------------------------
Restoring a 1972 Bay Window Bus that has not be registered for the road since 1981.
Sugar Land, Texas |
|
| Back to top |
|
|
poundman
Samba Member
Joined: April 05, 2024
Posts: 434
Location: Sugar Land, Texas
|
| Posted: Sun Jun 01, 2025 9:01 am Post subject: Re: Engine/Transmission removed where and how would you start? |
|
|
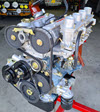
Using the wood shims idea I managed to get the fan shroud seperated.
It was hung up on the 2 locator pins at the edge of those points near the center. Be careful when separating where the oil tube is. You need some shims to get that started.
Since the fan shroud is the first thing you see on the engine, I want to invest in painting or powder coating it nice. I scrubbed off the heavy stuff and now they are soaking in degreaser for a few days.
I have the shroud with the peak hole at the top but I can't get that plastic removed, I might need to cut out of the soak doesn't do it. My fan has the timing marks at the top edge
_________________
-----------------------------------------
Restoring a 1972 Bay Window Bus that has not be registered for the road since 1981.
Sugar Land, Texas |
|
| Back to top |
|
|
SGKent
Samba Member
Joined: October 30, 2007
Posts: 42788
Location: at the beach
|
| Posted: Sun Jun 01, 2025 9:18 am Post subject: Re: Engine/Transmission removed where and how would you start? |
|
|
do not take the fan apart. It is assembled on a jig by vw and it will be out of round if you take it apart., causing the belt to hop
_________________
George Carlin:
"Most people don't know what they're doing, and a lot of them are really good at it."
Skills@EuroCarsPlus:
"never time to do it right but always time to do it twice" |
|
| Back to top |
|
|
poundman
Samba Member
Joined: April 05, 2024
Posts: 434
Location: Sugar Land, Texas
|
| Posted: Sun Jun 01, 2025 9:29 am Post subject: Re: Engine/Transmission removed where and how would you start? |
|
|
| SGKent wrote: |
| do not take the fan apart. It is assembled on a jig by vw and it will be out of round if you take it apart., causing the belt to hop |
Thanks. I was just reading up on that. How do people clean and paint the fan? I assume media blast then paint or powder coat.
_________________
-----------------------------------------
Restoring a 1972 Bay Window Bus that has not be registered for the road since 1981.
Sugar Land, Texas |
|
| Back to top |
|
|
SGKent
Samba Member
Joined: October 30, 2007
Posts: 42788
Location: at the beach
|
| Posted: Sun Jun 01, 2025 12:24 pm Post subject: Re: Engine/Transmission removed where and how would you start? |
|
|
| poundman wrote: |
| SGKent wrote: |
| do not take the fan apart. It is assembled on a jig by vw and it will be out of round if you take it apart., causing the belt to hop |
Thanks. I was just reading up on that. How do people clean and paint the fan? I assume media blast then paint or powder coat. |
I use a good glass bead then check each blade to file away any nicks, tape it and spray with aluminum paint, dry, retape and spray the black area.
_________________
George Carlin:
"Most people don't know what they're doing, and a lot of them are really good at it."
Skills@EuroCarsPlus:
"never time to do it right but always time to do it twice" |
|
| Back to top |
|
|
poundman
Samba Member
Joined: April 05, 2024
Posts: 434
Location: Sugar Land, Texas
|
| Posted: Sun Jun 01, 2025 8:10 pm Post subject: Re: Engine/Transmission removed where and how would you start? |
|
|
I switched over to the 1/2 cylinder head. Got the rockers, push rods, and tubes out without issue. Then removed the head. Only 1 head stud unscrewed but I managed to pull it out then heat up the nut and got it off without issue. I will just need to reinstall the stud. I assume red thread locker would work best?
What do you see with the heads and jugs. I just noticed that the jug #2 has the top fin partially cracked off.
How should I clean the heads and what should I use. Would brake cleaner and soft brush work? Could I soak the entire thing in my parts cleaner with tracker supply PSC-1000 solvent (like a kerosene)
I assume I need to do this to check for any cracks. To my untrained I they seem good. I don't see blow by. I am trying to find signs if this was a rebuilt engine and maybe how many miles it had. PO did say this was a replacement engine but was not sure how many miles (it was his Dad's bus).
Tubes and push rods look good.
Head flipped upside down
_________________
-----------------------------------------
Restoring a 1972 Bay Window Bus that has not be registered for the road since 1981.
Sugar Land, Texas |
|
| Back to top |
|
|
SGKent
Samba Member
Joined: October 30, 2007
Posts: 42788
Location: at the beach
|
| Posted: Sun Jun 01, 2025 11:30 pm Post subject: Re: Engine/Transmission removed where and how would you start? |
|
|
| Quote: |
| I assume red thread locker would work best? |
That or teflon sealant. Double nut it to reinstall it. Use a straight edge to get it roughly the same length installed.
You do have some blow by. Maybe paint the top of the cylinders with copper coat well mixed before putting the heads back on. With a high mile engine you are not going to get the perfection of a newly machined rebuild but I would not stress over it.
_________________
George Carlin:
"Most people don't know what they're doing, and a lot of them are really good at it."
Skills@EuroCarsPlus:
"never time to do it right but always time to do it twice" |
|
| Back to top |
|
|
poundman
Samba Member
Joined: April 05, 2024
Posts: 434
Location: Sugar Land, Texas
|
| Posted: Mon Jun 02, 2025 7:14 am Post subject: Re: Engine/Transmission removed where and how would you start? |
|
|
| SGKent wrote: |
| Quote: |
| I assume red thread locker would work best? |
That or teflon sealant. Double nut it to reinstall it. Use a straight edge to get it roughly the same length installed.
You do have some blow by. Maybe paint the top of the cylinders with copper coat well mixed before putting the heads back on. With a high mile engine you are not going to get the perfection of a newly machined rebuild but I would not stress over it. |
Something like this for teflon sealant ? https://www.amazon.com/Permatex-59214-Temperature-Thread-Sealant/dp/B0002UEOP0/ref=sr_1_4?sr=8-4
I have some of the Permatex copper anti-seize, but are you referring to the copper make-a-gasket 81878 ? And I understand you say paint which is very sparingly or light coat.
https://www.amazon.com/Permatex-81878-Maximum-Temperature-Silicone/dp/B0002UEOPA/ref=sr_1_6?sr=8-6
Should I put the copper sealer around areas indicated? On surface only, what about the inside mating surfaces?
_________________
-----------------------------------------
Restoring a 1972 Bay Window Bus that has not be registered for the road since 1981.
Sugar Land, Texas |
|
| Back to top |
|
|
Willin
Samba Member

Joined: October 10, 2019
Posts: 279
Location: Bozeman Mt
|
| Posted: Mon Jun 02, 2025 8:13 am Post subject: Re: Engine/Transmission removed where and how would you start? |
|
|
I have a blast gun from HF, the little gravity fed kind. I use it with "play sand",(sift out the big chunks).Lots of dust, so do it outside. Cleaned up the shroud good, then spray with a clear coat. Use a wire brush to get the heavy gunk off. Don't do this method on machined surfaces of course.
I used Berryman's carb cleaner on the pistons and heads. Use a soft wire brush, toothbrush or brass. Or the glass beads, but you'd want a blast cabinet so you can save the beads.
Put the sealant on just the tops of the cylinders.
Haven't had a reason to pull my nosecone. But maybe I should? Will it look like yours? I don't know.
_________________
73 bus. Org. 1700 with dual Weber 40 idfs, bus header with Empi qp muffler, CB magnaspark 2 " ready to run kit". |
|
| Back to top |
|
|
orwell84
Samba Member

Joined: May 14, 2007
Posts: 2780
Location: Plattsburgh, New York
|
| Posted: Mon Jun 02, 2025 8:20 am Post subject: Re: Engine/Transmission removed where and how would you start? |
|
|
Something I’ve always wondered about…sealing old heads to the cylinders. Not supposed to use the gaskets anymore, though they still come with gasket sets.
There is also the suggestion of lapping the cylinders to the heads using valve grinding compound. I always wondered…How do you know that you’ve lapped the head to the same depth on both cylinders?
I’ve also read about gluing them on. But not sure what that means exactly. Maybe that’s what the copper sealant is for?
I use kopper coat on the sealing surface for the heads and rtv between the cylinders in the case.
I have also wondered about using the stock head gaskets. I know they eventually fail, but usually after many miles. If you get 50k out of them, I wouldn’t consider that bad. The recommended mileage interval for pulling the heads, valve job, checking rings is 75k miles. |
|
| Back to top |
|
|
Wildthings
Samba Member
Joined: March 13, 2005
Posts: 52484
|
| Posted: Mon Jun 02, 2025 9:25 am Post subject: Re: Engine/Transmission removed where and how would you start? |
|
|
The only reason to clean the heads would be to look for cracks, because they are very quickly going to look the same again when put back into use. As for removing the same amount of material, just treat each head the same, same girt and amount of valve grinding compound, the same amount of pressure and the same amount of turning.
My way of dealing with heads when we still had a local automotive machine shop was to plop them on the counter and let them disassemble, clean, and inspect them, which often led to the guides and exhaust valves getting replaced.
You might consider new piston rings since you have done most of the work to get to them already. |
|
| Back to top |
|
|
poundman
Samba Member
Joined: April 05, 2024
Posts: 434
Location: Sugar Land, Texas
|
| Posted: Mon Jun 02, 2025 9:49 am Post subject: Re: Engine/Transmission removed where and how would you start? |
|
|
| Willin wrote: |
I have a blast gun from HF, the little gravity fed kind. I use it with "play sand",(sift out the big chunks).Lots of dust, so do it outside. Cleaned up the shroud good, then spray with a clear coat. Use a wire brush to get the heavy gunk off. Don't do this method on machined surfaces of course.
I used Berryman's carb cleaner on the pistons and heads. Use a soft wire brush, toothbrush or brass. Or the glass beads, but you'd want a blast cabinet so you can save the beads.
Put the sealant on just the tops of the cylinders.
Haven't had a reason to pull my nosecone. But maybe I should? Will it look like yours? I don't know. |
I love this idea of cheap blaster for the fan shroud. I have cleaned it up very good now. I could use this on the tins and other parts.
Something like this one https://www.harborfreight.com/18-oz-portable-abrasive-blaster-gun-kit-59490.html
I am not sure if I want to pull out the valves at this time, I need a special tool to remove the spring retainers. I will use carb cleaner and soft brush to examine the head.
_________________
-----------------------------------------
Restoring a 1972 Bay Window Bus that has not be registered for the road since 1981.
Sugar Land, Texas |
|
| Back to top |
|
|
|


