| Author |
Message |
BobB10
Samba Member

Joined: February 27, 2010
Posts: 106
Location: Sussex, New Brunswick CAN

|
 Posted: Mon Jun 17, 2013 6:18 pm Post subject: Re: Updates? Posted: Mon Jun 17, 2013 6:18 pm Post subject: Re: Updates? |
 |
|
| 1973Riviera wrote: |
| I just read this and am really curious about the engine you chose to go with. I've got a 1973 Riviera and it's sorely in need of an upgrade in power. |
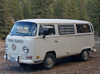
Well, I was going to post the paint and bodywork story first, but since you asked... I'm going to post the engine build instead. 
_________________
1971 Westfalia Campmobile
Restoration completed by German Supply. |
|
| Back to top |
|
 |
BobB10
Samba Member
Joined: February 27, 2010
Posts: 106
Location: Sussex, New Brunswick CAN
|
| Posted: Mon Jun 17, 2013 6:29 pm Post subject: |
|
|
THE ENGINE (Part 1)
Well Scott was quite busy and in the middle of a move, so the next logical solution to move the project along, was to get another pro to do the job.
Art Thraen is the best in the business, so off it went to the guys at Air Cooled Engineering. Scott and Art worked out the best engine for my bus, and Scott supplied all kinds of cool NOS and special parts. It was an interesting build since I wanted a bump in power, but could not go with a dual carb set-up since I wanted to keep the gas heater which came stock with my bus.
This is what they came up with...
_________________
1971 Westfalia Campmobile
Restoration completed by German Supply. |
|
| Back to top |
|
|
BobB10
Samba Member
Joined: February 27, 2010
Posts: 106
Location: Sussex, New Brunswick CAN
|
| Posted: Mon Jun 17, 2013 6:39 pm Post subject: |
|
|
Old engine is going to Art Thraen at aircooled engineering
Scott made a great custom crate to ship to A.C.E., he says you can never over build them.
Crate just fits into Scott's ’79 Bus...
Now it's off to the airport to ship!
Trucker dudes were perplexed about what an old VW Bus was doing at a shipping place...
_________________
1971 Westfalia Campmobile
Restoration completed by German Supply. |
|
| Back to top |
|
|
BobB10
Samba Member
Joined: February 27, 2010
Posts: 106
Location: Sussex, New Brunswick CAN
|
| Posted: Mon Jun 17, 2013 6:50 pm Post subject: |
|
|
We're going to go with basically new everything... "no excuses"
So a 2017cc engine with new OEM VW blueprinted case, welded DPR 78.4 german crank and flywheel (balanced), DPR stroker rod set, special cam & lifter set, new vw 040 heads, 92mm AA thick wall piston/cyl set... and a bunch of other technical things...
Nice NOS main bearings from Scott's stash
Kolbenschmidt still make nice rod bearings in Germany
Engine components ready for assembly
This is a DPR counterweighted crank
78.4 stroke
_________________
1971 Westfalia Campmobile
Restoration completed by German Supply. |
|
| Back to top |
|
|
BobB10
Samba Member
Joined: February 27, 2010
Posts: 106
Location: Sussex, New Brunswick CAN
|
| Posted: Tue Jun 18, 2013 6:46 pm Post subject: |
|
|
The Engine (Part 2)
Thick wall 92’s. Rods are stock German 311 rods clearanced for stroke
ACE selects genuine cases and offers me the ‘pick of the litter’
so pretty...
Cylinder heads are genuine VW Germany 040’s, with 32E x 39I valves
This mass of snakes is the CSP “Python” exhaust system... ordered with matched heater boxes... it'll all be ceramic coated black
_________________
1971 Westfalia Campmobile
Restoration completed by German Supply. |
|
| Back to top |
|
|
BobB10
Samba Member
Joined: February 27, 2010
Posts: 106
Location: Sussex, New Brunswick CAN
|
| Posted: Tue Jun 18, 2013 6:50 pm Post subject: |
|
|
Genuine VW crankcase clearanced for stroke
Pistons 94mm forged slipper skirt. Flywheel in photo is lightened but will be using stock weight unit
DPR 78.4mm welded German stroker crank
Bottom end components including NOS German main and rod bearings
Crank assembly installed
_________________
1971 Westfalia Campmobile
Restoration completed by German Supply. |
|
| Back to top |
|
|
skills@eurocarsplus
Samba Peckerhead

Joined: January 01, 2007
Posts: 17869
Location: sticksville, ct.
|
| Posted: Tue Jun 18, 2013 7:36 pm Post subject: |
|
|
not being able to see the mains that were used, it's tough to say, but you really should make sure they use a main with the internal (as in, crank side) oil groove.
why?
the aftermarket cranks do a poor job of oiling seeing that the cranks aren't 'tear dropped' at the oil holes, but rather straight drilled.
the center main feeds 2 rods. without this mod, the rods go under lubricated, and you will get to see them again......hopefully not by the high velocity hole it will put in the case.
just my 0.02
other than that, looks like a solid build
_________________
| gprudenciop wrote: |
my reason for switching to subaru is my german car was turning chinese so i said fuck it and went japanese....... |
| Jake Raby wrote: |
| Thanks for the correction. I used to be a nice guy, then I ruined it by exposing myself to the public. |
| Brian wrote: |
| Also the fact that people are agreeing with Skills, it's a turn of events for samba history |
|
|
| Back to top |
|
|
BobB10
Samba Member
Joined: February 27, 2010
Posts: 106
Location: Sussex, New Brunswick CAN
|
| Posted: Thu Jun 27, 2013 3:44 pm Post subject: |
|
|
THE ENGINE (Part 3)
Short block almost complete
Short Block is done, ready for the top end parts
Longblock is done
They are using the genuine VW/Bosch Mexico distributor with vacuum advance
Art is building a custom 34 PICT-3 carburetor
_________________
1971 Westfalia Campmobile
Restoration completed by German Supply. |
|
| Back to top |
|
|
BobB10
Samba Member
Joined: February 27, 2010
Posts: 106
Location: Sussex, New Brunswick CAN
|
| Posted: Thu Jun 27, 2013 3:47 pm Post subject: |
|
|
Venturi is enlarged. This carb type is used on the Score spec engines
Fancy magic happening right there...
Engine almost complete - installing CSP exhaust
Berg sump, full flow setup visible, CSP heater boxes
CSP header modified with heat risers for stock single solex manifold - cool or what!
_________________
1971 Westfalia Campmobile
Restoration completed by German Supply. |
|
| Back to top |
|
|
BobB10
Samba Member
Joined: February 27, 2010
Posts: 106
Location: Sussex, New Brunswick CAN
|
| Posted: Thu Jun 27, 2013 4:10 pm Post subject: |
|
|
THE ENGINE (Part 4)
On the dyno!!!!
75HP peek @4500 then it plateaus... 120.75 LbTQ @2800RPM .... and don't forget this is with a single solex too... I'm very impressed, and happy. Thanks guys!
Beauty shots...
... note the ceramic coated CSP headers
so pretty...
we will use the stock oil bath air cleaner... all nice and stock looking.
and here she sits inside my freshly painted bus awaiting Scott to button her in. (can't wait to driver her again)
A special thanks to Art Thraen and the guys at ACE. I know there has been changes over there recently (It's now called Blackline), good luck with the new company guys!! They were great to deal with, on time and answered all my silly questions like they weren't even silly at all.
_________________
1971 Westfalia Campmobile
Restoration completed by German Supply. |
|
| Back to top |
|
|
chadchadchad
Samba Member
Joined: May 19, 2009
Posts: 11
Location: Alameda California
|
| Posted: Sun Jul 07, 2013 8:42 pm Post subject: this is amazing |
|
|
| your bus will be so amazing! |
|
| Back to top |
|
|
BobB10
Samba Member
Joined: February 27, 2010
Posts: 106
Location: Sussex, New Brunswick CAN
|
| Posted: Mon Jul 08, 2013 4:40 am Post subject: Re: this is amazing |
|
|
| chadchadchad wrote: |
| your bus will be so amazing! |
Thanks 'chadchadchad'! I can't wait until it's all done, and feel the difference. I had a very old and tired motor before, should be night & day... 
_________________
1971 Westfalia Campmobile
Restoration completed by German Supply. |
|
| Back to top |
|
|
aryue
Samba Member
Joined: January 16, 2006
Posts: 1027
Location: Austin, TX
|
| Posted: Mon Jul 08, 2013 10:26 am Post subject: |
|
|
A tip of the hat to you, BobB10 - for showing us your build. I'm jealous - because when I went looking for a set of NOS German heads during my 1776cc build there weren't any to be had.
Having broke in my 1776cc with the center mount Solex 34 PICT 3 - I've decided to keep it that way - but with a venturi opened to 28mm rather than the 30mm - which really is needed for your 2017cc build. The carb is at Blackline Racing waiting in the queue.
I did get a header modified with a pre-heat tube while they available from John @ ac.net.
What I hope for would look like this:
What I received did have some fit issues with heater boxes due to the way the pre-heat tube was routed to the collector.
Thanks again for posting the updates with photos.
- Andrew in Austin, TX -
_________________
OldandSlow - but still chuggin.
http://www.ph.utexas.edu/~yue/VW/VWBus.html |
|
| Back to top |
|
|
BobB10
Samba Member
Joined: February 27, 2010
Posts: 106
Location: Sussex, New Brunswick CAN
|
| Posted: Mon Jul 08, 2013 12:58 pm Post subject: |
|
|
| aryue wrote: |
I did get a header modified with a pre-heat tube while they available from John @ ac.net.
Thanks again for posting the updates with photos.
- Andrew in Austin, TX - |
No prob Andrew, your build looks cool, the guys at Blackline do a great job. I hope you can get the clearance issues resolved...
I don't quite understand how those pre-heat tubes actually work really, and whether or not it has to go all the way back to to the collector... mine doesn't but the 2 images you show do... it's all magic I guess.
_________________
1971 Westfalia Campmobile
Restoration completed by German Supply. |
|
| Back to top |
|
|
Millennium Falcon
Samba Member

Joined: December 01, 2006
Posts: 405
Location: Toronto, Canada
|
| Posted: Mon Jul 08, 2013 1:50 pm Post subject: |
|
|
How in the world did I overlook this great thread over the past few months??? Jeez, it is like behind-the-scenes bus porn.
_________________
"Don't worry, she'll hold together . . . You hear me, baby? Hold together!" -Han to the Falcon
1972 White Campmobile
1700 cc Type IV
Dual Solex 34 PDSIT2/3 |
|
| Back to top |
|
|
BobB10
Samba Member
Joined: February 27, 2010
Posts: 106
Location: Sussex, New Brunswick CAN
|
| Posted: Tue Jul 09, 2013 5:03 am Post subject: |
|
|
| Millennium Falcon wrote: |
| How in the world did I overlook this great thread over the past few months??? Jeez, it is like behind-the-scenes bus porn. |
Hahaha, that's the best post ever Millennium Falcon! Makes me happy and feel somehow dirty at the same time... "what am I doing on the computer again honey? um I'm just posting porn to the internets... " 
Next I'll post the body & paint work...
_________________
1971 Westfalia Campmobile
Restoration completed by German Supply. |
|
| Back to top |
|
|
Busbodger
Samba Member
Joined: July 08, 2012
Posts: 117
Location: Small Town, Tennessee
|
| Posted: Tue Jul 09, 2013 1:02 pm Post subject: |
|
|
Can anyone ID those front seats for me???
Thanks!
| MsTaboo wrote: |
| BobB10 wrote: |
| MsTaboo wrote: |
Nice job!
Boy o boy does that look familiar. I did almost the same thing to my 71 Tintop Westy.
I used chemical stripper instead of media blasting. There are a few more photos in my gallery (around page 5, 7 and page 8 )
Good luck! |
Thanks MsTaboo!!! a '71 and 2 synchros... hmmmm how do you pick what to drive??! (I'm jealous!) |
Well, sadly the 71 Bay had to go.  But to some very nice new owners who put even more time and $ into her. But to some very nice new owners who put even more time and $ into her.
Here is how it looked when I sold:
And what they did:
Sometimes I really miss the A/C buses.
I had 10 of them over the years. But I really love my Syncros! |
|
|
| Back to top |
|
|
Busbodger
Samba Member
Joined: July 08, 2012
Posts: 117
Location: Small Town, Tennessee
|
| Posted: Tue Jul 09, 2013 1:18 pm Post subject: |
|
|
| Quote: |
| I don't quite understand how those pre-heat tubes actually work really, and whether or not it has to go all the way back to to the collector... mine doesn't but the 2 images you show do... it's all magic I guess. |
Pretty simple. If you have an intake manifold like the stock design with no pre-heat there will be weather conditions where the fuel/air mix leaving the carb will begin to freeze b/c of the drop in air pressure as it leaves the carb. You'd see alot of frost or ice on the outside of the intake. I've had a Type I engine freeze up and stall and then it would start right up when it thawed out.
The pre-heat tube that runs from the left side of the exhaust to the carb center section and then over to the right side is simply allowing exhaust pulses from the #2 and #4 cylinders to pulse back and forth through that tube and warm up the center section of the intake manifold to prevent the icing from occurring.
With time and miles and especially if the carb is set too rich - that pre-heat tube can clog up with carbon and rust. My fix (per Muir) was to spin a clutch cable with a power drill and feed it through the pre-heat tube and let it scrub out the rust and carbon. Just like a plumbing snake.
Beautiful bus. I agree on the rotisserie. I'm doing the laying on my back scraping and wire brushing the bottom of my bus thing. I have drawings for a rotisserie that I think I'll building eventually and adapt for Beetle and Bus restorations. Getting too "old" to lay on the floor and do that kind of work aka I'm not really old but don't like the task. Keep the updates coming. |
|
| Back to top |
|
|
aryue
Samba Member
Joined: January 16, 2006
Posts: 1027
Location: Austin, TX
|
| Posted: Tue Jul 09, 2013 2:22 pm Post subject: |
|
|
Busbodger - You hit the nail on the head regarding the need to heat the long intake manifold runners on a center-mount carburetor - in this case with two opposing cylinder banks that are nearly a meter apart. Not only icing is possible without some sort of preheat - but the gasoline doesn't stay properly atomized on its way to the cylinders.
The bi-directional pulse method to supply the heat risers with exhaust gases has been the industry standard for aftermarket headers for 40 plus years now.
#4 cylinder --> <-- #2 cylinder
No one has ever convinced me that the opposing pulses from #2 and # 4 cylinders actually pass complete through the heat risers at high RPMs. With that said, having some exhaust pass through the heat riser is a 100 times better than none at all with a center-mount carburetor.
The stock VW muffler - sends the pulses in one direction only. With an input at cylinder # 2 and a separate escape tube leading to near the tail pipe outlet - you are assured that exhaust gases pass completely through the heat riser at all RPMs.
#2 cylinder exhaust pressure ---> ---> lower pressure at the tail pipe outlet.
I'm opting to keep using the original carburetor, albeit with a modified venturi - which is why I included the above photos to show an aftermarket header modified to mimic the stock VW design. The image on top was what I wanted to copy. The bottom photo shows the design I wound up with. I will still have to periodically clean out the pre-heat tube.
With regards to icing - I bought a 69 Bus back 1996, which needed a replacement transmission. The previous owner told me of problems with icing during the colder months. While I had the engine out, I went to clean out the heat risers and noticed that header tubes beneath the heat riser take offs had not been drilled to provide any flow what so ever. Of course I drilled a passage through each tube and never noticed the icing problem in the 10 years that I drove it.
- Andrew in Austin, TX -
_________________
OldandSlow - but still chuggin.
http://www.ph.utexas.edu/~yue/VW/VWBus.html |
|
| Back to top |
|
|
Busbodger
Samba Member
Joined: July 08, 2012
Posts: 117
Location: Small Town, Tennessee
|
| Posted: Tue Jul 09, 2013 2:42 pm Post subject: |
|
|
| Quote: |
| The stock VW muffler - sends the pulses in one direction only. With an input at cylinder # 2 and a separate escape tube leading to near the tail pipe outlet - you are assured that exhaust gases pass completely through the heat riser at all RPMs. |
I learned something today! Thank you sir! |
|
| Back to top |
|
|
|


