| Author |
Message |
Jowlz
The Anti-Purist

Joined: May 02, 2005
Posts: 2464
Location: Tunkhannock, PA

|
 Posted: Sun Jul 17, 2005 12:38 pm Post subject: Combo spindle install with drum brakes Posted: Sun Jul 17, 2005 12:38 pm Post subject: Combo spindle install with drum brakes |
 |
|
In this post I will show how I installed Tweeds combo spindles and a drum brake set up on them. I choose drums because of the issues with 2 sets of disk brakes on a VW based car. I choose disk brakes on the rear. The kits are much cheaper and most of the weight is back there.
Parts needed:
Tweeds combo spindles
4 Hardened Link Pins (I recommend ordering from Tweeds(I will explain in the post))
Wheel Bearing set (Combo spindles take special bearings. OD's same as VW, ID's differnet)
Ball Joint brake backing plates
65 and older brake drums
65 and older Brake shoes
65 and older Hardware kit
Wheel bearing grease
Spray paint
10m x 1.50tp nuts (3)
Bolts from stock BJ Backing plate
10mmx1.50 tap
1 can Mar Hyde One Step
Thread locker
Tools needed:
3-5 lb. Mallet
Ring clip pliers (I recommend good quality)
Brake tools
Die grinder or drill with coarse wire brush
Safety Glasses
Assorted open end wrench
14mm Brake hose wrench
1.Using ring clip pliers, slide ring clip up the king pin. I didn't remove totally.
2.Insert bottom link pin in the hole in spindle. FOllow the directions Tweeds provides. You will notice that the bottom hole is actually slightly angled. Make sure you put the link pin in the correct way.
3.**Advice** Order your hardened link pins from Tweeds, even if you buy the spindles from Moores or Pacific Customs. I got Moores hardened link pins.
3a.If you get the link pins from another source, you will have to clearance them. The pins that Tweeds sell have a beveled head. The others do not.
3b. Put a bevel on 2 of the 4 link pins until they will clear the housing on the spindle.
3c. Insert a link pin into the spindle.
4. Turn the king pin around and push up into the spindle. Re-install ring clip.
5.Put a brass bushing over a link pin. Make sure the small hole in the bottom faces down. Drive the linkpin into the kingpin. This will seat the bushing.
6. This is what you will end up with:
7.Insert the link pin into the bottom trailing arm. Put the bolt on loosely.
8. Put shims according to your alignment.
9.Put the link pin retainer bolts into the arms. They are the allen head screws that come with the Tweeds arms.
**Note** Make sure that the notches in the link pins are out of the way of the bolt going in. Look in the hole. Clearance the notch in the link pins if you have to. If you dont you will need to get one of these:
10. Tighten link pin bolts. You are done.
This section deals with drum brake install onto combo spindles.
DRUM BRAKE INSTALL (This assumes used backing plates and new hardware)
1. Strip down your backing plates. Save the metal posts and the caps for the small round springs. Take a picture or draw a sketch of the springs.
2. Wire wheel or sand blast your backing plates. AS wire wheel will take just a few minutes to remove scale and any rust.
3.I always spray used parts with Mar-Hyde One Step. It converts any rust to black primer.
4. Spray paint backing plate.
5. While that is drying, tap out the three holes in the Tweeds Spindles, that backing plate bolts to. You could also use 3/8" nuts and bolts instead of tapping the holes out.
6. Put backing plates in place and bolt on. Thread lock the bolts. I also put nuts on the back of the bolts to make sure they were solid.
7. Install the wheel cylinders.
8. Adjust the star adjusters all the way in.
9. Put the brake shoes in place. The end of the shoes with the bigger tab goes into the wheel cylinder slot.
10.Install the small round springs that hold the brake drum to the backing plate. Use the OLD posts from the BJ plates and the spring caps.
11. Install brake shoe springs.
Your set up should look like this:
13. Clean the bearing surfaces of the drum with Brake Parts Cleaner.
14. Break out your wheel bearings. Pack them full of grease. I couldnt find my bearing packer(background in these pictures says it all), so I did it the old fashioned way. Get a hand full of grease. Rub it into the bearing. Like you are massaging it. The more grease that gets in there the better.If you want to make it easy, go get a bearing packer. They are inexpensive.
14. Press your bearings into the drum. Use a block of wood (clean). I usually lay a rag over the bearing to keep it clean. You want nothing to get in the grease. Tap the bearing in using light taps. Alternate sides and around the bearing to seat it evenly.
15. Put some more grease around outside of bearing.
16. Put in the dust sheild. Using the same method you used to put the wheel bearing in
16. Turn drum over and put the outer bearing in.
17. Look inside drum and make sure both bearings are seated all the way in.
18. Wash your hands of any grease.
19. Bring the drum back to your spindle.
20. Adjust the shoes with your hand so they don't interfere with the drum going on.
21. Put the retaining bolt on. I use the aluminum ones.
22. Adjust the brake shoes.
22. You are done.
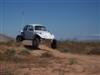
Here is the finished product with Warrior 6" wider beam, Tweeds 2 1/4" x 1 Trailing arms, 3" lift spindles, Drum Brakes, and 28 x 9.50 x 15 Super Swampers:
** Note regarding shocks on this set up. I used a Warrior beam with 8" towers. I double checked with Tweeds before deciding on shocks. I was told 8.5" travel shocks aren't enough. 10" travel shocks are long enough but the shock body will hit when compressed. Tweeds recommeneded cutting the towers off and using 12" travel shocks and shock hoops.**
_________________
The honey-do list put my project on hold....... |
|
| Back to top |
|
 |
baja5
Samba Member
Joined: February 28, 2004
Posts: 4326
Location: Ramona,Ca.
|
| Posted: Sun Jul 17, 2005 2:15 pm Post subject: |
|
|
| Just curious,did you use any link pin shims to adjust for camber?You will probably have to put some in when you are done to avoid negative camber. i think my car has 10 shims on the upper per side. |
|
| Back to top |
|
|
Jowlz
The Anti-Purist
Joined: May 02, 2005
Posts: 2464
Location: Tunkhannock, PA
|
| Posted: Sun Jul 17, 2005 2:33 pm Post subject: |
|
|
It looks like it is going to need some shims. There is some negative camber going on. It looks like the top of the side I put in will need shims. I am not going to tighten or adjust anything until I get the cage in place and built. I plan on disassembling and repainting everything with Enamel paint.
_________________
The honey-do list put my project on hold....... |
|
| Back to top |
|
|
jedrattle
Samba Member
Joined: December 02, 2004
Posts: 219
Location: Riverside, So Cal
|
| Posted: Wed Jul 20, 2005 2:11 pm Post subject: |
|
|
What bushings did you use in the beam?
_________________
`47 Studebaker pu--street rod
`69 Plymouth Valiant-project
`70 Manx wantabe--mid travel fun (someday)
`87 Toyota 4runner-built to wheel
`04 Neon--wife's
`05 Dodge-A 3500 cummins 6 sp 4wd tugboat
`07 KTM 525-Dual sport!
A house, 1.5 dogs, no kids, and no $$$$ |
|
| Back to top |
|
|
Jowlz
The Anti-Purist
Joined: May 02, 2005
Posts: 2464
Location: Tunkhannock, PA
|
| Posted: Wed Jul 20, 2005 7:56 pm Post subject: |
|
|
They were just Bugpack Urethane bushings.
_________________
The honey-do list put my project on hold....... |
|
| Back to top |
|
|
subybaja
Samba Member

Joined: July 06, 2005
Posts: 1026
Location: Anchorage
|
| Posted: Thu Jul 28, 2005 1:40 am Post subject: |
|
|
Tweed just told me that he no longer makes the BJ arms/spindles, "because you would still have to cut off your frame head and replace with frame rails to accommodate for the steering rack."
I realize that your setup is LP, Jowlz, but what are you doing for steering?
Why would BJ be different? |
|
| Back to top |
|
|
HamburgerBrad
Je suis Napoléon!

Joined: February 21, 2003
Posts: 6957
Location: SoCal
|
| Posted: Thu Jul 28, 2005 8:13 am Post subject: |
|
|
those spindles are for either ford or int'l tie rod ends. the best and easiest setup for that is a rack and pinion with the beefy ends on both sides.
i'm sure you can use a rack with a BJ setup (although i can't recall seeing it done in the recent past. but most people that retain the BJ beam, also retain stock steering
_________________
OGST | CU05 | OGJHC
1970 baja|1953 oval
Wanted: two beat up, ugly, curb rashed 6" phone dial wheels |
|
| Back to top |
|
|
Jowlz
The Anti-Purist
Joined: May 02, 2005
Posts: 2464
Location: Tunkhannock, PA
|
| Posted: Thu Jul 28, 2005 10:56 am Post subject: |
|
|
My pan was a 1968 pan. BJ/Swing axle. I took the long route and converted both to KP/LP front and IRS rear. The frame head swap wasnt too tough. If I could do it again I would eliminate the frame head completely as I am building a full cage, and it is getting in the way of the rack. For the steering I am using HD rack and pinion. The tie rods I bought were international on one end and ford on the other. The international ends fit the rack. The ford ends would usually fit stock VW spindles. The threaded shaft that hangs down is too small for the combo spindles. I got 2 more left handed international ends for the outsides. I will post the part # when I have a chance. You can get the ends at Napa, etc. They also fit Checker Cabs??
With any luck I should have a follow up post with a Rack and Pinion install most likely next week.
_________________
The honey-do list put my project on hold....... |
|
| Back to top |
|
|
HamburgerBrad
Je suis Napoléon!
Joined: February 21, 2003
Posts: 6957
Location: SoCal
|
| Posted: Thu Jul 28, 2005 10:59 am Post subject: |
|
|
| Jowlz wrote: |
| The ford ends would usually fit stock VW spindles. |
wrong. you need to take the spindles to a machine shop and have them reamed to fit.
_________________
OGST | CU05 | OGJHC
1970 baja|1953 oval
Wanted: two beat up, ugly, curb rashed 6" phone dial wheels |
|
| Back to top |
|
|
Jowlz
The Anti-Purist
Joined: May 02, 2005
Posts: 2464
Location: Tunkhannock, PA
|
| Posted: Thu Jul 28, 2005 4:10 pm Post subject: |
|
|
Yes I did leave out the fact that they would need to be taper bored. After I posted I rechecked and the Ford ends wont fit the rack or the combo spindles.
_________________
The honey-do list put my project on hold....... |
|
| Back to top |
|
|
UncleDirty
Samba Member

Joined: July 20, 2005
Posts: 745
Location: Riverside Ca
|
| Posted: Thu Jul 28, 2005 5:50 pm Post subject: |
|
|
On the after market combos you can run this set up. A 300m tapered pin, in the steering arm, with heims on your tie rods. I've been happy with it, the only thing better would be to double shear it.
Question: Who is Tweed?
Last edited by UncleDirty on Fri Jul 29, 2005 12:07 pm; edited 1 time in total |
|
| Back to top |
|
|
HamburgerBrad
Je suis Napoléon!
Joined: February 21, 2003
Posts: 6957
Location: SoCal
|
| Posted: Thu Jul 28, 2005 9:03 pm Post subject: |
|
|
tweeds is a company out of southern california that manufactures VW based front suspension oparts
_________________
OGST | CU05 | OGJHC
1970 baja|1953 oval
Wanted: two beat up, ugly, curb rashed 6" phone dial wheels
Last edited by HamburgerBrad on Sun Nov 20, 2005 11:00 pm; edited 1 time in total |
|
| Back to top |
|
|
UncleDirty
Samba Member
Joined: July 20, 2005
Posts: 745
Location: Riverside Ca
|
| Posted: Fri Jul 29, 2005 12:47 pm Post subject: |
|
|
Found a link to Tweeds, now I know what you guys are talking about.
Hell, I bought my Wright Place combos from McKenzies, when they were still in North Hollywood, so I guess I'm not hip to some of these newer fab dudes.  |
|
| Back to top |
|
|
jedrattle
Samba Member
Joined: December 02, 2004
Posts: 219
Location: Riverside, So Cal
|
| Posted: Sun Oct 23, 2005 8:53 am Post subject: |
|
|
btt I need it for reference right now. I am putting my Tweed stuff on today  finally!!!!! Thanks Jowlz! finally!!!!! Thanks Jowlz!
_________________
`47 Studebaker pu--street rod
`69 Plymouth Valiant-project
`70 Manx wantabe--mid travel fun (someday)
`87 Toyota 4runner-built to wheel
`04 Neon--wife's
`05 Dodge-A 3500 cummins 6 sp 4wd tugboat
`07 KTM 525-Dual sport!
A house, 1.5 dogs, no kids, and no $$$$ |
|
| Back to top |
|
|
fastbacker
Samba Member
Joined: August 17, 2006
Posts: 73
Location: San Francisco
|
| Posted: Wed Mar 26, 2014 2:36 am Post subject: |
|
|
Curious on what anchor block you used...ball joint or pre 66. Maybe they're the same? I'm looking at ordering the ball joint backing plates but it appears they don't come with the anchor blocks. And I've spent over an hour searching the web for them with no luck. Any tips? Thanks!!!
Craig |
|
| Back to top |
|
|
jps1145
Samba Member

Joined: March 16, 2005
Posts: 654
Location: Tehachapi, CA
|
| Posted: Wed Mar 26, 2014 7:14 am Post subject: |
|
|
| fastbacker wrote: |
Curious on what anchor block you used...ball joint or pre 66. Maybe they're the same? I'm looking at ordering the ball joint backing plates but it appears they don't come with the anchor blocks. And I've spent over an hour searching the web for them with no luck. Any tips? Thanks!!!
Craig |
You use ball joint backing plates and Link Pin drums. There are conversion bearings that let you do this. Combo spindles don't need any special "anchor block" whatever that is. I'm assuming you are talking about the spacer put at the bottom of the spindle shaft.
_________________
Tehachapi, CA
'69 Baja
Vintage Funco single seater
My Baja |
|
| Back to top |
|
|
fastbacker
Samba Member
Joined: August 17, 2006
Posts: 73
Location: San Francisco
|
| Posted: Wed Mar 26, 2014 9:20 am Post subject: |
|
|
I'm talking about drum brake parts...the blocks that attach (bolted or welded?) to the backing plates. The brake adjuster stars and screws go into these "anchor blocks". One side of a set of brake shoe springs also attach to these blocks.
I already have combo spindles on my ride but with no brakes. I am thinking of buying new ball jack backing plates from CB Performance for only $16 per but they don't appear to come with the anchor blocks.
If I can't find the anchor blocks, then I'll have to buy used ball joint backing plates. The question then is, will the ball joint backing plate anchor blocks be compatible with the the early drums?
Thanks-
Craig |
|
| Back to top |
|
|
jps1145
Samba Member
Joined: March 16, 2005
Posts: 654
Location: Tehachapi, CA
|
| Posted: Wed Mar 26, 2014 12:52 pm Post subject: |
|
|
| fastbacker wrote: |
I'm talking about drum brake parts...the blocks that attach (bolted or welded?) to the backing plates. The brake adjuster stars and screws go into these "anchor blocks". One side of a set of brake shoe springs also attach to these blocks.
I already have combo spindles on my ride but with no brakes. I am thinking of buying new ball jack backing plates from CB Performance for only $16 per but they don't appear to come with the anchor blocks.
If I can't find the anchor blocks, then I'll have to buy used ball joint backing plates. The question then is, will the ball joint backing plate anchor blocks be compatible with the the early drums?
Thanks-
Craig |
yes. that is the exact set up I had. Ball joint backing plate with drums from a link pin bug. The brake shoes are also the same for ball joint and link pin drums.
_________________
Tehachapi, CA
'69 Baja
Vintage Funco single seater
My Baja |
|
| Back to top |
|
|
|


