| Author |
Message |
mushroom
Samba Member

Joined: May 27, 2004
Posts: 7

|
 Posted: Thu Apr 20, 2006 7:15 am Post subject: Hubcap clips and hubcap clip tool Posted: Thu Apr 20, 2006 7:15 am Post subject: Hubcap clips and hubcap clip tool |
 |
|
| how easy is it without the proper rivet tool ? |
|
| Back to top |
|
 |
Clara 
Samba Member

Joined: June 14, 2003
Posts: 12644
|
| Posted: Thu Apr 20, 2006 7:22 am Post subject: Re: hubcap clip fitting |
|
|
| mushroom wrote: |
| how easy is it without the proper rivet tool ? |
I used machine screws and lock nuts from home depot on my 65 westy... it's really easy. I had drilled out all the old rivets before I got the wheels powdercoated... that's the trickiest part.
Hubcaps are overrated... i didn't bother putting them on any other buses.
It is really easy with the correct tool to install hubcap clips with rivets. campingbox is big on riveting hubcap clips on. AFAIK the correct tools are a hammer and a certain shaped chunk of metal (modified from a VW part )
_________________
The Obsolete Air-Cooled Documentation Project http://oacdp.org/ |
|
| Back to top |
|
|
Goodfellow
Samba Member

Joined: January 11, 2005
Posts: 95
Location: oklahoma
|
| Posted: Thu Apr 20, 2006 7:38 am Post subject: |
|
|
| I use pop rivets from home depot. Real Easy to install!! |
|
| Back to top |
|
|
vwbusbusvw
Banned

Joined: December 07, 2005
Posts: 1337
Location: San Diego
|
| Posted: Thu Apr 20, 2006 8:13 am Post subject: |
|
|
I used the VW rivets without the tool. I put the tire on the ground - face down. Found a bolt that would wedge between the rivet and the ground, and set it there. Then, WHACK! with a hammer. A few whacks later, rivets are in.
_________________
1994 Dodge Neon w/supercharged 1500dp
OMVWC
| Quote: |
| stuped is stuped duse |
|
|
| Back to top |
|
|
Mango Juice
Samba Member

Joined: February 11, 2001
Posts: 908
Location: U.S.A
|
| Posted: Thu Apr 20, 2006 8:28 am Post subject: |
|
|
| I made a tool before the good tool was put into production years ago...I made it out of a long bolt....I ground the head so it would fit in the area of the rim and drilled a hole so the rivet fit snugly in place, the concrete floor supports the bolt and custom nut on the other end....I flip the rim over and give the backside of the rivet a good smack with a punch and a 3lb hammer...I have had very good results without bending the rim area were the rivet and clip goes.....I think the tool they make now is a good investment as it is cheaper than it would cost to make what I have. Buy the good rivets and clips as you will be wasting your time as the cheapo's do not have the right angle to correctly support the hubcap.....oh yeah wear eye protection as metal in the eye is no fun!!! |
|
| Back to top |
|
|
DubStyle
SBS Hit Squad

Joined: July 26, 2003
Posts: 6250
Location: SBS headquarters: Missery
|
| Posted: Thu Apr 20, 2006 8:33 am Post subject: |
|
|
I used the screw and nut trick. Now the other trick is finding clips that work properly. 
_________________
Anthony
SBS #1
SBS #1 on FB
"The original & best lowered Split Bus website/club"
Last edited by DubStyle on Thu Apr 20, 2006 8:35 am; edited 1 time in total |
|
| Back to top |
|
|
mushroom
Samba Member
Joined: May 27, 2004
Posts: 7
|
|
| Back to top |
|
|
DubStyle
SBS Hit Squad
Joined: July 26, 2003
Posts: 6250
Location: SBS headquarters: Missery
|
| Posted: Thu Apr 20, 2006 8:36 am Post subject: |
|
|
I have those too and 3 of the 4 wheels hold find and one well I will have to remove it before I travel or I will be less one hubcap.
_________________
Anthony
SBS #1
SBS #1 on FB
"The original & best lowered Split Bus website/club" |
|
| Back to top |
|
|
Mango Juice
Samba Member
Joined: February 11, 2001
Posts: 908
Location: U.S.A
|
| Posted: Thu Apr 20, 2006 8:38 am Post subject: |
|
|
| Last time I looked Ronnie in Havasu had a bunch of Original German units which are the ones to use.......you will have to use a very small bolt and nut to work as the rim has a small indent on the backside of the rim for the rivet to fit into...this area does not mate against the drum...so if your nut is small enough not to rest against the drum it will work....buy junk bug rims and grind the head of the rivet off and center punch the the rest out and you will have a good original clip to re-use...now you will need the right rivets...good luck!! |
|
| Back to top |
|
|
DubStyle
SBS Hit Squad
Joined: July 26, 2003
Posts: 6250
Location: SBS headquarters: Missery
|
| Posted: Thu Apr 20, 2006 8:39 am Post subject: |
|
|
I heard he had some but he never got back to me so I assumed that he ran out.
_________________
Anthony
SBS #1
SBS #1 on FB
"The original & best lowered Split Bus website/club" |
|
| Back to top |
|
|
splitpile
Samba's Worst Speller
Joined: May 03, 2000
Posts: 5928
Location: back to living where hell meets the suface
|
| Posted: Thu Apr 20, 2006 8:51 am Post subject: |
|
|
| DubStyle wrote: |
| I heard he had some but he never got back to me so I assumed that he ran out. |
I just got another 500 before BYOB, have a couple hundred left. Real German made from original VW tooling. My rivets are also Genuine VW, but from Brazil. It's always best to call me
_________________
Stocking distributor of "The Funky Green Panels"
www.BUSTORATION.com metal and more for your bus
"no more hacking my sig line" |
|
| Back to top |
|
|
DubStyle
SBS Hit Squad
Joined: July 26, 2003
Posts: 6250
Location: SBS headquarters: Missery
|
| Posted: Thu Apr 20, 2006 8:53 am Post subject: |
|
|
LOL maybe I didn't PM the right guy.  I'll try calling you when I get back home in a couple of weeks. I'll try calling you when I get back home in a couple of weeks.
_________________
Anthony
SBS #1
SBS #1 on FB
"The original & best lowered Split Bus website/club" |
|
| Back to top |
|
|
slim6
Samba Member
Joined: May 14, 2004
Posts: 34
Location: london, UK
|
| Posted: Thu Apr 20, 2006 12:45 pm Post subject: |
|
|
| ... dont use the wolfsburg west clips - they are useless... I countersunk the rivet hole on the back of the wheel and used a small c/sunk bolt and nut to secure each clip. If the clip does snap (on 1 wheel of mine 3 out of the 5 did the first time i tried removing the hubcap) its easier to replace with a nut and bolt... |
|
| Back to top |
|
|
thom
Samba Member
Joined: October 12, 2000
Posts: 6253
Location: Sacramento
|
| Posted: Thu Apr 20, 2006 1:25 pm Post subject: |
|
|
I used 'closed-end' pop rivets, they work like a charm.
_________________
-Thom
1956 Single Cab
1957 Porsche 356A Sunroof
1957 23-Window Deluxe
1957 Mercedes Westfalia single cab
1963 Unimog 404
1965 E-Type |
|
| Back to top |
|
|
EverettB
Administrator

Joined: April 11, 2000
Posts: 71730
Location: Phoenix 602
|
|
| Back to top |
|
|
j.pickens
Samba Member
Joined: December 03, 2002
Posts: 9831
Location: Exit 7, New Jersey
|
| Posted: Thu Apr 20, 2006 7:12 pm Post subject: |
|
|
Just a metal block on the inside of the drum, and a blunt air chisel on the clip side of the rivet. Three or four hits with the air gun and you're set.
_________________
Founder and Chairman Emeritus, ECMSAS
BBX BBXII and BBXXI Long Distance Award Winner
| BeaterBarndoor wrote: |
i wish more people would actually drive their vws rather than just talking about what they have in the garage. |
| Red Fau Veh wrote: |
If you've seen one sunroof swivel seat kombi, you've seen them all!  |
|
|
| Back to top |
|
|
LHG
Samba Moderator
Joined: April 13, 2000
Posts: 1855
Location: LostHillsGuy, CA
|
| Posted: Thu Feb 15, 2007 9:38 pm Post subject: |
|
|
Here is my version of the often told story.....
"The Hubcap Clip Installation"
When I bought my current project, the wheels were already painted but without any hubcap clips. All it really takes to install them without damaging the wheels are the proper tools, a good work area, and a steady hand. The series of photos that follow take you step by step thru the process. It's a quick job and one wheel can be done to a very high standard in about 20 minutes. To avoid problems use original VW clips and rivets.
The tools I used for the job were, 5lb sledge, a large punch with fattened end, rivet mandrel, a right angle grinder, and eye protection. The rivet mandrel was purchased from ebay and the clips/rivets from Ronnie (splitpile).
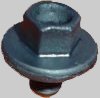
This frame shows how the mandrel holds the rivet and clip in place.
The tricky part is to get the wheel level at the correct height where you can work on the rivet accurately and with some precision. I found a very stable way to hold it using a large vise mounted on a work bench. I could put the mandrel on the flat part of the vise and used a 2x4 in the vise to hold the wheel. You can adjust the wood to level the tire and wheel.
With a little practice you will figure out exactly where the mandrel should be placed all ready to go with the rivet and clip in place. You can now gently lower the wheel into place.
Here is a view from the bottom showing the proper placement of the mandrel, rivet, and clip.
IMPORTANT: Use eye protection from this point on.
Now comes the fun part. I used the sledge for the first couple of whacks before it gets down to the level of the rim. After the first hit, take the wheel off and make sure the clip is at the proper angle.
I use the punch to adjust the clip after the first hit. If you wait till the end, the rivet holds the clip so tight it's very difficult to make any adjustments.
After about 4 hits with the sledge it's time to get out the punch. I custom ground the bottom of the punch to have a flat surface. Give it a few more hits to really set the rivet.
After examining an original wheel I noticed the rivet height was very low, lower than the surrounding wheel surface that mounts up to the brake drum. You can see in this photo the square dimple made by the powerful rivet tool the Germans used in the past. At this point I take the rivet down a bit with the grinder, not a lot, just enough to make it easier to get the rivet to the proper height.
After grinding, I finish it off with a few more shots with the punch. The punch smoothes out the grind marks and takes it down to the finished height. If you work carefully there is no damage to the finish of the wheel.
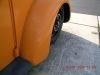
Double checking the height. I don't want any marks on my drums from high rivets.
The finished product, a nice tight clip ready to accept a beautiful hubcap. As you can see from the date stamp, this is the perfect wheel for my project.
New clips all around. Now I only have four more wheels to do! Thanks for checking this out. The End.... Finally!
_________________
Brian O'Kelly
Central Coast Chapter, CA - Vintage Volkswagen Club of America
www.centralcoastvwclub.com
www.facebook.com/groups/vintagevwclub/ |
|
| Back to top |
|
|
VW_MAN_73
Samba Member
Joined: November 18, 2005
Posts: 1003
Location: Sunny Florida
|
| Posted: Thu Feb 15, 2007 10:34 pm Post subject: |
|
|
LHG, thank you for the demonstration. Very good job and very informative
_________________
’73 Beetle - My first car, owned 26+ yrs
’71 VW Westfalia - Road-tripping across the US
Rescued & restoring a ’61 Dove Blue SO23 Bus
Follow our journey! |
|
| Back to top |
|
|
Riff Raff
Shivering Sambian

Joined: October 25, 2004
Posts: 3097
Location: Alberta
|
| Posted: Fri Feb 16, 2007 1:19 am Post subject: |
|
|
And if you are wondering about the difference between German and Brazilian clips, I did a destructive test to determine the value of each. Read it here:
http://nutsusers.proboards84.com/index.cgi?board=v...1163004987
_________________
The greatest obstacle to discovery is not ignorance, but the illusion of knowledge
- Daniel Boorstin |
|
| Back to top |
|
|
mynameismud
Samba Member

Joined: October 23, 2002
Posts: 5937
Location: Middle of a corn field
|
| Posted: Fri Feb 16, 2007 12:37 pm Post subject: |
|
|
sometimes you people scare me.. 
_________________
Even YOU can prevent FIRES!
Click to view image |
|
| Back to top |
|
|
|


