| Author |
Message |
lawn ninja
Samba Member

Joined: January 02, 2006
Posts: 1023
Location: Round Rock, TX

|
 Posted: Sun Dec 07, 2008 2:18 pm Post subject: The best 58 bug project, ever. Posted: Sun Dec 07, 2008 2:18 pm Post subject: The best 58 bug project, ever. |
 |
|
So last April I bought a 58 sedan and decided I was going to build it up. At first the plan was to just paint it do up a quick interior use the 1600 that came with it, blah blah blah... Well that plan didn't really ever happen. Instead I got it found some shit the PO tried to hide and decided to screw it all, bank account be damned. I went all out. Right now the car is at the paint shop and has been for 6 months or so. Last I saw the body was sitting painted but they were letting the paint cure for a month or two Then they were going to color sand it all. So anyways enough of my blabbering here are some pics of the resto. More to come once I get some updates...
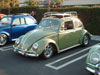
This is the day that I drove up to pick it up. It was a long day. I left early in the morning, drove to the bay area from so cal and then back to so cal.
Last edited by lawn ninja on Thu May 21, 2009 6:36 pm; edited 8 times in total |
|
| Back to top |
|
 |
lawn ninja
Samba Member
Joined: January 02, 2006
Posts: 1023
Location: Round Rock, TX
|
| Posted: Sun Dec 07, 2008 2:20 pm Post subject: |
|
|
THis is when I started sorting the project into boxes. I love tupperware.
Here you can see some of the color.
the turn signal stock. 6 wire, good shape, thank god.
All the odds and ends, sorted.
The sole piece of door panel material that exists for this car. It's part of what helped me decide that the car was diamond grey.
under the chrome a hint of the original grey color.
OG arm rest.
door panel with chrome trim pieces.
The back seat how it was found.
surprise, surprise a sweet surprise.
underneath the cover. OG interior.
Last edited by lawn ninja on Sat Feb 07, 2009 7:09 pm; edited 1 time in total |
|
| Back to top |
|
|
lawn ninja
Samba Member
Joined: January 02, 2006
Posts: 1023
Location: Round Rock, TX
|
| Posted: Sun Dec 07, 2008 2:23 pm Post subject: |
|
|
More of the color
getting ready to go to the blaster.
rust in front of the torsions
fenders
the back seat; lower section
post blasting seat cushion
good bumpers, wrong year overriders
out in the street about to go on the trailer
on the trailer
at the blaster off the pan
Pan at home with me pulling the motor out, or getting ready to. |
|
| Back to top |
|
|
lawn ninja
Samba Member
Joined: January 02, 2006
Posts: 1023
Location: Round Rock, TX
|
| Posted: Sun Dec 07, 2008 2:25 pm Post subject: |
|
|
Motor pulled
Pan, sans motor.
pan back on the trailer and ready to go and retrieve the body
body back from the blaster
for the springs I sealed them with self etching primer, but used white.
I bought these panels for the chrome bits on them. The clip in the background is the spare metal for my body.
|
|
| Back to top |
|
|
lawn ninja
Samba Member
Joined: January 02, 2006
Posts: 1023
Location: Round Rock, TX
|
| Posted: Sun Dec 07, 2008 2:31 pm Post subject: |
|
|
Here are some parts I started collecting for the car. I just took pics of everything so you'll have to bear with me.
This is nothing special; one of the mounts on the 58 was twisted.
Harness from Wiring Works
smoked vert mirror and the vw logo cap.
rechromed ash tray.
56 plates
58 seat backs ( my car cme with one late seat on the passenger side and the base of one had some broken tabs, all of which I noticed after blasting them)
58 bases
bumpers
subsequent destruction of the seat material..
torn down seats.
5 inch narrowed front beam from airkewld.
|
|
| Back to top |
|
|
lawn ninja
Samba Member
Joined: January 02, 2006
Posts: 1023
Location: Round Rock, TX
|
| Posted: Sun Dec 07, 2008 2:34 pm Post subject: |
|
|
So next on the agenda I took the car to the body shop and dropped it off. That was six months ago and I have some pics that go through some stages. I don't have anything yet with the outside painted but I will soon.
|
|
| Back to top |
|
|
lawn ninja
Samba Member
Joined: January 02, 2006
Posts: 1023
Location: Round Rock, TX
|
| Posted: Sun Dec 07, 2008 2:38 pm Post subject: |
|
|
Some pictures of the long block, its a 1914, nothing crazy insane but fun none the less. Finishing the motor is my next mini project on the car. I'm waiting on the engine tin right now and once I get it I can start to throw the motor together.
|
|
| Back to top |
|
|
lawn ninja
Samba Member
Joined: January 02, 2006
Posts: 1023
Location: Round Rock, TX
|
| Posted: Sun Dec 07, 2008 2:40 pm Post subject: |
|
|
more body shop pics along the way.
|
|
| Back to top |
|
|
lawn ninja
Samba Member
Joined: January 02, 2006
Posts: 1023
Location: Round Rock, TX
|
| Posted: Sun Dec 07, 2008 2:42 pm Post subject: |
|
|
Here is where stuff starts to get a little bit more shiny.
|
|
| Back to top |
|
|
lawn ninja
Samba Member
Joined: January 02, 2006
Posts: 1023
Location: Round Rock, TX
|
| Posted: Sun Dec 07, 2008 2:45 pm Post subject: |
|
|
Round about this point all of my interior stuff came back and the materials came in. So I started the assembly. This is about up to date. I have completed more on the interior but I'm taking my time with the covers so they sit perfect. I should have some more pics soon and some more updates from the paint shop.
You start with some bare seat frames freshly painted. The bright white stuff is sealer and the off white is paint. The grey areas are the primer that Koch used.
This is the cardboard backplate for the seat. It prevents people from fucking up the material on the springs when they shove their knees into the seat.
Assembled and ready for burlap.
cardboard backing in place. It had to be trimmed so the corners didn't stick up beyond the frame. I made the slots larger so it slid down. It would of created a werid bump in the upholstery.
Burlap sheet cut and layed on the spring. The burlap is used to prevent the coconut hair padding from working itself into the spring cushion. It is what the factory used.
Here is the burlap all trimmed and hog ringed to the spring cushion.
Here it is with the coconut padding on.
side view of upper front seat.
Both upper fronts, with the innards fully assembled.
lower part of the rear bench with the burlap on untrimmed.
trimmed.
close up of the hog rings
back seat with padding on it. The clamps were to try and curve the pad, but it didn't work. I ended up using gorilla glue on the whole back seam, to hold it down in place.
clampity clamp clamp.
upper with just burlap and trimmed.
upper and lower rear completed. |
|
| Back to top |
|
|
NOTAHONDA
Vegas Don
Joined: September 30, 2006
Posts: 1411
Location: Arizona
|
| Posted: Sun Dec 07, 2008 2:50 pm Post subject: |
|
|
Nice work!  |
|
| Back to top |
|
|
39coupe
Samba Member

Joined: April 08, 2008
Posts: 184
Location: Gwinnett, GA
|
| Posted: Sun Dec 07, 2008 3:01 pm Post subject: |
|
|
very nice
_________________
www.aircooledaddicts.org
Aircooled Addicts
'65 Beetle (red)
'65 Beetle (panama beige)
'65 Mustang
'39 Chevy Coupe |
|
| Back to top |
|
|
chickengeorge
Samba Member

Joined: August 18, 2004
Posts: 5694
Location: Spokompton Warshington
|
| Posted: Sun Dec 07, 2008 3:05 pm Post subject: |
|
|
| Very nice. |
|
| Back to top |
|
|
jmw1982
Samba Member
Joined: May 19, 2008
Posts: 298
Location: Weymouth, MA
|
| Posted: Sun Dec 07, 2008 4:40 pm Post subject: |
|
|
looks beautiful, its funny how the low budget project always turns into the money pit. but it looks like it will be awesome when its done.. keep the pictures coming...
_________________
________________________________________
'60 Beetle Indigo Blue |
|
| Back to top |
|
|
Dubbin68
Samba Member

Joined: June 27, 2006
Posts: 254
Location: Duluth, MN
|
| Posted: Sun Dec 07, 2008 5:03 pm Post subject: |
|
|
Looks sick! can't wait to see this thing all put back together...
_________________
68' Westy Weekender
73' Squareback
69’ Beetle |
|
| Back to top |
|
|
Slowlow 
Samba Member

Joined: March 17, 2004
Posts: 4121
Location: Northeast Tennessee
|
| Posted: Sun Dec 07, 2008 6:00 pm Post subject: |
|
|
Nice!
_________________
• Metal Fab & Quality Suspensions, Type I-II-III. Since 2004 • |
|
| Back to top |
|
|
iaccy
Samba Member

Joined: September 24, 2007
Posts: 1380
Location: CT
|
| Posted: Sun Dec 07, 2008 6:36 pm Post subject: |
|
|
wow that was a serious series of pictures...it's definitely progressing well!
It sure looks like you're a vw guy, I saw a corrado, and a jetta in the driveway  . Just out of curiosity, what's under the car cover? . Just out of curiosity, what's under the car cover? |
|
| Back to top |
|
|
FiveSeven
Samba Member

Joined: August 22, 2004
Posts: 174
Location: Rocket City
|
| Posted: Sun Dec 07, 2008 9:11 pm Post subject: |
|
|
Nice lookin' project
_________________
57 Oval |
|
| Back to top |
|
|
bigblue
Samba Member

Joined: July 20, 2006
Posts: 451
Location: where the c-130s fly!
|
| Posted: Sun Dec 07, 2008 9:30 pm Post subject: |
|
|
wow...beautiful car!!!   
_________________
1966 Sedan (Dad owned in Germany '74-'75)
1970 Yukon Yellow Sedan 'Puddin' SOLD
1970 Beetle Convertible (under restoration) SOLD
1970 Sedan (fresh restoration)Trophy Queen
1973 Super Beetle (Totaled in '99)
1972 Standard Beetle SOLD
looking for a 1969 Beetle hardtop
i mess with sasquatch on weekends.
| jmsmilin wrote: |
| ...he will be tucking blocks soon... |
|
|
| Back to top |
|
|
Steve.
Stinger Specialist
Joined: August 05, 2003
Posts: 1086
Location: Monterey Park, So. Cal
|
| Posted: Sun Dec 07, 2008 11:54 pm Post subject: |
|
|
Very nice! Thanks for all the pics
_________________
'64 Java
'66 Deluxe
Wanted! East LA Atlantic VW license plate frame! |
|
| Back to top |
|
|
|


