| Author |
Message |
82WestyMan
Samba Member
Joined: December 28, 2006
Posts: 1098
Location: Western OR

|
 Posted: Fri Jul 03, 2009 12:31 pm Post subject: Addco Sway Bars: F-719 & R-488 Posted: Fri Jul 03, 2009 12:31 pm Post subject: Addco Sway Bars: F-719 & R-488 |
 |
|
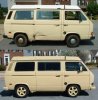
Well I broke down and decided to spring for the Addco Sway Bars for my 82 Westy
I ordered them from Shox.com in El Cajon, CA and since they're made in NC, they were shipped directly to me from there
It took 3-4 weeks to fill the order since the factory was out and had to make a run of them
Below are pictures of exactly what you get with each set of bars
Fronts - 719
Package Contents
Hardware Included
Instructions
Rears - 488
Package Contents
Hardware
Instructions
Caution Tag on Rear Link Hardware
NOTE: all the 'Bar-to-Body' bushings are rubber but the Rear Link Bushings (8 total) are polyurethane
I'm going to install them over the next couple of days.
doing the fronts first (since they should just be bolt-in's) and then the rears
I'll update my progress with pictures
_________________
"The floggings will continue until morale improves"
"I never did give anybody hell. I just told the truth and they thought it was hell" - Harry S. Truman
82 Westfalia - w/ a Raby 'Camper Special' engine |
|
| Back to top |
|
 |
82WestyMan
Samba Member
Joined: December 28, 2006
Posts: 1098
Location: Western OR
|
| Posted: Fri Jul 03, 2009 3:06 pm Post subject: |
|
|
Well, got the front in and didn't even have to jack up the front-end
(I intentionally wanted to install it at the vehicle height 'rest' position)
I stopped by my local FLAPS looking for replacement parts for the end of the link but they didn't have anything suitable. (I'll find something online and in urethane later)
I did pick up some 'grade 8' replacement bolts for the bar-to-frame mounting brackets
I also grabbed some thin plastic door handle washers to put between the link bushing and the bar
I also put a thin film of synthetic grease on the inside of the rubber mounts and in the bushing ends of the links just to be on the safe side
Here's some pics
Sway Bar: Old vs New
Mount: Old vs New
Link: Old vs New
_________________
"The floggings will continue until morale improves"
"I never did give anybody hell. I just told the truth and they thought it was hell" - Harry S. Truman
82 Westfalia - w/ a Raby 'Camper Special' engine |
|
| Back to top |
|
|
Vanagon Nut
Samba Member

Joined: February 08, 2008
Posts: 10506
Location: Sunshine Coast B.C.
|
| Posted: Sat Jul 04, 2009 9:42 am Post subject: |
|
|
hey nice post!
Since repairing and replacing front end parts on my '81 front end (stock), effects of wind buffeting have been reduced. But.... am still considering aftermarket sway bars.
Keep us posted on how the ride improves.
Thanks!
Neil.
_________________
1981 Westy DIY 15º ABA
(VW Gas I4)
1988 Westy DIY 50º ABA
VE7TBN |
|
| Back to top |
|
|
82WestyMan
Samba Member
Joined: December 28, 2006
Posts: 1098
Location: Western OR
|
| Posted: Sat Jul 04, 2009 11:42 am Post subject: |
|
|
Got the rears in this morning
The pictures tell the meat of the story but what I did was to temporarily hold the bar with all the brackets mounted in place at normal vehicle height to mark the placement of the brackets
After that it was just a matter of marking the holes that needed to be drilled
First I drilled the hole for the big L-bracket on the crossmember, then bolted it in and used it to make the first hold for u-bolts, then used that to drill the second hold for the u-bracket
I did try and out-smart myself and drilled the second u-bracket hole towards the outside (thinking i could use the factory hole near it help install the u-bracket).
When I got to installing the bar, it turns out the outer position interfers with the bar so I had to drill inner holes for the u-bolt
For the brackets on the arms, they were simple but on the passenger side, I had to trim a corner of the bracket to get it to sit flat on the arm.
It looks like the passenger side arm is the same as the driver side, just flipped over (and the spring seat changed) but the mounting surface is slightly different and I didn't want to change the position of the link bracket
I took it out for a test drive and i really like the change (wish i had them installed before i spent last week driving thru the back roads of VT, NH and ME). The body roll in the corners in much less than before
Temporarily held in place at normalvehicle height
Bar mounts in place
(Note: first pic is with the u-bolt in wrong
towards the outside interfers with the bar,
second pic is with the u-bolt toward the inside)
Rear link mount
(note: on the opposite side had to trim a corner of the bracket of to make it fit flush to the arm)
_________________
"The floggings will continue until morale improves"
"I never did give anybody hell. I just told the truth and they thought it was hell" - Harry S. Truman
82 Westfalia - w/ a Raby 'Camper Special' engine |
|
| Back to top |
|
|
wbx
Samba Member

Joined: April 11, 2005
Posts: 1254
Location: Monterey, CA
|
| Posted: Sat Jul 04, 2009 12:25 pm Post subject: |
|
|
Nice write-up! A couple questions for you...
Do you have a picture of the rear sway bar from the back of the van? I would like to see what it does to ground clearance.
What do you think the point of the U bolt is? Is it just to distribute stress and prevent the metal from bending?
Are you happy with the installation/hardware provided?
This is definitely something i want to do in the future...
-Damon
_________________
'84 Westy (first owner).......but my daily driver has pedals
My "perspective" mantra:
A Volkswagen Vanagon is just a material thing,
As such, it is of the earth,
And if i need to, I can let my Van go. |
|
| Back to top |
|
|
1621
Samba Member
Joined: May 15, 2006
Posts: 2174
|
| Posted: Sat Jul 04, 2009 1:33 pm Post subject: |
|
|
Very nice write up and pictures. Along with the 15"+ wheel and tire combo and new shocks, the larger front and adding a rear sway bar makes all the difference in the world. These vans - especially the Westies - need this extra support in my opinion. Makes the drive much more enjoyable. Thanks for posting.
_________________
'85 Westy |
|
| Back to top |
|
|
82WestyMan
Samba Member
Joined: December 28, 2006
Posts: 1098
Location: Western OR
|
| Posted: Sat Jul 04, 2009 1:56 pm Post subject: |
|
|
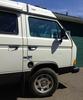
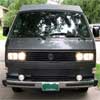
Here's some 'installed' pics from the rear
I do run H&R 'purple' lowering springs, Bilstein HD shocks and 16" wheels with 225HR55-16 H99 tires
(they're nearly dead-on to the height of stock tires, my speedo is off 1-2 mph at 65 from my GPS speed)
and i agree, they were the frosting on the 'handling' cake
_________________
"The floggings will continue until morale improves"
"I never did give anybody hell. I just told the truth and they thought it was hell" - Harry S. Truman
82 Westfalia - w/ a Raby 'Camper Special' engine |
|
| Back to top |
|
|
wbx
Samba Member
Joined: April 11, 2005
Posts: 1254
Location: Monterey, CA
|
| Posted: Sat Jul 04, 2009 9:27 pm Post subject: |
|
|
Thanks for that - better than i expected. It does seem like that rear bushing stack does hang down the most.
In your opinion, can you flip that angle bracket that attaches to the tailing arm over to suck up that bushing stack a little bit more? I don't know why i'm at all worried about it - i don't offroad, but it would be nice if it was easy to tuck it up a little higher.
That really seems like you have a pretty sweet handling setup. Nice work on your van 
_________________
'84 Westy (first owner).......but my daily driver has pedals
My "perspective" mantra:
A Volkswagen Vanagon is just a material thing,
As such, it is of the earth,
And if i need to, I can let my Van go. |
|
| Back to top |
|
|
wasserbox
Samba Member
Joined: April 08, 2008
Posts: 533
Location: Durango, CO
|
| Posted: Mon Jul 06, 2009 8:33 am Post subject: |
|
|
Nice write up.
3-4wk? Mine should be in the mail soon then...
Been about 5 weeks. |
|
| Back to top |
|
|
BlackDogVan
Samba Member

Joined: December 21, 2007
Posts: 855
Location: Vancouver Island
|
| Posted: Tue Aug 04, 2009 11:10 am Post subject: |
|
|
| Great write up 82westyman, thanks. Mine are through customs so hopefully I'll be enjoying them soon! I ordered mine through shox.com & would recommend them. They were able to arrange shipping direct from Addco & went the extra mile to ensure they were NOT sent via UPS saving me $$$ in BS brokerage fees. |
|
| Back to top |
|
|
82WestyMan
Samba Member
Joined: December 28, 2006
Posts: 1098
Location: Western OR
|
| Posted: Tue Aug 04, 2009 1:54 pm Post subject: |
|
|
I'd definitely recommend shox
Excellent service and follow up, personable, personal and professional
To be honest, wish I had found them earlier during my restoration
_________________
"The floggings will continue until morale improves"
"I never did give anybody hell. I just told the truth and they thought it was hell" - Harry S. Truman
82 Westfalia - w/ a Raby 'Camper Special' engine |
|
| Back to top |
|
|
wasserbox
Samba Member
Joined: April 08, 2008
Posts: 533
Location: Durango, CO
|
| Posted: Tue Aug 04, 2009 2:31 pm Post subject: |
|
|
| BlackDogVan wrote: |
| Mine are through customs |
When you install the front bar - word of advice.
There are 2 sets of brackets. One with 2 holes for bolts, and one with a hole and a lip.
Even if the hole / lip looks like it will work, don't waste your time. Just drill a hole for the front and use the 2-bolt bracket.
On the rears - If I was going to go back under there again (and I may in the near future), where 82WestyMan has his bracket mounted....
I would flip the bracket upside down from his image, and get in there with an angle grinder to get rid of part of the lip that interferes on the rear control arm to move it up as high as possible.
I don't see any reason that this rear bar has to sit as low as it does. I already flipped the bracket, and plan to come back with the grinder at some future point. |
|
| Back to top |
|
|
kenmag
Samba Member

Joined: March 12, 2007
Posts: 275
Location: Toronto, Canada
|
| Posted: Tue Aug 04, 2009 3:04 pm Post subject: |
|
|
wasserbox: would you be able to post a pic of your rear arm brackets? Just wanted to see how high you mounted them.
Thanks
Ken.
_________________
87GL Westy/suby ej22
87GL tintop/suby ej22
05 Golf TDI
95 jetta GLX |
|
| Back to top |
|
|
Tiiconaut
Samba Member
Joined: February 18, 2006
Posts: 85
|
| Posted: Tue Aug 04, 2009 3:24 pm Post subject: |
|
|
| Vanagon Nut wrote: |
hey nice post!
Since repairing and replacing front end parts on my '81 front end (stock), effects of wind buffeting have been reduced. But.... am still considering aftermarket sway bars.
Keep us posted on how the ride improves.
Thanks!
Neil. |
I like the original front westy swaybar much better than the Addco. Its much quieter because it has less parts (the addco big thru-bolt that goes thru donut bushing rattles with every bump. I did notice the Addco had less sway than the original bar....but the noise is annoying. |
|
| Back to top |
|
|
BlackDogVan
Samba Member
Joined: December 21, 2007
Posts: 855
Location: Vancouver Island
|
| Posted: Wed Aug 05, 2009 2:22 am Post subject: |
|
|
| Tiiconaut wrote: |
| Vanagon Nut wrote: |
hey nice post!
Since repairing and replacing front end parts on my '81 front end (stock), effects of wind buffeting have been reduced. But.... am still considering aftermarket sway bars.
Keep us posted on how the ride improves.
Thanks!
Neil. |
I like the original front westy swaybar much better than the Addco. Its much quieter because it has less parts (the addco big thru-bolt that goes thru donut bushing rattles with every bump. I did notice the Addco had less sway than the original bar....but the noise is annoying. |
Very interesting, i'm actually surprised thats the 1st comment about rattles i've read, the end link idea on the Addco's never really looked right to me. I would have perfered a whiteliine front & addco rear but whiteline is no more...
I'll install them & if the make noise maybe come up with a forked link to clamp the bar end to. Font end noise drives me nutz! |
|
| Back to top |
|
|
wasserbox
Samba Member
Joined: April 08, 2008
Posts: 533
Location: Durango, CO
|
| Posted: Wed Aug 05, 2009 7:08 am Post subject: |
|
|
| Tiiconaut wrote: |
| Its much quieter because it has less parts (the addco big thru-bolt that goes thru donut bushing rattles with every bump. |
Really?
Are you still using your OEM bushings on the dog bones?
Did you add an extra large washer on the outside as well as the included one on the inside?
The only rattle has been when I popped the aforementioned tab-brackets out of their mounting holes going over a big bump.
Blackdogvan - The hardware kit included is pretty minimal. At least on the rear end, you will be short about 10 washers.
Kenmag - no pictures - I'll try and get one posted tomorrow. |
|
| Back to top |
|
|
82WestyMan
Samba Member
Joined: December 28, 2006
Posts: 1098
Location: Western OR
|
| Posted: Sun Aug 09, 2009 5:04 pm Post subject: |
|
|
Just wanted to add a comment
Over the weekend I was up in the mountains of SC camping
(yes, there are real mountains in SC...)
It wasn't until I was driving thru the twists and turns of a backwoods state hwy in the Sumter NF that I really appreciated the sway bars
I guess I'd already gotten used to how the handling of the van changed because it wasn't until I'd been driving 20-30 minutes that it occurred to me...
"Hey, no body roll!!!"
Going down the interstate or in everyday driving, not so much
But when it really counts thru a twisty country or mountain road...
SWEET!!!
_________________
"The floggings will continue until morale improves"
"I never did give anybody hell. I just told the truth and they thought it was hell" - Harry S. Truman
82 Westfalia - w/ a Raby 'Camper Special' engine |
|
| Back to top |
|
|
j_dirge
Samba Member

Joined: August 08, 2007
Posts: 4641
Location: Twain Harte, CA
|
| Posted: Tue Nov 24, 2009 12:10 pm Post subject: |
|
|
Installed the Addco 25mm sway bar a couple weeks ago.
And like experienced here by others. One tab bracket insisted on popping out.
I used large bolts and washers on the brackets hoping that would provide enough bit to keep the brakcet in place.. But I realized the bracket itself flexs and then pops out.
Sooo.
I installled the two bolt brackets, instead.
Keeps it in place.
No rattling.
...though I have temporary spacers in there to help fill the room between the Addco-provided bushing and the frame.
Also worth noting. The newer Vanagons have 21mm swaybars and end bushings. These are slightly too large for the Addco end-bolts.. so I ordered the 19mm bushing from Van Cafe and its much better fit.
Now.. a question for the more learned here.
Rear sway bar or no rear sway bar?
I only installed the front sway bar.
Huge improvement. NO DOUBT!
But I wanted to avoid a rear bar so as not to lose too much articulation at the rear 2WD drive wheels when on trail.
Pros and cons of a rear sway bar on the van?
Any imminent handling dangers with NO rear sway bar?
_________________
-89 GL Westy, SVX.. finally.
-57 pan f/g buggy with a 67 pancake Type 3 "S"
"Jimi Hendrix owned one. Richard Nixon did not"
-Grand Tour, Season 1, episodes 4 and 5
| danfromsyr wrote: |
those are straight line runs with light weight race cars for only 1/4mile at a time..
not pushing a loaded brick up a mountain pass with a family of 4+ inside expecting to have an event free vacation..
|
|
|
| Back to top |
|
|
joet
Samba Member
Joined: January 28, 2011
Posts: 55
Location: Amherst, MA
|
| Posted: Mon Apr 11, 2011 10:41 am Post subject: |
|
|
Aadco bar just arrived. Is there any reason why the end bolts are so long? Has anyone tried to cut them down or used shorter ones?
Upgrading the endlinks (Fastwagens) and bushings (Powerflex) as well.
Here's a pic of the long bolt:
_________________
2003 Eurovan Weekender
Previously: 1987 Westy Weekender |
|
| Back to top |
|
|
fastwagens
Samba Member
Joined: March 01, 2004
Posts: 1028
Location: Michigan (The other west coast)
|
| Posted: Mon Apr 11, 2011 11:04 am Post subject: |
|
|
| joet wrote: |
Aadco bar just arrived. Is there any reason why the end bolts are so long? Has anyone tried to cut them down or used shorter ones?
Upgrading the endlinks (Fastwagens) and bushings (Powerflex) as well.
Here's a pic of the long bolt:
|
I think the bolts are long because they use an off the shelf size and the length determines the legnth of the shank. |
|
| Back to top |
|
|
|


