| Author |
Message |
TheEv
Samba Member

Joined: June 25, 2005
Posts: 98
Location: Centralia, Washington

|
 Posted: Tue Sep 01, 2009 11:31 am Post subject: My '78 Westfalia "fix up" Posted: Tue Sep 01, 2009 11:31 am Post subject: My '78 Westfalia "fix up" |
 |
|
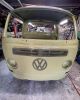
At last! I just purchased a '78 Westfalia in good shape and hope to document my journey as I fix it up. I say "fix up" because I have no intentions of showing this bus, I just want a great looking, solid, reliable camper to make some great memories with for years to come. I suspect there are many of you out there who are in the same boat... or bus.
What I'm working with:
Thanks to The Samba classifieds I found this '78 Westy in Portland Oregon from a nice, honest couple. The bus spent most of its life in California, and has very little rust. The engine runs great as I just took it out for a 400 mile road trip around the Olympic Peninsula in Washington. The folks I purchased it from were nice enough to put a couple hundred bucks into the engine / tune up before they sold it! I believe the engine is the original, but judging by the receipts, it has been rebuilt a couple times.
The interior of the bus is in pretty good condition. All the camping equipment like the sink, and propane stove are present and work well. There are some custom curtains, re-fabriced seat / mattress, and non vw carpet, but it all looks good and usable.
The pop top is in good condition as well. The seals look fairly new and soft. The canvas is also only a few years old and is in great condition (besides a poor paint job).
All in all, it is a great working, camp-ready bus!
What I'll be tackling in the "fix up" process:
- New Exhaust, as this current one is quite old and has holes.
- Simple rust prevention around some of the edges of the bus and underneath the windshield
- Dent, ding removal (I've never done this before)
- Battery pan solution / removal
- Paint prep and Paint (Will be doing this myself)
- Replacing all window seals / Detailing window hardware
Stand by to witness how much of a newb I am  |
|
| Back to top |
|
 |
Pinetops
Samba Member

Joined: March 24, 2007
Posts: 2987
|
| Posted: Tue Sep 01, 2009 11:49 am Post subject: |
|
|
That looks like a solid bus, congratulations. Do you have more photos? Unless there are some real issues with it, I would leave the paint job. Unless you have experience painting cars, chances are you will not be able to do better the first try. I would paint those wheels white or silver though. It will look better imo. Keep us posted.
_________________
"A rolling bus gathers no rust." |
|
| Back to top |
|
|
TheEv
Samba Member
Joined: June 25, 2005
Posts: 98
Location: Centralia, Washington
|
| Posted: Tue Sep 01, 2009 12:21 pm Post subject: |
|
|
Thanks Stuco! I do have more photos which I'll be posting a little later. As for the last paint job, I can tell it was done very sloppy. Many of the seals are painted over, and the paint seems to be of poor quality. I would rather re-paint to not only improve the look of the bus, but protect it down the road. I plan on painting it its original color which was Dakota beige (L13A)
Any Dakota Beige bays out there? I'd like to see what one looks like all shined up!
I did a little cargo area / roof rack removal and cleaning last night; I'll post pics tonight of the process. |
|
| Back to top |
|
|
babysnakes
Samba Member
Joined: August 19, 2008
Posts: 7174
|
| Posted: Tue Sep 01, 2009 1:24 pm Post subject: |
|
|
This is the '78 we picked up a few months ago. Except for 2 panels and the pop top,the paint is OG.
The 2 POs both kept it in a garage thus the fine condition.
Need I say more?
Last edited by babysnakes on Tue Sep 01, 2009 2:16 pm; edited 1 time in total |
|
| Back to top |
|
|
Pinetops
Samba Member
Joined: March 24, 2007
Posts: 2987
|
| Posted: Tue Sep 01, 2009 1:29 pm Post subject: |
|
|
| TheEv wrote: |
Thanks Stuco! I do have more photos which I'll be posting a little later. As for the last paint job, I can tell it was done very sloppy. Many of the seals are painted over, and the paint seems to be of poor quality. I would rather re-paint to not only improve the look of the bus, but protect it down the road. I plan on painting it its original color which was Dakota beige (L13A)
Any Dakota Beige bays out there? I'd like to see what one looks like all shined up!
I did a little cargo area / roof rack removal and cleaning last night; I'll post pics tonight of the process. |
In that case, I retract my paint advice. It sounds worse than it looks and I'm all for going back to that great OG color.
_________________
"A rolling bus gathers no rust." |
|
| Back to top |
|
|
TheEv
Samba Member
Joined: June 25, 2005
Posts: 98
Location: Centralia, Washington
|
| Posted: Tue Sep 01, 2009 1:47 pm Post subject: |
|
|
| babysnakes - Very nice looking bus. It looks like the interior is in amazing shape... original curtains and all. |
|
| Back to top |
|
|
babysnakes
Samba Member
Joined: August 19, 2008
Posts: 7174
|
| Posted: Tue Sep 01, 2009 2:13 pm Post subject: |
|
|
| Thanks, We lucked out. It was about a 180 mi round trip to pick it up. The motor needs work, but motors are easier to resto than bodies. The bus in the last pic is our '72. Kanas biege and pastel white, also OG except for the roof. |
|
| Back to top |
|
|
TheEv
Samba Member
Joined: June 25, 2005
Posts: 98
Location: Centralia, Washington
|
| Posted: Wed Sep 02, 2009 12:14 pm Post subject: |
|
|
Very cool... I just put a want ad on Craigslist for used auto body tools and got a call back from an retired gentleman who asked if he could teach me some thing at his shop! He says he has 40 years experience in auto restoration / painting.
We are meeting tomorrow. I'll bring my camera and see if I can get any shots of the work we do. |
|
| Back to top |
|
|
VWSHUTTERBUG
Samba Member
Joined: May 27, 2005
Posts: 21
Location: SEATTLE, WA
|
| Posted: Wed Sep 02, 2009 12:27 pm Post subject: |
|
|
| Nice Find! I'm up in Seattle looking for a 77-79 Westy, and saw that one in Portland. Looking forward to photos! |
|
| Back to top |
|
|
TheEv
Samba Member
Joined: June 25, 2005
Posts: 98
Location: Centralia, Washington
|
| Posted: Fri Sep 04, 2009 10:12 am Post subject: |
|
|
I met up with the Gentleman I met on Craigslist yesterday after work. He has a large shop and all the necessary tools to do professional body work / paint job and is willing to teach me all of it! He is only asking a small hourly fee to cover tool use / power etc.
We are starting on working out some dents on the nose of the bus on Tuesday. I'll bring my camera and document my learning as well as I can.
Stand by... |
|
| Back to top |
|
|
purplegodzilla
Samba Member

Joined: September 07, 2006
Posts: 253
Location: Duluth, Georgia
|
|
| Back to top |
|
|
TheEv
Samba Member
Joined: June 25, 2005
Posts: 98
Location: Centralia, Washington
|
| Posted: Tue Sep 08, 2009 11:35 pm Post subject: |
|
|
Started grinding into my Westy today!
All went well and I learned a lot. The guy helping me was great and let me get in and do most of the work as he supervised. I learned some of the techniques of dent pulling / hammering etc. I also got to watch him weld up a crack in the nose as well as the holes that were left from the tire mount.
Had a bit of a scare at first when one of studs from the stud setter caught something on the inside of my bus on fire (must have been the styrofoam backing) and I made use of my fire extinguisher  Nothing was damaged except for that backing and some black marks in the inside of the nose behind the kick panels. Scary! Nothing was damaged except for that backing and some black marks in the inside of the nose behind the kick panels. Scary!
I'll be posting some more pics in a couple days as we continue on in the body work phase. |
|
| Back to top |
|
|
TheEv
Samba Member
Joined: June 25, 2005
Posts: 98
Location: Centralia, Washington
|
| Posted: Fri Sep 11, 2009 11:24 am Post subject: |
|
|
Worked on the nose a bit more. Learned a little about how to work with body filler / sanding. It gets very tricky with the small lip on the bottom part of the nose.. but I'm getting it.
I'll be putting another several hours in this coming Monday.. so more pics then.
That is not me in the pic btw.. that is the nice gentleman that is helping me learn about body work
|
|
| Back to top |
|
|
TheEv
Samba Member
Joined: June 25, 2005
Posts: 98
Location: Centralia, Washington
|
| Posted: Wed Sep 16, 2009 9:01 am Post subject: Found Bondo :( |
|
|
Yesterday we decided to start to get the bus down to OG Paint / metal because of all the coats of primer / paint that the bus already had.
The process was very labor intense, but sort of neat at the same time. We used an industrial chemical airplane paint stripper that we painted on. In a matter of 30 seconds or so, the paint in those areas would bubble up and soften which allowed us to scrape it off.
We still have a few hours left of painting this stuff on and scraping, but we'll get there
The sad part is that we found a good amount of Bondo on the left side of the bus from a previous collision (I'm guessing). Hopefully as we get this off it won't be to deep. Looks like I have some more body filler training ahead of me This is kind of disappointing.. I really wish I did a thorough magnet test on the body before I purchased it.
Anybody have any suggestions / tips on where to go from here? Looks like we'll continue to paint strip the body and then tackle the filler work. I'm tempted to go ahead and gut the entire bus and paint the inside along with the body. Thoughts?
_________________
'89 Westy / 2.1L |
|
| Back to top |
|
|
RIOMX
Samba Member

Joined: September 30, 2005
Posts: 1234
Location: La Crosse, WI
|
| Posted: Wed Sep 16, 2009 9:57 am Post subject: |
|
|
Awesome work!
I also didn't notice some bondo spots on my bus (about three places on the driver side) and I was disappointed. All in all though, the bus is in great condition, so I'm not too upset.
It's really cool watching you go through this process and it'll serve as a great resource for when I do the same in the future (can't be yellow forever - it's killing me!)
Very eager to see what you'll do with the bondo areas. |
|
| Back to top |
|
|
TheEv
Samba Member
Joined: June 25, 2005
Posts: 98
Location: Centralia, Washington
|
| Posted: Thu Sep 17, 2009 9:47 pm Post subject: No Paint... Almost |
|
|
Well, we worked a few more hours today and for the most part, have all the paint removed from the bus. I'll probably need to remove the pop-top to get to the roof next, as well as remove all the windows.
Is there anything I should know about removing the windows as far as obtaining new window seals? I've noticed I can purchase new seals at the bus depot among other places, but are there any that I should try and salvage?
Also, my canvas is new and in super good condition. Any tips on removing it? I'm guessing it just involves taking out a bunch of screws?
We ground out all the bondo on the the left side of the bus. There was almost a half inch in some areas! It looks like whoever bondoed, didn't bother to pull the dents out very far before they added filler. All in all, the bus looks pretty good when we got it down to bare metal. I'm was sort of bummed about finding bondo, but now I'm glad that we'll be able to do it right this time and the bus will be much better overall. There is still a lot of detail paint stripping around the door jams, top of bus, bumper areas. I'm sure glad we used the chemical paint stripper before we sanded the paint off.. it helped a lot. Very much recommended, especially if your bus has been painted multiple times. More to come...
_________________
'89 Westy / 2.1L |
|
| Back to top |
|
|
VDubTech
Samba Member
Joined: December 29, 2002
Posts: 9156
Location: Syracuse, NY
|
| Posted: Thu Sep 17, 2009 10:01 pm Post subject: |
|
|
Leave the canvas attached to the top and just remove the 1.3 billion tiny phillips head screws holding it to the body. Roll it up and use some spring clamps to hold it out of the way while you remove the top.
As for window seals, don't bother with anything from Bus Depot. Get them from OEVeeDub or Wolfsburg West.
www.oeveedub.com
www.wolfsburgwest.com
There are a LOT of threads about window rubber, a quick search will bring up tons of information, but that's the long and short of it.
_________________
First Trip in the RustyBus:
http://www.thesamba.com/vw/forum/viewtopic.php?t=279077&highlight=
| borninabus wrote: |
| a measurement of your rod would be extremely useful. |
| notchboy wrote: |
| my dad wasnt a belittling cock when he tought me how to wrench on cars. |
| EverettB wrote: |
One photo = good for reference.
10 photos = douchebaggery |
|
|
| Back to top |
|
|
TheEv
Samba Member
Joined: June 25, 2005
Posts: 98
Location: Centralia, Washington
|
| Posted: Thu Sep 17, 2009 11:17 pm Post subject: |
|
|
Gracias VDubTech.. Just made a sizable purchase at oeveedub.com. Purchased my window rubber, some new taillight housings, antenna, etc.
_________________
'89 Westy / 2.1L |
|
| Back to top |
|
|
jamesdagg
Samba Member

Joined: August 18, 2007
Posts: 3364
Location: B.C.Canada
|
| Posted: Thu Sep 17, 2009 11:46 pm Post subject: |
|
|
The Bentley manual tells how to remove the poptop and the interior cabinets. I pulled my cabinets out of my '78 Westy and found a rust hole at the sink drain and ice box drain.
jim
_________________
'72 FI Westy
'71 Super rear inside defrost vents no longer available |
|
| Back to top |
|
|
TheEv
Samba Member
Joined: June 25, 2005
Posts: 98
Location: Centralia, Washington
|
| Posted: Fri Sep 18, 2009 12:12 am Post subject: |
|
|
Good to know Jim, I think I will do the same. I can't stand not knowing what may be lurking under the floor and all those cabinets
_________________
'89 Westy / 2.1L |
|
| Back to top |
|
|
|


