| Author |
Message |
wbx
Samba Member

Joined: April 11, 2005
Posts: 1254
Location: Monterey, CA

|
 Posted: Mon Nov 02, 2009 2:40 pm Post subject: Hi Torque starter intermittent problem Posted: Mon Nov 02, 2009 2:40 pm Post subject: Hi Torque starter intermittent problem |
 |
|
Hi everyone,
My van is currently equipped with a Hi-Torque starter, which has worked just fine for the last 7 years or so. Over the last month, it has decided to not work 100%. Usually it starts just fine, but when it doesn't, i can hear the solenoid click, but then no spinny.
There seems to be no temperature dependence, it happens when i am first starting up, or after several hours of driving. It can take up to 10 times trying to get it to actually spin before it starts the van up.
It hasn't left me stranded, yet, but is feeling like only a matter of time.
Any ideas as to what the problem could be, and how I could go about repairing it?
-Damon
_________________
'84 Westy (first owner).......but my daily driver has pedals
My "perspective" mantra:
A Volkswagen Vanagon is just a material thing,
As such, it is of the earth,
And if i need to, I can let my Van go. |
|
| Back to top |
|
 |
tencentlife
Samba Member

Joined: May 02, 2006
Posts: 10163
Location: Abiquiu, NM, USA
|
| Posted: Mon Nov 02, 2009 6:13 pm Post subject: |
|
|
Damon, I've had one of the IMI starters (the ones GW used to sell) and after being in use for 2 or 3 years it began having some intermittent no-workiness. It would often do nothing on the first turn of the key, not even an audible click, but would always spin up on the second try. Seemed to be more prevalent when the thing was cool.
So I took it apart and it was clear that some water had worked its way inside and there was some rust, mainly in the solenoid section. I have to ford a creek to get to my house and in spring the water gets pretty high, enough to wet down the starter with every crossing, so I'm sure that's when the thing got soaked.
I did a complete disassembly and cleanup, and sealed every joint as I put it back together to make it completely watertight. That was awhile ago, maybe a year already, and no trouble since then.
_________________
Shop for unique and useful Vanagon accessories at the Vanistan shop:
https://intrepidoverland.com/vanistan/
also available at VanCafe.com!
Please don't PM here, I will not reply. |
|
| Back to top |
|
|
wbx
Samba Member
Joined: April 11, 2005
Posts: 1254
Location: Monterey, CA
|
| Posted: Tue Nov 03, 2009 9:34 am Post subject: |
|
|
I'm not much of a river forder, so maybe that is why i got so much more life out of it. Sounds like the investigation was pretty straight forward. Anything tricky about the rebuild?
Thanks for the reply,
-Damon
_________________
'84 Westy (first owner).......but my daily driver has pedals
My "perspective" mantra:
A Volkswagen Vanagon is just a material thing,
As such, it is of the earth,
And if i need to, I can let my Van go. |
|
| Back to top |
|
|
tencentlife
Samba Member
Joined: May 02, 2006
Posts: 10163
Location: Abiquiu, NM, USA
|
| Posted: Tue Nov 03, 2009 9:55 am Post subject: |
|
|
It's a good bit more complicated than a regular starter because of the reduction gearing, but it's not terribly complex, just go slowly and take notes or pics as you disassemble if you don't trust your brain to keep track of where things go. The rest is standard electric motor stuff: clean out crusty lube, relube, brighten the commutator with a light abrasive paper and clean and degrease afterward, check brushes height and replace them if needed (they were a pretty standard size as I recall, although mine had a lot of length left so I didn't get new ones).
I looked it over to spot every place where water could potentially get in, so as I reassembled I used a silicone sealant (Reinzosil; black Dirko is the same stuff, but even Permatex would work here) between every joint. I remember making one or two special seals out of o-rings or plastic, use your ingenuity.
The thing doesn't need to breathe, it only operates a few seconds at a time so it can dissipate heat, so there is no potential trouble from making it watertight. My problem arose from it not.
I'm not going to be mch help for advice, this was a year ago and once a unique job like this is out of the way I forget all about it.
_________________
Shop for unique and useful Vanagon accessories at the Vanistan shop:
https://intrepidoverland.com/vanistan/
also available at VanCafe.com!
Please don't PM here, I will not reply. |
|
| Back to top |
|
|
wbx
Samba Member
Joined: April 11, 2005
Posts: 1254
Location: Monterey, CA
|
| Posted: Tue Nov 03, 2009 12:32 pm Post subject: |
|
|
No worries about the lack of specifics. I'm confident i can get in there just fine - i just wanted to know if there were any particular speedbumps that caught you by surprise. Doesn't sound like it, so a-disassemblin-i-will-go!
As always, thanks a ton for your contributions, 10c.
-Damon
_________________
'84 Westy (first owner).......but my daily driver has pedals
My "perspective" mantra:
A Volkswagen Vanagon is just a material thing,
As such, it is of the earth,
And if i need to, I can let my Van go. |
|
| Back to top |
|
|
wbx
Samba Member
Joined: April 11, 2005
Posts: 1254
Location: Monterey, CA
|
| Posted: Sun Jan 30, 2011 3:49 am Post subject: |
|
|
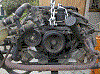
So... it only took me 1 year and 2 months to get to this, but hey... i got to it.
Here are a few pics from when i pulled my Hi-Torque / IMI-104 gear reduction starter apart. Really quite easy and a relaxing evening (except having to clean up the kitchen sink afterward).
Now, to preface this post, i have yet to put it back in the van and test it - this is just to show the inside of one of these things. Maybe someone will find this useful:
Just pulled apart and still dirty
From left to right:
motor end cap/commutator holder
commutator
armature
solenoid plunger and starter gear push spring(below)
main case (starter and solenoid fields)
idler gear housing (& idler gear)
starter shaft w/1 way clutch mechanism (below)
solenoid end cap
starter shaft nose bearing support housing
Main case gear end
Main case electrical end
Solenoid main power bus contacts
These are pretty rough and i think part of my problem
Solenoid switch contact
Also pretty rough
Armature and Commutator
Could use some freshening up
Starter shaft
The little gear spins the flywheel, the big gear is connected to the starter motor via an idler gear.
Whole Amature
what are these grooves for? They don't go all the way around - only what you see here...
Parts cleaned up
A little degreaser, a little filing and some sandpaper
Armature cleaned up
I don't have any emory cloth, and this was the best i could do...
Solenoid switch contact cleaned up
This part required a bit of work to smooth out with a file. It spins freely on the shaft, and I wish i could have figured out how to just flip it over to the good side. Not perfect, but definitely better.
Solenoid switch contact cleaned
Assembling commutator on to armature
This was a little bit fiddly. Basically, install the brushes part way, letting the brush springs hold them in place. Start with the two attached to the commutator, then on to the one that is tucked in closest to the main body. Finagle the last brush part way in, slip over the armature, and then pop the brushes in. Not too bad, really.
Installing gear train
grease holds the needle bearings in place. The open end of the race faces towards the motor. Housing installs with 2 M5 socket head cap screws.
Installing nose piece
This is what adapts it to the vanagon. Held on with 3 M5 SHC screws as shown.
Installing solenoid plunger
Drop the long spring in the hole and the solenoid plunger into the spring
That was my last picture. Tighten up the obvious screws and there ya go.
I hope it helps 
_________________
'84 Westy (first owner).......but my daily driver has pedals
My "perspective" mantra:
A Volkswagen Vanagon is just a material thing,
As such, it is of the earth,
And if i need to, I can let my Van go. |
|
| Back to top |
|
|
msinabottle
Samba Member

Joined: September 20, 2005
Posts: 3492
Location: Denver Area, Colorado
|
| Posted: Mon Jan 31, 2011 4:00 pm Post subject: Thank you! |
|
|
Thank you for such a detailed and potentially useful post! Winston's been quite happy with his Hi-Torque, but your post could be so very useful when the time comes. Thank you for your time and trouble.
_________________
'Winston,' '84 1.9 WBX Westy
Vanagon Poet Laureate: "I have suffered in
many ways, but never, never, never in silence." |
|
| Back to top |
|
|
Christopher Schimke
Samba Member

Joined: August 03, 2005
Posts: 5550
Location: PNW
|
| Posted: Mon Jan 31, 2011 4:32 pm Post subject: |
|
|
Glad to see that you are still alive too.
_________________
"Sometimes you have to build a box to think outside of." - Bruce (not Springsteen)
*Custom wheel hardware for Audi/VW, Porsche and Mercedes wheels - Urethane Suspension Bushings*
T3Technique.com or contact me at [email protected] |
|
| Back to top |
|
|
boulderdrop
Samba Member
Joined: February 06, 2008
Posts: 481
Location: Seattle, WA
|
| Posted: Mon Jan 31, 2011 5:52 pm Post subject: |
|
|
Nice work man! I pulled my HiTorque when it started having problems, but I still have it. That'd be a fun project!
_________________
== My Rides ==
1984 Westy, Bostig, AC, PS, Recaro
1980 24' J-Boat
1979 Sears Freespirit Moped
2012 Toyota Camry Hybrid (Wife's)
2024 Toyota Grand Highlander MAX/Pro |
|
| Back to top |
|
|
wbx
Samba Member
Joined: April 11, 2005
Posts: 1254
Location: Monterey, CA
|
| Posted: Mon Jan 31, 2011 9:59 pm Post subject: |
|
|
Glad it will help someone eventually. I figure there are probably like 50 people this pertains to, but why not document it? "Potentially useful" pretty much sums it up! 
Oh and Chris - yeah, still alive, just largely in lurker mode. The house-on-foundation gets all the attention while the house-on-wheels gets sad and slowly falls apart.
Registration is coming up and step 1 is to get the starter to turn the motor over... and for the record: SUCCESS
Nary a hesitation with the starter. We'll see how long it lasts. The only thing i think i should have done differently was to lightly lube the solenoid cylinder with some silicone grease to help that even more so. Next time.
Step 2 is to get the engine to actually start... more diagnostics needed for that, apparently (and not for this thread).
_________________
'84 Westy (first owner).......but my daily driver has pedals
My "perspective" mantra:
A Volkswagen Vanagon is just a material thing,
As such, it is of the earth,
And if i need to, I can let my Van go. |
|
| Back to top |
|
|
MsTaboo 
Samba Member

Joined: June 02, 2006
Posts: 4634
Location: East Kootenay, British Columbia
|
| Posted: Mon Jan 31, 2011 11:10 pm Post subject: |
|
|
WBX- those grooves are probably for balancing the armature
_________________
Currently:
'90 Syncro Westy 3 knob w/Zetec
The information age has morphed into the age of disinformation and willful ignorance. Agnotology!
When you stir up shit you're bound to get some on yourself.
Resist Kleptocratic Oligarchy (and Idiocracy)! |
|
| Back to top |
|
|
boulderdrop
Samba Member
Joined: February 06, 2008
Posts: 481
Location: Seattle, WA
|
| Posted: Fri Feb 25, 2011 11:07 am Post subject: |
|
|
| wbx wrote: |
| So... it only took me 1 year and 2 months to get to this, but hey... i got to it. |
I'm next! I'll rip my apart in a few months and report back, perhaps they both failed for the same reason. It was a nice starter and I was a little sad to buy a OEM Bosch, but happy with a motor that starts. 
_________________
== My Rides ==
1984 Westy, Bostig, AC, PS, Recaro
1980 24' J-Boat
1979 Sears Freespirit Moped
2012 Toyota Camry Hybrid (Wife's)
2024 Toyota Grand Highlander MAX/Pro |
|
| Back to top |
|
|
wbx
Samba Member
Joined: April 11, 2005
Posts: 1254
Location: Monterey, CA
|
| Posted: Fri Feb 25, 2011 11:50 am Post subject: |
|
|
A starting engine is definitely a good thing.
Please report back, as it would be good to find out if there is a common failure mode with these things. Servicing this starter really wasn't too big a deal at all, so hopefully a little knowledge will help keep people on the road reliably...
_________________
'84 Westy (first owner).......but my daily driver has pedals
My "perspective" mantra:
A Volkswagen Vanagon is just a material thing,
As such, it is of the earth,
And if i need to, I can let my Van go. |
|
| Back to top |
|
|
mmustang
Samba Member
Joined: February 14, 2011
Posts: 4
Location: Nova Scotia
|
| Posted: Fri Jul 06, 2018 7:30 am Post subject: Re: Hi Torque starter intermittent problem |
|
|
Good day folks.
I have a 79 westfalia and started on vacation yesterday. Stopped for lunch and came out to go and there was nothing when I went to start. I had to be transported home thanks to CAA (AAA in the US). I have a new IMI -104 starter but no instructions about the wiring, Can anyone help me? I have had this starter for a few years just in case, now is the casae, Cheers.
Ron |
|
| Back to top |
|
|
gonzalo
Samba Member

Joined: July 16, 2004
Posts: 71
Location: Chile
|
| Posted: Mon Feb 21, 2022 11:38 am Post subject: Re: Hi Torque starter intermittent problem |
|
|
I had the same problem, solved it using a relay increasing the tension used to start the motor. apparently the standard tension that passes thru the ingnition key its too low to keep the solenoid pushing firmly the contacts.
hope this can help to anyone having the same issue.
_________________
1976 VW Safari | 1963 VW Kleinbus Crew Cab | 1973 VW Super Beetle 1303 /German Look/
|
|
| Back to top |
|
|
virtualMo
Samba Member

Joined: July 14, 2023
Posts: 14
Location: Hudson, Massachusetts
|
| Posted: Mon Jul 24, 2023 11:56 am Post subject: Re: Hi Torque starter intermittent problem |
|
|
This is a really great thread! Thank you for taking the time to document an post this. I would have found it really helpful had I needed to spend a good part of my weekend rebuilding my starter, however GoWesty shipped me out a warranty replacement. 
But I book-marked this in my collection of great info for next time! |
|
| Back to top |
|
|
Sodo
Samba Member

Joined: July 06, 2007
Posts: 10901
Location: Western WA
|
| Posted: Mon Jul 24, 2023 1:41 pm Post subject: Re: Hi Torque starter intermittent problem |
|
|
Agreed, great thread, great pics.
And lots of people having starter troubles currently so it’s pertinent.
Link
OK heres the daisy-chain ground path, you can see it loose in the video.
Hope this helps.
I still don't know the name of this starter, so I called it "Hi-Torque"
I'd bypass all that stackup (daisy-chain connections) and add this direct ground on any GoWesty starter that’s been “outdoors” for a few years. And especially until you have time to unbolt it and service it.
I don't know whats inside that solenoid case or where the solenoid coil grounds.
Perhaps you don't need to include that intermediate ground point at the solenoid case. But you wanna make sure the solenoid coils have a good ground so it pulls hard and fast.
Heres a way to jumper to ground over a few daisy-chain groundpath connections that were loose & corroded. This guy was unable to tighten the screws but added a nut to the exposed threads (of one long screw). Its a good test too, and the van starts reliably (for now?). On this van you can’t see it but he added a copper ground cable from the starter bolt to the chassis. Which did not solve starting problems. This little 12ga wire solved it (for now ). I suppose he will unbolt the starter someday and do it all in the best way.
Copper is proper.
_________________
'90 Westy EJ25, NEW oil rings (!) 2Peloquins, 3knobs, SyncroShop pressure-oiled pinion-bearing & GT mainshaft, filtered, cooled gearbox.
'87 Tintop w 47k 53k, '12 SmallCar EJ25, cooled filtered original gearbox
....KTMs, GasGas, SPOT mtb |
|
| Back to top |
|
|
|


