| Author |
Message |
otiswesty
Samba Member

Joined: November 21, 2006
Posts: 1780
Location: Portland

|
 Posted: Thu Apr 28, 2022 11:22 am Post subject: 1978 Westfalia rebuild Posted: Thu Apr 28, 2022 11:22 am Post subject: 1978 Westfalia rebuild |
 |
|
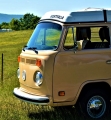
I have a 1978 Westfalia, sage green, that I bought in 1987. It's been a great car from the get go, and it went from being my DD to a second or third car almost 20 years ago. It only has 250K miles up from 89K miles when I bought it.
I moved up to Oregon from So Cal in 1998 and the bus has mostly been a street parked car. It eventually developed some rust under the window seals that worsened over time with some water intrusion getting under the floor and warping of the subfloor panels. I finally pulled it all apart last Fall and got it in for a full repaint and metal repair. There were some old bondo areas from before I bought the car that were starting to fail as well, so it was nice to get all that sorted.
I did have a full repaint in 1997 in LA, and the nose done in Oregon a long time ago after a minor collision. The bus had been at least partially repainted before I got it and was not pristine even when it was 9 years old. I didn't care though, I just loved the bus. My first car was the families' 74 Westy that I wrecked when I was 18.
I'll post up a whole bunch of pictures here. I have followed numerous Samba rebuild thread on late Bay Westfalias including the classic Eche bus. Ratwell is a frequent go to for me for many years and I have been chasing down rare bus parts for as long as I have had the bus.
Here is the latest and a shot from back in the day camping when my kids were little around Y2K.
_________________
1978 Sage Green P22 Westfalia
1988 T3 Syncro Single cab
Just a regular guy |
|
| Back to top |
|
 |
creative native
Samba Member
Joined: October 20, 2007
Posts: 1236
Location: WNC
|
| Posted: Thu Apr 28, 2022 1:00 pm Post subject: Re: 1978 Westfalia rebuild |
|
|
| There's nothing beautiful like a fresh Sage Green paint job. Your respect and appreciation for your Bus is apparent. I'm looking forward to more photos, Otiswesty. |
|
| Back to top |
|
|
mark d
Samba Member

Joined: February 06, 2013
Posts: 247
Location: Costa Rica
|
| Posted: Sat Apr 30, 2022 12:46 am Post subject: Re: 1978 Westfalia rebuild |
|
|
following with interest. damn nice bus
_________________
1972ish westfalia
"what good are tractors without violins ?" jose figueres |
|
| Back to top |
|
|
Abscate
Samba Member
Joined: October 05, 2014
Posts: 24492
Location: NYC/Upstate/ROW
|
| Posted: Sat Apr 30, 2022 1:12 am Post subject: Re: 1978 Westfalia rebuild |
|
|
Memories of camping with the kids even conquer the Wanker factor of my T4..
Nice Bus!
_________________
🇺🇸 🇺🇸 🇺🇸 🇺🇸 🇺🇸 🇺🇸 🇺🇸 🍊 🍊 🍊 |
|
| Back to top |
|
|
otiswesty
Samba Member
Joined: November 21, 2006
Posts: 1780
Location: Portland
|
| Posted: Tue May 31, 2022 8:46 pm Post subject: Re: 1978 Westfalia rebuild |
|
|
Here are a few detail pics of the challenging areas on the bus. Rust under most of the windows, some failed old bodywork and scabby areas on the cab floor and under the camper floor from water getting in around the windows.
No holes in the floor any where thank goodness except for the passenger side entry step.
_________________
1978 Sage Green P22 Westfalia
1988 T3 Syncro Single cab
Just a regular guy |
|
| Back to top |
|
|
otiswesty
Samba Member
Joined: November 21, 2006
Posts: 1780
Location: Portland
|
| Posted: Tue May 31, 2022 8:49 pm Post subject: Re: 1978 Westfalia rebuild |
|
|
Exterior of the bus had some failing bondo, a bad battery tray and old rocker damage. Overall, not that intimidating compared to some of the rusty reconstruction projects here.
_________________
1978 Sage Green P22 Westfalia
1988 T3 Syncro Single cab
Just a regular guy |
|
| Back to top |
|
|
otiswesty
Samba Member
Joined: November 21, 2006
Posts: 1780
Location: Portland
|
| Posted: Tue May 31, 2022 9:05 pm Post subject: Re: 1978 Westfalia rebuild |
|
|
Here were the areas that needed the most metal work.
All in all, pretty manageable
_________________
1978 Sage Green P22 Westfalia
1988 T3 Syncro Single cab
Just a regular guy |
|
| Back to top |
|
|
otiswesty
Samba Member
Joined: November 21, 2006
Posts: 1780
Location: Portland
|
| Posted: Tue May 31, 2022 9:09 pm Post subject: Re: 1978 Westfalia rebuild |
|
|
Floors cleaned up pretty nice with no surprises
_________________
1978 Sage Green P22 Westfalia
1988 T3 Syncro Single cab
Just a regular guy |
|
| Back to top |
|
|
otiswesty
Samba Member
Joined: November 21, 2006
Posts: 1780
Location: Portland
|
| Posted: Tue May 31, 2022 9:13 pm Post subject: Re: 1978 Westfalia rebuild |
|
|
The front windshield area was the worst under the glass, some pitting and pin holes at other windows but very minor.
_________________
1978 Sage Green P22 Westfalia
1988 T3 Syncro Single cab
Just a regular guy |
|
| Back to top |
|
|
otiswesty
Samba Member
Joined: November 21, 2006
Posts: 1780
Location: Portland
|
| Posted: Tue May 31, 2022 9:25 pm Post subject: Re: 1978 Westfalia rebuild |
|
|
The holes under the glass were TIG welded up. These guys could literally weld razor blade edges together. I figured they would want a new lip, but they said no. Okay.
The bigger areas were patched as well. No prefab panels, all done in house. A new battery tray from the classifieds here as well, welded in. It was seam sealed before primer and paint.
_________________
1978 Sage Green P22 Westfalia
1988 T3 Syncro Single cab
Just a regular guy
Last edited by otiswesty on Tue May 31, 2022 10:33 pm; edited 1 time in total |
|
| Back to top |
|
|
otiswesty
Samba Member
Joined: November 21, 2006
Posts: 1780
Location: Portland
|
| Posted: Tue May 31, 2022 9:33 pm Post subject: Re: 1978 Westfalia rebuild |
|
|
A few more pics of the prep work
A lot of tedious work there, the shop had my bus for 6 months
_________________
1978 Sage Green P22 Westfalia
1988 T3 Syncro Single cab
Just a regular guy |
|
| Back to top |
|
|
otiswesty
Samba Member
Joined: November 21, 2006
Posts: 1780
Location: Portland
|
| Posted: Tue May 31, 2022 9:45 pm Post subject: Re: 1978 Westfalia rebuild |
|
|
Then the repaint. Stock was L63H Sage Green.
The color match with the VW paint code sucked, and wasn't even close, so they just did their own match which I am very happy with. Maybe a little richer than the OG green.
_________________
1978 Sage Green P22 Westfalia
1988 T3 Syncro Single cab
Just a regular guy
Last edited by otiswesty on Tue May 31, 2022 10:44 pm; edited 2 times in total |
|
| Back to top |
|
|
otiswesty
Samba Member
Joined: November 21, 2006
Posts: 1780
Location: Portland
|
| Posted: Tue May 31, 2022 9:57 pm Post subject: Re: 1978 Westfalia rebuild |
|
|
I had to rent a trailer to get the top home, then I went and picked up the subfloor panels afterwards since they were 4x8' and 5x5'.
The top came out sweet, "autobody white" 
I left it upside down in the rain for a couple of days and then scrubbed the heck out of it. Remarkably, the 44 year old flocking did not come off with scrubbing, but I did get almost all evidence of old mildew staining out.
You can see some over spray on the flocking still there from the Westfalia factory roof prep. I thought it was some scuzz at first.
_________________
1978 Sage Green P22 Westfalia
1988 T3 Syncro Single cab
Just a regular guy
Last edited by otiswesty on Tue May 31, 2022 10:46 pm; edited 2 times in total |
|
| Back to top |
|
|
otiswesty
Samba Member
Joined: November 21, 2006
Posts: 1780
Location: Portland
|
| Posted: Tue May 31, 2022 10:03 pm Post subject: Re: 1978 Westfalia rebuild |
|
|
Here's my subfloor. A 9.6 mm marine grade ply and a 6 mm Baltic birch sheet for the overlay, replacing the malamine board or whatever it's called. I sealed these with polyurethane to reduce the risk of future warpage. Especially since the new repop green carpet does not have the rubber backing
It was the warping of the carpet and floor boards that was really bothering me before I got started. I felt that my metal floor's days were numbered. Caught it in time I think.
There were 6 screw holes in the metal floor where the thicker subfloor had been screwed down. No real rust at those holes before paint and I was able to get new stainless screws to drop through the same holes with just a little fiddling around.
Since I had the polyurethane can open and out, I sealed up the back of my reproduction interior panels which are a very nice and accurate looking laminate bonded to a thin Baltic birch ply. I have read these can warp drastically turning into a Pringle chip shape from moisture content variability. Maybe one day they will consider adding that to the manufacturing process...
_________________
1978 Sage Green P22 Westfalia
1988 T3 Syncro Single cab
Just a regular guy
Last edited by otiswesty on Tue May 31, 2022 10:38 pm; edited 2 times in total |
|
| Back to top |
|
|
otiswesty
Samba Member
Joined: November 21, 2006
Posts: 1780
Location: Portland
|
| Posted: Tue May 31, 2022 10:23 pm Post subject: Re: 1978 Westfalia rebuild |
|
|
I started adding sound deadening to the exposed exterior panels. Also the front doors, sliding door and rear hatch. I realize I could have used a little less coverage, but maybe I will get a little more insulation effect. I also bought a couple rolls of 10 mm adhesive backed closed cell foam off of Amazon. These will overlay all of the spaces with the sound deadener, the exception being the front doors. No more fiberglass batting insulation for this bus.
https://www.amazon.com/gp/product/B01I4F0J76/ref=ppx_yo_dt_b_asin_title_o00_s00?ie=UTF8&psc=1
_________________
1978 Sage Green P22 Westfalia
1988 T3 Syncro Single cab
Just a regular guy |
|
| Back to top |
|
|
creative native
Samba Member
Joined: October 20, 2007
Posts: 1236
Location: WNC
|
| Posted: Wed Jun 01, 2022 8:30 am Post subject: Re: 1978 Westfalia rebuild |
|
|
Otiswesty - "Just a regular guy" doing phenomenal things to his Bus! I’m impressed. I respect your humbleness, but "regular guys" just aren't this good. I'm already looking forward to more photos.
_________________
"The holy land is everywhere." ~ Black Elk
1979 Westfalia P27, California FI emissions spec. 100% VW fleet: '79 Westfalia, 2019 VW Atlas SEL Premium (Terra Brown/Shetland Beige), 2005 Passat GLX. |
|
| Back to top |
|
|
otiswesty
Samba Member
Joined: November 21, 2006
Posts: 1780
Location: Portland
|
| Posted: Wed Jun 01, 2022 9:50 pm Post subject: Re: 1978 Westfalia rebuild |
|
|
Thanks!
I've been wanting/planning to redo the paint for 10+ years. It has looked "okay" and the price for a repaint has just been more than I could swallow until now. Even with the crazy prices, it's hard to even get a good shop to take on a project like this and I don't have anywhere near the skill set myself.
I've just gotten a couple more orders in from BusDepot. Those guys are great.
_________________
1978 Sage Green P22 Westfalia
1988 T3 Syncro Single cab
Just a regular guy |
|
| Back to top |
|
|
otiswesty
Samba Member
Joined: November 21, 2006
Posts: 1780
Location: Portland
|
| Posted: Fri Jun 03, 2022 7:59 pm Post subject: Re: 1978 Westfalia rebuild |
|
|
The insulation from Amazon showed up. It's exactly what I was hoping for. Closed cell foam 10mm thick with a nice tenacious adhesive backing. At $38 per large sheet, it seems like a decent price plus free delivery. The two pieces I got did everything except the front behind the kick panels and the sliding door. I won't put any in the front cab doors due to me worrying about water entrapment. I need a 3rd piece but that should get here pretty soon.
I remember lung ago removing a thin white styrofoam layer behind the kick panels. That is a crappy open cell type of foam, but a great thermal insulator.
I sealed off the drain vent outlet behind the horse cover as I have converted to a Vanagon style P-trap under the sink. This will give me more shelf room as well in the kitchen cabinet.
_________________
1978 Sage Green P22 Westfalia
1988 T3 Syncro Single cab
Just a regular guy
Last edited by otiswesty on Sat Jun 04, 2022 6:47 am; edited 3 times in total |
|
| Back to top |
|
|
otiswesty
Samba Member
Joined: November 21, 2006
Posts: 1780
Location: Portland
|
| Posted: Fri Jun 03, 2022 8:07 pm Post subject: Re: 1978 Westfalia rebuild |
|
|
Since a lot of the insulation was in, I got to work adding some of those nice BusOK panels
_________________
1978 Sage Green P22 Westfalia
1988 T3 Syncro Single cab
Just a regular guy |
|
| Back to top |
|
|
otiswesty
Samba Member
Joined: November 21, 2006
Posts: 1780
Location: Portland
|
| Posted: Fri Jun 03, 2022 8:28 pm Post subject: Re: 1978 Westfalia rebuild |
|
|
I got the bumpers on, they were sand blasted and powder coated "white" so they show some little dents and defects, but overall very nice and certainly much better than before.
I got the back hatch and engine compartment door mounted. We had a scare and thought the small engine hatch hinge piece was lost, but one of the paint guys had just hung it from a wire inside the van where it wasn't very noticeable.
The seals were installed with that 3M black weather strip adhesive. It sets up fast.
Had a major disaster as I was starting to work on the hatch, I had the roof set on top of the car and overhanging the back end. As I pulled one of the hinge pieces upward, the strong spring action ripped it out of my hand and slammed into the rear roof edge ripping a gash in it. I almost cried.... 
Turns out there are a lot of different conical screws that I took out. Both Phillps and Allen type and of course I don't remember which goes where. Here's how I reinstalled them so far.
If I did them wrong, let me know please
_________________
1978 Sage Green P22 Westfalia
1988 T3 Syncro Single cab
Just a regular guy |
|
| Back to top |
|
|
|


