| Author |
Message |
sc1out
Samba Member
Joined: September 27, 2010
Posts: 141

|
 Posted: Sat Jan 01, 2011 10:29 am Post subject: shift assembly evaluation Posted: Sat Jan 01, 2011 10:29 am Post subject: shift assembly evaluation |
 |
|
| I am rebuilding my 84 Vanagon, manual trans, 148K. The motor and trans were out when I purchased the van so I have no experience with shifting this van. I have the shift assembly out and dismantled. No apparent wear or busted parts, just semi solidified grease. Before I rush out and put in a new shifter assembly kit and replace the nylon ball connector on the side of the tranny what should I look for to justify the costs of replacing these two components? Or should I just wait til the install is complete, test the tightness of the shift linkage and its "vagueness" lack thereof? |
|
| Back to top |
|
 |
pioneer1
Samba Member
Joined: February 11, 2008
Posts: 2074
Location: Ontario Canada
|
| Posted: Sat Jan 01, 2011 12:50 pm Post subject: shifter |
|
|
I think you could examine the interior of the cup for wear.If it's full of mollified grease and not white metal dust you are probably good to reuse it or at least try it before you open your wallet. While it's on the bench check the "rear nylon bushing" for play on the diameter of the shifting rod. If there is much of a gap this will definitely affect your gear selection. The nylon bushing are available (Terry Kay?) and a pain to replace after it's installed.
_________________
"Always waiting for tomorrow ruined everything"
'85 Porsche 911 Targa
'76 Westfalia project |
|
| Back to top |
|
|
Vanagon Nut
Samba Member

Joined: February 08, 2008
Posts: 10518
Location: Sunshine Coast B.C.
|
| Posted: Sat Jan 01, 2011 1:01 pm Post subject: |
|
|
The parts you refer to aren't hard to get at for the most part. Not a whole lot more work to inspect, install, test, replace as needed.
Check for excessive play at U joint. Mine have a little play, but shifter isn't sloppy. They can be taken apart and lubed.
Neil.
_________________
1981 Westy DIY 15º ABA
(VW Gas I4)
1988 Westy DIY 50º ABA
VE7TBN |
|
| Back to top |
|
|
tschroeder0
Samba Member
Joined: April 14, 2008
Posts: 2098
Location: Boulder CO
|
| Posted: Sat Jan 01, 2011 3:51 pm Post subject: |
|
|
| If you have it out it's a good idea to at least replace the two bushings that the shaft slides through, these wear and create a lot of side to side slop, it made a big difference in mine. |
|
| Back to top |
|
|
levi
Samba Member
Joined: February 11, 2005
Posts: 5522
Location: Las Vegas
|
| Posted: Sat Jan 01, 2011 4:33 pm Post subject: |
|
|
First thing I'd look at is the condition of the shift rod ears.
If the tabs are busted off the ends
then anything else you do won't make it shift like it could with this.
_________________
One of these days I'm gonna settle down,
but till I do I won't be hangin round.
Going down that long lonesome highway,
gonna see life my way
https://youtu.be/cSrL0BXsO40 |
|
| Back to top |
|
|
sc1out
Samba Member
Joined: September 27, 2010
Posts: 141
|
| Posted: Sat Jan 01, 2011 4:56 pm Post subject: |
|
|
thanks for all the tips and info. I did clean, inspect and reassemble the shift assembly. Looked at the shift linkage the full length and hand tested for play in the bushings. Looked good, no real play laterally. I will remove the cup from the linkage and check it againist the "ball" on the side of the tranny.
The shift rod ears are in good shape. I cleaned and greased them.
The u joint felt tight, no play to speak of that I could determine from pulling front to back and side to side.
All looks well and the process is very simple. Should be very easy to repeat if the vague shifting syndrome appears. |
|
| Back to top |
|
|
MsTaboo 
Samba Member

Joined: June 02, 2006
Posts: 4624
Location: East Kootenay, British Columbia
|
| Posted: Sat Jan 01, 2011 10:29 pm Post subject: |
|
|
Hey Levi,
Where did you source the shift rod end? Mine are worn and I had to fab one but not happy with result.
Thanks
_________________
Currently:
'90 Syncro Westy 3 knob w/Zetec
The information age has morphed into the age of disinformation and willful ignorance. Agnotology!
When you stir up shit you're bound to get some on yourself.
Resist Kleptocratic Oligarchy (and Idiocracy)! |
|
| Back to top |
|
|
levi
Samba Member
Joined: February 11, 2005
Posts: 5522
Location: Las Vegas
|
| Posted: Sat Jan 01, 2011 11:04 pm Post subject: |
|
|
Those are old pics from archive, I don't know off-hand of anyone that's selling new shift rods.
_________________
One of these days I'm gonna settle down,
but till I do I won't be hangin round.
Going down that long lonesome highway,
gonna see life my way
https://youtu.be/cSrL0BXsO40 |
|
| Back to top |
|
|
syncrodoka
Samba Member

Joined: December 27, 2005
Posts: 12410
Location: Santa Cruz, CA
|
| Posted: Sat Jan 01, 2011 11:39 pm Post subject: |
|
|
| New front shift rods have gone the way of the Dodo bird years ago. |
|
| Back to top |
|
|
Terry Kay
Banned

Joined: June 22, 2003
Posts: 13331
|
| Posted: Sat Jan 01, 2011 11:49 pm Post subject: |
|
|
If I was inspecting / lubing up the shift shaft, the first thing in order would be to at least remove the front & rear hollow polyurethane bushings and make sure that they were tight & lubed to the max.
The stock ones are hollow & if at all worn will give you all of the slop in shifting --a lot more than you need.
If they are a bit sloppy get a pair of the Delrin solid bushings on the shaft--it'll tighten that shaft slop outa there --like right now.
Second thing is to take the center ( aft ) CV/U-joint apart, clean the dried up grease outa them and lube well with high temp / low wash out sticky grease.
This will help a bunch.
Inspect the trans arm ball, make sure it's good & tight in the shift shaft cup, and load the cup up with high temp grease too.
Take a good look at the split pin & holes at the shifter cup--they can get all wallowed out and make for a bunch of play in the shift shaft--before the trans arm.
The front tabs at the shift lever bottom are also real important--and the bind here is that they front assembly is NLa, and nobody has come up with a viable solution to rebuild them--this is a big problem.
_________________
T.K. |
|
| Back to top |
|
|
MsTaboo
Samba Member
Joined: June 02, 2006
Posts: 4624
Location: East Kootenay, British Columbia
|
| Posted: Sun Jan 02, 2011 1:22 pm Post subject: |
|
|
Here are a couple pics of worn shift rod caps and replacement I fab'ed from UHMW.
_________________
Currently:
'90 Syncro Westy 3 knob w/Zetec
The information age has morphed into the age of disinformation and willful ignorance. Agnotology!
When you stir up shit you're bound to get some on yourself.
Resist Kleptocratic Oligarchy (and Idiocracy)! |
|
| Back to top |
|
|
syncrodoka
Samba Member
Joined: December 27, 2005
Posts: 12410
Location: Santa Cruz, CA
|
| Posted: Sun Jan 02, 2011 1:30 pm Post subject: |
|
|
The tab on the passenger's side is shorter than the driver's side as well as it tapers down from the front to back and is't flat on the top but angles in.
Does your fix work well? |
|
| Back to top |
|
|
sc1out
Samba Member
Joined: September 27, 2010
Posts: 141
|
| Posted: Sun Jan 02, 2011 3:47 pm Post subject: |
|
|
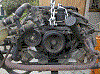
Pulled the shift ball off the tranny and fitted it into the socket to check the fit after cleaning it out. Looks like it has about .006 clearance. Packed it with grease and it seems tight enough to do what it was designed.
However, as you can see from the picture the ball mount is breaking up around the neck. Probably quite common and it seems tight for now but needs replacing. Tried to remove the socket from the shift lever but the Bentley does not say which way the tension pin is removed. From the top or the bottom? Any body have any knowledge of this procedure? I would like to remove it so I can either repack or replace the slider bushing next to it. Getting close to installation and would like all the shift linkage to be as in good as shape as possible since this is the easiest it will get. |
|
| Back to top |
|
|
MsTaboo
Samba Member
Joined: June 02, 2006
Posts: 4624
Location: East Kootenay, British Columbia
|
| Posted: Sun Jan 02, 2011 3:55 pm Post subject: |
|
|
Hey Syncrodoka
Thanks for the feedback. I had just the worn part, was unaware there should be a difference. No... the shifting is better than before but still clunky.
I'll try reforming the cap using the photo from levi as a guide.
_________________
Currently:
'90 Syncro Westy 3 knob w/Zetec
The information age has morphed into the age of disinformation and willful ignorance. Agnotology!
When you stir up shit you're bound to get some on yourself.
Resist Kleptocratic Oligarchy (and Idiocracy)! |
|
| Back to top |
|
|
BushChicken
Samba Member
Joined: March 11, 2010
Posts: 250
Location: California
|
| Posted: Sun Jan 02, 2011 4:00 pm Post subject: |
|
|
| Hammer the roll pin into the socket from the outside (air hammer works wonders). It is recommended to replace the roll pin with a new one when reinstalling. |
|
| Back to top |
|
|
sc1out
Samba Member
Joined: September 27, 2010
Posts: 141
|
| Posted: Sun Jan 02, 2011 4:16 pm Post subject: |
|
|
| Thank you. Will do. |
|
| Back to top |
|
|
boulderdrop
Samba Member
Joined: February 06, 2008
Posts: 481
Location: Seattle, WA
|
| Posted: Sun Jan 02, 2011 6:27 pm Post subject: |
|
|
| levi wrote: |
then anything else you do won't make it shift like it could with this.
|
The bumper-ears on my van are causing a ton of slop and i need to fab some new ones. I remember a posting that gave pretty detailed instructions, using jb weld i think, but i cant find the posting at all. Anyone know where it is? |
|
| Back to top |
|
|
syncrodoka
Samba Member
Joined: December 27, 2005
Posts: 12410
Location: Santa Cruz, CA
|
|
| Back to top |
|
|
boulderdrop
Samba Member
Joined: February 06, 2008
Posts: 481
Location: Seattle, WA
|
| Posted: Wed Jan 05, 2011 11:15 am Post subject: |
|
|
@71MYSTABOO: The Ears on my Shift-Rod, down in the gatebox, are getting really worn. Especially the front-driver's side, which has a large notch missing from it... making it horrendous in 2nd, but the damage is causing really bad slop in every gear-selection.
I see that you used UHMW and I found the wikipedia listing for it, but not a lot more. What product did you use to help (re)create these ears? I'd love to create something similar to the posting @levi made and you're damn close. What'd you do? |
|
| Back to top |
|
|
MsTaboo
Samba Member
Joined: June 02, 2006
Posts: 4624
Location: East Kootenay, British Columbia
|
| Posted: Wed Jan 05, 2011 3:48 pm Post subject: |
|
|
boulderdrop,
The material is UHMW (Ultra High Molecular Weight) polyethylene, an extremely dense plastic. You can source it from a large plastics supplier or sometimes good woodworking suppliers (Rockler) will have some. (they sell it for jigs) It is expensive, put very versatile material. It can be heated up to make it plastic and when cool will retain shape.
I had some left over from when I made snowboard bindings in the 80's. (the best! Still using a pair I made in 1985, UHMW is bombproof!)
I took a chunk about 3/4 inch thick and machined to approximate the remaining ear cap. As you can see in the photo, the stuff gets sort of fuzzy from working. You can smooth by using a quick pass with a blowtorch.
Good luck.
_________________
Currently:
'90 Syncro Westy 3 knob w/Zetec
The information age has morphed into the age of disinformation and willful ignorance. Agnotology!
When you stir up shit you're bound to get some on yourself.
Resist Kleptocratic Oligarchy (and Idiocracy)! |
|
| Back to top |
|
|
|


