| Author |
Message |
dmercer
Samba Member

Joined: June 20, 2004
Posts: 264

|
 Posted: Sun Apr 03, 2011 11:45 pm Post subject: Dan's August 1958 Coupe Posted: Sun Apr 03, 2011 11:45 pm Post subject: Dan's August 1958 Coupe |
 |
|
Hi folks,
After well over six years it looks like the end is finally in sight for the restoration of my August, 1958 coupe. Over the years I've appealed to the collective brain of the forum on numerous occasions, but I never put together a thread documenting the various steps (and missteps) taken along the way.
I bought the car as a basket case project, partially disassembled and freshly painted sell-it-fast red. I didn't know what I was doing and thought I had found a car which would require very little rust repair or body work. In retrospect there were countless warning signs that I overlooked, and I really think someday I should write up my experience as a 'how not to buy an early karmann ghia' thread. Shortly after getting it home and taking stock I realized that something was wrong with the driver side airbox -- it didn't line up properly with the front vent and there were broken spot welds on the inner fender. A generous application of paint stripper and a few fewer IQ points later revealed the tip of the iceberg:
The driver side fender had been grafted on after an accident -- probably sometime in the distant past since it was brazed in place. The replacement fender (which looked as if it had been through a number of scrapes itself) overlapped the original metal and filler had been used to make it all right. There was also substantial rust behind both mudwalls, and the floors had been covered with fiberglass to keep them from falling apart. If I had given up and sold the car at this point, I would have saved myself a ridiculous amount of time and money... but I guess huffing that paint remover had left me few enough IQ points that continuing on seemed like a good idea. I had the car blasted so there would be no more surprises before getting the metal work started.
About this time the Edmonson testimony ghia came on the market in North Carolina -- the first time, when it was unrestored and had not yet been parted from its original 36HP motor and Judson. I came very close to making an offer on the car, but then I thought "Why would you want a rusty east coast car that you'll have to truck all the way across the country when you've got a car that just needs a little metal work and then you're done? And you've put so much money into it already!" If I had taken a few moments to read about the sunk cost fallacy at this time, I could have saved myself some time and money. :-) So metal work began.
The lowest parts of both A pillars had to be rebuilt with new metal.
The fender fixed properly and nose finished in metal.
Fender creases that had been filled with bondo were fixed correctly and the stretched metal heat-shrunk.
It's fun to paste these images in one after another because it gives the impression that all this occurred within the space of a few lazy weekends, but sadly getting from the first rust repair to the picture above took me the better part of 2 years. This was the point where people at work would stop asking me "How is your VW project going?" because I'd reply with a far-away expression and a sigh.
I met Rick Clark and through him hazetguy around this time and the direction of the project changed. These guys were very interested in the period correctness of the restorations that they were involved with and had an amazing depth of knowledge to share. Rather than just making my build a "neat old car", I began trying to figure out how to make my restoration more correct to the late 1950s. About this time I decided to stay six volt, started collecting screw-terminal relays and other esoteric hardware, and the like. This is the motor that they built for me.
Bodywork. Holy smokes. How much money have I spent in sanding? This is a skill where I have no capability. After all that metal work we were trying to get away with a little filler as possible and largely succeeded.
But at huge cost. From the time metalwork finished to the time I got it to the final restoration shop, I went through 3 shops and 2 years. Two of the shops took the car with a deposit and proceeded to do nothing -- just let it gather dust for months. At one point the building where my car was being stored put up a "FOR LEASE" sign and I began scheming about how to stage a rescue. In the end the last shop (where it is now) ended up taking the car back to metal and more or less starting from scratch. During this time, a beautiful black original-owner coupe came up for sale in Berkeley and I thought long and hard about buying it and putting this project up for sale -- but I ended up emailing John Moxon about it instead.
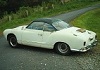
Late last year painting began. The color is Aerosilber with Grauweiss top, a 1958 combination, though probably not original to the car. The folks the VW museum were unable to give me the details on the birth certificate due to unreadable records. My wife notes that the car is very appropriately colored like a United States bank note.
One of the nice aspects of the restoration taking so long is that I had a chance to collect lots of notes and details from folks on the forum here. Here is my effort to reproduce the undercoat present on the front decklid.
Reassembly and rewire, and after years an area where I actually have something to contribute. The harness is from Wiring Works and was both flawless and very clear as to how to install. Someone posted some very nice large PDF files of a color wiring scheme to thesamba and that was printed out and blown up to use as a guide.
I had the gauges restored at North Hollywood Speedometer and they came back like new. The manual choke is one of Lisa's excellent reproductions and in a later picture you'll see that the knob has been painted to match the rest which all came from Brezelwerks. You can see that we made a mistake on the masking of the A pillars -- they should be body color on the inside as the headliner only goes down a short bit on early cars. This was fixed shortly after this picture was taken.
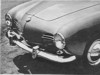
Fitted with some euro headlight assemblies I had laying about and orange lenses.
Motor in! The shop fabricated some very nice tarboards using a thick variety of dynamat covered with heavy tar paper. It has a nice texture and is somewhat glossy, similar to the OG stuff.
Inspired by Scott Doonan's coupe, this extra reinforcement does a great deal to help keep the decklid rigid after it has been cut for for the air cleaner.
Taken this weekend. Here some of Lemke's mats look quite nice next to the tunnel mat by Wolfsburg West. Sadly, the one piece front rubber is still unavailable, so it will be square weave carpet from WCC -- for now. Also, the boost gauge for the Judson is visible mounted under the radio blockoff.
So that is where I am as of today. If only I could email this thread to myself circa 2004 I could have saved myself a lot of trouble! Only thing is, I probably would have taken more or less the same course -- although perhaps a little more direct.
I don't think I've added quite enough images to this post, so here are a few more. I hope you don't mind.
I'll use this thread to post updates as they come in the future.
Dan M. |
|
| Back to top |
|
 |
John Moxon 
Samba Moderator

Joined: March 07, 2004
Posts: 14196
Location: Southampton U.K.
|
| Posted: Mon Apr 04, 2011 12:29 am Post subject: |
|
|
I'm so pleased you've taken the plunge Dan and decided to tell the story.
I know you must have lost so much sleep over the last 6 years wondering just what you had taken on but with completion nearing, the fact that you're actually telling the story means your nights must be serene again.
I'm proud to say I count both yourself and Scott D as friends, (not just for your involvement with my Ghia  ) as there can't be many more dedicated and meticulous Ghia restorers out there. ) as there can't be many more dedicated and meticulous Ghia restorers out there.
It's time to sit back and take the credit for what looks like another fantastic Lowlight project nearing completion. 
_________________
John.
Judson Supercharger Information on The Samba
My 1958 Shorrock Supercharged Karmann Ghia
Stop dead photo links! Post your photos to The Samba Gallery! |
|
| Back to top |
|
|
RockStock
Samba Member

Joined: November 26, 2004
Posts: 4214
Location: England
|
| Posted: Mon Apr 04, 2011 12:40 am Post subject: |
|
|
well done Dan, looks great
good story too
liking the hood undercoat detail
_________________
-StockRocks- |
|
| Back to top |
|
|
captainvw
Samba Member
Joined: October 12, 2007
Posts: 124
Location: garage
|
| Posted: Mon Apr 04, 2011 3:36 am Post subject: |
|
|
wow, looks amazing  |
|
| Back to top |
|
|
70 140
Samba Member
Joined: September 22, 2002
Posts: 8471
Location: Ontario Canada
|
| Posted: Mon Apr 04, 2011 4:28 am Post subject: |
|
|
It looks like it was worth the time and effort.
Will it be a driver? |
|
| Back to top |
|
|
tondemonai
Samba Member

Joined: January 08, 2008
Posts: 364
Location: Memphis, TN
|
| Posted: Mon Apr 04, 2011 5:59 am Post subject: |
|
|
Looks awesome, man! Sorry about all the drama and trouble involving getting her restored, but she's looking fine now. Just about time to get in there and have a fun drive!
_________________
(O= i =O) One day, lad, this car will be yours. |
|
| Back to top |
|
|
Mr. Odd Ball
Samba Member
Joined: September 10, 2010
Posts: 43
Location: Manti
|
| Posted: Mon Apr 04, 2011 6:36 am Post subject: |
|
|
| Quote: |
| reproduce the undercoat present on the front decklid. |
How/What did you do?use to do this? I'm looking to do something similar on my Ghia. |
|
| Back to top |
|
|
52brezelfenster
Samba Member
Joined: August 02, 2005
Posts: 767
Location: OR
|
| Posted: Mon Apr 04, 2011 7:46 am Post subject: |
|
|
| What a beauty! |
|
| Back to top |
|
|
calexican
Samba Member

Joined: June 11, 2008
Posts: 741
Location: El Paso, TX
|
| Posted: Mon Apr 04, 2011 9:13 am Post subject: |
|
|
| thanks for the great thread. i think its great that you tried to get the car back to its original color, but found out there was no way to know what it was, that gave you the freedom to choose any color, and the fact that you still have a marriage, and that she has a sense of humor about it is even better! your car is a great piece of art, and in the big picture worthwhile as beauty to behold. |
|
| Back to top |
|
|
Ojai63dbl
Samba Member
Joined: March 12, 2007
Posts: 459
|
| Posted: Mon Apr 04, 2011 1:59 pm Post subject: Beautiful! |
|
|
Dan
That is absolutely a beautiful rebuild. Like the color, whats your interior seat color.
BTW: It made me laugh reading your --- " would I do it again comments, and how many differnt shops till completion, etc. commentary."
As I looked at the pictures I also saw the adds-ons (Judson, restored guages, Lemke mats.....) and year correct parts, it made me think about my ghia, a '65 coupe that has been near completion for years (I wont say how many). The never finished project ghia that will someday make the east coast ghia show and then return to Ventura where it once made the first, second, and third ghia shows at KGPR.
Now its time to be honest (at least Ill be).
Would I spend the money again to restore it ---- absolutely. Is it smart use of money (absolutely not)
However, I look forward to that first drive and I am sure you cant wait for the first time you crank the key and go for that long ride. The cost will fade away as the smile grows.
Enjoy it - drive it - and hope to see it at some shows. |
|
| Back to top |
|
|
Ojai63dbl
Samba Member
Joined: March 12, 2007
Posts: 459
|
| Posted: Mon Apr 04, 2011 2:02 pm Post subject: one last thing |
|
|
| Do you have the link that details the "Scott Doonan's extra reinforcement for enhancing decklid rigidity on the Judson scoop |
|
| Back to top |
|
|
Karmann Gheezer
Samba Member

Joined: April 12, 2006
Posts: 447
|
| Posted: Mon Apr 04, 2011 2:06 pm Post subject: |
|
|
Dan, beautiful piece of art. Thanks for awesome thread and photos.
R
_________________
 |
|
| Back to top |
|
|
58lolight
Samba Member

Joined: October 25, 2006
Posts: 781
Location: Ct
|
| Posted: Mon Apr 04, 2011 3:11 pm Post subject: |
|
|

Wow! The car looks great!
_________________
58 Beetle (o\i/o)
58 Ghia (o=i=o) |
|
| Back to top |
|
|
INLANDGHIA
Samba Member
Joined: August 14, 2010
Posts: 383
Location: moreno valley
|
| Posted: Mon Apr 04, 2011 5:16 pm Post subject: |
|
|
| Wow she really looks good great job! |
|
| Back to top |
|
|
dmercer
Samba Member
Joined: June 20, 2004
Posts: 264
|
| Posted: Mon Apr 04, 2011 6:22 pm Post subject: |
|
|
Thanks so much for all the kind words and encouragement. Anywhere I look on the car I see contributions made by the members of this forum. From folks who do rebuilds or make hard to find parts available like John Copello, John Lemke, Kevin Ferguson, Gary Constantine, Mike at House of Ghia, Lisa Meier and Udo Dreisoerner, to the forum historians and masters of minutiae, David Ruby, Loren, Broadacus, RockStock, pbaptist, John Moxon, Jeff Lipnichan, and others who have contributed their time, expertise and parts, we have a tremendous community here and I never would have been able to get this project to where it is without your support.
| 70 140 wrote: |
| Will it be a driver? |
I'm determined to drive the car regularly, though the first few times out will likely give me a heart attack. :-) Luckily the local hospital is only a block away.
| Mr. Odd Ball wrote: |
| Quote: |
| reproduce the undercoat present on the front decklid. |
How/What did you do?use to do this? I'm looking to do something similar on my Ghia. |
It's just undercoat applied before painting. The shop had some on hand as apparently Porsche 356s have a very similar treatment. If you're interested in the specific product PM me and I'll dig it up.
| Ojai63dbl wrote: |
| That is absolutely a beautiful rebuild. Like the color, whats your interior seat color. |
Kevin Ferguson of Trimtec makes beautiful reproduction interiors that employ custom fabrics that match quite closely the original materials used. Check it out:
I should have some pictures of the seats very soon as they will be going to the upholsterer this week. After so many years of snail-pace progress things really are quite dizzying now!
| Ojai63dbl wrote: |
| Do you have the link that details the "Scott Doonan's extra reinforcement for enhancing decklid rigidity on the Judson scoop |
You can find the commented picture of Scott's beautiful car here. One of the problems with the Judson scoop is that you must cut through both the outer skin of the decklid and the inner rain tray, which basically destroys the structural integrity of the lid. Bolting the scoop in place helps a little, but this modification does a much better job.
Once again, thanks for the encouragement and I'll keep the pictures coming! |
|
| Back to top |
|
|
sparkleplenty
Samba Member

Joined: January 09, 2008
Posts: 1114
Location: California
|
| Posted: Mon Apr 04, 2011 8:34 pm Post subject: |
|
|
Dan...very, very nice. I have a basketcase 56' myself. People have stopped asking me how it's going too...  I just keep pressing forward with every nut, bolt, screw and thingamagigi... This is very inspiring....Great job... I just keep pressing forward with every nut, bolt, screw and thingamagigi... This is very inspiring....Great job...
_________________
'56 European Oval Ragtop-Stock
'56 Karmann Ghia Coupe-Stock
'59 Italian Series I Li150 Lambretta-Stock
"Give a man a fish, feed him for a day. Teach a man to fish, feed him for a lifetime."
"Only when the tide goes out do you discover who is swimming naked." |
|
| Back to top |
|
|
retrowagen
Samba Member
Joined: October 11, 2004
Posts: 1857
|
| Posted: Mon Apr 04, 2011 9:11 pm Post subject: |
|
|
Dan,
You're a huge asset to our little community - for having the perseverent and resourceful research skills of a Ph.D. candidate, the patience of a saint, the commitment and care of the unconditional lover, and the wisdom and good sense to keep the project in a healthy perspective and your personal life well in balance! My hat is off to you, sir!
From what I've seen in my few years around the Karmann-Ghia world, 99% of most guys would have taken shortcuts against the integrity of the restoration, had they discovered what you had. However, you are in that 1% who have taken great pains to do it right... may you and your family gain back the sweat, money, energy, and years spent on your project, hundredfold, in the sheer enjoyment of such a beautiful and characterful automobile.
_________________
David Ruby
President, Karmann-Ghia World Club |
|
| Back to top |
|
|
ScottDoonan
Samba Member

Joined: August 04, 2005
Posts: 546
Location: Northern California
|
| Posted: Mon Apr 04, 2011 9:36 pm Post subject: WOW |
|
|
Dan,
Your project has turned into something unbelievable. It has been stated over and over in this thread, but you have done a great job. The car is beautiful, and it more importantly is done right. It takes a special person to bring these cars back from the dead, you gotta stick it out even when the times get tough. You my friend did all that, and then some. Top notch job can't wait to see it in person. Congratulations again. |
|
| Back to top |
|
|
d5626
Samba Member
Joined: December 09, 2008
Posts: 154
Location: Pomona
|
| Posted: Mon Apr 04, 2011 10:03 pm Post subject: |
|
|
| Great job!!! Takes a special person to push through all those obstacles. All your time and effort shows in the ghia you're creating and you should be proud..... Must be nice to finally see that light at the end of the tunnel as your project is nearing completion, maybe someday (or year) I'll see that light too, with my lowlight project....LOL. |
|
| Back to top |
|
|
ripreston
Samba Member

Joined: May 16, 2006
Posts: 147
Location: U.K. to L.A.
|
| Posted: Tue Apr 05, 2011 1:04 am Post subject: |
|
|
| Absolutely stunning! Aerosilver was the perfect choice. Incredible restoration — whatever amount of time and money went into it was well worth it! |
|
| Back to top |
|
|
|


