| Author |
Message |
Daverham
Samba Member
Joined: August 27, 2009
Posts: 1397
Location: USA

|
 Posted: Tue Sep 06, 2011 10:52 am Post subject: Another Windshield Rust Repair Done - with pics. Posted: Tue Sep 06, 2011 10:52 am Post subject: Another Windshield Rust Repair Done - with pics. |
 |
|
Here's how I did it and what I learned along the way.
First off: I've been gas welding for years, had never MIG welded before. Convinced by the folks in the Paint/Body forum, I got myself a little used MIG welder and learned how to use it. Wow. Awesome. I've heard them called "the hot glue gun of welders." No doubt. You just squirt hot steel where you want it. LOVE. Granted, I had a little trial and error for a couple days, practicing on sheet steel in my garage, blew some holes, made some messes. But I figured it out (it's all about the settings, wire feed speed, amps, etc) and I'm never going back to gas for body work.
For the record, I got a used Telwin 90070 "Multi Mig" welder for $300 on CL. Made in Italy. Uses argon/CO2 gas. According to folks on the web, it's a light duty "hobby welder" and that's perfect for body work. It worked flawlessly for me and is my new true love in the tools department.
Back to the bus: I looked at the very cool Gerson (http://www.klassicfab.com/) repair panel (search the image gallery for that), but decided that the kit from Bus Depot would work for me, despite the rust going just a little bit beyond what they cover.
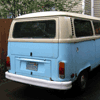
The problem: Rusty holes visible from the outside on both corners, water getting in. Not to mention my windshield is badly cracked and that old rubber is so mossy and ugly. Clearly, this needs to be done for many reasons. New glass in sitting in the back of the bus, awaiting completion of metal work. Note: I got the glass for $90 at a MS Glass in Greenwood (Seattle - http://www.msglassoutlet.com/
So let's do this. Slice the rubber from the inside.
All the way around.
Peel
Push out the top. Go outside. Pull it out. So easy - even while taking pictures with one hand!
Pretty ugly under there, but we can handle this.
Wire wheel reveals bigger holes.
I have some air tools, including a cut-off wheel, but I've learned that the affordable air compressors just can't deliver the CFM to actually USE any of them besides the blower nozzle. You gotta spring for the really big CFM numbers (7+) if you want any power at all and those compressors are WAY more expensive than the light-duty ones. So I grabbed my old electric drill and it worked famously. Plenty of torque to buzz through that steel quite quickly. I used a little stack of REALLY cheap cut-off wheels from Harbor Freight. Worked great. A lot of stuff from HF is total junk, of course, but some things work just fine, as we shall see.
Almost ready to yank the old metal out.
Drilled out the spot welds. I used a standard 3/8 drill bit from the hardware store and a little cutting lube. Worked great and didn't damage the backing panel at all.
After I drilled out all the welds, I grabbed that little strip with a pair of pliers and it ripped out like I was tearing open a zipper. ZIIIP! Everything you see applies to both corners, by the way.
Fitting the replacement panels carefully. They required some minor bending and trimming to fit. No big deal. By the way, the panels meet in the middle, but I didn't need all that so I cut them short. You can see the new metal meeting the old metal edge-to-edge. These will be butt-welds.
I drilled the back of the replacement panels so I could tack them in against that backing panel, just like at the factory. Quarter-inch holes or maybe 5/16 - whatever.
Tack welded into place (this is the first side I did, the welds got WAY better as I went  ). ).
I won't show you ALL my welds because the first round was a little sloppy  - but I got the hang of it by the time I got to the other side. Anyway, what I lack(ed) in welding skill I make up in grinder experience! I chanced upon this cup-shaped grinding wheel at a hardware store last week and grabbed it, thinking it might be handy for this repair. It turned out to be PRICELESS. Definitely required equipment. Also, that angle grinder is another cheap-ass HF purchase. I really don't endorse most of their cheap junk tools - I've really seen quite a few break right in my hands - but I've has this grinder for years and done quite a lot of sanding with it. It works great. Yeah, the handle broke off, and I had to replace it with a sawed-off bike handlebar, but the motor and arbor really work great, and that's what matters most - and it was really cheap! - but I got the hang of it by the time I got to the other side. Anyway, what I lack(ed) in welding skill I make up in grinder experience! I chanced upon this cup-shaped grinding wheel at a hardware store last week and grabbed it, thinking it might be handy for this repair. It turned out to be PRICELESS. Definitely required equipment. Also, that angle grinder is another cheap-ass HF purchase. I really don't endorse most of their cheap junk tools - I've really seen quite a few break right in my hands - but I've has this grinder for years and done quite a lot of sanding with it. It works great. Yeah, the handle broke off, and I had to replace it with a sawed-off bike handlebar, but the motor and arbor really work great, and that's what matters most - and it was really cheap!
So here are those welds after I smoothed them out a bit. Look at all that solid steel!
Something is reflecting pink in this pic. It's not bondo, just an odd reflection, I guess.
I shot some primer on there to protect it while I'm busy for the next couple days. I'll wire-wheel that off before I proceed with the next steps. But that's all steel you're seeing, no filler yet. Not bad. I might do a thin treatment of filler just to smooth everything out a little more. I guess I could keep grinding, but I'd rather not cut into that sheet metal too much. It's not that thick to begin with.
So what's next:
• Maybe a little filler just to smooth it out. Not sure yet. High-build primer might be enough.
• Primer, paint, glass & rubber, done.
What I already know plus what I have recently learned about post-patch-repair PAINTING:
• Filler (Bondo) Sticks to BARE-metal, so don't put it on top of paint.
• Buck up and go to an auto body supply shop (Wesco, in Seattle) for your supplies. True Value and Fred Meyer are not going to have you what you need.
• Rough up your bare metal with 80 grit sand paper.
• Clean it with wax/grease remover and lint-free towels, both from the auto body shop. Not Windex. Not Acetone. Not Marine Clean, alcohol, gasoline, water, witch hazel, aged dog pee, vodka, kool-aid or anything else. Use wax/grease remover from the auto paint store. This is vital for the paint and/or filler to stick. Probably the most important step so don't half-ass it now!
• Use catalyzed or etching primer made for bare-metal, automotive use. Skip the Krylon, Rust-oleum, etc. I got etching primer in a spray can
• Then use high-build primer on top of that.
• Then paint. I got a can of close-enough-for-now color match paint. To hold me over until next year. Next year I'll pull all the glass and re-paint the whole thing (if I don't veer off a cliff in the meantime due to bald tires).
I'm using rattle cans - all automotive paint from the auto body shop. I don't think there is anything suitable at the hardware store, so don't be cheap or lazy. Take a hundred bucks with you and get some good stuff... and all this is just temporary - until I repaint the whole bus next year, after this and a handful of other little rust repair jobs I will be tackling during the dark winter months ahead.
I'll post completion pics in a few days, after I finish the paint and install the glass. Wish me luck.
Edit: Here's the follow-up pics, so they are all in one place:
Here's the old string-in-the-groove trick.
I've done this a few times before - but you learn something every time. What I learned this time:
• Put THREE wraps of string in that groove. You'll be so happy to have another chance to pull that lip in. No harm done if you don't need them. When we got it aligned right, it only took one, but the extras sure give you peace of mind.
• Use silicone lube. I got some little samplers at the sex shop this stuff is AWESOME. It really made this easier than I've ever done this before. Truly. Do this. No water. No Vaseline. Get the silicone. Srsly, LUBE IT UP! Now what to do with the leftovers...
• Take the time to make sure you're aligned perfectly. I guess I've been lucky in the past, this time I had to adjust a couple times. No big deal, but if I'd just measured my left/right alignment between the rain gutters in the first place, I'd have saved a good half hour.
• In the end it wasn't 100% necessary, but I found that while I was wiggling things around, a couple bicycle tire levers were perfect for manually pulling the rubber over the lip and double checking things. It might be handy to have some of those on hand before you begin.
Here you can see the touchup to the dash, which was rusted pretty bad before. This involved welding up a couple pin holes, some high-build primer, sanding, automotive spray paint and feathering the new black paint into the old black paint with some wet, soapy steel wool.
My lovely wife wielding the Windex after it was in:
New seal Porn:
New Glass Porn:
This windshield came with a blue tint band across the top. It's a little annoying but not the end of the world. Next time I'll make sure to avoid that. Overall, I LOVE having new glass, the world seems so much clearer, like one of those allergy medicine commericals and I LOVE knowing that my rust is gone and there won't be any puddles at my feet this winter.
Last edited by Daverham on Tue Sep 13, 2011 9:00 am; edited 1 time in total |
|
| Back to top |
|
 |
AB westy nut
Samba Member
Joined: June 01, 2010
Posts: 1125
Location: Calgary, Alberta
|
| Posted: Tue Sep 06, 2011 11:23 am Post subject: |
|
|
That is some beautiful work right there. Any chance you and your little MIG friend want to drop my my place? 
_________________
1963 Ruby Red 356 Cabriolet
1976 Sage Green Westfalia Deluxe |
|
| Back to top |
|
|
VAVWFAN
Samba Member
Joined: January 16, 2010
Posts: 758
Location: Middletown, Virginia
|
| Posted: Tue Sep 06, 2011 11:46 am Post subject: |
|
|
Nice!! I was able to save mine with a little sandind and POR product. I was Lucky!!
Regarding the rattle can paint; I assume you got matching "rattle can" paint at the body store?!? They do make it to the original paint code, and while expensive, it works fine. Mine blended in remarkbly well; almost flawless with original paint... I went to the tech section abobe; paint/upholstry section and got the paint code. Like I said; it's almost perfect and certainly OK for my bus, which is more utilitarian than show!
Right now, I'm just happy to clean up rust, and keep it at bay (no pun intended). For instance, my drivers floor & doglegs weren't too bad. I treated with POR-15 in the bad areas, and good primer, but painted with (yup rustoleum) rattle can white. Where it would show, I painted with the proper VW rattle-can color (because the damn stuff is expen$ive). It looks OK, but if I pull the mat,,,,,yeah, the color changes, but again,,,,,it's for protection right now. Hopefully this economy will get better - lol.
_________________
If it weren't for "last minutes;" -- nothing would ever get done! |
|
| Back to top |
|
|
Daverham
Samba Member
Joined: August 27, 2009
Posts: 1397
Location: USA
|
| Posted: Tue Sep 06, 2011 11:50 am Post subject: |
|
|
I just grabbed a touch-up can that looked pretty close. I'll feather it with wet sandpaper and it will be fine for now. Next year will be a total re-paint, so I just need "close enough" until then.
We'll see how close it really is in the near future (it might suck!). Pics will follow either way. It's the quality/protection that concerns me at this point, not the color. That will happen soon enough. |
|
| Back to top |
|
|
VAVWFAN
Samba Member
Joined: January 16, 2010
Posts: 758
Location: Middletown, Virginia
|
| Posted: Tue Sep 06, 2011 12:14 pm Post subject: |
|
|
Here another point of view..... what if the economy sucks as bad next year,,,,or worse??
If you blend it now with th proper code paint, you feel so obligated to pull the windshield in and out again (if you go that far with it????
I craced mine putting it back in. Then got SafetyLite to put new one in.......
Maybe it doesnt mTter, but for another 20 bucks, youll have an option should money be harder to come by next year...........
...................Im just saying!!!!!
_________________
If it weren't for "last minutes;" -- nothing would ever get done! |
|
| Back to top |
|
|
Daverham
Samba Member
Joined: August 27, 2009
Posts: 1397
Location: USA
|
| Posted: Tue Sep 06, 2011 12:40 pm Post subject: |
|
|
| Overall my bus is in bad need of a repaint. Nothing I do in any one particular spot is going to make or break it either way. Plus I have 4 other rust repairs to complete and it's not factory paint anyway, some crappy re-paint done 10 years ago. Flaking off. I like your style, but spot touch ups are not a long term option for this one. It's going to be patchy and ugly for one more year - but it's going to be all rust-free steel! If my personal economy tanks then it will be longer - if not, then she's getting a shiny new coat! I'm OK either way. |
|
| Back to top |
|
|
60vwnewengland
Twin #2

Joined: June 25, 2003
Posts: 1809
Location: Cape Cod & District of Columbia
|
| Posted: Tue Sep 06, 2011 12:45 pm Post subject: |
|
|
awesome thread!
Should be labeled as a sticky! How to repair your windshield sill
_________________
77 Westy - Cape Cod Sage
70 Beetle
71 Super Beetle
RIP TheWalrus (Big Jack) 1988-2024 |
|
| Back to top |
|
|
fsf1o1
Samba Member
Joined: February 12, 2011
Posts: 186
Location: Florida
|
| Posted: Tue Sep 06, 2011 1:03 pm Post subject: |
|
|
| Sweet man |
|
| Back to top |
|
|
Islero
Samba Member
Joined: August 11, 2011
Posts: 89
Location: Spain
|
| Posted: Tue Sep 06, 2011 1:41 pm Post subject: |
|
|
You did a lovely job welding, and I agree in don't try to save on prepping-painting proccess, there is only one way to go: quality proffessional products.
Rattle cans may do its purpose "decently", but you can go a step further with a home compressor and paint gun. |
|
| Back to top |
|
|
Islero
Samba Member
Joined: August 11, 2011
Posts: 89
Location: Spain
|
| Posted: Tue Sep 06, 2011 1:48 pm Post subject: |
|
|
| May I ask you a question Daverham (and friends)? Where I'm living car insurance pays a broken windshield, a new one+labor, not the same there? |
|
| Back to top |
|
|
BusterBrown
Samba Member

Joined: December 15, 2009
Posts: 1397
Location: Arizona
|
| Posted: Tue Sep 06, 2011 1:58 pm Post subject: |
|
|
Awesome job reporting your project here Daverham! And the crisp, clear photos really help too. I'm saving this one. Thanks!
_________________
1978 Sage Green Westfalia (Happy Trails, SOLD)
1977 Transporter
Life is short. Can I have some of yours? |
|
| Back to top |
|
|
skills@eurocarsplus
Samba Peckerhead

Joined: January 01, 2007
Posts: 17850
Location: sticksville, ct.
|
| Posted: Tue Sep 06, 2011 1:58 pm Post subject: Re: Another Windshield Rust Repair Done - with pics. |
|
|
good job! if you click my 'click here' link, you can see what a chore windshield rust can be. if i can just make a suggestion, next time you need to grind welds, you should knock down the heavies with a grinding wheel (like you did) but you should finish with a SAIT flap wheel. they give the most control and won't leave the finished product looking like you carved it with a chain saw. other than that, i think you did a great job! 
this is what i am talking about:
http://www.toolup.com/sait_70102_3x1-120g-flap-wheel.aspx
they really let you sculpt the steel, and you could have formed a real nice edge on the windshield lip, and used no filler
look at the pictures, you can see your edge is squared off and notchy. using a flap wheel, you could have made it look like the rust never happened
| Daverham wrote: |
So here are those welds after I smoothed them out a bit. Look at all that solid steel!
|
_________________
| gprudenciop wrote: |
my reason for switching to subaru is my german car was turning chinese so i said fuck it and went japanese....... |
| Jake Raby wrote: |
| Thanks for the correction. I used to be a nice guy, then I ruined it by exposing myself to the public. |
| Brian wrote: |
| Also the fact that people are agreeing with Skills, it's a turn of events for samba history |
|
|
| Back to top |
|
|
Daverham
Samba Member
Joined: August 27, 2009
Posts: 1397
Location: USA
|
| Posted: Tue Sep 06, 2011 2:14 pm Post subject: |
|
|
| Well it's not too late! I'll get a flap wheel after work tonight. If I have to add a little steel, then that's what I'll do. Fantastic tip. Thanks. |
|
| Back to top |
|
|
mattcuddy
Samba Member

Joined: October 22, 2003
Posts: 2036
Location: Philly, PA
|
| Posted: Tue Sep 06, 2011 2:18 pm Post subject: |
|
|
| Also could have bought a replacement panel that was a bit longer, so your seam would have been in the middle of the beltline bulge. Just another option. |
|
| Back to top |
|
|
averr789
Samba Member

Joined: September 19, 2006
Posts: 133
|
| Posted: Tue Sep 06, 2011 2:32 pm Post subject: |
|
|
| Very nice this is a patience tester to say the least! |
|
| Back to top |
|
|
Daverham
Samba Member
Joined: August 27, 2009
Posts: 1397
Location: USA
|
| Posted: Tue Sep 06, 2011 2:37 pm Post subject: |
|
|
| Those panels were long enough to meet in the middle, but I had really solid metal there, so I cut them short. I figure more original steel is better, if only to make sure the shape/alignment is perfect. |
|
| Back to top |
|
|
Daverham
Samba Member
Joined: August 27, 2009
Posts: 1397
Location: USA
|
| Posted: Tue Sep 06, 2011 3:55 pm Post subject: |
|
|
| Quote: |
| May I ask you a question Daverham (and friends)? Where I'm living car insurance pays a broken windshield, a new one+labor, not the same there? |
My insurance replaces windshields, sure. But what's that part-time guy going to do when he comes out to my office parking lot in his Astro van with his little clipboard, pulls out the glass and finds those big rusty holes? I'm pretty sure body work and paint is not included in that glass replacement policy. |
|
| Back to top |
|
|
skills@eurocarsplus
Samba Peckerhead
Joined: January 01, 2007
Posts: 17850
Location: sticksville, ct.
|
| Posted: Tue Sep 06, 2011 5:14 pm Post subject: |
|
|
the flap wheels are slow going, i would start at 80 grit and work up to 120. they are amazing, and with a little patients, will be worth the effort
_________________
| gprudenciop wrote: |
my reason for switching to subaru is my german car was turning chinese so i said fuck it and went japanese....... |
| Jake Raby wrote: |
| Thanks for the correction. I used to be a nice guy, then I ruined it by exposing myself to the public. |
| Brian wrote: |
| Also the fact that people are agreeing with Skills, it's a turn of events for samba history |
|
|
| Back to top |
|
|
bugger101
Samba Member
Joined: September 04, 2010
Posts: 1559
Location: orlando
|
|
| Back to top |
|
|
Islero
Samba Member
Joined: August 11, 2011
Posts: 89
Location: Spain
|
| Posted: Wed Sep 07, 2011 2:20 am Post subject: |
|
|
| Daverham wrote: |
| Quote: |
| May I ask you a question Daverham (and friends)? Where I'm living car insurance pays a broken windshield, a new one+labor, not the same there? |
My insurance replaces windshields, sure. But what's that part-time guy going to do when he comes out to my office parking lot in his Astro van with his little clipboard, pulls out the glass and finds those big rusty holes? I'm pretty sure body work and paint is not included in that glass replacement policy. |
Of course, rust repair, etc, is not included, I was just wondering.
Thank you |
|
| Back to top |
|
|
|


