| Author |
Message |
PtownVdub
Samba Member

Joined: February 02, 2009
Posts: 63
Location: Portland, OR

|
 Posted: Sun Jan 15, 2012 6:16 pm Post subject: 1973 Bus Engine Bay Wiring Questions Posted: Sun Jan 15, 2012 6:16 pm Post subject: 1973 Bus Engine Bay Wiring Questions |
 |
|
I have been lurking in this forum since August when I first picked up my 1973 Bus. I have been trying to learn as much as possible since this is my first Bus and my 4th aircooled VW. I haven't introduced myself or my Bus yet so I figured it was time and I also had a few questions but first a little history about my Bus.
I pulled the Bus out of a barn near Monmouth, Oregon. It did not come with an engine, mice had made the interior their home, and the Bus did not have a title. However, the price was right for free.  Since August, I acquired the title for the Bus, picked up a 1972 Rivieria parts Bus, redid the interior, rebuilt the engine, and started working on the brakes, suspension, and tires. Since August, I acquired the title for the Bus, picked up a 1972 Rivieria parts Bus, redid the interior, rebuilt the engine, and started working on the brakes, suspension, and tires.
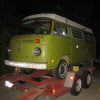
The Bus the morning after dragging it home:
And the Bus today:
After installing my freshly rebuilt 1700cc engine with factory 1972 dual Solex carbs and oil bath air cleaner, I ran into a few questions regarding the wiring in the engine bay. It appears that the last engine that was in the Bus was an upright engine because there was an old style regulator mounted on the firewall and the rear engine mounts had been modified. I have a feeling that some of the wiring was also modified along the way as well.
I have been able to sort out enough of the engine wiring to make the engine run. Although it is not running well because the ignition timing and the dual carbs are not tuned. I took a few pictures and highlighted the wires that I am wondering about. I would really appreciate insight and feedback regarding these random wires. Thanks in advance.
#1:Wires going to coil, oil pressure switch area.
#2: Wires by heat booster fan.
#3: Wires by voltage regulator.
#4: Wires coming out of the main harness near the right tail light.
And here is a picture of the entire engine bay:
Thank you for any and all help.
_________________
2001 Eurovan MV - 2.8L 24v, 4 speed automatic |
|
| Back to top |
|
 |
busdaddy
Samba Member

Joined: February 12, 2004
Posts: 53256
Location: Surrey B.C. Canada, but thinking of Ukraine
|
| Posted: Sun Jan 15, 2012 7:34 pm Post subject: |
|
|
That's a pretty creative way of making 50mm fresh air hose fit, why not just buy the correct parts? If you had a type 1 in there was the input shaft shortened?, if it was you'd better have a modified flywheel with a pilot bearing installed.
Sadly although those are good pictures they really don't show all the colors of the wires and where they come from well, the 73 engine compartment is wired exactly the same as a 72 except the booster fan grounds at it's mount instead of near the RH tail light, some find the earlier diagram easier to understand. You'll find alot of those wires near the battery are for the diagnostic system so they can be taped up.
http://www.thesamba.com/vw/archives/info/wiringt2.php
_________________
Rust NEVER sleeps and stock never goes out of style.
Please don't PM technical questions, ask your problem in public so everyone can play along. If you think it's too stupid post it here
Stop dead photo links! Post your photos to The Samba Gallery!
Слава Україні! |
|
| Back to top |
|
|
telford dorr
Samba Member

Joined: March 11, 2009
Posts: 3632
Location: San Diego (Encinitas)
|
| Posted: Sun Jan 15, 2012 9:09 pm Post subject: |
|
|
The alternator on your current engine should connect to the regulator on the right side firewall (unlike bugs, which used alternators with internal regulators.) Thus, your assumption about having an upright engine based on the existence of a regulator may be erroneous.
Other than that, if it runs, you're 85% there.
Study the schematic for all of the connections to the blower motor and its (possibly missing) relay. That should consume a bunch of wiring.
After that, investigate all of the rear lighting wiring. That should get rid of most of the rest.
Anything left is likely diagnostic connector wiring, which will never be used again, and thus can be eliminated.
_________________
'71 panel, now with FI
'Experience' is the ability to recognize a mistake when you're making it again - Franklin P. Jones
In theory, theory works in practice; in practice, it doesn't - William T. Harbaugh
When you're dead, you don't know you're dead. The pain is only felt by others.
Same thing happens when you're stupid. - Philippe Geluck
More VW electrical at http://telforddorr.com/ (available 9am to 9pm PST) |
|
| Back to top |
|
|
Sage79
Samba Member
Joined: September 13, 2008
Posts: 437
Location: Holland MI
|
| Posted: Mon Jan 16, 2012 7:34 am Post subject: |
|
|
PTown, nice bus, I first thought is was a Sportsmobile like mine but no.
Anyway, I looked at my '73 which is relatively unmolested and can offer this advice (double check against other info you may have):
Pic #1 - I have no clue what the black/green wire is. On my bus there is a sheath with three wires which looks like the one in question, it contains a blue/gn wire which splits out a little early and goes to a connector which does go to the oil pressure sensor, the other two wires go to the coil, a black to coil terminal 15 and a grey/rd to terminal 1 for the diagnostic plug.
Pic #2 - the blower relay connector does indeed get a red (fuse) for power, a brown/wh and a blue/yel (the blue/yel goes to the voltage regulator)
Pic #3 - the voltage regulator connector has a green, a red, and a brown which all come from one sheath (from the alternator?) in addition to a black which has a connector like yours and goes to the diagnostic plug.
The red wire terminal on the voltage regulator connector also has a blue wire which splits at a connector into a blue for the dash light and a blue/yel which goes to the blower fan relay connector.
Pec #4 - it looks like the blue circle is indeed the sheath of two wires for the right side marker light and the red circle is the package of wires from the battery to the diagnostic plug.
Since it's hard to see the colors in your pics, the wiring diagram should confirm your wires. As others have said, the diagnostic plug is obsolete.
Dirk
_________________
Dirk
'79 Westy 2.0FI
'77 delux 2.0FI 090Auto - now my son's |
|
| Back to top |
|
|
PtownVdub
Samba Member
Joined: February 02, 2009
Posts: 63
Location: Portland, OR
|
| Posted: Mon Jan 16, 2012 12:09 pm Post subject: |
|
|
Thank you for the input and feedback, everyone. I think I have figured out where all the wires going except for the ones in the forth picture. I still have to investigate those further but I think they are diagnostic plug related.
| busdaddy wrote: |
| That's a pretty creative way of making 50mm fresh air hose fit, why not just buy the correct parts? If you had a type 1 in there was the input shaft shortened?, if it was you'd better have a modified flywheel with a pilot bearing installed. |
I didn't have the proper Bus fresh air hoses on hand but I had everything else laying around so that was my motivation for going that route. I didn't use the transaxle that came with the Bus. I used the engine and transaxle that came out of my 1972 parts Bus. Thank you for the help and pointing me to the 1972 wiring diagram.
| Sage79 wrote: |
PTown, nice bus, I first thought is was a Sportsmobile like mine but no.
Anyway, I looked at my '73 which is relatively unmolested and can offer this advice (double check against other info you may have):
[...]
Since it's hard to see the colors in your pics, the wiring diagram should confirm your wires. As others have said, the diagnostic plug is obsolete.
Dirk |
Thank you. Yeah, my Bus is a Riviera conversion. Thank for checking my wiring against your Bus. I think that I now have almost all of my engine compartment wiring figured out.
Once again, thanks for the help. Now I can start to focus my attention on the brakes.
_________________
2001 Eurovan MV - 2.8L 24v, 4 speed automatic |
|
| Back to top |
|
|
GeorgeO.
Samba Member
Joined: October 08, 2010
Posts: 881
Location: Menifee, CA
|
| Posted: Mon Jan 16, 2012 9:44 pm Post subject: Wiring problems |
|
|
| I bought my bus with the harness cut in the engine bay. Some guy offered the PO to rebuild the motor and charged him 500 buck. The motor and the 500 bucks are no where to be found. |
|
| Back to top |
|
|
busdaddy
Samba Member
Joined: February 12, 2004
Posts: 53256
Location: Surrey B.C. Canada, but thinking of Ukraine
|
| Posted: Mon Jan 16, 2012 9:55 pm Post subject: Re: Wiring problems |
|
|
| GeorgeO. wrote: |
| I bought my bus with the harness cut in the engine bay. Some guy offered the PO to rebuild the motor and charged him 500 buck. The motor and the 500 bucks are no where to be found. |
Sad story indeed, but how does this help Ptowndub with his wiring issues?
_________________
Rust NEVER sleeps and stock never goes out of style.
Please don't PM technical questions, ask your problem in public so everyone can play along. If you think it's too stupid post it here
Stop dead photo links! Post your photos to The Samba Gallery!
Слава Україні! |
|
| Back to top |
|
|
VDubTech
Samba Member
Joined: December 29, 2002
Posts: 9157
Location: Syracuse, NY
|
| Posted: Tue Jan 17, 2012 6:59 am Post subject: |
|
|
You need to get the correct coil bracket for your engine. It has an "arm" on it that the throttle return spring attaches to. Your return spring will of course need to be replaced after you stretched it out so far and the new one attached to the coil bracket as God and VW intended.
_________________
First Trip in the RustyBus:
http://www.thesamba.com/vw/forum/viewtopic.php?t=279077&highlight=
| borninabus wrote: |
| a measurement of your rod would be extremely useful. |
| notchboy wrote: |
| my dad wasnt a belittling cock when he tought me how to wrench on cars. |
| EverettB wrote: |
One photo = good for reference.
10 photos = douchebaggery |
|
|
| Back to top |
|
|
busdaddy
Samba Member
Joined: February 12, 2004
Posts: 53256
Location: Surrey B.C. Canada, but thinking of Ukraine
|
| Posted: Tue Jan 17, 2012 8:43 am Post subject: |
|
|
| VDubTech wrote: |
| You need to get the correct coil bracket for your engine. It has an "arm" on it that the throttle return spring attaches to. Your return spring will of course need to be replaced after you stretched it out so far and the new one attached to the coil bracket as God and VW intended. |
Hmmm... I didn't notice the 72 throttle bar, that is the correct place for the 73 style return spring but the 72 linkage does make it sit on an odd angle, the right coil bracket would help.
_________________
Rust NEVER sleeps and stock never goes out of style.
Please don't PM technical questions, ask your problem in public so everyone can play along. If you think it's too stupid post it here
Stop dead photo links! Post your photos to The Samba Gallery!
Слава Україні! |
|
| Back to top |
|
|
PtownVdub
Samba Member
Joined: February 02, 2009
Posts: 63
Location: Portland, OR
|
| Posted: Tue Jan 17, 2012 2:58 pm Post subject: |
|
|
As far as I know, the dual Solex carburetor linkage setup that I have on the engine is the 1972 setup. I am also running the 1972 idle circuit line along with the oil bath air cleaner. I also have most of the pieces to run the 1973 - 1974 as well but not everything so that was why I went with the 1972 setup.
I did a search and looked in the Bentley but could not find a picture of the proper coil bracket and throttle spring. Does anyone have a picture of this setup? Alternatively, does anyone have an extra one of these brackets that I could buy? I am also missing the dashpot and bracket as well. Thanks!
I have spent some more time sorting out my wiring issues and have the horn, front blinkers / marker lights, and left rear brake and blinker lights all working. I just need to do some more investigation to get the right rear lights working but my guess is that I have a ground issue on that corner.
_________________
2001 Eurovan MV - 2.8L 24v, 4 speed automatic |
|
| Back to top |
|
|
busdaddy
Samba Member
Joined: February 12, 2004
Posts: 53256
Location: Surrey B.C. Canada, but thinking of Ukraine
|
| Posted: Tue Jan 17, 2012 3:41 pm Post subject: |
|
|
Ground those solid brown wires over by the battery to the tabs on the post inside of the tail light, betcha the tail light starts working 
_________________
Rust NEVER sleeps and stock never goes out of style.
Please don't PM technical questions, ask your problem in public so everyone can play along. If you think it's too stupid post it here
Stop dead photo links! Post your photos to The Samba Gallery!
Слава Україні! |
|
| Back to top |
|
|
PtownVdub
Samba Member
Joined: February 02, 2009
Posts: 63
Location: Portland, OR
|
| Posted: Tue Jan 17, 2012 3:47 pm Post subject: |
|
|
Thank you for the picture busdaddy. I have never seen that style of coil bracket before. I definitely do not have one of those kicking around in my parts collection but now I know what I need to look for. And thank you for the taillight wiring information. I am going to go hook up those grounds tonight and see what happens but only after I put new bulbs in the first. It seems like every light bulb on this Bus has either been burnt out or missing.
_________________
2001 Eurovan MV - 2.8L 24v, 4 speed automatic |
|
| Back to top |
|
|
PtownVdub
Samba Member
Joined: February 02, 2009
Posts: 63
Location: Portland, OR
|
| Posted: Thu Jan 19, 2012 8:35 am Post subject: |
|
|
I finally had a couple hours of free time last night to investigate the remaining wires in the engine bay as well as take a look at the taillight wiring. I discovered that the tail light grounds were corroded which was preventing the lights on the right side of the Bus from working. Once the ground connections were all cleaned up and new bulbs were installed, all of the rear lights on the Bus started working. 
I also tracked down the four remaining engine bay wires and determined that two were for the diagnostics plug and two were for emissions related controls that have since been removed. I covered up the wire ends and tucked them back out of the way for now. So that means that all of my engine bay wiring questions have been solved! Thanks again for all of the help.
Now I can focus on replacing the rear brakes ...
_________________
2001 Eurovan MV - 2.8L 24v, 4 speed automatic |
|
| Back to top |
|
|
airkooledchris
Samba Member

Joined: January 25, 2005
Posts: 2722
|
| Posted: Thu Jan 19, 2012 10:12 am Post subject: |
|
|
| cool bus, good on ya for bringing it back to life. |
|
| Back to top |
|
|
|


