| Author |
Message |
hans j
Samba Member

Joined: May 06, 2006
Posts: 2746
Location: Salt Lake City UT

|
 Posted: Sun Jun 17, 2012 9:19 am Post subject: Since bumpers are always interesting, I'll add my build Posted: Sun Jun 17, 2012 9:19 am Post subject: Since bumpers are always interesting, I'll add my build |
 |
|
Been working on it slowly this week but should get mostly done this weekend. I'll add it to my build thread when I get some more extra time.
My requirements for a bumper:
Have a beefy hitch (not installed yet but I can say the engine and suspension will be the only limiting factors in my tow capacity!)
Have a tire swing away that fits under the tail lights (this was the hard one)
Use the far bolt inside the frame for added strength
Have D-shackle mounts, directly bolted to the frame of vehicle
Look good 
Basically what I came up with was using 1/2" plate for the main brackets, these each have a place for 3/4" pin diameter shackles on the end. 3/16" 2"x3" square tube for the main bumper, 3/16" 2"x2" square tube for the swing away, 1/4" 2"ID square tube for the hitch receiver. There will also be a reinforcement welded on the back side of the bumper from the brackets to the hitch, just more strength. Thinking the piece of 1/8" 1"x1" Square tube I have left over from another project.
I gave a lot of thought to the swing hinge. It needed to be either low to clear the tail lights or high to go over them. I decided on the bronze bushing type, using a large bolt through them and the swing away. They have grease fittings on them and will be serviceable and be replaceable. I went with a Destaco latch (as most do) but a different type than usually used for the vanagon stuff, and in a different location (haven't built it yet so no pics).
I need to do some revamping of the hinge, I was only thinking single shear when I built it in my head and now it's proving too much flex in the bumper. This will be corrected today with an additional support welded to the main bumper for the top of the hinge pin.
End caps are still to be determined but I do know I will be incorporating the look of the sliders running up to the rear of the wheel well. The ends will be supported from underneath and "should" protect the rear corners of the body.
On to the pics!!
$30 of remnant steel plus maybe $20 worth of steel left over from my rock slider build:
I didn't like just a straight bar going across so I had to make four cuts and get them all lined up. This puts it closer to the body at the corners.
Mocking it up!
I like it
I decided this is too uneven for each side, so it got welded back together. The new split will be just to the right of the license plate.
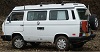
As of right meow:
There are some things I would do differently if I do it again, it fits very close which I like, but it's actually too close. The license plate does flip down enough to access it with the upper bar in place, but you can't read the words at the bottom of the plate (Green with Agriculture). I won't be using that access in the future with the TDI, but I don't know when that will happen so I wanted it to work easily until then. I still might weld on another piece of 1/4" plate to the shackle mount, but realistically the 1/2" should be strong enough.
I wouldn't have any issue dangling a vanagon from a forklift with this bumper...
_________________
1986 Canadian Syncro Westy TDI - 1989 Syncro Single Cab - 2001 Audi S4 - 1981 VW Caddy ABA - 1980 VW Caddy EV - 1973 VW T-181
Last edited by hans j on Sun Jun 17, 2012 7:36 pm; edited 1 time in total |
|
| Back to top |
|
 |
rubbachicken
Samba Member

Joined: October 05, 2004
Posts: 3058
Location: socal
|
| Posted: Sun Jun 17, 2012 11:35 am Post subject: |
|
|
looks nice, are you going to put a receiver in there for a tow bar or bike rack
you could also fit spare wheel carrier while you are about it, i would if i made my on bumpers
_________________
lucy our westy
lucy's BIG adventure
meet 'burni' |
|
| Back to top |
|
|
an86carrera
Samba Member
Joined: May 09, 2007
Posts: 293
Location: Bradenton, FL
|
| Posted: Sun Jun 17, 2012 5:22 pm Post subject: |
|
|
I like it. Looks pretty strong.
_________________
Len
Current Vehicles
'84 Westy '95 2.2 Subaru
'08 Dodge 2500 diesel
'75 914 |
|
| Back to top |
|
|
hans j
Samba Member
Joined: May 06, 2006
Posts: 2746
Location: Salt Lake City UT
|
| Posted: Sun Jun 17, 2012 7:33 pm Post subject: |
|
|
| rubbachicken wrote: |
looks nice, are you going to put a receiver in there for a tow bar or bike rack
you could also fit spare wheel carrier while you are about it, i would if i made my on bumpers |
Yeah I forgot that... That's the whole reason I decided to build a new bumper! I need a place for my oversize spare, no space in my regular spot. One side will hold the spare, the other side will be modular, either jerry cans, ski/snowboard rack, and possibly another spare. The hitch might pull a Hobie Cat small sail boat someday, or flat tow another one of my cars if needed.
Todays adventure...
I needed to do a double shear hinge for strength, so I came up with this bracket.
Then I got bored...
Back to business
I was able to build them to do double duty as the stop for the swing arm, that way it won't swing too far open. I'm still thinking about putting on hatch struts to hold it open.
Weldable primer where parts overlap. Currently it weighs 54 pounds.
Blurry latch detail. They say it holds 700 pounds. Don't know how, but it was the one that fits and 700 pounds seems strong enough to me.
The piece of angle is the stop and levels the ends of the swing arms. You can also see how very close the bumper is to the license plate bracket.
Unfortunately the 11 gauge steel I used as brackets wasn't strong enough, even with the angle iron corner. I'll be welding in some 1/4" plate this week. I should have done that to begin with 
The carriers will be welded just inside of the rear lights. I will also probably be installing some extra LED lights in the bumper itself. I really want some really bright reverse lights, some rear fog lights and some extra brake lights. OK so everything. Can't have enough lighting, especially in a big slow brick like mine.
_________________
1986 Canadian Syncro Westy TDI - 1989 Syncro Single Cab - 2001 Audi S4 - 1981 VW Caddy ABA - 1980 VW Caddy EV - 1973 VW T-181 |
|
| Back to top |
|
|
vwlovr
Samba Member

Joined: May 21, 2006
Posts: 1122
Location: on the road
|
| Posted: Mon Jun 18, 2012 12:31 am Post subject: |
|
|
nice, at first it thought it looked dumb until i realized how it worked, then i thought it was awesome
definitely do something to hold them open, if you're on a hill trying to open the hatch it's a necessity. i did the pathfinder rack and it has like an L shaped pin you can put in a hole to lock it open, you could do that with your design, maybe do a spring loaded pin or something. |
|
| Back to top |
|
|
carterzest
Samba Member

Joined: January 22, 2008
Posts: 3840
Location: Star, ID
|
| Posted: Mon Jun 18, 2012 1:32 am Post subject: |
|
|
Great job Hans. I was confused at first too, but, that's not that unusual.
Your van looks good on my lift 
Great posts. |
|
| Back to top |
|
|
zippyslug31
Samba Member
Joined: July 20, 2007
Posts: 799
Location: Central Oregon
|
| Posted: Mon Jun 18, 2012 7:59 am Post subject: |
|
|
I like your thinking and where this is going...! 
_________________
previous:
'80 westy
current:
'90 syncro westy 2.5L subi, triple knob, 16" wheels.
'84 sunroof van, 2.1L motor. |
|
| Back to top |
|
|
Jteerlink
Samba Member
Joined: February 18, 2007
Posts: 167
|
| Posted: Wed Jun 20, 2012 7:47 am Post subject: |
|
|
| I like it...you taking orders? |
|
| Back to top |
|
|
hans j
Samba Member
Joined: May 06, 2006
Posts: 2746
Location: Salt Lake City UT
|
| Posted: Wed Jun 20, 2012 8:39 am Post subject: |
|
|
Thanks guys, I got some more work done last night.
Tacked in place. I used a tall chair and 2x4's to position the tire in the place I wanted. I also gave me a little extra room just in case I ever go to a larger tire.
Attachment detail. I used a bad rear hub off a B5A4 Audi. It's hubcentric for my wheels so it's easy to load the tire and not have to put any effort into lining the holes up. I may still go with studs in the future. It got reinforced and capped on top to seal it up.
Tacked and open. It's wobbly, but mostly due to my weak hinge design. I'll reinforce that tonight and I might even have to put a longer bolt all the way through the bumper
Yup it's close! I might pull the entire bumper out a little. I was also thinking about putting a small latch on the hatch to hold it from bouncing...
Without tire and reinforced
I decided to run the tire backwards to keep weight forward and so I could stuff recovery gear inside the wheel (under a spare tire cover).
Once it's sturdy, I'll really like it. I really like the design and execution, but it needs to be stronger. I may have to change the hinge design completely to get what I want
_________________
1986 Canadian Syncro Westy TDI - 1989 Syncro Single Cab - 2001 Audi S4 - 1981 VW Caddy ABA - 1980 VW Caddy EV - 1973 VW T-181 |
|
| Back to top |
|
|
hans j
Samba Member
Joined: May 06, 2006
Posts: 2746
Location: Salt Lake City UT
|
| Posted: Wed Jun 20, 2012 8:42 am Post subject: |
|
|
| Jteerlink wrote: |
| I like it...you taking orders? |
No but if I decide to build another (better) one I'll sell you this one. Or you can borrow mine to take to a fabricator and copy it!
_________________
1986 Canadian Syncro Westy TDI - 1989 Syncro Single Cab - 2001 Audi S4 - 1981 VW Caddy ABA - 1980 VW Caddy EV - 1973 VW T-181 |
|
| Back to top |
|
|
Jteerlink
Samba Member
Joined: February 18, 2007
Posts: 167
|
| Posted: Wed Jun 20, 2012 8:45 am Post subject: |
|
|
| its a deal |
|
| Back to top |
|
|
SSWesty
Samba Member

Joined: August 20, 2008
Posts: 735
Location: Bellevue
|
| Posted: Thu Jun 21, 2012 9:40 pm Post subject: |
|
|
| Nice build, I like how you angled the bumper so it's not flat. Mine is flat and I am not very fond of the gaps on the corners. I am still fiddling with my hinges too. I am learning it takes a bit of noodling to get a sturdy hinge. Looking forward to seeing what you come up with. |
|
| Back to top |
|
|
hans j
Samba Member
Joined: May 06, 2006
Posts: 2746
Location: Salt Lake City UT
|
| Posted: Fri Jun 22, 2012 9:31 pm Post subject: |
|
|
Here is the detail of my hinge.
I had to tack a washer (that was exactly the same size as the diameter of my bolt) to the top shear point. That was a lot of my problem. The hole I drilled wasn't exact and there was some slop.
I also added that extra 1/4" plate to the back, that helped a lot too.
But I still get some play/sag in the swing out. I believe the box just isn't strong enough with the end open like that. So what I am thinking is to weld a captive pinch type lock nut to the inside of the bottom of the bumper. That will essentially give me three more inches of leverage. Right now, all that weight is being placed on a very small leverage point, even though it's double shear.
That is the only thing I can come up with, and keep it the look I want. You can see the hinge is servicable too, I'll just put a 2" square plastic cap on the end to access it. I really didn't want to weld anything inside the bumper that wouldn't be easy to get to (don't know why I would ever need to get to it anyway), but I didn't really want a nut sticking out the bottom of the corner which could possibly take some damage. Maybe I am being too picky?
So far though it looks pretty stable in the rear view mirror. I will hopefully get out in the woods this weekend and see if it falls off...
_________________
1986 Canadian Syncro Westy TDI - 1989 Syncro Single Cab - 2001 Audi S4 - 1981 VW Caddy ABA - 1980 VW Caddy EV - 1973 VW T-181 |
|
| Back to top |
|
|
boof1306
Samba Member
Joined: July 10, 2010
Posts: 304
Location: MELBOURNE AUSTRALIA
|
| Posted: Fri Jun 22, 2012 10:16 pm Post subject: |
|
|
| Nice job. What about welding in the pipe and grease nipple idea to the lower piece of rhs and running the bolt right through it? You could even then ream the entire hole to suit a larger o/d bolt and reduce your play to a minimum. |
|
| Back to top |
|
|
|


