| Author |
Message |
EA812
Samba Member
Joined: December 07, 2008
Posts: 1231
Location: North central, CT

|
 Posted: Sat Dec 22, 2012 4:44 pm Post subject: Project 66 Daily Driver. Posted: Sat Dec 22, 2012 4:44 pm Post subject: Project 66 Daily Driver. |
 |
|
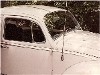
After completing Project Herbie this year (see http://www.thesamba.com/vw/forum/viewtopic.php?t=336044) I decided to do it all again. Well not everything this time. I found a better candidate that has solid heater channels and mostly solid floor pans. My plan is once it is done to use this one as a daily driver for a year. I followed the blog Jonathan Klinger had for his 365Days of A and thought what a good car the Beetle would be for this plus people drive them daily all the time.
[/img]
Last edited by EA812 on Thu Feb 21, 2013 10:49 am; edited 3 times in total |
|
| Back to top |
|
 |
Jon65
Samba Member

Joined: September 29, 2012
Posts: 2417
|
| Posted: Sat Dec 22, 2012 8:51 pm Post subject: |
|
|
| Cool. Looks like a good project. |
|
| Back to top |
|
|
EA812
Samba Member
Joined: December 07, 2008
Posts: 1231
Location: North central, CT
|
| Posted: Sat Jan 05, 2013 8:57 am Post subject: |
|
|
Since this isn’t going to be a body off resto I decided while the engine is out to take care of some rust removal and painting. Pulled the trans axle and cleaned it up plus replaced the mounts and metal brake lines.
Last edited by EA812 on Tue Jan 29, 2013 9:32 am; edited 2 times in total |
|
| Back to top |
|
|
terrieann
Samba Member

Joined: August 17, 2011
Posts: 50
Location: Columbia County, NY
|
| Posted: Sat Jan 05, 2013 11:34 am Post subject: |
|
|
Looks so interesting! Wish I had a place to dig into mine and wish I wasn't so chicken to do it!
_________________
1972 VW Type 3 Fastback - Her name is Joy |
|
| Back to top |
|
|
EA812
Samba Member
Joined: December 07, 2008
Posts: 1231
Location: North central, CT
|
| Posted: Sat Feb 09, 2013 3:45 pm Post subject: |
|
|
Cleaned the dash up recently. The paint still looks good.
[/img] |
|
| Back to top |
|
|
EA812
Samba Member
Joined: December 07, 2008
Posts: 1231
Location: North central, CT
|
| Posted: Thu Feb 21, 2013 10:55 am Post subject: |
|
|
I cut out some cancer recently and spliced in a piece that came with this project.
Here it is with the fender for a test fit. Turns out this piece was straighter than original. Now the hood closes better .
|
|
| Back to top |
|
|
EA812
Samba Member
Joined: December 07, 2008
Posts: 1231
Location: North central, CT
|
| Posted: Sun Mar 03, 2013 3:38 pm Post subject: |
|
|
I wasn’t planning on doing any welding on this project yet but A fellow CVA member kind of lit a fire under my butt so I’ve rebuilt the spare tire compartment now and fixed the front left quarter panel. The biggest part of the welding is done now.
|
|
| Back to top |
|
|
Jon65
Samba Member
Joined: September 29, 2012
Posts: 2417
|
| Posted: Sun Mar 03, 2013 6:36 pm Post subject: |
|
|
Sweet. 
Nice, clean job. Looks great. |
|
| Back to top |
|
|
EA812
Samba Member
Joined: December 07, 2008
Posts: 1231
Location: North central, CT
|
| Posted: Mon Mar 04, 2013 12:32 pm Post subject: |
|
|
| jon65 wrote: |
Sweet.
Nice, clean job. Looks great. |
Thanks! |
|
| Back to top |
|
|
EA812
Samba Member
Joined: December 07, 2008
Posts: 1231
Location: North central, CT
|
| Posted: Wed Mar 06, 2013 9:58 pm Post subject: |
|
|
I spent a lot of time to save the original front apron. When cutting the front spare tire compartment side off I welded the apron to what was left to the quarter panel so I wouldn’t loose its position on the body. Since it was still attached that way it was hard to drill out the spot welds in there so I had to spend a lot of time grinding them off instead.
Since the hood seal channel was messed up I finally figured a way to manipulate the channel piece left over from Herbie.
|
|
| Back to top |
|
|
EA812
Samba Member
Joined: December 07, 2008
Posts: 1231
Location: North central, CT
|
| Posted: Mon Apr 01, 2013 2:27 pm Post subject: |
|
|
Some updates: I finished repairing the rear corners of the floor pan halves. Then painted with Eastwood rust encapsulator. I'm using Tractor Supply tractor and implement paint this time around instead of bed liner paint for the final coat. The stuff is like an epoxy paint and cheap too!
|
|
| Back to top |
|
|
sportin-wood
Samba Member

Joined: September 12, 2010
Posts: 2307
Location: Texas
|
| Posted: Mon Apr 01, 2013 8:54 pm Post subject: |
|
|
Looking good! Always good to see someone saving a bug, giving it new life.
_________________
Dave
.
1966 Bug project
1973 Thing project
.
"Relax, all right? My old man is a television repairman. He's got this ultimate set of tools. I can fix it." --- Jeff Spicoli |
|
| Back to top |
|
|
EA812
Samba Member
Joined: December 07, 2008
Posts: 1231
Location: North central, CT
|
| Posted: Wed Apr 03, 2013 7:27 am Post subject: |
|
|
| sportin-wood wrote: |
| Looking good! Always good to see someone saving a bug, giving it new life. |
Look whose talking. Good job on yours as well! |
|
| Back to top |
|
|
sportin-wood
Samba Member
Joined: September 12, 2010
Posts: 2307
Location: Texas
|
| Posted: Wed Apr 03, 2013 12:21 pm Post subject: |
|
|
Yeah, but you seem to have waaay better welding skills than I have! One question - are you going to be changing out your transmission mounts (front and rear)? I'm looking to do that soon, but can't seem to find any forum posts on doing that on our '66 year bugs (specifically the front mount). The rear should be faily simple especially because I have the motor out already.
_________________
Dave
.
1966 Bug project
1973 Thing project
.
"Relax, all right? My old man is a television repairman. He's got this ultimate set of tools. I can fix it." --- Jeff Spicoli
Last edited by sportin-wood on Fri Apr 05, 2013 9:16 pm; edited 1 time in total |
|
| Back to top |
|
|
EA812
Samba Member
Joined: December 07, 2008
Posts: 1231
Location: North central, CT
|
| Posted: Thu Apr 04, 2013 11:36 am Post subject: |
|
|
Yea I did all the trans mounts plus the nose cone seal. With the engine out now would be the best time to do them. Since your probably gonna be doing brake lines and stuff, it isn’t much more work to pull the transaxle. Make sure to notch the spring plates before hand so you don’t lose alignment for your rear axles.
The bugme videos have been a big help on all this stuff. |
|
| Back to top |
|
|
Rome
Samba Member
Joined: June 02, 2004
Posts: 10728
Location: Pearl River, NY
|
| Posted: Sat Apr 06, 2013 3:29 pm Post subject: |
|
|
| Great to see a relatively solid '60's Beetle being revived in New England. Good work so far! I hope you can get it roadworthy even if the bodywork is still in progress, and drive it to VW meets in CT this season. |
|
| Back to top |
|
|
sportin-wood
Samba Member
Joined: September 12, 2010
Posts: 2307
Location: Texas
|
| Posted: Sat Apr 06, 2013 9:01 pm Post subject: |
|
|
| EA812 wrote: |
.......Make sure to notch the spring plates before hand so you don’t lose alignment for your rear axles.
The bugme videos have been a big help on all this stuff. |
Been watching my BugMe Video Vol. 5 on transmission removal - is the torsion plate the same as the spring plate? That's what he notches.
_________________
Dave
.
1966 Bug project
1973 Thing project
.
"Relax, all right? My old man is a television repairman. He's got this ultimate set of tools. I can fix it." --- Jeff Spicoli |
|
| Back to top |
|
|
EA812
Samba Member
Joined: December 07, 2008
Posts: 1231
Location: North central, CT
|
| Posted: Sun Apr 14, 2013 10:51 am Post subject: |
|
|
Took the axle beam off recently, cleaned it up a bit and painted. It’s defiantly gonna need ball joints and tie rods.
|
|
| Back to top |
|
|
EA812
Samba Member
Joined: December 07, 2008
Posts: 1231
Location: North central, CT
|
| Posted: Sun Apr 21, 2013 3:54 pm Post subject: |
|
|
| sportin-wood wrote: |
| EA812 wrote: |
.......Make sure to notch the spring plates before hand so you don’t lose alignment for your rear axles.
The bugme videos have been a big help on all this stuff. |
Been watching my BugMe Video Vol. 5 on transmission removal - is the torsion plate the same as the spring plate? That's what he notches. |
I think so. He also gives a good trick on how to align it all back up with the bolts and a vice grip. You will be in good shape following his directions;) I watched the video when I put it all back a few months ago. |
|
| Back to top |
|
|
shano63 
Samba Member

Joined: October 06, 2006
Posts: 3645
Location: Stormville NY
|
| Posted: Sun Apr 21, 2013 4:04 pm Post subject: |
|
|
Great work Brent....I'll be watching for more updates!
_________________
63 T1 Ragtop Gulf Blue
20 Toyota Corolla 6spd
22 Wrangler 6spd
78 F250 4x4 4spd
Chris
Take it as it comes-- Morrison |
|
| Back to top |
|
|
|


