| Author |
Message |
KidJoe86
Samba Member

Joined: April 07, 2013
Posts: 35
Location: United States

|
 Posted: Sun Jun 23, 2013 7:01 pm Post subject: Another '72 Super Beetle Project..big update lots of 7/31/13 Posted: Sun Jun 23, 2013 7:01 pm Post subject: Another '72 Super Beetle Project..big update lots of 7/31/13 |
 |
|
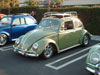
so im pretty new to the VW scene i grew up a Toyota Guy and i've always had friends and family with vw's but never really thought about buying one for myself till one day about a year ago i seen the cleanest split window i had ever seen ....i've been looking and looking for the past year....looking for something affordable but project worthy so since April I kinda stumbled upon this one and after doing a ton of research on the supers from the good, and the bad's. I decided a 71-72 super was the way i wanna go especially because i'm way more familiar with the suspension setup the supers have then on a standard beetle.... I literally just picked up the car today and am very excited for the project ahead....a project i'm calling Betty......here's a Pic of it finally in my garage...i'm gonna be posting all my progress from now on...... tonight i think i might start preping and priming body pieces for the matte black look that i'm after the first pic is of the car and the second is of my ideas for the basic layout of what im going for.....minus the chop top......gonna keep you guys posted every chance i get....
Last edited by KidJoe86 on Wed Jul 31, 2013 11:53 am; edited 6 times in total |
|
| Back to top |
|
 |
KidJoe86
Samba Member
Joined: April 07, 2013
Posts: 35
Location: United States
|
| Posted: Mon Jun 24, 2013 12:07 am Post subject: |
|
|
so i know i have alot of stuff to do on this new project but i thought it could use a face lift as far as the dash goes...so i decided to tape it off and sand it down and respray it....what do you guys think.....
Before
And After
|
|
| Back to top |
|
|
longdx
Samba Member
Joined: June 07, 2013
Posts: 16
Location: maryland,us
|
| Posted: Mon Jun 24, 2013 12:24 am Post subject: |
|
|
| Like it,best of luck. i picked up a '73 Super several weeks ago. I still haven't done anything on note to it except tow it to my house, put air in the tires, turn the crank to see if the engine is seized (it is not). I went out today to check the underside of the floor pans (so far so good) but the real test willl be when I remove the body. |
|
| Back to top |
|
|
KidJoe86
Samba Member
Joined: April 07, 2013
Posts: 35
Location: United States
|
| Posted: Mon Jun 24, 2013 10:15 am Post subject: |
|
|
| longdx wrote: |
| Like it,best of luck. i picked up a '73 Super several weeks ago. I still haven't done anything on note to it except tow it to my house, put air in the tires, turn the crank to see if the engine is seized (it is not). I went out today to check the underside of the floor pans (so far so good) but the real test willl be when I remove the body. |
thanks....yeah as soon as i got mine home i went straight to work, cause I've been biting at the bit to get my hands on this thing for awhile....good luck with urs.... |
|
| Back to top |
|
|
KidJoe86
Samba Member
Joined: April 07, 2013
Posts: 35
Location: United States
|
| Posted: Fri Jun 28, 2013 12:51 am Post subject: |
|
|
okay so yesterday i took out all my seats and removed the half installed carpet kit.....today i vaccumed the inside and cleaned it up as best as i could and this is what it looked like after all the cleaning i wish i would've took a picture before but oh well heres a few
then i hit it with about a can and a half of rust-oleum professional flat protective enamel
this was the end result
then i masked off the doors and sprayed them both but i kinda got in the zone so i didnt get to take a pic of the passenger side but i got one of the driver side. heres a before in the blue two tone that i bought it with.
and heres after i sanded them both and sprayed em
i also cleaned up the engine compartment sanded it down and sprayed it with truck bedliner coating it actually covered in one coat which surprised the heck out of me...
also i was reading that the speedo lights at night arent very bright so i decided to take apart the whole assembly and put reflective metal tape on the inside cap.... for a better reflective surface.....and while i had it apart i decided to spray the trim ring on it.....
so that's it for today tomorrow i'm gonna most likely remove the trunk lid to start sanding and prepping all the trunk area for a new flat coat of paint....so far so good and cant wait to have her on the road.... here's a couple pics of the trunk
|
|
| Back to top |
|
|
Steve.
Stinger Specialist
Joined: August 05, 2003
Posts: 1086
Location: Monterey Park, So. Cal
|
| Posted: Fri Jun 28, 2013 11:21 am Post subject: |
|
|
Making progress bro! Once you get the bug itch, there's no getting rid of it! I wanna check her out soon.
_________________
'64 Java
'66 Deluxe
Wanted! East LA Atlantic VW license plate frame! |
|
| Back to top |
|
|
Steve.
Stinger Specialist
Joined: August 05, 2003
Posts: 1086
Location: Monterey Park, So. Cal
|
| Posted: Fri Jun 28, 2013 11:22 am Post subject: |
|
|
Making progress bro! Once you get the bug itch, there's no getting rid of it! I wanna check her out soon.
_________________
'64 Java
'66 Deluxe
Wanted! East LA Atlantic VW license plate frame! |
|
| Back to top |
|
|
KidJoe86
Samba Member
Joined: April 07, 2013
Posts: 35
Location: United States
|
| Posted: Fri Jun 28, 2013 5:45 pm Post subject: |
|
|
| oldeskool65 wrote: |
| Making progress bro! Once you get the bug itch, there's no getting rid of it! I wanna check her out soon. |
fur sure dude.... i cant wait to finish up the interior.... probably gonna go pick up a new carpet kit this weekend |
|
| Back to top |
|
|
19super73
Hardcore Stock Nazi

Joined: October 18, 2007
Posts: 4350
Location: Cité Soleil
|
|
| Back to top |
|
|
KidJoe86
Samba Member
Joined: April 07, 2013
Posts: 35
Location: United States
|
| Posted: Sat Jun 29, 2013 12:22 am Post subject: |
|
|
| 19super73 wrote: |
| If your plan is to backdate the Super to a standard from pre '67, it's going to look like ass. Not trying to slam your idea but others have tried it and it just looks strange... |
No not trying to backdate it just putting my own touch on my new super the only thing I'm not liking is the blah bumpers but it'll look good just wait till I finish it and let me know what you think afterwards.....
_________________
Joe
72' Super Beetle |
|
| Back to top |
|
|
KidJoe86
Samba Member
Joined: April 07, 2013
Posts: 35
Location: United States
|
| Posted: Sat Jun 29, 2013 1:05 am Post subject: |
|
|

_________________
Joe
72' Super Beetle
Last edited by KidJoe86 on Wed Jul 31, 2013 11:56 am; edited 1 time in total |
|
| Back to top |
|
|
KidJoe86
Samba Member
Joined: April 07, 2013
Posts: 35
Location: United States
|
| Posted: Thu Jul 18, 2013 1:09 pm Post subject: just a small update since i'm waiting on a motor...... |
|
|
so i was bored and wanted to do something cool that i found on a forum so i decided to take a few points from the write up i found but didnt follow it completely step by step....i used 3M adhesive cleaner to clean the tires 3 to 4 times before i initially painted the tires and it came out pretty good can't wait to see how they work out....the guy that wrote the write up i got this from has driven on his with out touchups for a little over 8 months now and hasnt had any issues...he said there is small flex cracks but nothing big that makes em look bad...... but heres a couple pics from before and after...
_________________
Joe
72' Super Beetle |
|
| Back to top |
|
|
KidJoe86
Samba Member
Joined: April 07, 2013
Posts: 35
Location: United States
|
| Posted: Wed Jul 31, 2013 11:52 am Post subject: |
|
|
okay i've been super busy with the project since my last update...gonna try and cover everything i've done so far so here we go......
first off i found that the PO had bodywork done to the car and they used a shit ton of bondo especially on the roof, and it was done incorrectly cause moisture got under the bondo and it was starting to fall apart. heres a pic of what it looked like when i peeled the cracked and broken bondo
so me and my dad went to town on the roof removing the massive pile of filler and used the correct amount of bondo to fix the dents and dings up there
after we finished that up i sanded down the entire car with 80 grit, pretty much just the top coat of paint because it is still a good base for what we're going for
hit it with 220 grit to get the sratches out from the 80 grit, then began priming it
just a side note.. the rear apron is gonna get replaced cause most of it is bondo, so not worth trying to fix it. so just gonna prime it for now...
after that i hit it with a guide coat
also i finally painted the trunk, it only took me a month to get to it...
Here's what she looks like with all the pieces on now.....
_________________
Joe
72' Super Beetle |
|
| Back to top |
|
|
|


