| Author |
Message |
Kabasue
Samba Member

Joined: March 19, 2011
Posts: 359
Location: Nevada

|
 Posted: Sun Dec 14, 2014 3:08 am Post subject: type 4 Engine refresh Posted: Sun Dec 14, 2014 3:08 am Post subject: type 4 Engine refresh |
 |
|
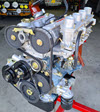
A few months ago I traded two bug engines for a bay window bus that was abandon at a garage 10 years ago. The mechanic said it never ran right even after several tries at getting it to run right. Well I finally pulled the engine and started to strip the engine down. I would like to get away with the doing only the minimum to get it to run properly. I am how ever ready to do a complete rebuild if it becomes necessary. As always I didn't take any before pictures before I got started so sorry  . .
As with all frustrating problems, it probably not 1 big thing that parked this bus, but a bunch of little things added together for one big headache for the previous owner. First thing I noticed was a bunch of engine tins where missing. The front three tins, finger guard, heat deflector, and the small bit that covers the fan shroud to heater box (so if you have any of that I am in the market). Oh and no engine seal. A nut was missing off the intake near piston 1 which why it was extra gritty when I inspected the piston. Probably a nasty vacuum leak. The fuel hose was several different types of hose spliced together which probably severely effected fuel pressure.
Digging further the cooling flap wire was not attached which probably didn't helped with the engine getting up to temperature. The first real problem I ran into was after I removed the push rod tubes, and discovered the lifters where as flat as Kansas in December. The mechanic had said he had a hell of a time adjusting the lifters, and I hoped they might of been hydrological lifters that where dry. Nope mechanical lifters that where worn flat. So I am looking at new lifters, and possible a new cam (I hope not cause I don't want to split the case)
I was worried when I took off the heads I would find burnt valves, and worn out pistons. I was pleasantly surprised at very heads/pistons while dirty where very salvageable. I was even able to rub some of the carbon off with a little gas and my finger tip. I guess I will be sitting around the work bench for a few hours with a toothbrush, and some gas to clean them up.
Heads 1 and 2, notice the 1 spot is extra grungy, pretty sure there was a vacuum leak here.
Pistons 1 and 2, I will have to add new rings as soon as I can find a place to buy them from.
Heads 3 and 4. At some point in the past some one must of worked on them because I found a ton of gasket sealant gluing the jugs to the case.
and of course pistons 3/4
My next steep when I get some free time is to closely inspect the came shaft for wear, and tear.
_________________
Remember to get your VW spayed or neutered
71 SB convertible (Finally Finished!)
73 Transporter (next project)
73 Westy with a 411 engine (Finally Finished) |
|
| Back to top |
|
 |
Bleyseng
Samba Member

Joined: July 03, 2005
Posts: 4759
Location: Seattle
|
| Posted: Sun Dec 14, 2014 7:26 am Post subject: |
|
|
Cam and lifters are a matched set so you need to split the case and install new ones. Its not that difficult and allows you to check the bearings wear and clearance plus other assembly issues.
_________________
70 Ghia Black convert-9/69 build date-stock w/133k 1600 SP-barn find now with a rebuilt tranny and engine
77 Westy 2.0L w/Ljet, Camper Special engine-95hp and with LSD!(sold)
76 Porsche 914 2.1L L20c, 120hp Djet (sold)
87 Syncro Westy Titan Red 2.1L 2 knob 100k miles |
|
| Back to top |
|
|
raygreenwood
Samba Member
Joined: November 24, 2008
Posts: 23531
Location: Oklahoma City
|
| Posted: Sun Dec 14, 2014 8:15 am Post subject: |
|
|
Really....you should go through the heads. Those are vw marked intake valves.....and unless you have proof this thing had low miles on it with no abuse. ...when it was parked long ago....IMHO ....40+ years is too long to still have unknown stock parts running around.
The 3/4 head side looks like it has less valve margin left that the 1/2 side. It has probably had the valves and seats recut at some point.
I would pull the valves, measure guide to valve tolerance and see what you have.
Otherwise....a fairly good condition 1.7l on the surface. Ray |
|
| Back to top |
|
|
Wasted youth
Samba Member

Joined: July 06, 2012
Posts: 5175
Location: California's Hot and Smoggy Central Valley
|
| Posted: Sun Dec 14, 2014 8:27 am Post subject: |
|
|
As bleyseng said... Cams and lifters are matched. It would be foolish to replace only the lifters. If the lifters are flat, what do you think the internal bearings look like?
Have you measured crankshaft end play? Also, lay a straightedge across all four valve tips after you removed the rocker arms. Are the tips uniform, or is one or more sitting high? |
|
| Back to top |
|
|
Kabasue
Samba Member
Joined: March 19, 2011
Posts: 359
Location: Nevada
|
| Posted: Sun Dec 14, 2014 5:20 pm Post subject: |
|
|
Thank you for the useful information, looks like I will be buying some valves as well. As for the lifters I thought you could buy new lifters, and use your old cam, but not the other way around. Can you get your cam/lifters reground, or it's not suggested? New cams and lifters run about 250ish which isn't going to break the bank, but it does add up quick.
I stuck my mag light into the engine case, and all the lobs of the came looked, and felt good except 1 which had the double rainbow wear on it (see the pic below).
While I have your attention, I have 2 other type 4 engines both of which had electric fuel pumps. This one has a mechanical fuel pump with a extra nozzle on it. Was this fuel supply for the gas heater? Which would you suggest mechanical, or electric fuel pumps?
Also trying to split the air shroud, so I can stick it in the dishwasher. I have all the screws out of it, and I can work a screw driver around the outside with no problem. There are two areas that look like a post in it that can be knocked out (see green circles), but I don't want to take a punch and rubber mallet to it until I actually know that is what they are.
_________________
Remember to get your VW spayed or neutered
71 SB convertible (Finally Finished!)
73 Transporter (next project)
73 Westy with a 411 engine (Finally Finished) |
|
| Back to top |
|
|
busdaddy
Samba Member

Joined: February 12, 2004
Posts: 53222
Location: Surrey B.C. Canada, but thinking of Ukraine
|
| Posted: Sun Dec 14, 2014 5:28 pm Post subject: |
|
|
That cam isn't worth putting back in IMO, save money on stuff that's on the outside and easy to change later, stuff like a cam isn't an afternoon driveway job to replace.
The mechanical pump is far better if you are running carbs, correct pressure and automatic gravity feed prevention when stopped, the third line is a drain incase it fails internally.
I can't recall if that's a dowel in your shroud photo or a screw with a broken off head, either way hammering it with a small drift may help.
_________________
Rust NEVER sleeps and stock never goes out of style.
Please don't PM technical questions, ask your problem in public so everyone can play along. If you think it's too stupid post it here
Stop dead photo links! Post your photos to The Samba Gallery!
Слава Україні! |
|
| Back to top |
|
|
Wildthings
Samba Member

Joined: March 13, 2005
Posts: 52739
|
| Posted: Sun Dec 14, 2014 6:26 pm Post subject: |
|
|
| You need to make sure the valves are tight in the guides before making the decision to reuse your heads. Anything more than the tiniest movement side to side is not acceptable. I don't know the wear limit off hand, but I suspect it is something like .005". |
|
| Back to top |
|
|
timvw7476
Samba Member
Joined: June 03, 2013
Posts: 2524
Location: seattle
|
| Posted: Sun Dec 14, 2014 7:48 pm Post subject: type 4 Engine refresh |
|
|
About the cam & lifters, yes they can be resurfaced/rebuilt, DPR in
California can handle it, I prefer to keep the right cam gear # with the
engine case, there is a number, with +,-.or O for neutral, to describe
the tooth off-set of the cam gear, on the backside of your cam gear
set up, it (the#) keeps your gears in proper mesh & prevents the
big cam gear from being chewed up prematurely.
I've found torn cam gear teeth of a O gear wheel ground off in 8,000 miles.
When it happens, everything has to come apart to repair it.
Keeping the factory # driven gear will remove the potential failure. |
|
| Back to top |
|
|
MacLeod Willy
Samba Member
Joined: February 18, 2014
Posts: 933
Location: Ontario Canada
|
| Posted: Sun Dec 14, 2014 8:22 pm Post subject: Fan housing |
|
|
The fan housing has 2 locating pins that are hell to get off. Put a small bit of pressure with the screwdivers around the outside, then soak it with penetrating oil and tap around the pin locations. I said tap.  You may want a beer with you, it might take a while. You may want a beer with you, it might take a while. |
|
| Back to top |
|
|
Wildthings
Samba Member
Joined: March 13, 2005
Posts: 52739
|
| Posted: Sun Dec 14, 2014 8:33 pm Post subject: |
|
|
| Your cam wear it pretty typical for a Type 4 engine. I have had good luck resurfacing lifters and have gone more miles afterwards than many and perhaps most get out of their replacement Type 4 cams. At this point I consider resurfacing the lifters at about 100K miles to be normal maintenance. You need sufficient lift to get good power and have a cool running engine, so checking the lift with a dial indicator would be in order. |
|
| Back to top |
|
|
Kabasue
Samba Member
Joined: March 19, 2011
Posts: 359
Location: Nevada
|
| Posted: Sun Dec 14, 2014 8:40 pm Post subject: |
|
|
should I bang out the pins from the front of the shroud or from behind.
_________________
Remember to get your VW spayed or neutered
71 SB convertible (Finally Finished!)
73 Transporter (next project)
73 Westy with a 411 engine (Finally Finished) |
|
| Back to top |
|
|
Wildthings
Samba Member
Joined: March 13, 2005
Posts: 52739
|
| Posted: Sun Dec 14, 2014 8:57 pm Post subject: |
|
|
I would spray the crap out of them first, maybe giving them several days to soak. Not sure what will happen if you take a hammer and punch to them, maybe not something good.  |
|
| Back to top |
|
|
Wasted youth
Samba Member
Joined: July 06, 2012
Posts: 5175
Location: California's Hot and Smoggy Central Valley
|
| Posted: Sun Dec 14, 2014 11:42 pm Post subject: |
|
|
I had one fan shroud that was a real sonofabitch to separate... but was very glad I stayed with it. The interior was pretty awful. 
What I did was shoot a little penetrating oil in where the pins go. Then got out the collection of putty knives and worked them in between the halves. Careful, even prying effort, a little at a time. Moved the putty knives around to new locations. Kept doing this 'til I got about an 1/8 inch crack. Then moved up with wooden wedges like you use when you install a door casement in a building. Worked a few of those in, then some more until it was finally separated. Took about thirty minutes. The key was to keep the prying pressure as even as possible around the case, while also keeping the penetrating oil on the pins with every little bit of progress.
Personally, I wouldn't tap or hit it, because I am afraid of cracking the cast aluminum or somehow fuggin' up the seat where the pins go. |
|
| Back to top |
|
|
1967250s
Samba Member
Joined: May 02, 2007
Posts: 2137
|
| Posted: Mon Dec 15, 2014 1:38 am Post subject: |
|
|
1700cc? 1800cc? Carbs? I'd bet problem is somewhere else, like carbs. Very few mechanics knew right procedure to do the OG PDSIT's. Cam looks ok to me. Pistons have a few miles on them, better hone cylinders, replace rings. Check valves carefully, they might be sodium filled. Had them break on me a couple times, better to get stainless ones. If you can, do replace or check the bearings. What engine code is there?
_________________
'72 Elm Green Deluxe |
|
| Back to top |
|
|
Kabasue
Samba Member
Joined: March 19, 2011
Posts: 359
Location: Nevada
|
| Posted: Sun Dec 21, 2014 8:54 pm Post subject: |
|
|
Didn't get much done on the engine it's self, but the garage is finally clean! Bit of a set back, I was hoping to start the rebuild of the engine in February, but I just got a 1400 dollar repair bill for the front end of my bug (I think I just paid for their x-mass).
I did get the pressure plate and the clutch disk off. Looks like their was some serious chatter. I am hoping the pressure plate is salvageable, and the dark stains I see mean nothing important.
I can't get the fly wheel off, it's only supposed to be on with 80 pounds of pressure. I can't get it loose, and none of my breaker bars are the correct size for my 17mm any suggestions?
_________________
Remember to get your VW spayed or neutered
71 SB convertible (Finally Finished!)
73 Transporter (next project)
73 Westy with a 411 engine (Finally Finished) |
|
| Back to top |
|
|
Wildthings
Samba Member
Joined: March 13, 2005
Posts: 52739
|
| Posted: Sun Dec 21, 2014 9:33 pm Post subject: |
|
|
Looks like you have a hodge podge of bolts there. Maybe they are 16mm and not 17mm heads, or maybe the threads were retapped to take English bolts. Kind of hard to know until you get them off. How does a 5/8 socket fit?
How are you locking the flywheel? It takes a pretty good lever/bar to hold it securely. |
|
| Back to top |
|
|
1967250s
Samba Member
Joined: May 02, 2007
Posts: 2137
|
| Posted: Sun Dec 21, 2014 9:58 pm Post subject: |
|
|
They may easily have been over torqued by some dummy. Run it over to a mechanic and have them take them out with an airgun, bet it would be cheap. Be sure not to force case apart. If it won't split easily, you have missed something.
_________________
'72 Elm Green Deluxe |
|
| Back to top |
|
|
SGKent 
Samba Member
Joined: October 30, 2007
Posts: 42958
Location: at the beach in Northern Wokistan
|
| Posted: Sun Dec 21, 2014 10:02 pm Post subject: |
|
|
If you read enough threads here and in other VW type 4 engine forums you will find one consistent statement that brings little argument. It goes something like, "Well, we have all been bit trying to same money with a reground cam and lifters."
I think that in a type 1 engine you can get away with it but in a type 4 engine it just comes back eventually to bite you.
Lifters can be reground and reseated to original cam but you are living dangerously when you do this. If a lobe goes flat you will have to pull the engine and split the case again.
From the evenness of the carbon on the pistons and the lack of the oil washing over the rings, my best guess is that engine has somewhere around 50,000 miles on it and has been rebuilt before as Wildthings picked up on what looks like to me too to be different flywheel bolts, and some rounded at that.
_________________
 Canned Water - the new California approved parts cleaner (except in a drought in which case rub it with sand). Canned Water - the new California approved parts cleaner (except in a drought in which case rub it with sand).
George Carlin:
"Most people don't know what they're doing, and a lot of them are really good at it."
Skills@EuroCarsPlus:
"never time to do it right but always time to do it twice" |
|
| Back to top |
|
|
Tcash
Samba Member

Joined: July 20, 2011
Posts: 12843
Location: San Jose, California, USA
|
| Posted: Mon Dec 22, 2014 6:53 am Post subject: |
|
|
none of my breaker bars are the correct size for my 17mm any suggestions?
Measure the square drive on the breaker bar and the socket square hole.
You probably need the 1/2 to 3/8 adapter.
3 Pc Impact Socket Adapter Set
Don't round off the bolt heads anymore. Or you will be chiseling or cutting them off with a torch.
Good Luck
Tcash |
|
| Back to top |
|
|
flat4powerhouse
Samba Member
Joined: May 18, 2007
Posts: 27
Location: rapid city sd
|
| Posted: Mon Dec 22, 2014 10:07 am Post subject: |
|
|
big ass breaker bar or air ratchet is what works the best, deff wouldn't hot chisel them off
_________________
because i live in a bus down by the river
78 bay window truck
68 baja bug |
|
| Back to top |
|
|
|


