| Author |
Message |
E.Tolkamp
Samba Member

Joined: May 31, 2019
Posts: 19
Location: Clinton, B.C.

|
 Posted: Thu Jun 11, 2020 9:10 pm Post subject: 1959 Survivor Restoration Build Posted: Thu Jun 11, 2020 9:10 pm Post subject: 1959 Survivor Restoration Build |
 |
|
I have decided to document my journey on my first VW build to help me along the process and to keep me motivated along the way. A couple months ago I purchased a 1962 baja pan and body that i intended to restore back to original condition, so I started on the search for a donor car. I came across an add for a 1960 rolling shell for a good price and thought it had enough parts to help me with my '62 so I drove out to pick it up. When I arrived and started looking over the car I noticed it had original tube fenders and ribbed fenders and thought to myself it might be an earlier model, so I looked up the vin and sure enough it came back as a 1959. I have since decided to use my '62 as a parts car and to get the 1959 road worthy again, leaving the original paint and patina, dents, scrapes and character and adding some personal touches along the way.
Picking it up after 30+ years sitting in the trees
Back home, no garage so most of the work will be done outdoors
|
|
| Back to top |
|
 |
Chickensoup
Samba Member
Joined: January 06, 2018
Posts: 5395
Location: Good Hope, GA
|
| Posted: Thu Jun 11, 2020 10:39 pm Post subject: Re: 1959 Survivor Restoration Build |
|
|
cool car. i see potential. what are your plans?
_________________
-'85 c10 5.3 LS, cam, heads, long tubes, x pipe, 3 inch spin tech's
-'01 e46 325ci *tree modded 
-'05 B5.5 TDI Wagon 17in sport rims ;EGR + BSM + ASV Delete, Stage-2 Tune, straight pipe
'65 Tourist Delivery Build
'66 RIP |
|
| Back to top |
|
|
finster
Samba Member

Joined: May 26, 2012
Posts: 10594
Location: not far from the madding crowd
|
| Posted: Fri Jun 12, 2020 1:58 am Post subject: Re: 1959 Survivor Restoration Build |
|
|
not sure what your weather is like there but wouldn't it be advisable to build a simple shelter or car port first to keep it out of the elements?
_________________
"we're here on Earth to fart around" kurt vonnegut
nothing lasts, nothing is finished, and nothing is perfect... |
|
| Back to top |
|
|
E.Tolkamp
Samba Member
Joined: May 31, 2019
Posts: 19
Location: Clinton, B.C.
|
| Posted: Fri Jun 12, 2020 9:03 am Post subject: Re: 1959 Survivor Restoration Build |
|
|
Chickensoup, my plans are to do all the typical rust repair trying to preserve as much as the original paint and patina on the exterior as possible. I am planning to lower it a bit and keep original 5 lug VW wheels, I have a 40hp case that came with the purchase that I plan on building to shove in there. For the interior I have seen a beige tweed set that I would like to try out , tho one change I would make would be to have a small headliner like the Canadian standards. That is about all I've thought up for now.
finster, I will probably end up making a little tarp lean to near the end of summer but for now its decent enough weather to work in the elements, and since it has sat outside for 30 years it will be fine outside for the disassembly stage of this build. |
|
| Back to top |
|
|
E.Tolkamp
Samba Member
Joined: May 31, 2019
Posts: 19
Location: Clinton, B.C.
|
| Posted: Fri Jun 12, 2020 5:35 pm Post subject: Re: 1959 Survivor Restoration Build |
|
|
Started with cleaning the exterior of the dirt and grime build up to see some more of the og colour which I found out is L335 Capri Blue. So far I have removed the passenger and rear seat, steering column, speedo, gas tank, rear quarter windows, all 4 fenders, pan bolts and the front beam. One of the best investments I made was a propane torch which I used on every body to pan and fender bolt, with only 4 bolts snapping off in the process. Removing the body was a bit of a chore for a one man crew without any jacks but i made due caveman style with what I had in the yard. Definitely going to invest in a jack in the near future to make life easier! Here are the progress Pictures so far. Enjoy!
Half cleaned
Gas tank removed
2 seats removed, drivers is rusted on the rails
Fenders removed
Lifting the body
Front beam removal and dismantle
|
|
| Back to top |
|
|
61SNRF
Samba Member

Joined: March 29, 2009
Posts: 4658
Location: Whittier 90602
|
| Posted: Fri Jun 12, 2020 6:36 pm Post subject: Re: 1959 Survivor Restoration Build |
|
|
Looks like it survived a hurricane!
I do like your credo though, original is where it's at now. Can't buy that sh*t 
Best wishes for a fun time ahead 
_________________
-Bruce
An ounce of prevention is worth a pound of cure. |
|
| Back to top |
|
|
E.Tolkamp
Samba Member
Joined: May 31, 2019
Posts: 19
Location: Clinton, B.C.
|
| Posted: Fri Jun 12, 2020 7:27 pm Post subject: Re: 1959 Survivor Restoration Build |
|
|
| Thanks! Yup it definitely needs some work hah should be a fun project to work on |
|
| Back to top |
|
|
Forever Busless
Samba Member
Joined: May 07, 2020
Posts: 5
Location: Boston
|
| Posted: Mon Jun 22, 2020 9:05 pm Post subject: Re: 1959 Survivor Restoration Build |
|
|
Right on brother!!! Survivor original. Patina.Rust. Dents, and Scratches. They all tell a little history of the car. A window into its past. Not to mention how upsetting it is getting a scratch in a pristine paint job. Want to drive it? Enjoy it? It is a better way to go I think. I also have a 59. Same color it looks like. Just uncovered the original interior under some new seat covers, and deciding to leave it alone. If you can, and it’s original, use it. If it is way beyond, and if you can, replace with original used. Dirty, and old looking it may be, but that is age. That is patina. That is art. True Five Nine style. Keep it up, can’t wait to see when she’s rollin!!!
-Once in a while you get shown the light, in the strangest of places if you look at it right. -R. Hunter |
|
| Back to top |
|
|
E.Tolkamp
Samba Member
Joined: May 31, 2019
Posts: 19
Location: Clinton, B.C.
|
| Posted: Mon Jun 22, 2020 9:43 pm Post subject: Re: 1959 Survivor Restoration Build |
|
|
Slow progress on the survivor restoration but none the less.. progress. Its hard to spend money and time on the vw when money needs to be put into the daily driver and time needs to be spent with 3 little kids, but there is still an update on the tear down.
I was able to spend some time cleaning and wire wheeling the front beam, making it look a lot better. I am considering just clear coating it instead of some fresh black paint just to go with the whole survivor patina look of the car. Today I completed the task of dragging the pan out from under the body which is making it so much easier dismantling the rest of the odds and ends on the pan.
The master cylinder is removed and the pedal cluster is unbolted, I just need to unhook the cable. Will I need to grab it with something so it doesn't fall into the tunnel or is it quite easy to retrieve ones disconnected? That is pretty much all the progress so far, next up will be to get the transmission separated from the pan.
Front beam cleaned up
Pan removed from under the body
This is the cable I'm worried of losing in the tunnel, or will it just drop down where it is?
|
|
| Back to top |
|
|
Pruneman99
Samba Member
Joined: February 22, 2012
Posts: 5013
Location: Oceanside
|
| Posted: Mon Jun 22, 2020 10:43 pm Post subject: Re: 1959 Survivor Restoration Build |
|
|
The clutch cable? It will stay there but you can feed it from the back if it gets lost. It rides in a tube of it's own. But it should really get replaced.
Nice find. Good luck! |
|
| Back to top |
|
|
E.Tolkamp
Samba Member
Joined: May 31, 2019
Posts: 19
Location: Clinton, B.C.
|
| Posted: Tue Jun 23, 2020 8:30 am Post subject: Re: 1959 Survivor Restoration Build |
|
|
| Pruneman99 wrote: |
The clutch cable? It will stay there but you can feed it from the back if it gets lost. It rides in a tube of it's own. But it should really get replaced.
Nice find. Good luck! |
Ahh thanks, I will for sure be replacing it then |
|
| Back to top |
|
|
E.Tolkamp
Samba Member
Joined: May 31, 2019
Posts: 19
Location: Clinton, B.C.
|
| Posted: Tue Jun 23, 2020 8:40 am Post subject: Re: 1959 Survivor Restoration Build |
|
|
| Forever Busless wrote: |
Right on brother!!! Survivor original. Patina.Rust. Dents, and Scratches. They all tell a little history of the car. A window into its past. Not to mention how upsetting it is getting a scratch in a pristine paint job. Want to drive it? Enjoy it? It is a better way to go I think. I also have a 59. Same color it looks like. Just uncovered the original interior under some new seat covers, and deciding to leave it alone. If you can, and it’s original, use it. If it is way beyond, and if you can, replace with original used. Dirty, and old looking it may be, but that is age. That is patina. That is art. True Five Nine style. Keep it up, can’t wait to see when she’s rollin!!!
-Once in a while you get shown the light, in the strangest of places if you look at it right. -R. Hunter |
Yeup thats what Im thinking! Some of the bigger dents I will try and hammer out a bit but for the most part leave it as is. I checked out your '59 looks like a really solid starting point, its always nice to uncover factory interior! |
|
| Back to top |
|
|
Rome
Samba Member
Joined: June 02, 2004
Posts: 10829
Location: Pearl River, NY
|
| Posted: Tue Jun 23, 2020 1:11 pm Post subject: Re: 1959 Survivor Restoration Build |
|
|
| Joeric, several years ago a very devoted, and motivated man in England described his experience with reviving a barn find oval window Beetle. Although the thread is very long, I'm sure some of his parts revival techniques can be applied to your '59: https://www.thesamba.com/vw/forum/viewtopic.php?t=419739&highlight= |
|
| Back to top |
|
|
E.Tolkamp
Samba Member
Joined: May 31, 2019
Posts: 19
Location: Clinton, B.C.
|
| Posted: Tue Jun 23, 2020 8:45 pm Post subject: Re: 1959 Survivor Restoration Build |
|
|
Thanks for the link Rome, looks like I have a bunch of reading to do! |
|
| Back to top |
|
|
E.Tolkamp
Samba Member
Joined: May 31, 2019
Posts: 19
Location: Clinton, B.C.
|
| Posted: Fri Jun 26, 2020 3:43 pm Post subject: Re: 1959 Survivor Restoration Build |
|
|
I was able to get out today and work on the chassis, the mosquitoes are ferocious this time of year and with no cover its hard to get work done without getting eatin alive! First I started by removing the rear shocks, drums and spring plate bolts. The propane torch has been the most useful tool so far this build almost every nut and bolt has required it! I then proceeded to cut the rubber brake lines and detach the clutch cable, the rear transmission mount bolts were already removed previous to my owner ship so I just needed to remove the two from the nose cone and I was able to yank out the transaxle. Now that the pan is light enough I can load it into the back of my truck and bring it down to the mainland to my Dads where I have access to more tools and a welder and my '62 parts car is parked there as well. My next step is to get to the body and try and remove the 2 doors, I am hoping with my trusty torch that they wont give me to much grief! Wish me luck haha
|
|
| Back to top |
|
|
E.Tolkamp
Samba Member
Joined: May 31, 2019
Posts: 19
Location: Clinton, B.C.
|
| Posted: Sat Jul 11, 2020 3:35 pm Post subject: Re: 1959 Survivor Restoration Build |
|
|
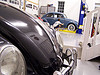
I was able to load the transaxle and the pan into the back of my truck and bring it down to the mainland where I will be doing the majority of the work on it. My Dad had a wooden dolly that needed assembly which made for a good platform for working on the pan. I was able to cut out the remainder of the pan halfs and clean up the edges to start fitting some new pans in.
Wasnt much left of the passenger side pan, made for a quick cut out.
both sides removed
I started with a hammer and chisel then found this air chisel which made the job 10x easier!
Test fitting a pan that my dad had in his shop, not looking to bad
Picture of my 1962 parts car
Complementary picture of my dads 1959 Beetle that he is close to putting back on the road. We found out both our Beetles were probably shipped on the same boat to Vancouver back in the day, our VIN numbers are only 800 apart which is pretty interesting.
|
|
| Back to top |
|
|
Dibaltic
Samba Member
Joined: May 06, 2007
Posts: 564
Location: Chambersburg, Pennsylvania
|
| Posted: Sat Jul 11, 2020 3:53 pm Post subject: Re: 1959 Survivor Restoration Build |
|
|
| Nice work! Cool you and your Dad both have 1959's my dad I both have 59's as well. |
|
| Back to top |
|
|
Rome
Samba Member
Joined: June 02, 2004
Posts: 10829
Location: Pearl River, NY
|
| Posted: Sun Jul 12, 2020 1:13 pm Post subject: Re: 1959 Survivor Restoration Build |
|
|
| What's the story with the blue oval Beetle in your dad's garage? |
|
| Back to top |
|
|
E.Tolkamp
Samba Member
Joined: May 31, 2019
Posts: 19
Location: Clinton, B.C.
|
| Posted: Sun Jul 12, 2020 4:35 pm Post subject: Re: 1959 Survivor Restoration Build |
|
|
| Dibaltic wrote: |
| Nice work! Cool you and your Dad both have 1959's my dad I both have 59's as well. |
Thanks! That's pretty cool, the more I read about 1959's the more appreciation I have for them. |
|
| Back to top |
|
|
E.Tolkamp
Samba Member
Joined: May 31, 2019
Posts: 19
Location: Clinton, B.C.
|
| Posted: Sun Jul 12, 2020 4:38 pm Post subject: Re: 1959 Survivor Restoration Build |
|
|
| Rome wrote: |
| What's the story with the blue oval Beetle in your dad's garage? |
We picked it up locally around 4 months ago, not to sure about the history of it. My dad is planning to start on it once he finishes his '59, slowly working towards getting a split one day! |
|
| Back to top |
|
|
|


