Posted: Yesterday 5:18 am
Size: 600x400 Views: 7
Rating: Not rated
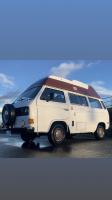
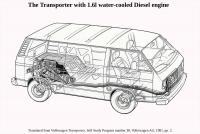
251261169c OEV VW Underbody Heater Protective Plate sanchius
"Originally fitted to models with the additional Eberspächer BA6/DA6 heater between the chassis rails, but useful protection for things like chargecooler pipework" View other images: From sanchius Search Forums for photo
Posted: Yesterday 5:18 am
Size: 343x354 Views: 2
Rating: Not rated
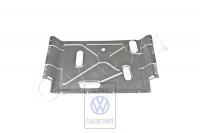
251261169c OEV VW Underbody Heater Protective Plate sanchius
"Originally fitted to models with the additional Eberspächer BA6/DA6 heater between the chassis rails, but useful protection for things like chargecooler pipework" View other images: From sanchius Search Forums for photo
Posted: Yesterday 5:18 am
Size: 450x650 Views: 6
Rating: Not rated
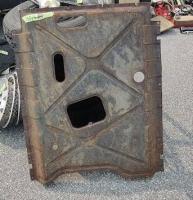
251261169c OEV VW Underbody Heater Protective Plate sanchius
"Originally fitted to models with the additional Eberspächer BA6/DA6 heater between the chassis rails, but useful protection for things like chargecooler pipework" View other images: From sanchius Search Forums for photo
Posted: Mon Dec 01, 2025 8:42 pm
Size: 1600x1200 Views: 3
Rating: Not rated
1992 Eurovan California Westfalia fridge mod Camper75
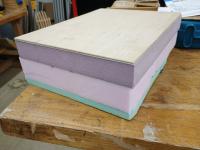
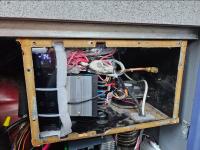
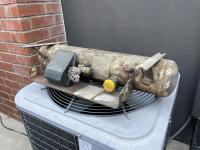
I was having a bunch of fridge issues with my 1992 eurovan. After a bunch of research I realized it could cost $1000+ to repair, and I'd be still stuck with a temperamental old fridge. I tried a new idea. I purchased a BODEGACOOLER 12 Volt compressor style cooler for about $300. I ripped the cooler apart without damaging any of the refrigerant components. I removed the eurovan compressor and condenser and controller, saving as much of the copper piping as i could (cut as close to the compressor and condenser as I could.) On the BODEGACOOLER I cut off the evaporator piping leaving as much copper line as I could (cut the copper lines just before the transition to aluminum lines.) I carefully twisted and pulled the aluminum piping out of the ecomomizer coil, sliding the coil onto the same line just onto the copper section of it closer to the compressor.) I soldered the 1/4" copper evaporator vapor line (out) on the eurovan to the copper 1/4" line to the compressor in, adding a couple of feet of 1/4" copper refrigerant line so I could work on everythingon the floor of the van. I cut the copper line from the condenser to the evaporate where it was 1/4" on both the van and the cooler (keeping both tiny copper lines and both moisture collectors attached to the half i was keeping.) This just means I have two moisture collectors in the system. I also have two capillary tubes (small copper lines,) in the system, but it seem to work fine with both. Because Idid this I could solder the lines in between the two at the 1/4" copper lines attached to the capillary tubes. I also soldered a refrigerant fill valve to the compressor, as the cooler just had the fill line pinched off and sealed. I attached the new compressor temperature sensing unit to the vapor line midway between the evaporator and compressor, (aluminum foil taped to the line under the tube insulation.)
I pulled a vacuum on the system for about 45min. Then filled the system with a small amount of R134a. Tested it, insulated the lines, and then tucked it in View other images: From Camper75 Search Forums for photo
Posted: Mon Dec 01, 2025 4:52 pm
Size: 1079x811 Views: 0
Rating: Not rated
1992 Eurovan California Westfalia fridge mods Camper75
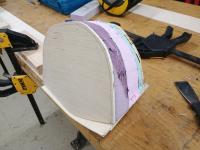
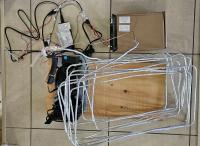
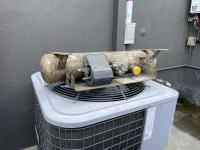
I was having a bunch of fridge issues with my 1992 eurovan. After a bunch of research I realized it could cost $1000+ to repair, and I'd be still stuck with a temperamental old fridge. I tried a new idea. I purchased a BODEGACOOLER 12 Volt compressor style cooler for about $300. I ripped the cooler apart without damaging any of the refrigerant components. I removed the eurovan compressor and condenser and controller, saving as much of the copper piping as i could (cut as close to the compressor and condenser as I could.) On the BODEGACOOLER I cut off the evaporator piping leaving as much copper line as I could (cut the copper lines just before the transition to aluminum lines.) I carefully twisted and pulled the aluminum piping out of the ecomomizer coil, sliding the coil onto the same line just onto the copper section of it closer to the compressor.) I soldered the 1/4" copper evaporator vapor line (out) on the eurovan to the copper 1/4" line to the compressor in, adding a couple of feet of 1/4" copper refrigerant line so I could work on everythingon the floor of the van. I cut the copper line from the condenser to the evaporate where it was 1/4" on both the van and the cooler (keeping both tiny copper lines and both moisture collectors attached to the half i was keeping.) This just means I have two moisture collectors in the system. I also have two capillary tubes (small copper lines,) in the system, but it seem to work fine with both. Because Idid this I could solder the lines in between the two at the 1/4" copper lines attached to the capillary tubes. I also soldered a refrigerant fill valve to the compressor, as the cooler just had the fill line pinched off and sealed. I attached the new compressor temperature sensing unit to the vapor line midway between the evaporator and compressor, (aluminum foil taped to the line under the tube insulation.)
I pulled a vacuum on the system for about 45min. Then filled the system with a small amount of R134a. Tested it, insulated the lines, and then tucked it in View other images: From Camper75 Search Forums for photo
Posted: Mon Dec 01, 2025 4:01 pm
Size: 1096x1600 Views: 0
Rating: Not rated
1992 Eurovan California Westfalia fridge mod Camper75
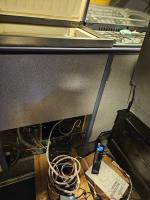
I was having a bunch of fridge issues with my 1992 eurovan. After a bunch of research I realized it could cost $1000+ to repair, and I'd be still stuck with a temperamental old fridge. I tried a new idea. I purchased a BODEGACOOLER 12 Volt compressor style cooler for about $300. I ripped the cooler apart without damaging any of the refrigerant components. I removed the eurovan compressor and condenser and controller, saving as much of the copper piping as i could (cut as close to the compressor and condenser as I could.) On the BODEGACOOLER I cut off the evaporator piping leaving as much copper line as I could (cut the copper lines just before the transition to aluminum lines.) I carefully twisted and pulled the aluminum piping out of the ecomomizer coil, sliding the coil onto the same line just onto the copper section of it closer to the compressor.) I soldered the 1/4" copper evaporator vapor line (out) on the eurovan to the copper 1/4" line to the compressor in, adding a couple of feet of 1/4" copper refrigerant line so I could work on everythingon the floor of the van. I cut the copper line from the condenser to the evaporate where it was 1/4" on both the van and the cooler (keeping both tiny copper lines and both moisture collectors attached to the half i was keeping.) This just means I have two moisture collectors in the system. I also have two capillary tubes (small copper lines,) in the system, but it seem to work fine with both. Because Idid this I could solder the lines in between the two at the 1/4" copper lines attached to the capillary tubes. I also soldered a refrigerant fill valve to the compressor, as the cooler just had the fill line pinched off and sealed. I attached the new compressor temperature sensing unit to the vapor line midway between the evaporator and compressor, (aluminum foil taped to the line under the tube insulation.)
I pulled a vacuum on the system for about 45min. Then filled the system with a small amount of R134a. Tested it, insulated the lines, and then tucked it in View other images: From Camper75 Search Forums for photo
Posted: Mon Dec 01, 2025 4:01 pm
Size: 1600x1200 Views: 0
Rating: Not rated
1992 Eurovan California Westfalia fridge mod Camper75
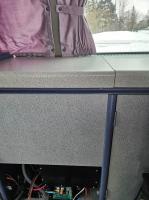
I was having a bunch of fridge issues with my 1992 eurovan. After a bunch of research I realized it could cost $1000+ to repair, and I'd be still stuck with a temperamental old fridge. I tried a new idea. I purchased a BODEGACOOLER 12 Volt compressor style cooler for about $300. I ripped the cooler apart without damaging any of the refrigerant components. I removed the eurovan compressor and condenser and controller, saving as much of the copper piping as i could (cut as close to the compressor and condenser as I could.) On the BODEGACOOLER I cut off the evaporator piping leaving as much copper line as I could (cut the copper lines just before the transition to aluminum lines.) I carefully twisted and pulled the aluminum piping out of the ecomomizer coil, sliding the coil onto the same line just onto the copper section of it closer to the compressor.) I soldered the 1/4" copper evaporator vapor line (out) on the eurovan to the copper 1/4" line to the compressor in, adding a couple of feet of 1/4" copper refrigerant line so I could work on everythingon the floor of the van. I cut the copper line from the condenser to the evaporate where it was 1/4" on both the van and the cooler (keeping both tiny copper lines and both moisture collectors attached to the half i was keeping.) This just means I have two moisture collectors in the system. I also have two capillary tubes (small copper lines,) in the system, but it seem to work fine with both. Because Idid this I could solder the lines in between the two at the 1/4" copper lines attached to the capillary tubes. I also soldered a refrigerant fill valve to the compressor, as the cooler just had the fill line pinched off and sealed. I attached the new compressor temperature sensing unit to the vapor line midway between the evaporator and compressor, (aluminum foil taped to the line under the tube insulation.)
I pulled a vacuum on the system for about 45min. Then filled the system with a small amount of R134a. Tested it, insulated the lines, and then tucked it in View other images: From Camper75 Search Forums for photo
Posted: Mon Dec 01, 2025 4:01 pm
Size: 1600x1175 Views: 0
Rating: Not rated
1992 Eurovan California Westfalia fridge mod Camper75
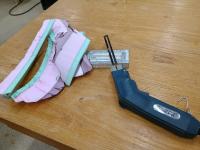
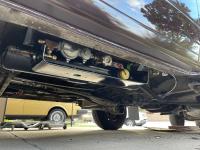
I was having a bunch of fridge issues with my 1992 eurovan. After a bunch of research I realized it could cost $1000+ to repair, and I'd be still stuck with a temperamental old fridge. I tried a new idea. I purchased a BODEGACOOLER 12 Volt compressor style cooler for about $300. I ripped the cooler apart without damaging any of the refrigerant components. I removed the eurovan compressor and condenser and controller, saving as much of the copper piping as i could (cut as close to the compressor and condenser as I could.) On the BODEGACOOLER I cut off the evaporator piping leaving as much copper line as I could (cut the copper lines just before the transition to aluminum lines.) I carefully twisted and pulled the aluminum piping out of the ecomomizer coil, sliding the coil onto the same line just onto the copper section of it closer to the compressor.) I soldered the 1/4" copper evaporator vapor line (out) on the eurovan to the copper 1/4" line to the compressor in, adding a couple of feet of 1/4" copper refrigerant line so I could work on everythingon the floor of the van. I cut the copper line from the condenser to the evaporate where it was 1/4" on both the van and the cooler (keeping both tiny copper lines and both moisture collectors attached to the half i was keeping.) This just means I have two moisture collectors in the system. I also have two capillary tubes (small copper lines,) in the system, but it seem to work fine with both. Because Idid this I could solder the lines in between the two at the 1/4" copper lines attached to the capillary tubes. I also soldered a refrigerant fill valve to the compressor, as the cooler just had the fill line pinched off and sealed. I attached the new compressor temperature sensing unit to the vapor line midway between the evaporator and compressor, (aluminum foil taped to the line under the tube insulation.)
I pulled a vacuum on the system for about 45min. Then filled the system with a small amount of R134a. Tested it, insulated the lines, and then tucked it in View other images: From Camper75 Search Forums for photo
Posted: Mon Dec 01, 2025 4:01 pm
Size: 1200x1600 Views: 1
Rating: Not rated
1992 Eurovan California Westfalia fridge mod Camper75
I was having a bunch of fridge issues with my 1992 eurovan. After a bunch of research I realized it could cost $1000+ to repair, and I'd be still stuck with a temperamental old fridge. I tried a new idea. I purchased a BODEGACOOLER 12 Volt compressor style cooler for about $300. I ripped the cooler apart without damaging any of the refrigerant components. I removed the eurovan compressor and condenser and controller, saving as much of the copper piping as i could (cut as close to the compressor and condenser as I could.) On the BODEGACOOLER I cut off the evaporator piping leaving as much copper line as I could (cut the copper lines just before the transition to aluminum lines.) I carefully twisted and pulled the aluminum piping out of the ecomomizer coil, sliding the coil onto the same line just onto the copper section of it closer to the compressor.) I soldered the 1/4" copper evaporator vapor line (out) on the eurovan to the copper 1/4" line to the compressor in, adding a couple of feet of 1/4" copper refrigerant line so I could work on everythingon the floor of the van. I cut the copper line from the condenser to the evaporate where it was 1/4" on both the van and the cooler (keeping both tiny copper lines and both moisture collectors attached to the half i was keeping.) This just means I have two moisture collectors in the system. I also have two capillary tubes (small copper lines,) in the system, but it seem to work fine with both. Because Idid this I could solder the lines in between the two at the 1/4" copper lines attached to the capillary tubes. I also soldered a refrigerant fill valve to the compressor, as the cooler just had the fill line pinched off and sealed. I attached the new compressor temperature sensing unit to the vapor line midway between the evaporator and compressor, (aluminum foil taped to the line under the tube insulation.)
I pulled a vacuum on the system for about 45min. Then filled the system with a small amount of R134a. Tested it, insulated the lines, and then tucked it in View other images: From Camper75 Search Forums for photo
Posted: Mon Dec 01, 2025 4:01 pm
Size: 1079x1440 Views: 0
Rating: Not rated
1992 Eurovan California Westfalia fridge mod Camper75
I was having a bunch of fridge issues with my 1992 eurovan. After a bunch of research I realized it could cost $1000+ to repair, and I'd be still stuck with a temperamental old fridge. I tried a new idea. I purchased a BODEGACOOLER 12 Volt compressor style cooler for about $300. I ripped the cooler apart without damaging any of the refrigerant components. I removed the eurovan compressor and condenser and controller, saving as much of the copper piping as i could (cut as close to the compressor and condenser as I could.) On the BODEGACOOLER I cut off the evaporator piping leaving as much copper line as I could (cut the copper lines just before the transition to aluminum lines.) I carefully twisted and pulled the aluminum piping out of the ecomomizer coil, sliding the coil onto the same line just onto the copper section of it closer to the compressor.) I soldered the 1/4" copper evaporator vapor line (out) on the eurovan to the copper 1/4" line to the compressor in, adding a couple of feet of 1/4" copper refrigerant line so I could work on everythingon the floor of the van. I cut the copper line from the condenser to the evaporate where it was 1/4" on both the van and the cooler (keeping both tiny copper lines and both moisture collectors attached to the half i was keeping.) This just means I have two moisture collectors in the system. I also have two capillary tubes (small copper lines,) in the system, but it seem to work fine with both. Because Idid this I could solder the lines in between the two at the 1/4" copper lines attached to the capillary tubes. I also soldered a refrigerant fill valve to the compressor, as the cooler just had the fill line pinched off and sealed. I attached the new compressor temperature sensing unit to the vapor line midway between the evaporator and compressor, (aluminum foil taped to the line under the tube insulation.)
I pulled a vacuum on the system for about 45min. Then filled the system with a small amount of R134a. Tested it, insulated the lines, and then tucked it in View other images: From Camper75 Search Forums for photo
Posted: Mon Dec 01, 2025 9:48 am
Size: 1024x768 Views: 6
Rating: Not rated
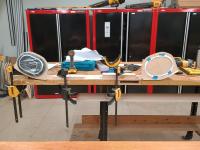
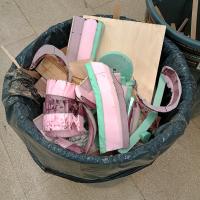
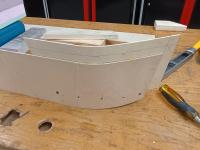
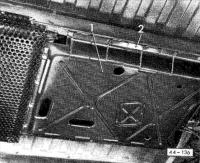
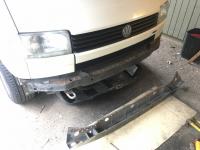
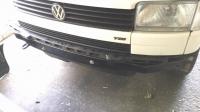
Early Eurovan/T4 Euro spec bumper install Joshwa
Series of pictures that cover the removal of US spec bumper extra metal View other images: From Joshwa Search Forums for photo
Posted: Mon Dec 01, 2025 9:48 am
Size: 768x1024 Views: 2
Rating: Not rated
Early Eurovan/T4 Euro spec bumper install Joshwa
Series of pictures that cover the removal of US spec bumper extra metal View other images: From Joshwa Search Forums for photo
Posted: Mon Dec 01, 2025 9:48 am
Size: 1024x768 Views: 5
Rating: Not rated
Early Eurovan/T4 Euro spec bumper install Joshwa
Series of pictures that cover the removal of US spec bumper extra metal View other images: From Joshwa Search Forums for photo
Posted: Mon Dec 01, 2025 9:48 am
Size: 1024x768 Views: 2
Rating: Not rated
Early Eurovan/T4 Euro spec bumper install Joshwa
Series of pictures that cover the removal of US spec bumper extra metal View other images: From Joshwa Search Forums for photo
Posted: Mon Dec 01, 2025 9:48 am
Size: 1024x576 Views: 2
Rating: Not rated
Early Eurovan/T4 Euro spec bumper install Joshwa
Series of pictures that cover the removal of US spec bumper extra metal View other images: From Joshwa Search Forums for photo
Posted: Mon Dec 01, 2025 9:48 am
Size: 1024x768 Views: 1
Rating: Not rated
Early Eurovan/T4 Euro spec bumper install Joshwa
Series of pictures that cover the removal of US spec bumper extra metal View other images: From Joshwa Search Forums for photo
Posted: Mon Dec 01, 2025 9:48 am
Size: 1024x576 Views: 1
Rating: Not rated
Early Eurovan/T4 Euro spec bumper install Joshwa
Series of pictures that cover the removal of US spec bumper extra metal View other images: From Joshwa Search Forums for photo
Posted: Mon Dec 01, 2025 9:48 am
Size: 1024x768 Views: 2
Rating: Not rated
Early Eurovan/T4 Euro spec bumper install Joshwa
Series of pictures that cover the removal of US spec bumper extra metal View other images: From Joshwa Search Forums for photo
Posted: Mon Dec 01, 2025 9:48 am
Size: 1024x768 Views: 2
Rating: Not rated
Early Eurovan/T4 Euro spec bumper install Joshwa
Series of pictures that cover the removal of US spec bumper extra metal View other images: From Joshwa Search Forums for photo
All times are Mountain Standard Time/Pacific Daylight Savings Time Page 1 of 4297
You cannot upload new pics in this category You cannot rate pics in this category You cannot edit your pics and comments in this category You cannot delete your pics and comments in this category