| Author |
Message |
finster
Samba Member

Joined: May 26, 2012
Posts: 9932
Location: not far from the madding crowd

|
 Posted: Mon May 19, 2025 3:44 am Post subject: Re: Hebster52 Posted: Mon May 19, 2025 3:44 am Post subject: Re: Hebster52 |
 |
|
so much good work there on small details.  how does the rain drain off the catcher? how does the rain drain off the catcher?
_________________
"we're here on Earth to fart around" kurt vonnegut
nothing lasts, nothing is finished, and nothing is perfect... |
|
| Back to top |
|
 |
Hebster52
Samba Member
Joined: March 14, 2003
Posts: 1886
Location: Finland, Jakobstad
|
|
| Back to top |
|
|
Hebster52
Samba Member
Joined: March 14, 2003
Posts: 1886
Location: Finland, Jakobstad
|
| Posted: Mon Jun 02, 2025 10:05 pm Post subject: Re: Hebster52 |
|
|
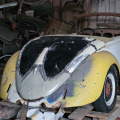
Been mostly working on new parts and details the past weeks.
Bent the 30mm tube for the windshield frame. The tubewill have to be cut into two pieces to be able to fit it later.
Btw. The windshield will be split sedan windshield as originally on the first prototype. However the frame will be detailled more like the vert frames just to avoid looking like the Wizard roadsters from the 80's and 90's..
Now turning my work forward on the body I just couldn't look at the half arsed work a 20 years younger me had done... So I decided to make it right...
The sparewheel well also needed new bottom. In this case i decided to not make it myself from sheetmetal.. But could not afford the very expensive and nice panel from wolfparts so I just bought some economy panel for 1/10th of the price.
Off course I couldn't use it as it was so it got beaten right away to look more correct.. The bulge in the bottom needed to be smoothened out!
Also had to chisel out the typical pre-55 tabs for the wiring..
_________________
~Kris~
"The Hebster52" my Hebmuller replica build
The 912ST
The KidVRod project
The 356 Pre-A replica,SOLD
The 1966 Kommanderwagen, SOLD |
|
| Back to top |
|
|
Hebster52
Samba Member
Joined: March 14, 2003
Posts: 1886
Location: Finland, Jakobstad
|
|
| Back to top |
|
|
Hebster52
Samba Member
Joined: March 14, 2003
Posts: 1886
Location: Finland, Jakobstad
|
|
| Back to top |
|
|
Hebster52
Samba Member
Joined: March 14, 2003
Posts: 1886
Location: Finland, Jakobstad
|
| Posted: Sun Jun 15, 2025 2:36 am Post subject: Re: Hebster52 |
|
|
Not much progress lately. Mostly working on bits and pieces needed for rustrepairs and rebuilding the front section at the moment.
Since my budget don't allow big investments in repairpanels it forces me to be creative instead...
The front wheelwells need some attention and the righthand side is worse so decided to give it a go from sheetmetal...
First created a jig or form.
Then just sketched the profile on the sheetmetal and started hammer the shapes with a chisel.
Pretty happy with it now even though just roughly shaped...
_________________
~Kris~
"The Hebster52" my Hebmuller replica build
The 912ST
The KidVRod project
The 356 Pre-A replica,SOLD
The 1966 Kommanderwagen, SOLD |
|
| Back to top |
|
|
VW_Jimbo 
Samba Member

Joined: May 22, 2016
Posts: 11111
Location: Huntington Beach, CA
|
| Posted: Tue Jun 17, 2025 6:44 pm Post subject: Re: Hebster52 |
|
|
Hey Kris! I still drop in and have a looks now and again! Love your work!
On those wire harness retainers. How did you “chisel” them out? By hand? Air chisel? How did you get the radius done?
I modified a cheap spare tire well piece too, for my 54 build and figured if I could not find a way to punch those tabs out by painting time, I would just weld in some. But, maybe you have a method I did not consider? Care to teach a student something?
Thanks man!
_________________
Jimbo
There is never enough time to do it right the first time, but all the time necessary the second time!
| TDCTDI wrote: |
| Basically, a whole bunch of fuckery to achieve a look. |
| 67rustavenger wrote: |
GFY's Xevin and VW_Jimbo!  |
|
|
| Back to top |
|
|
Hebster52
Samba Member
Joined: March 14, 2003
Posts: 1886
Location: Finland, Jakobstad
|
|
| Back to top |
|
|
VW_Jimbo
Samba Member
Joined: May 22, 2016
Posts: 11111
Location: Huntington Beach, CA
|
| Posted: Wed Jun 18, 2025 3:45 pm Post subject: Re: Hebster52 |
|
|
| Hebster52 wrote: |
| I just sacrificed ordinary woodworking chisels. Since I know how to sharpen them I didn't mind. However they didn't get that bad with these few tabs. |
Awesome! I am a woodworker by birth. Grew up with a father owning a custom cabinet shop. I started working in it at age 7. I will probably sharpen up one of my old Stanley chisels. Sounds like abuse using my old Marples chisels! Got to save those ones! Irwin bought that company, so who knows what is going to happen to the quality! Glad I got me a few sets scattered through all of the toolboxes!
Thanks for the reply. Never would have thought of using a wood chisel. I was getting ready to use my Dremel and try free handing those 180s. Then slice the long sides with a tiny cut off wheel.
Thank you!
_________________
Jimbo
There is never enough time to do it right the first time, but all the time necessary the second time!
| TDCTDI wrote: |
| Basically, a whole bunch of fuckery to achieve a look. |
| 67rustavenger wrote: |
| GFY's Xevin and VW_Jimbo! |
|
|
| Back to top |
|
|
Hebster52
Samba Member
Joined: March 14, 2003
Posts: 1886
Location: Finland, Jakobstad
|
| Posted: Thu Jun 19, 2025 11:51 pm Post subject: Re: Hebster52 |
|
|
Yes. Patience is good here. Had a piece of wood under the panel.
First I basically "marked" the straight sides with the chisel. Just a bit heavier with the corner of the straight chisel to the top of the tab.
Then I took the rounded chisel. Radius 4-5mm, I think. With this I cut the full radius all through. It will distort the panel some. Now that the panel is punctured I cut the straight edges to the base.
I then bent the tab enough so I could clean the edges with a small file. Then hammered the tab and edges flat again.
Hope this explanation helps some?
_________________
~Kris~
"The Hebster52" my Hebmuller replica build
The 912ST
The KidVRod project
The 356 Pre-A replica,SOLD
The 1966 Kommanderwagen, SOLD |
|
| Back to top |
|
|
Hebster52
Samba Member
Joined: March 14, 2003
Posts: 1886
Location: Finland, Jakobstad
|
| Posted: Fri Jun 20, 2025 12:01 am Post subject: Re: Hebster52 |
|
|
Yesterday I started preparing the leftside wheelwell but realised that it was much worse rusted and pitted than I first had thought...
So I thought it's just not worth patching with small patches and decided to make a similar repairpanel as I made to the right side...
As we have Midsummer long weekend and went to the summerhouse. So I brought some tools and material with me just to be able to start preparing the panel.
I got the panel preshaped.
Also cut the pieces for the forming jig. Just need some shaping and gluing before I can finish the second panel too.
_________________
~Kris~
"The Hebster52" my Hebmuller replica build
The 912ST
The KidVRod project
The 356 Pre-A replica,SOLD
The 1966 Kommanderwagen, SOLD |
|
| Back to top |
|
|
VW_Jimbo
Samba Member
Joined: May 22, 2016
Posts: 11111
Location: Huntington Beach, CA
|
| Posted: Sat Jun 21, 2025 10:01 am Post subject: Re: Hebster52 |
|
|
| Hebster52 wrote: |
Yes. Patience is good here. Had a piece of wood under the panel.
First I basically "marked" the straight sides with the chisel. Just a bit heavier with the corner of the straight chisel to the top of the tab.
Then I took the rounded chisel. Radius 4-5mm, I think. With this I cut the full radius all through. It will distort the panel some. Now that the panel is punctured I cut the straight edges to the base.
I then bent the tab enough so I could clean the edges with a small file. Then hammered the tab and edges flat again.
Hope this explanation helps some? |
Thank you very much! I will try it out this weekend on some extra sheet stock. Appreciate you sharing your skillset with us all!
_________________
Jimbo
There is never enough time to do it right the first time, but all the time necessary the second time!
| TDCTDI wrote: |
| Basically, a whole bunch of fuckery to achieve a look. |
| 67rustavenger wrote: |
| GFY's Xevin and VW_Jimbo! |
|
|
| Back to top |
|
|
Hebster52
Samba Member
Joined: March 14, 2003
Posts: 1886
Location: Finland, Jakobstad
|
|
| Back to top |
|
|
Hebster52
Samba Member
Joined: March 14, 2003
Posts: 1886
Location: Finland, Jakobstad
|
|
| Back to top |
|
|
Hebster52
Samba Member
Joined: March 14, 2003
Posts: 1886
Location: Finland, Jakobstad
|
| Posted: Sat Jun 28, 2025 2:17 am Post subject: Re: Hebster52 |
|
|
Well. Since most of the work have already gone out of hands (mopo karannut käsistä, spårat ur.. ) I came to the conclusion that also the framerails and bodymounts under the tank needed to be rebuilt. The rails have been patched at some point but still cracks and bad rust repair attempts..
These rails are available new but since these are pretty simple pieces I decided to make them myself....
_________________
~Kris~
"The Hebster52" my Hebmuller replica build
The 912ST
The KidVRod project
The 356 Pre-A replica,SOLD
The 1966 Kommanderwagen, SOLD |
|
| Back to top |
|
|
Hebster52
Samba Member
Joined: March 14, 2003
Posts: 1886
Location: Finland, Jakobstad
|
|
| Back to top |
|
|
Hebster52
Samba Member
Joined: March 14, 2003
Posts: 1886
Location: Finland, Jakobstad
|
|
| Back to top |
|
|
VW_Jimbo
Samba Member
Joined: May 22, 2016
Posts: 11111
Location: Huntington Beach, CA
|
| Posted: Wed Jul 02, 2025 7:35 pm Post subject: Re: Hebster52 |
|
|
I love panels from Mika! They always fit and are the right thickness! Plus is an outstanding metal worker!
Those sure look Purdy!
_________________
Jimbo
There is never enough time to do it right the first time, but all the time necessary the second time!
| TDCTDI wrote: |
| Basically, a whole bunch of fuckery to achieve a look. |
| 67rustavenger wrote: |
| GFY's Xevin and VW_Jimbo! |
|
|
| Back to top |
|
|
Hebster52
Samba Member
Joined: March 14, 2003
Posts: 1886
Location: Finland, Jakobstad
|
|
| Back to top |
|
|
Hebster52
Samba Member
Joined: March 14, 2003
Posts: 1886
Location: Finland, Jakobstad
|
|
| Back to top |
|
|
|


