| Author |
Message |
Keith
Samba Member

Joined: August 15, 2005
Posts: 3632
Location: Brodheadsville, PA

|
 Posted: Sun Oct 27, 2019 11:44 pm Post subject: Re: Ben's '56 Ragtop Project Posted: Sun Oct 27, 2019 11:44 pm Post subject: Re: Ben's '56 Ragtop Project |
 |
|
| ernstben wrote: |
| rich caramadre wrote: |
(It took a full day of hammering, pulling, pushing, and cutting to make the body fit down all the way on the heater channels and rear crossmember, but it got there in the end.)
To this I would suggest hanging the doors before finishing the welding. I've learned it doesn't take much to slightly twist the body and knock the alignment off. |
Really, really good advice here. Thanks!
I hung the doors before we left for a trip. The passenger one is pretty darn close:
The driver's side though.... whooo boy:
I haven't made much progress in the last couple of weeks and it's partly been because now I have to go back and cut out and redo some welds to get this back to being acceptable. Ah well. At least I didn't get further down the welding road! |
I was looking at the pics and noticed you don’t have any bracing on the body at all for cutting out the heater channels and I thought to myself “there’s no way in the world that body hasn’t twisted” and sure enough it did.
I would get the doors on, cut the welds for the heater channels, line up the gaps and either weld strips of metal from the doors to the quarter panels to hold the body in line or get the body in line and weld bracing inside the car or both.
_________________
Formerly known in the forums as "OVALTEEN"
"I firmly believe that some villagers from Botswana could probably build a better road than PennDot."- Splitty
"If you do anything to your car someone will hate on you for it. People absolutely love to complain and find fault with others. Don't let it bother you. Just live and have fun."- Lind |
|
| Back to top |
|
 |
ernstben
Samba Member

Joined: April 30, 2005
Posts: 622
Location: Manchester, Mi
|
| Posted: Mon Oct 28, 2019 4:29 pm Post subject: Re: Ben's '56 Ragtop Project |
|
|
Thanks for the concern, but I did weld in supports before I touched the old channels:
I haven't had a ton of time to devote to the bug as of late, but I was able to determine that the sag on the driver's side was a result of saggy hinges and the fact that I didn't tighten all the hinge screws when I checked (it was too close to the garage wall to swing the door open at the time). I checked the measurements that other members have provided at 40 1/2 inches on the B post and they were both spot-on.
_________________
Ben
'63 Ghia Coupe Project
'59 Panel Project
'56 Ragtop Project |
|
| Back to top |
|
|
ernstben
Samba Member
Joined: April 30, 2005
Posts: 622
Location: Manchester, Mi
|
| Posted: Sun Mar 08, 2020 7:03 pm Post subject: Re: Ben's '56 Ragtop Project |
|
|
Boy, the winter (and baby #2 showing up!) really slows down progress. Not to worry though, we're out of hibernation and back to making progress.
During a lull in the cold weather, I went out into the woods with my trusty sawzall to visit my dad's old bug:
A little zip and I've got a piece to use to repair the rusted out portion of my A pillar:
I also stripped the original 36hp down as far as I could, but I still can't get it to turn over:
I think my plans are going to move on to a different engine. I have a lead on a 1500 that I might snag. I'm thinking about using a 30pict with the manual choke to keep at least that original functionality. I ended up making peace with a lower geared trans and got the required bus nosecone and hockey stick and got it install with new mounts and such:
Then, last week, I got reacquainted with my welder and finished up the back on the passenger side heater channel/fender/crossmember area and then seam-sealed and painted it. I used so many of the absolutely fabulous threads here as inspiration. In comparison, my work is totally amateur, but at least it's strong. 
_________________
Ben
'63 Ghia Coupe Project
'59 Panel Project
'56 Ragtop Project |
|
| Back to top |
|
|
ernstben
Samba Member
Joined: April 30, 2005
Posts: 622
Location: Manchester, Mi
|
| Posted: Sun Apr 26, 2020 4:40 pm Post subject: Re: Ben's '56 Ragtop Project |
|
|
Made some more progress!
I don't know if I've mentioned this yet, but when I bought the car, it had a pretty serious dent above the windshield (along with a rust spot, hurray!). I can only imagine that this was caused by someone's forehead back in the day:
I pulled it out a bit and did some quick welding to replace the rusted out metal:
I also used the repair section from my dad's '59 to replace the weirdly rusted-out A pillar:
And, finally, finished up the rear rust repair and installed three-point seat belt mounts in the B pillars:
Lastly, I filled the gas tank with water and welded in a flange for a sending unit. I have my eye on a fake Dehne gauge. 
_________________
Ben
'63 Ghia Coupe Project
'59 Panel Project
'56 Ragtop Project |
|
| Back to top |
|
|
ernstben
Samba Member
Joined: April 30, 2005
Posts: 622
Location: Manchester, Mi
|
| Posted: Mon May 04, 2020 9:27 am Post subject: Re: Ben's '56 Ragtop Project |
|
|
Had a couple hours this weekend to turn this:
Into this:
Now I'm one H apron away from having a solid rearend!
I'm very appreciative for the other posters around these parts who are doing such a diligent job showing their work. It's also super helpful that we seem to be tackling similar issues! Thanks VW_Jimbo, Scotty, Doug, Tom, et al.
_________________
Ben
'63 Ghia Coupe Project
'59 Panel Project
'56 Ragtop Project |
|
| Back to top |
|
|
ernstben
Samba Member
Joined: April 30, 2005
Posts: 622
Location: Manchester, Mi
|
| Posted: Sat May 23, 2020 5:21 am Post subject: Re: Ben's '56 Ragtop Project |
|
|
I run out of steam doing welding and have to switch it up every now and then with different projects on the bug. My most recent one is the steering wheel. It wasn't in great shape, but not terrible either:
Quotes from Koch's and others were consistently around $450... so I read a bunch and decided to give it a go myself. After routing out the cracks, filling, sanding, and priming, I put it down on my coffee table and noticed that it is definitely not flat:
I wonder if the same accident that put the forehead-shaped dent in the metal above the windshield resulted in a chest-shaped bend in the steering wheel? I can't imagine another reason why it would be bent this way? If so... ouch! I hope the person was alright!
So... I'm steering wheel-less. Go for a reproduction petri one from Flat-4? Banjo and deal with the flex people complain about?
_________________
Ben
'63 Ghia Coupe Project
'59 Panel Project
'56 Ragtop Project |
|
| Back to top |
|
|
Rome
Samba Member
Joined: June 02, 2004
Posts: 10545
Location: Pearl River, NY
|
| Posted: Sat May 23, 2020 7:26 am Post subject: Re: Ben's '56 Ragtop Project |
|
|
Since the steering wheel center crossbar/"wing" now has a gentle bend in it so that the hub is tilted, have you considered bending it back straight? Slip the steering wheel fully onto the steering column splines. Apply upper body force against the rim at the joint where the rim meets the center crossbar (leverage). Check alignment. If needed and if possible, turn the steering wheel around backwards and push on that joint. You could measure the distance of the rim to the dashboard at each end of the crossbar so that you can monitor the reduction in the distance difference as you progress... I don't know if the center crossbar and hub section are also metal like the rim core is; I imagine it would be. Too bad you don't have a mangled spare steering wheel that you could buy for cheap just to investigate. Or find a photo of an oval steering wheel that underwent restoration and the person took a shot of the core. Fire damaged wheel on which the outer plastic was burned off?
Do you have a steering wheel club (lock)? I can imagine you could slip that over the rim edge at both ends of the crossbar, and use the exposed bar from the lock shaft to bend the steering wheel back while it's on the column splines. If not enough leverage, slip a pipe (floor jack lever?) over the supposedly hardened lock shaft and apply pressure. Turn steering wheel around backwards to push if needed. |
|
| Back to top |
|
|
ernstben
Samba Member
Joined: April 30, 2005
Posts: 622
Location: Manchester, Mi
|
|
| Back to top |
|
|
Dibaltic
Samba Member
Joined: May 06, 2007
Posts: 564
Location: Chambersburg, Pennsylvania
|
| Posted: Sun Jun 07, 2020 11:43 am Post subject: Re: Ben's '56 Ragtop Project |
|
|
| Nice work it's coming along great! |
|
| Back to top |
|
|
ernstben
Samba Member
Joined: April 30, 2005
Posts: 622
Location: Manchester, Mi
|
| Posted: Thu Jun 25, 2020 4:35 pm Post subject: Re: Ben's '56 Ragtop Project |
|
|
More pictures to come, but in the short term here, I finally had to make a paint color decision. The chassis build-up has made it too heavy for the poor little Harbor Freight dolly to handle, so I needed some tires/rims. Not having a full set of rollers, I replaced some hubcap clips, had some sandblasting done, and voila:
_________________
Ben
'63 Ghia Coupe Project
'59 Panel Project
'56 Ragtop Project |
|
| Back to top |
|
|
Dibaltic
Samba Member
Joined: May 06, 2007
Posts: 564
Location: Chambersburg, Pennsylvania
|
| Posted: Thu Jun 25, 2020 6:51 pm Post subject: Re: Ben's '56 Ragtop Project |
|
|
| Nice color! |
|
| Back to top |
|
|
Rome
Samba Member
Joined: June 02, 2004
Posts: 10545
Location: Pearl River, NY
|
| Posted: Thu Jun 25, 2020 6:56 pm Post subject: Re: Ben's '56 Ragtop Project |
|
|
| Nice work with the 2-tone wheel paint. What technique did you use to mask off the 2 colors? Index cards, masking tape, a tall "shield"; or something else? In the past month I experimented with cards and a shield made out of a few plastic "For Sale" signs to 2-tone some 4-bolt wheels (black centers, ivory outers using spray cans). Each method had some pro's and cons. |
|
| Back to top |
|
|
ernstben
Samba Member
Joined: April 30, 2005
Posts: 622
Location: Manchester, Mi
|
| Posted: Thu Jun 25, 2020 7:00 pm Post subject: Re: Ben's '56 Ragtop Project |
|
|
Thanks Rome. They're not perfect, but good enough unless you really get down and look closely.
I used a deck and a half of playing cards, jamming each of them in the gap and then taping them down in a sort of fan pattern. It worked fairly well, but I was forced to go back with a small brush and touch up numerous areas after the fact. What a pain!
_________________
Ben
'63 Ghia Coupe Project
'59 Panel Project
'56 Ragtop Project |
|
| Back to top |
|
|
Rome
Samba Member
Joined: June 02, 2004
Posts: 10545
Location: Pearl River, NY
|
| Posted: Thu Jun 25, 2020 8:34 pm Post subject: Re: Ben's '56 Ragtop Project |
|
|
I also had to go back to cover up some minor overspray from the 4 x 6" index card method. Placed each card in one direction. Found that using at least 1/2 to 2/3 card overlap helped, and held them down by placing a 12" plastic planter base on top. Held and moved the spray can so that the paint spray would go in the direction of the cards so that the spray mist would not go into the card gaps.
Have you decided on tires- brand and size? Medium width white walls would look great if you use the same wine red from the wheel outer section for the body color. |
|
| Back to top |
|
|
ernstben
Samba Member
Joined: April 30, 2005
Posts: 622
Location: Manchester, Mi
|
| Posted: Fri Jun 26, 2020 4:57 pm Post subject: Re: Ben's '56 Ragtop Project |
|
|
| Rome wrote: |
Have you decided on tires- brand and size? Medium width white walls would look great if you use the same wine red from the wheel outer section for the body color. |
I'm sort of a stock appearance sort of guy, so I've landed on Coral Red as my color of choice for the body. I opted for Nexen 165 80 R15s for a relatively stock look and also because I can't find many bad opinions about them for the price range.
I'll do a more significant dump of progress photos as soon as I remember to snap some pictures, but I did have a fun milestone today:
Moving forward!
_________________
Ben
'63 Ghia Coupe Project
'59 Panel Project
'56 Ragtop Project |
|
| Back to top |
|
|
ernstben
Samba Member
Joined: April 30, 2005
Posts: 622
Location: Manchester, Mi
|
| Posted: Sun Jun 28, 2020 11:58 am Post subject: Re: Ben's '56 Ragtop Project |
|
|
Alrighty: time to get this thread up-to-date!
I'm shooting to get the body back down on the chassis in the next couple months with an eye on getting the whole thing to a bodyshop for paint this fall and winter. To that end, I've been working on welding in new panels.
Front firewall:
Some repairs in the lower front quarter:
I've waited to weld in the rear apron as I was hoping to make it removable, but the more I push and pull on stuff, the more difficult that task seems and the less enthusiastic I am to try it:
I've been slowly working my way forward to this:
I ordered a pair of front panels from Virtanen and after a two month wait for shipping:
I've also been working on the chassis, doing tasks that would be unpleasant with the body back in place. Restored and installed the pedal assembly with clutch cable (still need to paint the roller):
I found a 3'' narrowed beam locally. Drilled some dimples, installed some bushings, and:
Dual circuit master:
Steering box disassembled, cleaned, and filled with corn head grease:
New autostick starter:
I can see the light at the end of the tunnel with welding and I'm excited to get the body back down on the chassis now that it's rollable.
_________________
Ben
'63 Ghia Coupe Project
'59 Panel Project
'56 Ragtop Project |
|
| Back to top |
|
|
VW_Jimbo 
Samba Member

Joined: May 22, 2016
Posts: 11162
Location: Huntington Beach, CA
|
| Posted: Sun Jun 28, 2020 12:25 pm Post subject: Re: Ben's '56 Ragtop Project |
|
|
Looking really good! It always feels so good to be done with body work!
_________________
Jimbo
There is never enough time to do it right the first time, but all the time necessary the second time!
| TDCTDI wrote: |
| Basically, a whole bunch of fuckery to achieve a look. |
| 67rustavenger wrote: |
| GFY's Xevin and VW_Jimbo! |
|
|
| Back to top |
|
|
ernstben
Samba Member
Joined: April 30, 2005
Posts: 622
Location: Manchester, Mi
|
| Posted: Mon Jun 29, 2020 2:14 pm Post subject: Re: Ben's '56 Ragtop Project |
|
|
A big day today! I had a full 8 hours to concentrate on making some progress on the nose and I'm super excited about what I got accomplished. The light at the end of the tunnel is getting nearer!
I warmed up the ol' angle grinder and went to work:
And then tons of measuring, cutting, and welding later:
The front part of the apron is just sitting there at the moment. I'm going to graft in the 4th "finger" from the existing apron to make it correct for a '56. Woo!
_________________
Ben
'63 Ghia Coupe Project
'59 Panel Project
'56 Ragtop Project |
|
| Back to top |
|
|
Stephgm
Samba Member
Joined: October 24, 2017
Posts: 7
Location: Portugal
|
| Posted: Tue Jun 30, 2020 1:30 am Post subject: Re: Ben's '56 Ragtop Project |
|
|
Hello,
Great work man!!!
what modification did you make so that the front panels from Virtanen were 100% compatible with your model...I talked to Mika from Virtanen and the panels are up to 51 |
|
| Back to top |
|
|
ernstben
Samba Member
Joined: April 30, 2005
Posts: 622
Location: Manchester, Mi
|
| Posted: Tue Jun 30, 2020 9:29 am Post subject: Re: Ben's '56 Ragtop Project |
|
|
| Stephgm wrote: |
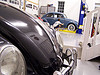
what modification did you make so that the front panels from Virtanen were 100% compatible with your model...I talked to Mika from Virtanen and the panels are up to 51 |
The bottom part of the rear of the panel didn't match up to the metal on my car. Apparently they enlarged the space where the beam sits on the body sheet metal at some point post-'51. I had to cut out the section that is pressed for the shock absorber mounts and basically move it up/slightly pivot it. The red line in this image is where the section I cut out used to be, the green is the stock metal that I had to meet:
_________________
Ben
'63 Ghia Coupe Project
'59 Panel Project
'56 Ragtop Project |
|
| Back to top |
|
|
|


