| Author |
Message |
livingskies
Samba Member
Joined: April 18, 2020
Posts: 208
Location: Western Canada

|
 Posted: Thu Nov 05, 2020 1:48 pm Post subject: Re: New 1964 Sub-Hatch Project Posted: Thu Nov 05, 2020 1:48 pm Post subject: Re: New 1964 Sub-Hatch Project |
 |
|
Thanks everyone. This forum is a great resource; would be lost without it.
That fabric is very nice and my first choice, for sure. IIRC, someone in another thread mentioned needing 8 meters of the seat material and another 6 meters of the curtain material. A total of 14 meters @ 125 Euros, plus shipping, taxes, and brokerage, translates into a lot of Canadian dollars - 3 grand or more. And then the sewing and other labor, if one has to pay for that. Maybe the finished product will have enough value to justify the expenditure? |
|
| Back to top |
|
 |
oakman
Samba Member

Joined: February 05, 2014
Posts: 1749
Location: Edge of the Desert, Ca
|
| Posted: Thu Nov 05, 2020 3:43 pm Post subject: Re: New 1964 Sub-Hatch Project |
|
|
Cool Westy!
The value is whether or not it is worth it to you to spend the money to make it "factory correct". These Westfalias can and will drain your wallet if you want to have everything tidy and correct.
_________________
Brandon |
|
| Back to top |
|
|
velvetgreen
Samba Member

Joined: August 17, 2004
Posts: 2893
Location: Canada
|
| Posted: Thu Nov 05, 2020 7:21 pm Post subject: Re: New 1964 Sub-Hatch Project |
|
|
^^ Well said Brandon and worth thinking about before diving in to the pool of money.. Often times old Westfalias have been either improved/abused (matter or perspective) or have had parts go missing.
Depending on how "factory correct/original" you want the bus to be will likely cost some serious $$ and time chasing down all the parts.
Really more a matter of how important it is to you and how you plan to use the vehicle.
Don't get me wrong that fabric that Bob makes is excellent and if I had unlimited funds would be all over it. Just if I spent that kind of money on the cushions I might be too nervous to actually use the bus for camping.
To make a long story short for me I have two sets of cushions. One is the original set (with the factory original uncomfortable springs and horsehair and fabric) which I use if I want the bus more as a prop and another set with generic knock off cloth and foam if I actually want to camp in the bus.
Final word if you are over 5' 8" in height you will need to put some sort of cushiony thing over the engine bay as the bed only makes up to be 68" long |
|
| Back to top |
|
|
earlywesty
Samba Member

Joined: May 03, 2004
Posts: 2378
Location: In the woods, Ontario
|
| Posted: Thu Nov 05, 2020 7:46 pm Post subject: Re: New 1964 Sub-Hatch Project |
|
|
| livingskies wrote: |
Thanks everyone. This forum is a great resource; would be lost without it.
That fabric is very nice and my first choice, for sure. IIRC, someone in another thread mentioned needing 8 meters of the seat material and another 6 meters of the curtain material. A total of 14 meters @ 125 Euros, plus shipping, taxes, and brokerage, translates into a lot of Canadian dollars - 3 grand or more. And then the sewing and other labor, if one has to pay for that. Maybe the finished product will have enough value to justify the expenditure? |
I would check the number of metres needed for an SO33. The cost is similar to recovering a set of microbus seats, not unreasonable and subhatch westys hold their value better than any split bus. Not sure I would be scared to camp on them them but I sure would be careful. Also worth considering how much camping you will actually do with it, every weekend or twice a year? That might help decide. Keep the updates coming. |
|
| Back to top |
|
|
livingskies
Samba Member
Joined: April 18, 2020
Posts: 208
Location: Western Canada
|
| Posted: Thu Nov 05, 2020 9:35 pm Post subject: Re: New 1964 Sub-Hatch Project |
|
|
buseric, thanks for the input. We also have a 1974 bay window Westfalia in very nice condition that we use for camping. The 1974 has a relatively useful design, with that double bed upstairs. We also added a solar powered refrigerator. This past summer, we spent about five weeks in it, camping at a nearby national park.
When we finish the sub-hatch (and who knows when that will be), we may have to make a decision about whether we will use both for camping. If we can find a tent attachment for the sub-hatch, that would make the sub-hatch more attractive for actual use. |
|
| Back to top |
|
|
j.pickens
Samba Member
Joined: December 03, 2002
Posts: 9831
Location: Exit 7, New Jersey
|
| Posted: Thu Nov 05, 2020 10:48 pm Post subject: Re: New 1964 Sub-Hatch Project |
|
|
| velvetgreen wrote: |
^^ Well said Brandon and worth thinking about before diving in to the pool of money.. Often times old Westfalias have been either improved/abused (matter or perspective) or have had parts go missing.
Depending on how "factory correct/original" you want the bus to be will likely cost some serious $$ and time chasing down all the parts.
Really more a matter of how important it is to you and how you plan to use the vehicle.
Don't get me wrong that fabric that Bob makes is excellent and if I had unlimited funds would be all over it. Just if I spent that kind of money on the cushions I might be too nervous to actually use the bus for camping.
To make a long story short for me I have two sets of cushions. One is the original set (with the factory original uncomfortable springs and horsehair and fabric) which I use if I want the bus more as a prop and another set with generic knock off cloth and foam if I actually want to camp in the bus.
Final word if you are over 5' 8" in height you will need to put some sort of cushiony thing over the engine bay as the bed only makes up to be 68" long |
Really great idea about the two sets of cushions. Just about everyone I know with OG Westie cushions adds a memory foam mattress pad cut to fit over the OG cushions when they camp. Your idea is better, and you don't have to stash the foam cover when you want to entertain in your bus.
_________________
Founder and Chairman Emeritus, ECMSAS
BBX BBXII and BBXXI Long Distance Award Winner
| BeaterBarndoor wrote: |
i wish more people would actually drive their vws rather than just talking about what they have in the garage. |
| Red Fau Veh wrote: |
If you've seen one sunroof swivel seat kombi, you've seen them all!  |
|
|
| Back to top |
|
|
Clara 
Samba Member

Joined: June 14, 2003
Posts: 12612
|
| Posted: Thu Nov 12, 2020 11:22 am Post subject: Re: New 1964 Sub-Hatch Project |
|
|
This was the before pic I was looking for :
after scraping and re-finishing and new repro triangle knobs
booze bottle bracket:
|
|
| Back to top |
|
|
crofty
Judas of the North

Joined: August 09, 2000
Posts: 19830
Location: Land of Whine and Phonies
|
| Posted: Thu Nov 12, 2020 1:03 pm Post subject: Re: New 1964 Sub-Hatch Project |
|
|
The cabinets look great!
_________________
Your Vanagon sucks, Stop waving at me.
| HamburgerBrad wrote: |
I slept on crofty's tent once. I passed out drunk from two bottles of Everett's brother's wine. |
|
|
| Back to top |
|
|
livingskies
Samba Member
Joined: April 18, 2020
Posts: 208
Location: Western Canada
|
| Posted: Tue Nov 24, 2020 10:26 am Post subject: Re: New 1964 Sub-Hatch Project |
|
|
Thought that I would post a few pictures of "progress" since the last post. Main attention is to some of the remaining body work jobs. All four wheels wells had been cut to accommodate larger tires, so metal replacement there was a priority. I am posting a few before pictures and a few of the arches after repair. All four are done. They still needs more finishing; just sprayed a little acid etch primer on those areas for now. (The Klokkerholm panels used for the rear wheel well arches are rather light; I would have preferred heavier gauge panels. For the front, I made up my own repair panels, rather than cut up the new dog legs that came with the bus. They might come in handy for another project some day.)
As seen below, the left rear outrigger had rust through, so I replaced that outrigger and jack point. The inner rocker next to the jack point also developed a small hole as I worked on the area, so I added an 18 gauge plate over that; strength over beauty. Still a little grinding and clean up work to do there. The rest of the underside looks very good, with just fairly light surface rust. The bus never had undercoating, so no peeling undercoat to deal with.
My plan for the underside is to clean it up and then coat with POR15. I've done that before, many years ago, on non VW projects, and it has held up well. I like the POR15 a lot better than Eastwood Rust Encapsulator, which I also have used. Considering the relatively good condition of the underside, I'm not disassembling everything, putting it on a rotisserie, and media blasting it. A clean up and repaint seems like the better (and much easier) option. I'm also shooting non-hardening rust preventative solution of several types (Lloyds AD2000 and RustChek) into cavities that can't be cleaned or painted. That, and the dry garage and dry prairie climate here, should help prevent future rust issues.
Two other rust issues found on the body. Of course the battery area had a hole rusted through, so I replaced the recessed section. And one side door panel had rust through on the lower inner structure. That was an odd one, as the bottom edge and outside of the door was very good. Someone had attempted a repair previously but had not dealt with all the issues. Anyway, it's now rebuilt. I was more concerned with making that solid than with making it look pretty as it will be covered by the door panel.
Last edited by livingskies on Tue Nov 24, 2020 11:03 pm; edited 2 times in total |
|
| Back to top |
|
|
livingskies
Samba Member
Joined: April 18, 2020
Posts: 208
Location: Western Canada
|
| Posted: Tue Nov 24, 2020 10:58 pm Post subject: Re: New 1964 Sub-Hatch Project |
|
|
After spending a little time scraping and wire brushing the underside of the bus this evening, I'm rethinking the POR15 plan. Most of the underside does not have nearly as much surface rust as it first appeared. Most of what looked like rust comes off with scraping and wire brushing. Scrubbing with a cleaner and pads likely will help further. Underneath is much of the original Pearl White paint. It seems a shame to put POR15 over much of that. A couple of pictures below:
Any recommendations on how to handle this? After further cleaning and prep, POR15 on just the areas that need more protection and then spray a coat or two of Pearl White or similar paint on all the surfaces under there? Just clean it and leave it as is? Cover with a clear coat of some sort? Or??
|
|
| Back to top |
|
|
Clara
Samba Member
Joined: June 14, 2003
Posts: 12612
|
| Posted: Wed Nov 25, 2020 10:26 am Post subject: Re: New 1964 Sub-Hatch Project |
|
|
| livingskies wrote: |
After spending a little time scraping and wire brushing the underside of the bus this evening, I'm rethinking the POR15 plan. Most of the underside does not have nearly as much surface rust as it first appeared. Most of what looked like rust comes off with scraping and wire brushing. Scrubbing with a cleaner and pads likely will help further. Underneath is much of the original Pearl White paint. It seems a shame to put POR15 over much of that. A couple of pictures below:
Any recommendations on how to handle this? After further cleaning and prep, POR15 on just the areas that need more protection and then spray a coat or two of Pearl White or similar paint on all the surfaces under there? Just clean it and leave it as is? Cover with a clear coat of some sort? .....Or?? |
looks good to me. I'd not re-paint or re-coat it underneath.
Honestly, if you park it dry and give it a bath and clean where the sun don't shine once a year it should last a long time.
Wash out the rockers and doglegs and jack points where dirt collects in crevices and holds moisture against the metal.
Then again, looks like your bus needs a paint job at this point, so maybe do the underside when the bus gets painted?
IMO POR15 is ugly
_________________
The Obsolete Air-Cooled Documentation Project http://oacdp.org/ |
|
| Back to top |
|
|
Braukuche
Samba Member
Joined: September 03, 2004
Posts: 11205
|
| Posted: Wed Nov 25, 2020 1:12 pm Post subject: Re: New 1964 Sub-Hatch Project |
|
|
Pretty sure VW didn’t paint the underside, Ive never seen evidence of it on any of my buses, it’s probably just the epoxy primer which sometimes looks white.
Once that primer is shot it’s shot, it will rust again there with any moisture exposure. When I paint a bus I shoot a couple coats of epoxy primer under there and leave it. You can get light grey and even white epoxy primer.
_________________
Go Reds! Smash state!
Retirement is here!
1960 double cab
1960 Baja Bug
1963 stretched double cab
1962 Golde sunroof Ghia
1963 356 B coupe
1963 Notchback
1967 21 window less rusty now
1989 Westfalia |
|
| Back to top |
|
|
livingskies
Samba Member
Joined: April 18, 2020
Posts: 208
Location: Western Canada
|
| Posted: Fri Nov 27, 2020 11:11 pm Post subject: Re: New 1964 Sub-Hatch Project |
|
|
Just thought I would share more about what I'm seeing on the underside of the '64, now that I've spent a number of days under there.
There does seem to be contradictory evidence about the original color of the bus undersides. A search on this forum turned up lots of threads and information about that. After reading all that, it seems possible or even likely that until 1962 or 1963, VW painted the undersides in a medium grey color. Beginning in about 1963, many of the buses mentioned in the threads appear to have much of their undersides painted body color.
So far, I've put in lots of hours so far cleaning up the underside of this '64. Lots of scraping, wire brushing, and rubbing with scotch pads, and several types of degreaser on the greasy areas at the front and back.
It seems clear by the amount of surviving paint under the grime that the bottom of the main (cargo) part of the floor and some other parts were painted an off white - probably the same Pearl White as the body. Under the cab is a somewhat different situation. Parts, such as behind the front valance, the front frame sections, etc. are the off white color. But the underside of the cab floor is either a light grey or a light blue (my wife thinks it's grey, while I see light blue), with some areas having a black coating over that. The white paint on the frame sections under the cab has survived in nearly perfect condition, while the frame and inner rockers behind the cab have virtually no paint on them. It seems that the frame and inner rockers received a different paint process or less paint than much of the rest of the underside. I'm confident that no one cleaned or repainted the underside of this bus before; the hardened grease that was caked on under the cab and towards the transaxle had been there for many decades.
I also suspect that VW dipped the undersides somehow. Especially the bottom of the floor has hundreds of dried paint droplets protruding down from the floor. Maybe the floor and underside was dipped before the body went on??
Unlike restorations of some other makes of vehicles where getting the underside paint right matters a lot, this doesn't seem to be a big deal with VW buses. Maybe that's a good thing. |
|
| Back to top |
|
|
EverettB
Administrator

Joined: April 11, 2000
Posts: 71555
Location: Phoenix 602
|
|
| Back to top |
|
|
livingskies
Samba Member
Joined: April 18, 2020
Posts: 208
Location: Western Canada
|
| Posted: Sun Dec 11, 2022 10:35 am Post subject: Re: New 1964 Sub-Hatch Project |
|
|
Thought that I would provide an update on this SO33 sub-hatch project. The previous owner had begun the restoration maybe 20 years ago, but then the work had stalled. It was about as rust free as I have seen, and had been kept inside for much of its life.
I didn't do everything myself; my wife helped make a lot of the more tedious jobs (stripping cabinets, for example) go better. And we have to give credit to TheSamba forums and the many active members for the wealth of information contained in threads and other resources. Without this, many things would be much more difficult, if not impossible.
Since we bought it, work continued on and off over the past two years and is now more or less complete. Lots of mechanical work happened, including bearings, seals, brakes, wiring, and minor work on the engine. I did try a few different carburetor and distributor combinations. It's a dual port engine. Since a lot of wiring was disconnected and left hanging, sorting out the wiring and getting everything working proved challenging.
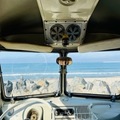
We stripped the dark stain off of the cabinets and refinished them. For the walls and ceiling, we used European Baltic birch, available at Windsor Lumber in Canada. We made up a piece of sisal carpet; not a perfect replica of the original but close enough for now. The entire cab area underwent refurbishing and restoration. The entire underside underwent cleaning, some minimal repair, and repainting. The original paint on the underside, which had never been tampered with, was much the same color as the pearl white on the body.
The exterior and interior paint, in the original pearl white, went on in early 2021 - base/clear in my paint booth. It turned out well with very little buffing required. Wheels powder coated.
It runs well, and we drove it around some, with the rear curtains and upholstery still to do.
With the drop in value of the Euro, fabric for the curtains and rear seats from BBT became more affordable. We had bits and pieces of the original fabric, which helped with knowing what to buy. We bit the bullet and bought that in the summer. Then, this fall, we made up and installed the various pieces. A few years ago, we bought a commercial Juki sewing machine, which makes sewing much easier. I do the layout and cutting of the fabric, and my wife sews it. Snaps hold the curtains for the cab area in place when installed, as original.
A few things are not 100% correct, but can be easily changed. For example, it had two new non-correct radial tires when I bought it. So I bought two more identical tires. They may be bit too flexible and I may change them some time. The bungees and other parts for the curtain retainers are close but not exact reproductions; maybe better will come along. Also installed a few non-original gauges; the removable panel above the windshield was cut previously for old gauges.
Overall, we are very happy with the result. It helped a lot to start with a solid bus that required minimal metal replacement. Even so, it was a lot of work.
A few minor jobs remain. I still have to install the panels at the front of the passenger compartment below the dash to cover up all the wiring, etc; they stayed off in the event of more wiring work needed. And I'm not sure what to put over the floor area in the rear between the cabinets. We thought of making a two inch thick foam mat, covered with matching upholstery - or just placing a loose mat there. Maybe someone can tell me how Westfalia finished that detail.
Not sure whether to keep it or move it on to a new owner to enjoy - if we could find a good new not-too-rusty project, that would make me feel better about letting this one go.
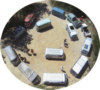
A few pics follow. These were taken before installing the bungees that hold the curtain bottoms in place. Doors, lids, and windows with all new seals/weatherstrips fit well - some are not completely closed in the photos.
|
|
| Back to top |
|
|
von_hansel
Samba Member
Joined: June 12, 2006
Posts: 815
Location: Inland Empire
|
| Posted: Sun Dec 11, 2022 11:46 am Post subject: Re: New 1964 Sub-Hatch Project |
|
|
Wow! Your bus turned out really nice.
Paint looks amazing. I really like the fact you went with the OG color.
_________________
| Mugatu wrote: |
| von_hansel is still so hot right now |
|
|
| Back to top |
|
|
Braukuche
Samba Member
Joined: September 03, 2004
Posts: 11205
|
| Posted: Sun Dec 11, 2022 12:29 pm Post subject: Re: New 1964 Sub-Hatch Project |
|
|
Beautiful result. Interior looks warm and inviting with all that wood.
_________________
Go Reds! Smash state!
Retirement is here!
1960 double cab
1960 Baja Bug
1963 stretched double cab
1962 Golde sunroof Ghia
1963 356 B coupe
1963 Notchback
1967 21 window less rusty now
1989 Westfalia |
|
| Back to top |
|
|
von_hansel
Samba Member
Joined: June 12, 2006
Posts: 815
Location: Inland Empire
|
| Posted: Sun Dec 11, 2022 3:20 pm Post subject: Re: New 1964 Sub-Hatch Project |
|
|
| livingskies wrote: |
And I'm not sure what to put over the floor area in the rear between the cabinets. We thought of making a two inch thick foam mat, covered with matching upholstery - or just placing a loose mat there. Maybe someone can tell me how Westfalia finished that detail.
|
Originally there was a marble mat back there.
There is a good thread on Westy Marble Mat's that go over the engine firewall. It can be found here
It looks like Jacek was looking into repoping the marble mat back in 2020 but he disappeared off of this site. I was told he can be reached via Spacebook? I would reach out to him.
_________________
| Mugatu wrote: |
| von_hansel is still so hot right now |
|
|
| Back to top |
|
|
oakman
Samba Member
Joined: February 05, 2014
Posts: 1749
Location: Edge of the Desert, Ca
|
| Posted: Sun Dec 11, 2022 7:30 pm Post subject: Re: New 1964 Sub-Hatch Project |
|
|
Wow, your Westy turned out sweet!! If you are looking to hang on to a bus as a keeper, this may be the one. Nice dry Westfalia subhatch buses aren't the easiest thing to find, especially with their interiors. I camp in mine at Vw events at least a few times a year and love it. It's nice to enjoy the fruits of your labor.
PS: Beware of moths and your interior fabric!!
_________________
Brandon |
|
| Back to top |
|
|
livingskies
Samba Member
Joined: April 18, 2020
Posts: 208
Location: Western Canada
|
| Posted: Sun Dec 11, 2022 10:31 pm Post subject: Re: New 1964 Sub-Hatch Project |
|
|
Thanks for the kind words and advice regarding the marble mat. I don't suppose anyone has a source for something close to the original?
I forgot to mention that the bus was converted to 12 volts. That also allowed for the installation of a second battery (deep cycle) on the left side of the engine compartment, along with an isolator to protect the starting battery from draining. One can easily connect a portable solar panel and controller to the deep cycle battery when camping off grid. The interior also has several LED lights and USB charge plugs. When installing those, I took care not to butcher the original cabinetry. Those systems work great. We had that in a 1974 Westfalia, and we camped off grid in a trailer with just solar panels for most of last summer. |
|
| Back to top |
|
|
|


