| Author |
Message |
chillzombies
Samba Member
Joined: November 09, 2008
Posts: 66
Location: Long Island, New York

|
 Posted: Sun Nov 10, 2024 12:34 pm Post subject: My 87 syncro build Posted: Sun Nov 10, 2024 12:34 pm Post subject: My 87 syncro build |
 |
|
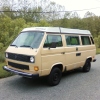
I picked up this 1987 Vanagon GL Syncro a little over a month ago. I normally start a build thread right away and document everything I do to new vehicles I purchase but I’ve been slacking. So now I’ll do some backtracking and document what I’ve done the best I can. I really should start filming stuff but that’s more things to do and I’ve got a long list to get done.
First things first I’ve owned many vintage VW’s, modern and built some pretty cool vehicles if I do say so myself. My previous fun car was a 1981 VW Rabbit pickup which I swapped a ALH TDI into and enjoyed a lot. Nonetheless this vehicle will also be getting an ALH swapped into it at some point hopefully sooner than later.
Just picked the van up outside of Pittsburgh, stopped at a Walmart to get wiper blades, rain x glass cleaner and a lot of air freshener’s. It stunk like mouse piss in there pretty bad.
The journey home was thankfully uneventful, minus the insane rain and wind from hurricane Hellene’s left overs. Drove home what should’ve been 6 hours but took nearly 12 with pit stops and NYC traffic.
The next day I started to gut the interior right away.
The interior was a home baked set up. Nothing wrong with it per se but it wasn’t up to my standards and certainly not suitable for my wife and puppy to sleep/camp in. So I ripped out the plywood cabinet, ripped out the subfloor, removed the glue, removed the front carpet, removed the headliner, and basically anything that was shitty. |
|
| Back to top |
|
 |
sanchius 
Samba Member

Joined: May 03, 2007
Posts: 1592
Location: IN
|
|
| Back to top |
|
|
dougnlina
Samba Member

Joined: January 19, 2016
Posts: 316
Location: San Francisco, CA
|
| Posted: Sun Nov 10, 2024 5:42 pm Post subject: Re: My 87 syncro build |
|
|
Looks like the PO left you a Plethora of extra wires to sort through to get back to some semblance of stock. My van started out looking a lot like yours, same year, color and roof rack! -enjoy the journey 
_________________
"Grover" a '87 Syncro Poptop 1.8T
"Olive" a '60 Ragtop Beetle (retired)
"Kermit" '79 Westfalia (retired)
"Patches" '72 Beetle (retired)
"Wilbur" '69 Camper (retired)
"Bernice" 67 Beetle, My first love, (Also Retired) |
|
| Back to top |
|
|
dobryan
Samba Member

Joined: March 24, 2006
Posts: 17295
Location: Brookeville, MD
|
|
| Back to top |
|
|
danfromsyr
Samba Member

Joined: March 01, 2004
Posts: 15410
Location: Syracuse, NY
|
| Posted: Mon Nov 11, 2024 9:03 am Post subject: Re: My 87 syncro build |
|
|
nice van and good start for a project
but one of the dumbest places to mount a diesel fuel tank ever..
that PO should be slapped..
_________________
| Abscate wrote: |
| These are the reasons we have words like “wanker” |
|
|
| Back to top |
|
|
4Gears4Tires
Samba Member
Joined: October 08, 2018
Posts: 4390
Location: MD
|
| Posted: Mon Nov 11, 2024 6:42 pm Post subject: Re: My 87 syncro build |
|
|
That's a lot to untangle. Definitely the easiest/fastest approach is to go back to square one and start fresh. Nice buy.
_________________
'87 Syncro Ferric Oxyhydroxide Superleggera Edition
'85 Westy Sciuridae Domus Edition |
|
| Back to top |
|
|
chillzombies
Samba Member
Joined: November 09, 2008
Posts: 66
Location: Long Island, New York
|
| Posted: Tue Nov 12, 2024 7:28 am Post subject: Re: My 87 syncro build |
|
|
Yeah unfortunately there’s a lot to untangle, reveal and clean here but I’m up for the challenge, it’s gonna take some time and elbow grease but I’ve made tons of progress just yet to post about it so here we go.
Sorted through the majority of the accessory wiring and basically got rid of most of it, as it was stuff I won’t use or I didn’t like how it was wired up.
Found 3 rust holes in the floor which I’ll be addressing soon. Unfortunate but expected. Glad it’s not worse than this to be honest.
Removed the headliner found a few mouse house’s which I promptly removed.
I then proceeded to scrape alll of the old fuzzy dusty insulation off the roof.
Last edited by chillzombies on Tue Nov 12, 2024 7:32 am; edited 1 time in total |
|
| Back to top |
|
|
MayorMcCheese
Samba Member
Joined: October 07, 2009
Posts: 769
Location: Lancaster PA
|
| Posted: Tue Nov 12, 2024 7:31 am Post subject: Re: My 87 syncro build |
|
|
| What did you end up paying for that? It was listed for a while and crusty syncro's have been sitting on the market forever these days. |
|
| Back to top |
|
|
4Gears4Tires
Samba Member
Joined: October 08, 2018
Posts: 4390
Location: MD
|
| Posted: Tue Nov 12, 2024 7:35 am Post subject: Re: My 87 syncro build |
|
|
You've got your work ahead of you!
I started somewhere similar with my Syncro. The best thing I did before I started on the rust repair was buy a good welder, an ESAB Rebel EMP 215ic. https://www.thesamba.com/vw/forum/viewtopic.php?t=...mp;start=0
_________________
'87 Syncro Ferric Oxyhydroxide Superleggera Edition
'85 Westy Sciuridae Domus Edition |
|
| Back to top |
|
|
chillzombies
Samba Member
Joined: November 09, 2008
Posts: 66
Location: Long Island, New York
|
| Posted: Tue Nov 12, 2024 7:40 am Post subject: Re: My 87 syncro build |
|
|
| MayorMcCheese wrote: |
| What did you end up paying for that? It was listed for a while and crusty syncro's have been sitting on the market forever these days. |
I originally saw this van listed for $23,000 about 3 years ago. Then listed again for $18,000 some time last year. Then most recently when I was in the market again, it was up for $12,500. I ended up paying $11k and I purchased a solid shaft for the front differential for another $200, so $11,200 all in. It has a decoupler but no front locker so I need to get more parts for the front locker before it becomes a triple knob but dual knob for $11k seemed like a great deal even considering it’s rusty and a bit janky. Happy with my purchase as I know it’ll only grow in value as I repair and add to it. |
|
| Back to top |
|
|
chillzombies
Samba Member
Joined: November 09, 2008
Posts: 66
Location: Long Island, New York
|
| Posted: Tue Nov 12, 2024 7:47 am Post subject: Re: My 87 syncro build |
|
|
First things first, the stock mirrors are TERRIBLE. They shake like a leaf the whole time driving and they’re just too small. So truck mirrors were the first thing I really replaced.
I then ordered a big shot shifter from Van cafe, a new power steering rack, bushings etc. but once I realized my carpet was gross and needed to be replaced that got put on hold until I can install the carpet and then the shifter over it, I don’t wanna do anything twice if I don’t have to.
At this point I covered the whole floor in sound deadener and the interior got a lot quieter, but the roof is what really gives the tin can sound so that’s next. |
|
| Back to top |
|
|
4Gears4Tires
Samba Member
Joined: October 08, 2018
Posts: 4390
Location: MD
|
| Posted: Tue Nov 12, 2024 8:34 am Post subject: Re: My 87 syncro build |
|
|
I did something similar with my Syncro. Just absolutely covered it with sound deadener and it made a real difference. The front cab is completely covered. However, now that I am fixing up my second van I am starting to have doubts about it trapping water and creating rust pockets.
_________________
'87 Syncro Ferric Oxyhydroxide Superleggera Edition
'85 Westy Sciuridae Domus Edition |
|
| Back to top |
|
|
chillzombies
Samba Member
Joined: November 09, 2008
Posts: 66
Location: Long Island, New York
|
| Posted: Tue Nov 12, 2024 9:06 am Post subject: Re: My 87 syncro build |
|
|
My wife helped remove the insulation on the ceiling a bit before I covered it in sound deadening.
We took the van on a camping trip we had planned for months but we had only purchased the van 2 weeks prior so it was a lot of crunch time last minute stuff to get it at least decent enough to sleep in. We drove it to the campground and I worked on getting the roof covered so the dust wouldn’t rain on us while we slept. |
|
| Back to top |
|
|
4Gears4Tires
Samba Member
Joined: October 08, 2018
Posts: 4390
Location: MD
|
| Posted: Tue Nov 12, 2024 9:18 am Post subject: Re: My 87 syncro build |
|
|
If you haven't done so, I recommend stuffing the walls with Rockwool before you put the panels back on. It helps a lot with the sound as well.
_________________
'87 Syncro Ferric Oxyhydroxide Superleggera Edition
'85 Westy Sciuridae Domus Edition |
|
| Back to top |
|
|
chillzombies
Samba Member
Joined: November 09, 2008
Posts: 66
Location: Long Island, New York
|
| Posted: Tue Nov 12, 2024 9:26 am Post subject: Re: My 87 syncro build |
|
|
Camping trip was a success, the van wasn’t ready mechanically or camper wise but we said screw it and did it anyway. Our new puppy Wally had a blast, and he actually loves hanging in the van on the bed.
After we left the campground one of our neighbors an older gentlemen in his early 70’s suggested we take a quick ride over to a scenic view and the climb was quite steep, knocking this little guy out of his hiding spot, mummified mouse.
Quite gross but happy he’s out of the van. I gotta remove the dash this spring and clean back there too. There must be some more nests hidden in the air box or something. |
|
| Back to top |
|
|
chillzombies
Samba Member
Joined: November 09, 2008
Posts: 66
Location: Long Island, New York
|
| Posted: Tue Nov 12, 2024 10:25 am Post subject: Re: My 87 syncro build |
|
|
| 4Gears4Tires wrote: |
| If you haven't done so, I recommend stuffing the walls with Rockwool before you put the panels back on. It helps a lot with the sound as well. |
That’s my next step, I have some 3m thinsulate and I’m going to get some havelock wool to stuff each panel. The van came with all of the ABS panel’s minus the hatch, and the 2 rear most. So I’ll have to pull them and pack them out. |
|
| Back to top |
|
|
MsTaboo
Samba Member

Joined: June 02, 2006
Posts: 4617
Location: East Kootenay, British Columbia
|
| Posted: Tue Nov 12, 2024 12:06 pm Post subject: Re: My 87 syncro build |
|
|
| chillzombies wrote: |
Quite gross but happy he’s out of the van. I gotta remove the dash this spring and clean back there too. There must be some more nests hidden in the air box or something. |
Great work so far.
Absolutely remove the dash and heater box asap. That dead mouse was on a direct path into the heater and vent lines.
Not a good idea to be breathing the leftovers of mice droppings and nests!
Check out 4Gears's thread for inspiration.
https://www.thesamba.com/vw/forum/viewtopic.php?t=795240&start=100
As noted above, rock wool will make for additional insulation and sound deadening - however (especially with the exterior covered in bedliner which will hide rust) you're gonna want to spray some Fluid Film at the bottom of all cavities and panel seams. Vanagons rust from the inside out at the seams because of condensation.
_________________
Currently:
'90 Syncro Westy 3 knob w/Zetec
The information age has morphed into the age of disinformation and willful ignorance. Agnotology!
When you stir up shit you're bound to get some on yourself.
Resist Kleptocratic Oligarchy (and Idiocracy)! |
|
| Back to top |
|
|
chillzombies
Samba Member
Joined: November 09, 2008
Posts: 66
Location: Long Island, New York
|
| Posted: Sat Nov 16, 2024 7:28 am Post subject: Re: My 87 syncro build |
|
|
Finally got around to installing the Rocky Mountain westy twin peaks bumpers.
They look awesome and are rock solid.
I then installed the RMW rock sliders and a few days later I installed the RMW ladder. I have the RMW front skid plate too but wanted to install the big shot shifter first.
Also popped in the replacement tail lights, look the same but nicer and newer.
Noticed the driver side taillight looks melted, I wonder if this van had a fire at some point. I haven’t seen any other signs of fire but who knows.
And my carpet arrived from newton finally, so now I can install that and throw in the big shot shifter. |
|
| Back to top |
|
|
MsTaboo
Samba Member
Joined: June 02, 2006
Posts: 4617
Location: East Kootenay, British Columbia
|
| Posted: Sat Nov 16, 2024 2:08 pm Post subject: Re: My 87 syncro build |
|
|
| chillzombies wrote: |
......
And my carpet arrived from newton finally, so now I can install that and throw in the big shot shifter. |
You're gonna love the new carpet. I installed the kit last year.
Here's a thread with "dougnlina's" and mine experiences with the install and some of the minor problems.
Note; be aware the cutout mark for the hand brake lever is wrong (at least it was on mine). Also, a heat gun (or hot hair dryer) will help with softening the stiff backing when you go to fold the carpet around the 90* corners.
https://www.thesamba.com/vw/forum/viewtopic.php?t=777545&highlight=
_________________
Currently:
'90 Syncro Westy 3 knob w/Zetec
The information age has morphed into the age of disinformation and willful ignorance. Agnotology!
When you stir up shit you're bound to get some on yourself.
Resist Kleptocratic Oligarchy (and Idiocracy)! |
|
| Back to top |
|
|
chillzombies
Samba Member
Joined: November 09, 2008
Posts: 66
Location: Long Island, New York
|
| Posted: Mon Nov 18, 2024 6:05 am Post subject: Re: My 87 syncro build |
|
|
Installed some new horns, PIAA super bass horn kit from Japan and a go westy horn relay kit. Now when I honk people will actually know I’m honking and hopefully get out of the way lol
Also wired up a new radio but I guess it NEEDS to the red accessory power wire hooked up. Not sure where I should tap into for that so I gotta do a little research. I also need to get my house battery reinstalled and get an isolation kit so I can run the radio and accessories off that battery. This radio is pretty cool it’s a single din car play radio, reviews are all good. |
|
| Back to top |
|
|
|


