| Author |
Message |
Critter1
Samba Member

Joined: August 04, 2004
Posts: 1579
Location: Sacramento

|
 Posted: Sat Jun 24, 2017 3:09 pm Post subject: Re: Side Marker Location. Posted: Sat Jun 24, 2017 3:09 pm Post subject: Re: Side Marker Location. |
 |
|
Perfect, thank you bad1916.
Looks like 1.25" up from the body line and 4.75" from the fender edge.
_________________
Justin |
|
| Back to top |
|
 |
Mike Fisher
Samba Member

Joined: January 30, 2006
Posts: 18042
Location: Eugene, OR
|
| Posted: Sat Jun 24, 2017 11:10 am Post subject: Re: Side Marker Location. |
|
|
6.25" & 1.375" to the center of the far mounting hole.
_________________
https://imgur.com/user/FisherSquareback/posts
69 FI/AT square Daily Driver
66 sunroof,67,70,71,71,71AT,72,72AT,73 Parts
two 57 oval ragtops sold
'68 Karmann Ghia sold
Society is like stew. If you don't keep it stirred up you end up with a lot of scum on the top! - Russ_Wolfe/Edward Abbey |
|
| Back to top |
|
|
bad1916
Samba Member
Joined: November 14, 2010
Posts: 224
Location: Camarillo ca
|
| Posted: Sat Jun 24, 2017 9:11 am Post subject: Re: Side Marker Location. |
|
|
Here's a few with measurements off my 63.hope this helps.
Bryce
_________________
SEMPER PARATUS!
1963 SQUAREBACK |
|
| Back to top |
|
|
Critter1
Samba Member
Joined: August 04, 2004
Posts: 1579
Location: Sacramento
|
| Posted: Fri Jun 23, 2017 2:02 pm Post subject: Re: Side Marker Location. |
|
|
| Erik G wrote: |
| what year? 63 and 64 are different |
Early / 63 style. No trim, side marker above the body line.
_________________
Justin |
|
| Back to top |
|
|
Erik G
Samba Member

Joined: October 16, 2002
Posts: 13546
Location: Tejas!
|
|
| Back to top |
|
|
Critter1
Samba Member
Joined: August 04, 2004
Posts: 1579
Location: Sacramento
|
| Posted: Fri Jun 23, 2017 11:45 am Post subject: Re: Side Marker Location. |
|
|
Old thread revival!
Can someone PLEASE post measurements of where the side marker hole is on an early car? Distance from edge of fender at the door to edge or opening, and distance from body line up to edge of opening. Earlier in this thread someone posted the exact size of the hole, so I'm good there.
_________________
Justin |
|
| Back to top |
|
|
ALLWAGONS
Samba Member
Joined: June 03, 2000
Posts: 4616
Location: Pasadena CA/DTLA soon China
|
| Posted: Sun Jan 12, 2014 10:13 pm Post subject: |
|
|
Sidemarker bases.
I have two different kinds. One is cast, the other is stamped aluminium.
_________________
I'd be UNSTOPPABLE if not for Law Enforcement and PHYSICS.
I recycle old cars and parts, other than when I rot, that's as Green as I am going to get.
Thanks to my Tesla driving neighbors, I feel more relaxed driving my SUBURBAN and old VW's.
Everything sounds good on paper! |
|
| Back to top |
|
|
vw4ever
Samba Member

Joined: September 29, 2006
Posts: 123
Location: San Diego
|
| Posted: Fri Mar 23, 2012 3:45 pm Post subject: |
|
|
Max< I am ordering the stainless moulding from ISPWest.
_________________
67 t1 resto-custom
69 Type 3 Squareback Rat-in-da-werks!!! |
|
| Back to top |
|
|
Max Boost
Samba Member

Joined: October 14, 2007
Posts: 38
Location: Los Angeles
|
| Posted: Fri Mar 23, 2012 1:56 pm Post subject: |
|
|
| What are you guys using to cut the molding and crimping the end of molding? |
|
| Back to top |
|
|
DaBlackSamba
Samba Member

Joined: August 22, 2010
Posts: 317
Location: west eugene, or
|
| Posted: Sun Dec 25, 2011 6:59 pm Post subject: |
|
|
awesome thread, i'm gonna bump this for when i get my sidemarkers so that i know what goes where when i put mine on
_________________
1968 VW variant |
|
| Back to top |
|
|
vw4ever
Samba Member
Joined: September 29, 2006
Posts: 123
Location: San Diego
|
| Posted: Mon Feb 21, 2011 8:20 am Post subject: |
|
|
yes chapolito
4 ways = hazards
_________________
67 t1 resto-custom
69 Type 3 Squareback Rat-in-da-werks!!! |
|
| Back to top |
|
|
chapolito
Samba Member

Joined: April 01, 2010
Posts: 111
Location: San Diego, CA
|
| Posted: Mon Feb 21, 2011 12:55 am Post subject: Re: How To install side marker lights of Type 3 |
|
|
thanks for the step by step with pictures, I'll definitely be coming back to this when I'm ready.
this may be a stupid question, but what are 4 ways? is that another way to call hazard lights?
_________________
the abomination - 72 squarish
Chapolito Web Design |
|
| Back to top |
|
|
KTPhil 
Samba Member

Joined: April 06, 2006
Posts: 35878
Location: Conejo Valley, CA
|
| Posted: Sun Feb 20, 2011 5:27 pm Post subject: Re: How To install side marker lights of Type 3 |
|
|
| Bobnotch wrote: |
| Once you pass the wire thru the rubber plug, you need about 10 inches of wire to reach the bulb holder. There's only the 1 layer there Phil. |
Awesome, crystal clear now, thanks!
Probably doing this later this summer, but I'll hang on to this thread. I have all the parts, even an OEM-style crimper and plastic tee connectors. When I repaint the fenders I'll do this stuff first.
In stopped traffic, those side-mounted turn signals are a help; the fronts and rears aren't visible to the car next to you that you want to let you in.
Ignored during regular speed driving, like all turn signals, though.  |
|
| Back to top |
|
|
Bobnotch
Samba Member

Joined: July 06, 2003
Posts: 23364
Location: Kimball, Mi
|
| Posted: Sun Feb 20, 2011 5:09 pm Post subject: Re: How To install side marker lights of Type 3 |
|
|
| KTPhil wrote: |
| DHanna wrote: |
| Have a look on the quarter panel under the dash each side. There should?? be a small rubber blanking grommet in the hole where the wire goes through. I think the holes were on all vehicles regardless of whether the parkers were fitted or not. You shouldn't have to drill new ones and the wire doesn't go through the fender so isn't a problem if you need to remove fender. |
Thanks, but I'm still not clear on the routing. From inside the car, it goes throuigh the hole you mentioned... and from there...? At some pint it has to penetrate the panel to reach the lamp. Where is that? Do you have a photo of the wire from the actual lamp to that pint?
Thanks! |
Once you pass the wire thru the rubber plug, you need about 10 inches of wire to reach the bulb holder. There's only the 1 layer there Phil. On mine, I did it like you're wanting to do (use them as side mounted turn signals, that work with the 4 ways), and I added them into the turn signal connection on the leftside of the steering column (where all the wires are). I think I used 2 "T" connectors to join those wires with the turn signal connection wires. It's really a plug and play set up. I'll probably do the T-34 that way as well. On my 65, the side markers come on with the 4 ways, which light up quite a bit, but then I'm using the red and white style on mine.
_________________
Bob 65 Notch S with Sunroof
71 Notch ...aka Krunchy; build pics here;
http://www.thesamba.com/vw/forum/viewtopic.php?t=249390 -been busy working
64 T-34 Ghia...aka Wolfie, under construction... http://www.thesamba.com/vw/forum/viewtopic.php?t=412120
| Tram wrote: |
| "Friends are God's way of apologizing for relatives." |
| Tram wrote: |
| People keep confusing "restored" and "restroyed". |
|
|
| Back to top |
|
|
KTPhil
Samba Member
Joined: April 06, 2006
Posts: 35878
Location: Conejo Valley, CA
|
| Posted: Sun Feb 20, 2011 4:08 pm Post subject: Re: How To install side marker lights of Type 3 |
|
|
| DHanna wrote: |
| Have a look on the quarter panel under the dash each side. There should?? be a small rubber blanking grommet in the hole where the wire goes through. I think the holes were on all vehicles regardless of whether the parkers were fitted or not. You shouldn't have to drill new ones and the wire doesn't go through the fender so isn't a problem if you need to remove fender. |
Thanks, but I'm still not clear on the routing. From inside the car, it goes throuigh the hole you mentioned... and from there...? At some pint it has to penetrate the panel to reach the lamp. Where is that? Do you have a photo of the wire from the actual lamp to that pint?
Thanks! |
|
| Back to top |
|
|
DHanna
Samba Member

Joined: June 15, 2004
Posts: 246
Location: North Richmond, N.S.W Aust.
|
| Posted: Sun Feb 20, 2011 3:09 pm Post subject: Re: How To install side marker lights of Type 3 |
|
|
| KTPhil wrote: |
| Adriel Rowley wrote: |
| Interesting. What use are you going to have for the side marker? |
Me, I'm going to wire them up as side-mounted turn signals. They will also come on with the 4-ways.
The next challenge is figuring out how to run the wire in a stock location and make it easily removable should the fender have to come off. I have the stock gasketing but I'm not very confident it will stay dry with all the road splash in those areas. |
Have a look on the quarter panel under the dash each side. There should?? be a small rubber blanking grommet in the hole where the wire goes through. I think the holes were on all vehicles regardless of whether the parkers were fitted or not. You shouldn't have to drill new ones and the wire doesn't go through the fender so isn't a problem if you need to remove fender. |
|
| Back to top |
|
|
vw4ever
Samba Member
Joined: September 29, 2006
Posts: 123
Location: San Diego
|
| Posted: Sun Feb 20, 2011 3:08 pm Post subject: |
|
|
Not exactly sure if I want to run them as Parking or Turn indicators.
I might just hook up lazer beams instead and shoot down unsuspecting Rice Burners as they pass me on the freeway.
Hope you guys liked the step by step. The Drivers side took seriously 8 minutes to complete.
I just center punched the three holes and drilled, cut and filed...done deal!!!
_________________
67 t1 resto-custom
69 Type 3 Squareback Rat-in-da-werks!!! |
|
| Back to top |
|
|
KTPhil
Samba Member
Joined: April 06, 2006
Posts: 35878
Location: Conejo Valley, CA
|
| Posted: Sun Feb 20, 2011 2:43 pm Post subject: Re: How To install side marker lights of Type 3 |
|
|
| Adriel Rowley wrote: |
| Interesting. What use are you going to have for the side marker? |
Me, I'm going to wire them up as side-mounted turn signals. They will also come on with the 4-ways.
The next challenge is figuring out how to run the wire in a stock location and make it easily removable should the fender have to come off. I have the stock gasketing but I'm not very confident it will stay dry with all the road splash in those areas. |
|
| Back to top |
|
|
DHanna
Samba Member
Joined: June 15, 2004
Posts: 246
Location: North Richmond, N.S.W Aust.
|
| Posted: Sun Feb 20, 2011 2:42 pm Post subject: |
|
|
"Interesting. What use are you going to have for the side marker?"
Replace the red/clear lense with amber lense. Disconnect wires from parking light power and connect to right and left indicator power. Much more use than parkers. |
|
| Back to top |
|
|
vw4ever
Samba Member
Joined: September 29, 2006
Posts: 123
Location: San Diego
|
| Posted: Sun Feb 20, 2011 2:13 pm Post subject: How To install side marker lights of Type 3 |
|
|
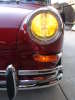
So I went out to the garage about an hour ago and here's what I came up with:
Tools you will need:
Start out by laying out the measurements:
Next, center punch your holes:
Here is the fun part. Get out your drill and a UniBit. Steady pressure but not to aggressive, let the tool do the work:
When you are finished drilling the holes it should look something like this:
Now get out your Wiss snips or a grinder to remove the metal between the holes like this:
Next step, grab a file and clean up the hole:
Last step is test fitting the Marker light base, sorry for the focus:
Here is a shot of the backside:
Thanks for following along. Hope this helps anybody with installing Marker Lights.
I cant wait to get some seals and lenses to tidy up my install.
Have fun guys.
Ryan
PS. Thanks DHanna for the measurements.
_________________
67 t1 resto-custom
69 Type 3 Squareback Rat-in-da-werks!!! |
|
| Back to top |
|
|
|


