| Author |
Message |
pyrOman
Fire Master

Joined: July 21, 2003
Posts: 12538
Location: Over 2002 posts deleted!

|
 Posted: Wed Aug 02, 2006 7:02 am Post subject: Posted: Wed Aug 02, 2006 7:02 am Post subject: |
 |
|
| tom62 wrote: |
pyr0man, truck is looking good! to bad about the engine.
I saw were you were looking for treasure chest handle |
Thanks! 
Is your truck a '68? 
Mine doesn't have a "handle" but one of them hole covers. Much "like" the one on my '65 Dormy's engine lid but with a bigger opening. 
_________________
Some people are so busy being clever they don't have time enough to be wise. |
|
| Back to top |
|
 |
tom62
Samba Member
Joined: August 21, 2005
Posts: 654
|
| Posted: Wed Aug 02, 2006 5:43 pm Post subject: |
|
|
nope it's a 69
1600 single port with and old kadron exhaust and a pertronix in the dist. |
|
| Back to top |
|
|
pyrOman
Fire Master
Joined: July 21, 2003
Posts: 12538
Location: Over 2002 posts deleted!
|
| Posted: Fri Aug 04, 2006 6:55 am Post subject: |
|
|
Your truck looks much sweeter than the Plump Truck!
Here's the cover on the right side:
It's almost the same as the one on the splitbus engine lid but has a bigger opening and it is "offset" somewhat.
_________________
Some people are so busy being clever they don't have time enough to be wise. |
|
| Back to top |
|
|
tom62
Samba Member
Joined: August 21, 2005
Posts: 654
|
| Posted: Fri Aug 04, 2006 10:41 am Post subject: |
|
|
I guess there was a change for 69 as the other side also has a handle and I think it is org? The key cover is missing though. There is just the pin showing. I like the handle it makes getting the key out easier.
Don't pay attention to the dirt. I got caught in a cloud burst on a dirt road and the truck is a mess tonight! |
|
| Back to top |
|
|
pyrOman
Fire Master
Joined: July 21, 2003
Posts: 12538
Location: Over 2002 posts deleted!
|
| Posted: Sun Aug 06, 2006 8:08 am Post subject: |
|
|
Such are the "mild" changes through the model years. 
Update:
So I "thought" the Gutless Wonder was toast  and replaced it with Sir Leaks-A-Lot. Well, was having a very hard time getting it tuned right or idling correctly. Thought it had to be a carburation problem so decided to make 1 set out of 2 of the 4 Kaduds I got. To remove the carbs you have to, of course, remove the plug wires first. So when I pulled on the #3, the wire just slipped right out of the plug connector! I said to myself "Uhm, that came off way too easy." Looked into the wire and I see nothing, as in NO actual wire in it! and replaced it with Sir Leaks-A-Lot. Well, was having a very hard time getting it tuned right or idling correctly. Thought it had to be a carburation problem so decided to make 1 set out of 2 of the 4 Kaduds I got. To remove the carbs you have to, of course, remove the plug wires first. So when I pulled on the #3, the wire just slipped right out of the plug connector! I said to myself "Uhm, that came off way too easy." Looked into the wire and I see nothing, as in NO actual wire in it!  Pull the connector and find some green corrosive residue in it. Maybe that was my troublem to begin with. Pull the connector and find some green corrosive residue in it. Maybe that was my troublem to begin with. 
Replaced it with a good used one and the motor fired right up and idled great!  Did a fine tunning, took it for a spin and it did great with so much power it was burning the tall rubber and all that jazz! Did a fine tunning, took it for a spin and it did great with so much power it was burning the tall rubber and all that jazz! 
However, I drove it to work the next morning and though it ran awesome, it also leaked profusedly leaving such a huge cloud behind that I think the envirowhackos will be thanking me for single handedly ending global warming by starting global cooling! 
Needless to say, yesterday I again swapped back to the Gutless Wonder, re-tuned it and it seems like it will do fine for another while albeit with much less power.
_________________
Some people are so busy being clever they don't have time enough to be wise. |
|
| Back to top |
|
|
ruckman101
Samba Member

Joined: March 15, 2004
Posts: 961
Location: Portland "Little Beirut", OR
|
| Posted: Sun Aug 06, 2006 10:21 pm Post subject: |
|
|
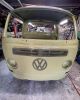
I think it is totally valid to claim '68 through '71 bays with upright type 1 engines as pleasantly plump rather than full blown fat.
neal
_________________
Where are we going, and why am I in this hand-basket? |
|
| Back to top |
|
|
pyrOman
Fire Master
Joined: July 21, 2003
Posts: 12538
Location: Over 2002 posts deleted!
|
| Posted: Mon Aug 07, 2006 6:54 am Post subject: |
|
|
Glad you see it that way too!
BTW, I picked that name from a clothing store we usta have here in SoCal called "Pretty & Plump"!
_________________
Some people are so busy being clever they don't have time enough to be wise. |
|
| Back to top |
|
|
biggraham
Samba Member

Joined: March 15, 2003
Posts: 728
Location: Felton
|
| Posted: Thu Nov 02, 2006 7:04 pm Post subject: |
|
|
Let's not forget your 65 has a fat chick beam, isn't that like putting young breasts on an old broad?  , this coming from a man who had problems giving away a deluxe 71... , this coming from a man who had problems giving away a deluxe 71...
_________________
67 S0-42 Pop-Top Walkthru |
|
| Back to top |
|
|
pyrOman
Fire Master
Joined: July 21, 2003
Posts: 12538
Location: Over 2002 posts deleted!
|
| Posted: Tue Dec 12, 2006 8:28 am Post subject: |
|
|
So once again I put on my "hack'O'man" hat and took the slicer to the Plump Truck. This time to cut off "excess" support for the rear apron. This "excess" gets in the way when installing/removing an engine with dual carburators. Funny how when they made these fatchicks they went phat in more ways than one!
These same supports are NOT as close together in a splitbus. Not only are they too close for no apparent reason but the apron itself has bolts provision for only the ones closer to the edge! 
So a-slicing I went and here's what it looks like:
Easy access baby!
_________________
Some people are so busy being clever they don't have time enough to be wise. |
|
| Back to top |
|
|
steponmebbbboom
Samba Member
Joined: May 01, 2004
Posts: 6390
|
| Posted: Tue Dec 12, 2006 2:56 pm Post subject: |
|
|
| that is an interesting detail i noticed about rear aprons, some have four bolt holes, others have only two. i believe the aprons with two holes are late version, my original '69 apron has four holes. |
|
| Back to top |
|
|
pyrOman
Fire Master
Joined: July 21, 2003
Posts: 12538
Location: Over 2002 posts deleted!
|
| Posted: Tue Dec 12, 2006 3:12 pm Post subject: |
|
|
I only use 2 on the Dormy's apron anyway. The thing I particularly didn't like is the narrow passage for the engine with the dual carbs. I though it was ridiculous to have to raise the truck as if it didn't have a removable apron!?!?! 
So the excess just had to go!
_________________
Some people are so busy being clever they don't have time enough to be wise. |
|
| Back to top |
|
|
tubdub
Samba Member
Joined: March 29, 2004
Posts: 2274
|
| Posted: Tue Dec 12, 2006 3:25 pm Post subject: truck |
|
|
| what about the body to engine seal? looks like it had to go too. well at least it will be easier to pull the engine when you decide to replace that seal |
|
| Back to top |
|
|
pyrOman
Fire Master
Joined: July 21, 2003
Posts: 12538
Location: Over 2002 posts deleted!
|
| Posted: Wed Dec 13, 2006 9:32 am Post subject: Re: truck |
|
|
| tubdub wrote: |
| what about the body to engine seal? looks like it had to go too. |
Guilty as charged! 
Not driving it much as it is lately but, yes, I have to seal the compartment still.
Didn't have a problem before with the Gutless Wonder since that punny little engine could not muster enough heat to warm up itself!
_________________
Some people are so busy being clever they don't have time enough to be wise. |
|
| Back to top |
|
|
pyrOman
Fire Master
Joined: July 21, 2003
Posts: 12538
Location: Over 2002 posts deleted!
|
| Posted: Wed Mar 12, 2008 9:01 am Post subject: |
|
|
Well, I'm higher than a kite now! I had the front tires replaced with the same as the rear TALL Jeep ones and now I have to readjust the headlights as well as the speedo! 
However, the cheap tire shop I used bungled up a few of the lugnuts/bolts and now I'm a bit affraid to drive it.
So now I'm in search of a new set of lugnuts/bolts for the empi 5 spoke style rims. Anybody here has a set or some, or maybe know someone else who does?
_________________
Some people are so busy being clever they don't have time enough to be wise. |
|
| Back to top |
|
|
pyrOman
Fire Master
Joined: July 21, 2003
Posts: 12538
Location: Over 2002 posts deleted!
|
| Posted: Mon Aug 20, 2012 6:32 am Post subject: |
|
|
Wow! Been THAT long since I updated this thread!
So, since it'll prolly be just as long as the next update, here's a long assed post!
The Funky Green new bed has arrived!!!!!
Step one, open box and inspect contents:

Step 2, removal of leftover rusty bed. Here's the process as I decided to approach it. "Sliced" an opening all the way around it in order to "peel" off the crimped edge. Did the rear clip first...
Plan "A" was to cut each strip inbetween supports, but then decided on plan "B" which was to pop the welds using a pneumatic chisel and rolling the bed off. Went like this: RATTATATATATATA... POP... RATTATATATATATA... POP... RATTATATATATATA... POP... RATTATATATATATA... POP... RATTATATATATATA... POP... Roll... RATTATATATATATA... POP... RATTATATATATATA... POP... RATTATATATATATA... POP... RATTATATATATATA... POP... RATTATATATATATA... POP... Roll... On and on and on....
Here's the pile of rusty bed:
At the end of the day Saturday, though it was all removed in a little over a couple of hours, the job really kicked my asstronout, so I called it quits but covered the truck so as to keep crap off it. Today, I'll start cleaning and prepping for the new bed install. By the way, I am considering "bonding", which is a fancy word for "glue", instead of welding. We have been using bonding to build aeroplane skins and the like already so it may be easyer and strong enough for this job!
Alright, so yesterday there wasn't as much noise but just enough... Got to remove the rest of the offending rusty parts, as well as somewhat straightening the forward bulkhead. Also, after taking all the scrap metal(rust) and other items to Crazy John's shop for eventual disposal, got to pick up some rectangular tubing to replace and reinforce the pieces cut off the bulkhead. Pix follows...
The "lip" or "L" shaped part of the bottom support was totally rusted so I decided to just cut it off and make a new "L" shaped one. However, I will use 1x3 rectangular tubing instead to replace the missing "L", which makes it all the more strong. And as if that wasn't enough, I will be adding a 1x2 rectangular tubing "cross bar" half way up the bulkhead.
_________________
Some people are so busy being clever they don't have time enough to be wise. |
|
| Back to top |
|
|
Desertbusman
Samba Member

Joined: June 03, 2005
Posts: 14655
Location: Arizona
|
| Posted: Mon Aug 20, 2012 7:40 am Post subject: |
|
|
| pyrOman wrote: |
So once again I put on my "hack'O'man" hat and took the slicer to the Plump Truck. This time to cut off "excess" support for the rear apron. This "excess" gets in the way when installing/removing an engine with dual carburators. Funny how when they made these fatchicks they went phat in more ways than one!
These same supports are NOT as close together in a splitbus. Not only are they too close for no apparent reason but the apron itself has bolts provision for only the ones closer to the edge!
So a-slicing I went and here's what it looks like:
Easy access baby!
|
You've probably realized it by now but pre '71 aprons used the 4 bolts. '71 had the 2 bolt apron which is somewhat wierd since each frame ear had 2 holes but unlike yours there were no threads on the inboard holes. No threaded nut welded on the inside of the inboard holes.
So you butchered it. But I did it on mine also for the same reason- engine R & R with dual carbs. 
_________________
71 Superbug
71 Westy |
|
| Back to top |
|
|
pyrOman
Fire Master
Joined: July 21, 2003
Posts: 12538
Location: Over 2002 posts deleted!
|
| Posted: Mon Aug 20, 2012 9:30 am Post subject: |
|
|
And ^^that^^ was when it ran the Kaduds! It currently has 40mm Dellortos!
_________________
Some people are so busy being clever they don't have time enough to be wise. |
|
| Back to top |
|
|
Sloride
Samba Member

Joined: February 09, 2002
Posts: 927
|
|
| Back to top |
|
|
pyrOman
Fire Master
Joined: July 21, 2003
Posts: 12538
Location: Over 2002 posts deleted!
|
| Posted: Mon Aug 20, 2012 1:36 pm Post subject: |
|
|
It's a truck and it is used as such. Plus, if you can't see that from an airplane, I'm okay with it!!!
_________________
Some people are so busy being clever they don't have time enough to be wise. |
|
| Back to top |
|
|
babysnakes
Samba Member
Joined: August 19, 2008
Posts: 7149
|
|
| Back to top |
|
|
|


